Nytro
-
Posts
18795 -
Joined
-
Last visited
-
Days Won
743
Everything posted by Nytro
-
With WPA3, Wi-Fi security is about to get a lot tougher Finally, a security reprieve for open Wi-Fi hotspot users. By Zack Whittaker for Zero Day | January 8, 2018 -- 22:28 GMT (22:28 GMT) | Topic: Security At last, Wi-Fi security -- or lack of -- is about to get its day in the sun. The Wi-Fi Alliance, an industry body made up of device makers including Apple, Microsoft, and Qualcomm, announced Monday its next-generation wireless network security standard, WPA3. The standard will replace WPA2, a near-two decades-old security protocol that's built in to protect almost every wireless device today -- including phones, laptops, and the Internet of Things. SECURITY 101 One of the key improvements in WPA3 will aim to solve a common security problem: open Wi-Fi networks. Seen in coffee shops and airports, open Wi-Fi networks are convenient but unencrypted, allowing anyone on the same network to intercept data sent from other devices. WPA3 employs individualized data encryption, which scramble the connection between each device on the network and the router, ensuring secrets are kept safe and sites that you visit haven't been manipulated. Another key improvement in WPA3 will protect against brute-force dictionary attacks, making it tougher for attackers near your Wi-Fi network to guess a list of possible passwords. The new wireless security protocol will also block an attacker after too many failed password guesses. WPA2, the current incarnation of the wireless security standard since 2004, uses a four-way handshake to securely allows new devices with a pre-shared password to join a network. The newer WPA3 will use a newer kind of handshake, Mathy Vanhoef, a computer security academic, told ZDNet, which will "not be vulnerable to dictionary attacks." A new wireless security standard can't come soon enough. A few months ago Wi-Fi security was under scrutiny amid a security vulnerability in WPA2, discovered by Vanhoef, which put every WPA2-compatible device -- including routers, phones, and computers -- at risk of hijack. The new WPA3 security standard is expected to land in devices later this year. Sursa: http://www.zdnet.com/article/wpa3-wireless-standard-tougher-wifi-security-revealed/
-
Cum arată Eveline Cismaru, tânăra care a spart sistemul de securitate al Poliţiei din Washington GALERIE FOTO Publicat: Vineri, 29 Decembrie 2017 19:21 // Actualizat: Vineri, 29 Decembrie 2017 19:26 // Sursa: romaniatv.net Autor: Filip Stan Eveline Cismaru, tânăra care a spart sistemul de securitate al Poliției din Washington, publica poze provocatoare pe Facebook. Ea a fost arestată, alături de Mihai Alexandru Işvanca, pe 15 decembrie, la București, în cadrul unei operațiuni care viza mai mulți hackeri români. Comenteaza PrevNext Mihai Alexandru Işvanca și Eveline Cismaru sunt acuzați de procurorii americani că au piratat sistemul care gestionează camerele de supraveghere din Washington. Tinerii au accesat fraudulos aproape 123 de calculatoare care erau conectate la camerele de supraveghere ale Poliției Metropolitane din Washington. În ianuarie, cei doi hackeri români au reușit să scoată din funcțiune două treimi din numărul camerelor video ale Poliției, notează observator.tv. Secret Service a informat că un număr de computere conectate la camere de supraveghere ale Departamentului Poliției Metropolitane au fost afectate în perioada 9-12 ianuarie de virușii de tip ransomware "cerber" şi "dharma". Incidentul a avut loc chiar înaintea ceremoniei de învestire în funcție a președintelui Donald Trump, iar autoritățile americane au demarat imediat o investigație. Mihai Alexandru Işvanca și Eveline Cismaru ar fi vrut să obțină o sumă de bani pentru a debloca sistemul. În prezent, Mihai Alexandru Işvanca se află în arest preventiv, iar femeia în arest la domiciliu, în vederea extrădării. Curtea de Apel Bucureşti a judecat în 16 decembrie cazul lor, acordând termen 11 ianuarie 2018 pentru judecarea cererii de extrădare. Citeste mai mult pe RTV.NET: http://www.romaniatv.net/cum-arata-eveline-cismaru-tanara-care-a-spart-sistemul-de-securitate-al-politiei-din-washington_395508.html#ixzz533E5F9P9
-
https://github.com/hfiref0x/VBoxHardenedLoader
-
Ban.
-
Stack Based Buffer Overflows on x86 (Windows) – Part II In the first part of this article, we discussed about the basics that we need to have in order to properly understand this type of vulnerability. As we went through how the compiling process works, how assembly looks like and how the stack works, we can go further and explore how a Stack Based Buffer Overflow vulnerability can be exploited. Introduction We previously discussed that the stack (during a function call) contains the following (in the below order, where the “local variables” are stored at the “smallest address” and “function parameters” are stored at the highest address): Local variables of the function (for example 20 bytes) Previous EBP value (to create the stack frame, saved with PUSH EBP) Return address (placed on the stack by the CALL instruction) Parameters of the function (placed on the stack using PUSH instructions) Sursa: https://nytrosecurity.com/2017/12/20/stack-based-buffer-overflows-on-x86-windows-part-ii/
-
- 3
-

-
Da, vazusem la un moment dat, o sa il scot. L-am pus in Apache si probabil in genereaza si IPBoard.
-
Am facut update la server. Aveti acum si HTTP 2.0. Sa imi ziceti daca sunt probleme.
-
A reinceput sa creasca Bitcoin.
-
O descriere oficiala puteti gasi aici: https://www.bestjobs.eu/ro/loc-de-munca/working-student-application-security-internship Daca aveti intrebari, astept un mesaj privat.
- 1 reply
-
- 1
-

-
Salut, 1&1 cauta persoane interesate de securitatea aplicatiilor web. Se cauta si pentru penetration testing si pentru dezvoltarea unor aplicatii legate de acest lucru. Daca e cineva interesat, astept un mesaj privat si va pot oferi mai multe detalii.
- 1 reply
-
- 1
-

-

[RST] Stack Based Buffer Overflows on x86 (Windows) – Part I
Nytro replied to Nytro's topic in Proiecte RST
O sa ma uit sa vad daca gasesc plugin-ul. -
Stack Based Buffer Overflows on x86 (Windows) – Part I I wrote this article in Romanian, in 2014, and I decided to translate it, because it is a very detailed introduction in the exploitation of a “Stack Based Buffer Overflow” on x86 (32 bits) Windows. Introduction This tutorial is for beginners, but it requires at least some basic knowledge about C/C++ programming in order to understand the concepts. The system that we will use and exploit the vulnerability on is Windows XP (32 bits – x86) for simplicity reasons: there is not DEP and ASLR, things that will be detailed later. I would like to start with a short introduction on assembly (ASM) language. It will not be very detailed, but I will shortly describe the concepts required to understand how a “buffer overflow” vulnerability looks like, and how it can be exploited. There are multiple types of buffer overflows, here we will discuss only the easiest to understand one, stack based buffer overflow. Sursa: https://nytrosecurity.com/2017/12/09/stack-based-buffer-overflows-on-x86-windows-part-i/
-
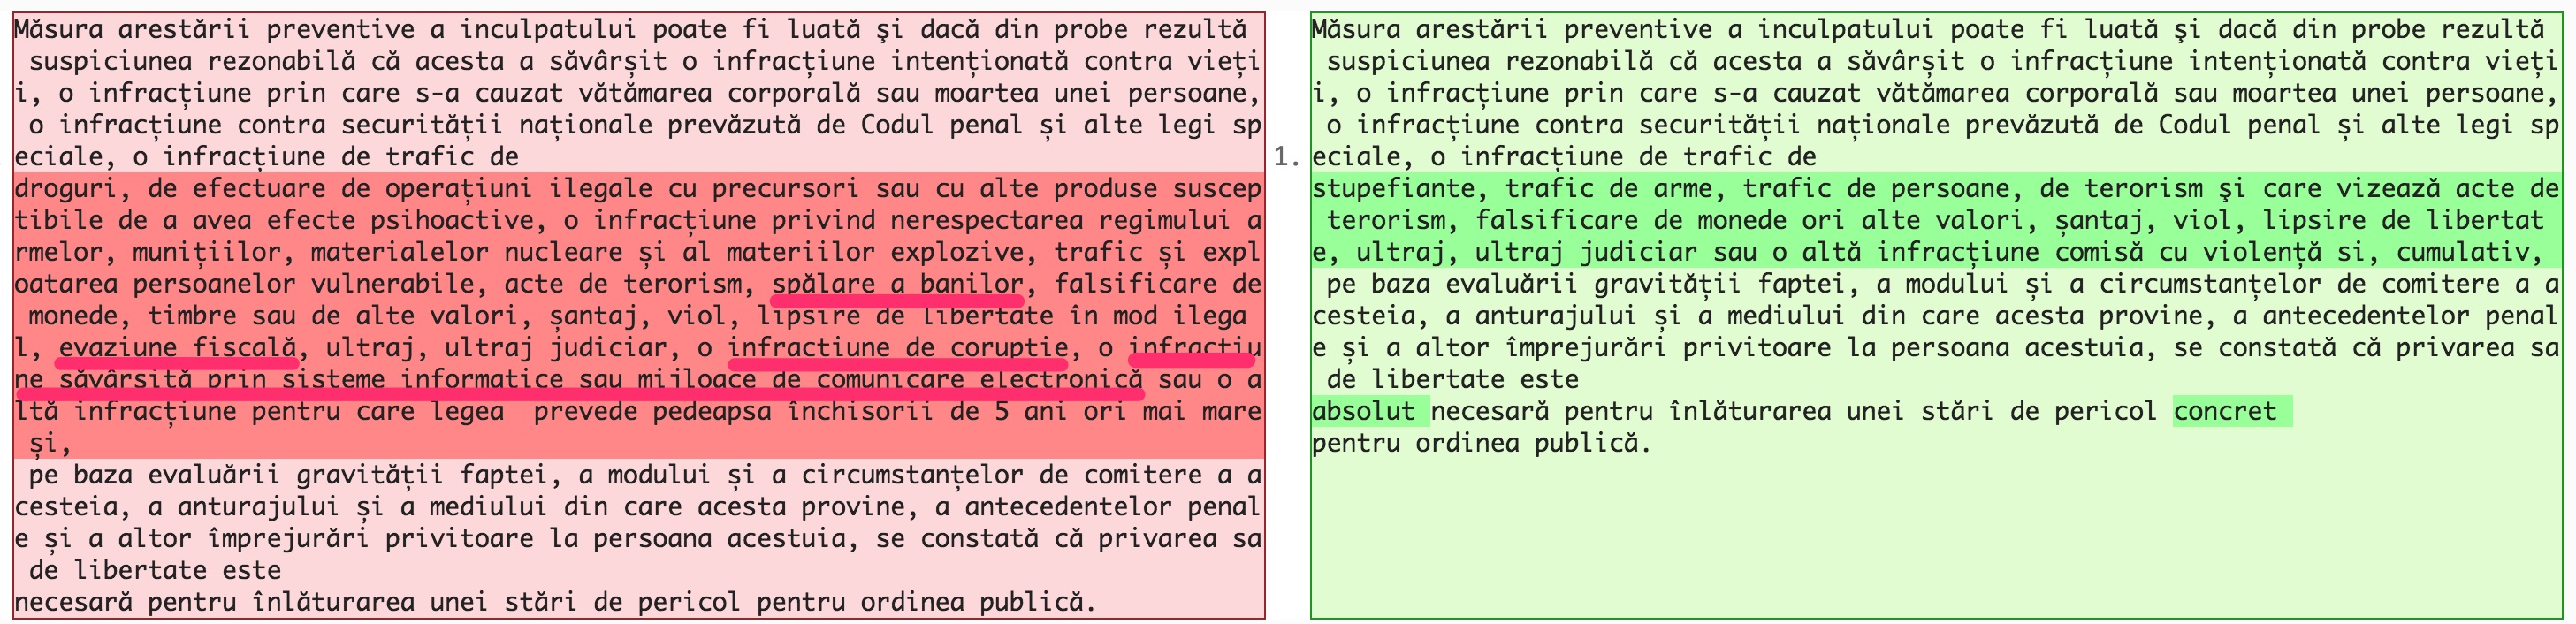
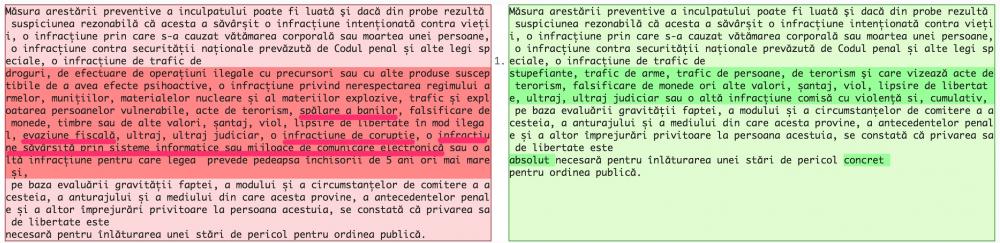
Salut, Ma uitam azi peste modificarile facute de catre "prietenii" de la PSD-ALDE si observ ceva interesant. Este vorba de "Art. 223 Condițiile și cazurile de aplicare a măsurii arestării preventive", alineatul 2. Textul initial: "Măsura arestării preventive a inculpatului poate fi luată şi dacă din probe rezultă suspiciunea rezonabilă că acesta a săvârșit o infracțiune intenționată contra vieții, o infracțiune prin care s-a cauzat vătămarea corporală sau moartea unei persoane, o infracțiune contra securității naționale prevăzută de Codul penal și alte legi speciale, o infracțiune de trafic de droguri, de efectuare de operațiuni ilegale cu precursori sau cu alte produse susceptibile de a avea efecte psihoactive, o infracțiune privind nerespectarea regimului armelor, munițiilor, materialelor nucleare și al materiilor explozive, trafic și exploatarea persoanelor vulnerabile, acte de terorism, spălare a banilor, falsificare de monede, timbre sau de alte valori, șantaj, viol, lipsire de libertate în mod ilegal, evaziune fiscală, ultraj, ultraj judiciar, o infracțiune de corupție, o infracțiune săvârșită prin sisteme informatice sau mijloace de comunicare electronică sau o altă infracțiune pentru care legea prevede pedeapsa închisorii de 5 ani ori mai mare și, pe baza evaluării gravității faptei, a modului și a circumstanțelor de comitere a acesteia, a anturajului și a mediului din care acesta provine, a antecedentelor penale și a altor împrejurări privitoare la persoana acestuia, se constată că privarea sa de libertate este necesară pentru înlăturarea unei stări de pericol pentru ordinea publică." Textul modificat: "Măsura arestării preventive a inculpatului poate fi luată şi dacă din probe rezultă suspiciunea rezonabilă că acesta a săvârșit o infracțiune intenționată contra vieții, o infracțiune prin care s-a cauzat vătămarea corporală sau moartea unei persoane, o infracțiune contra securității naționale prevăzută de Codul penal și alte legi speciale, o infracțiune de trafic de stupefiante, trafic de arme, trafic de persoane, de terorism şi care vizează acte de terorism, falsificare de monede ori alte valori, șantaj, viol, lipsire de libertate, ultraj, ultraj judiciar sau o altă infracțiune comisă cu violență si, cumulativ, pe baza evaluării gravității faptei, a modului și a circumstanțelor de comitere a acesteia, a anturajului și a mediului din care acesta provine, a antecedentelor penale și a altor împrejurări privitoare la persoana acestuia, se constată că privarea sa de libertate este absolut necesară pentru înlăturarea unei stări de pericol concret pentru ordinea publică." Aveti aici un DIFF: Cum ma asteptam, se vede ca lipsesc urmatoarele lucruri: - spalarea banilor - evaziune fiscala - infractiune de coruptie Dar si "infractiune savarsita prin sisteme informatice sau mijloace de comunicare electronica". Cu alte cuvinta, dupa parerea mea de persoana care nu se pricepe in domeniul legal, pentru acele infractiuni nu se va mai aplica arestarea preventiva. Am postat acest lucru pentru ca in cazul in care sunteti acuzati de "infractiuni savarsite prin sisteme informatice", sa aveti in vedere ca (daca va trece legea si probabil va trece), nu veti putea fi retinuti. Gasiti aici o colectie de modificari marca PSD: http://media.hotnews.ro/media_server1/document-2017-12-14-22176865-0-transpunere-directiva-nevinovatie-13-dec.pdf
-
Eu imi fac mai multe griji pentru ei: https://www.seagate.com/de/de/enterprise-storage/nytro-drives/
-
Eu am username-ul de "Nytro" de prin 2007-2008. Trebuie sa vad de cand au ales ei numele firmei sa stiu cine are prioritate. Da, e adevarat ce zici, o sa ma gandesc si la altceva, thanks!
-
Mi-am facut si eu blog. Nu o sa scriu prea des, doar asa, din cand in cand... https://nytrosecurity.com/
- 9 replies
-
- 19
-
-
-
Un tip Slick facuse acel program (Conquistador killer) si era admin aici pe forum. Se poate face acel program si pentru alte jocuri de acel gen. Daca il cumparai, il putea si crackui si nu te mai interesa de licenta lui, nu?
-
Investiti in oua. Multumiti-mi mai tarziu.
-
48$ pe an? Cu banii astia imi iau Yahoo! Premium/Pro, tot atat este. </joke>
-
La eMAG sunt ceva reduceri cu voucher "eMAG16ani". Reducerile (la multe produse) sunt mici, dar pe bune. Orice produs, reducere 5%. Ma uitasem la Huawei Mate 10 Pro, reducerea e reala de 170 RON. La anumite categorii sunt reduceri de 10%-20%-30%. Poate va ajuta.
-
Nu am idee. Ar putea sa dea un semn daca mai sunt pe aici.
-
Why <blank> Gets You Root https://objective-see.com/blog/blog_0x24.html
-
Ai vreun 0day de care nu vrei sa ne spui? Batman poate scrie si exploit-uri de kernel daca vrea...
-
Change the root password Choose Apple menu () > System Preferences, then click Users & Groups (or Accounts). Click , then enter an administrator name and password. Click Login Options. Click Join (or Edit). Click Open Directory Utility. Click in the Directory Utility window, then enter an administrator name and password. From the menu bar in Directory Utility, choose Edit > Change Root Password… Enter a root password when prompted. Via: https://support.apple.com/en-us/HT204012