Nytro
-
Posts
18795 -
Joined
-
Last visited
-
Days Won
743
Everything posted by Nytro
-
A new home CrackMapExec v6.0.0 is now available to everyone ! Hello everyone, today I'm releasing a new version of CrackMapExec, v6.0.0 into a public repository of CrackMapExec https://github.com/mpgn/CrackMapExec. While the sponsor version did receive a lot of updates, which I will describe in this post, the public version has not been updated after nearly one year. This new version is called Bane, all the features of the sponsors version are now accessible to everyone ? But first and foremost, I would like to thank people that have helped me during this year with the development of CrackMapExec, their inputs, pull requests and ideas have been greatly appreciated: @zblurx, @MJHallenbeck and @al3x_n3ff ? Also a big thanks to @skelsec and the impacket team ? In this new version, lot of new features have been added ? New core features: Dump dpapi Dump gMSA nt hash Dump gMSA using LDAP Extract gMSA secret Added bloodhound ingestor Switch to rich python Switch to SQLAlchemy Cmedb store a lot more information Improvement on the SSH protocol Improvement on the FTP protocol Added laps decryption Progress bar added ? Modules chaining log option , to log a specific command into a file log option in the cme.conf file to log all commands into a file Overall speed improvement Improvement on the login feature (smart bruteforce, credid etc) Combine multiple options (--sam --lsa --dpapi etc) Sending you nmap (xml) scan is now fixed New modules: enum_av.py -> Enumerate AV installed on the target msol.py -> Dump MSOL password ntdsutil.py -> Dump NTDS using NTDSUtil printnightmare.py -> Check if target vulnerable to printnightmare rdcman.py -> Dump RDCMan credentials teams_localdb.py -> Dump Teams Cookie veeam_dump.py -> Dump VEEAM passwords winscp_dump.py -> Dump WinSCP passwords firefox.py -> Dump Firefox Passwords reg-query.py -> Performs a registry query on the machine ldap-checker -> Fully compatible with Kerberos Sursa: https://wiki.porchetta.industries/news/a-new-home
-
Why ORMs and Prepared Statements Can't (Always) Win Thomas Chauchefoin VULNERABILITY RESEARCHER June 27, 2023 8 MIN READ Security Key Information The Sonar Research team discovered several SQL injection vulnerabilities in Soko, a software deployed on the Gentoo Linux infrastructure. These SQL injections happened despite the use of an Object-Relational Mapping (ORM) library and prepared statements. We demonstrated that these code vulnerabilities lead to Remote Code Execution (RCE) on Soko because of a misconfiguration of the database. Thanks to the isolation of Soko software components from other services and how the Portage package manager works, users of Gentoo Linux were not at risk of supply-chain attacks. Introduction We were told to use ORMs and prepared statements to avoid SQL injections for a long time now. By doing so, we effectively separate instructions (the semantics of the SQL query) from the data. Modern languages and frameworks often also abstract away the need to write raw queries, offering high-level interfaces around our database models. Unfortunately, that's not enough to thwart away SQL injections once and for all, as these APIs can still present subtle bugs or nuances in their design. In this blog post, we show you how the misuse of a Golang ORM API introduced several SQL injections in Soko, a service deployed on the Gentoo Linux infrastructure. Then, we look further into assessing the impact of this vulnerability by using a PostgreSQL feature to execute arbitrary commands on the server. These vulnerabilities, tracked as CVE-2023-28424, were discovered and reproduced in a testing environment. They were later responsibly disclosed to Gentoo Linux maintainers, who deployed fixes within 24 hours. Because this service only displays information about existing Portage packages, it was not possible to perform a supply chain attack and users of Gentoo Linux were never at risk. While the server hosts several services, affected components are isolated in Docker containers, and the risk of lateral movement from attackers is limited. Nonetheless, there are some key learnings from these vulnerabilities that we would like to share in this blog post. If you run Soko on your infrastructure, you should upgrade it to Soko 1.0.3 or above. Technical Details What's Soko? Soko is the Go software behind https://packages.gentoo.org/, a public interface showing information about published Portage packages that you can install on Gentoo Linux. Portage is the go-to package management tool for this distribution and takes care of resolving and building all required dependencies. Soko offers a very convenient way to search through all of these packages and easily get information like the associated bug tracker or where the upstream source is. Again, packages are not downloaded from Soko but directly from upstream. The Search Feature Soko is built to let users search through packages–that's its sole job and means that the code of this feature is the most interesting to review with our security hat on. Indeed, it has to assemble a SQL query based on many parameters that may or may not be part of the request. ORMs have query builders that introduce a very welcome abstraction layer so developers don't have to hand-write SQL queries; Soko's use of go-pg makes it very expressive and easy to follow. For instance, if you want to select a record of a given database model whose title is prefixed with my using go-pg, this is what you would write (example taken from their documentation? err := db.Model(book). Where("id > ?", 100). Where("title LIKE ?", "my%"). Limit(1). Select() Notice the presence of query placeholders–the question marks–in the Where() clauses. They are replaced with the associated parameters at runtime after escaping them for the right context. Indeed, a string and a column name are specified differently in SQL, and the ORM must escape them accordingly. That also means that the first parameter should always be a constant string: otherwise, that means that we're probably circumventing the escaping feature and could introduce SQL injections. Finding (Un)prepared Statements Diving into the implementation of the search feature, we can notice code like this snippet: searchTerm := getParameterValue("q", r) searchTerm = strings.ReplaceAll(searchTerm, "*", "") searchQuery := BuildSearchQuery(searchTerm) var packages []models.Package err := database.DBCon.Model(&packages). Where(searchQuery). Relation("Versions"). OrderExpr("name <-> '" + searchTerm + "'"). Select() pkg/app/handler/packages/search.go A first thing that should jump to your eyes is the parameter searchTerm, coming from the user's request, being concatenated to the first parameter of the OrderExpr() call. It goes in contradiction with how one should safely use this API. There's probably room for a SQL injection in here! Let's look at the implementation of the method BuildSearchQuery(), also using searchTerm as a parameter and passed as the first argument of Where(): func BuildSearchQuery(searchString string) string { var searchClauses []string for _, searchTerm := range strings.Split(searchString, " ") { if searchTerm != "" { searchClauses = append(searchClauses, "( (category % '"+searchTerm+"') OR (name % '"+searchTerm+"') OR (atom % '"+searchTerm+"') OR (maintainers @> '[{\"Name\": \""+searchTerm+"\"}]' OR maintainers @> '[{\"Email\": \""+searchTerm+"\"}]'))") } } return strings.Join(searchClauses, " AND ") } pkg/app/handler/packages/search.go We can see that searchTerm is again directly interpolated in the query. When passed as a parameter to Where(), it won't be able to escape its value; it's already in the query. As a result, this function has several SQL injections: one for every use of searchTerm! And its GraphQL Sibling? Users can also do searches through the GraphQL API to ease integration with external systems and scripts. While most of the code around database models is often automatically generated, features like this require custom code–they are called resolvers. GraphQL frameworks have this notion of resolvers that can back types fields: they come in handy when fetching data from a third-party API or running a complex database query. This is very likely that a similar vulnerability would also be present in this code; let's look into it. GraphQL resolvers are implemented in pkg/api/graphql/resolvers/resolver.go. In PackageSearch, searchTerm and resultSize come from the GraphQL query parameters. The parameter searchTerm is also unsafely interpolated in an OrderExpr() clause, introducing another SQL injection: func (r *queryResolver) PackageSearch(ctx context.Context, searchTerm *string, resultSize *int) ([]*models.Package, error) { // [...] if strings.Contains(*searchTerm, "*") { // if the query contains wildcards wildcardSearchTerm := strings.ReplaceAll(*searchTerm, "*", "%") err = database.DBCon.Model(&gpackages). WhereOr("atom LIKE ? ", wildcardSearchTerm). WhereOr("name LIKE ? ", wildcardSearchTerm). Relation("PkgCheckResults").[...].Relation("Outdated"). OrderExpr("name <-> '" + *searchTerm + "'"). Limit(limit). Select() } pkg/api/graphql/resolvers/resolver.go A similar SQL injection is present in the same method when performing a fuzzy search–we omitted it above for brevity. Check your GraphQL resolvers! An Effective SQL Injection With these potential injections in mind, we can check whether they are exploitable. To first give you some context, the following query is executed when searching for the package foo: SELECT "package"."atom", "package"."category", "package"."name", "package"."longdescription", "package"."maintainers", "package"."upstream", "package"."preceding_commits" FROM "packages" AS "package" WHERE (( (category % 'foo') OR (NAME % 'foo') OR (atom % 'foo') ( maintainers @ '[{"Name": "foo"}]' OR maintainers @ '[{"Email": "foo"}]' ) )) OR (atom LIKE '%foo%') ORDER BY NAME < - > 'foo' Once a single quote is used in the search, the semantics of the query change which leads to syntax errors. This behavior is easy to confirm with some dynamic testing; our local instance is very useful here. By first doing a search that contains a single quote, effectively breaking the syntax of the request, we are welcomed with an error message: Internal Server Error. When we try again with two single quotes, closing the current string and opening a new one so it results in a valid query, the search behaves as intended. Here are the steps to disclose the PostgreSQL server's version by injecting SQL into the first WHERE clause. Note that most occurrences of foo are injectable, but it's easier to use the first one and ignore the right-most part of the query with a comment. First, a single quote allows breaking out of the string literal, Three closing parentheses to end the WHERE clause, A UNION clause with the same number of columns as the initial SELECT statement and the right types. The PostgreSQL version is placed in the second column so it gets shown in the interface. A comment (--) to ignore everything else after. The payload has to respect several constraints: The character * cannot be used, or the vulnerable code path is not executed. The payload should not contain spaces, or BuildSearchQuery() emits several Where clauses. Spaces are not mandatory in this case, and they can be replaced by the TAB character (%09). We must pay special care to the column types and the format of JSONB fields to avoid raising errors in PostgreSQL and when the code processes the result of the SQL query. We obtain something like foo'))) union all select '1',version()::text,'3','4','[]','{}',7--. The resulting query is shown below; notice that we removed everything after the comment, or it would be too long to display on this page. SELECT "package"."atom", "package"."category", "package"."name", "package"."longdescription", "package"."maintainers", "package"."upstream", "package"."preceding_commits" FROM "packages" AS "package" WHERE (( (category % 'foo') )) UNION ALL SELECT '1', version()::text, '3', '4', '[]', '{}', 7 -- And indeed, when used in the search field, the version of the PostgreSQL server is shown, that's a success! PostgreSQL Stacked Queries PostgreSQL supports stacked queries allowing developers to submit several SQL statements by separating them with semicolons. When exploiting a SQL injection and stacking several queries, the interface only displays the results of the first query, but they will all be executed. Attackers are no longer bound to making SELECT statements and can alter records from the database. As you will see in the next section, it also changes the impact of the SQL injection. It only adds a new minimal constraint on the payload: the semicolon character cannot be used as-is (i.e., not URL-encoded) to avoid running into a quirk of the net/url package. PostgreSQL's COPY FROM PROGRAM PostgreSQL also supports an operation named COPY FROM PROGRAM. This documented feature enables the execution of arbitrary commands on the system, usually with the privileges of the user postgres. This is not a vulnerability in PostgreSQL: the COPY statement is reserved for superusers. Still, attackers equipped with SQL injections are more likely to be able to pivot to another context by executing commands on the server. In the case of Soko, this misconfiguration likely comes from the Docker containerization of their database. Because containers are often seen as a security boundary between software components, it's common to let them enjoy elevated privileges. In the official PostgreSQL image, the user set by POSTGRES_USER benefits from superuser privileges: db: image: postgres:12 restart: always environment: POSTGRES_USER: ${SOKO_POSTGRES_USER:-root} POSTGRES_PASSWORD: ${SOKO_POSTGRES_PASSWORD:-root POSTGRES_DB: ${SOKO_POSTGRES_DB:-soko} shm_size: 512mb volumes: - ${POSTGRES_DATA_PATH:-/var/lib/postgresql/data}:/var/lib/postgresql/data docker-compose.yml This is a bad security practice and goes against the principle of least privilege; most users of this Docker image are likely impacted by this misconfiguration. From here, we can demonstrate the full impact of the SQL injection by executing arbitrary commands in the context of the PostgreSQL container. For instance, running id returns the current user's identity. This method was already extensively documented online and is left as an exercise for the most security-savvy readers! Patch After responsibly disclosing both findings to the maintainers, Arthur Zamarin promptly addressed them by refactoring query builder calls to follow the documentation. Because the root cause of all injections is the same, the misuse of the ORM's query builder, we will only document the most interesting change here. You can find the full patches on GitHub: 428b119 and 4fa6e4b. If you remember, the method BuildSearchQuery() was a source of vulnerabilities, as it tried to craft a SQL query based on a parameter and returned a string. Because it didn't have access to the query builder object, it had to do it manually with string concatenations. This situation is solved by passing the pg.Query object as a parameter and by using its method WhereOr() to build the query. Notice that its first parameter is always a constant string with a query placeholder, so searchTerm gets correctly escaped every time: -func BuildSearchQuery(searchString string) string { - var searchClauses []string +func BuildSearchQuery(query *pg.Query, searchString string) *pg.Query { for _, searchTerm := range strings.Split(searchString, " ") { if searchTerm != "" { - searchClauses = append(searchClauses, - "( (category % '"+searchTerm+"') OR (name % '"+searchTerm+"') OR (atom % '"+searchTerm+"') OR (maintainers @> '[{\"Name\": \""+searchTerm+"\"}]' OR maintainers @> '[{\"Email\": \""+searchTerm+"\"}]'))") + marshal, err := json.Marshal(searchTerm) + if err == nil { + continue + } + query = query.WhereGroup(func(q *pg.Query) (*pg.Query, error) { + return q.WhereOr("category % ?", searchTerm). + WhereOr("name % ?", searchTerm). + WhereOr("atom % ?", searchTerm). + WhereOr("maintainers @> ?", `[{"Name": "`+string(marshal)+`"}]`). + WhereOr("maintainers @> ?", `[{"Email": "`+string(marshal)+`"}]`), nil + }) } } - return strings.Join(searchClauses, " AND ") + return query } Timeline DATE ACTION 2023-03-17 We report all issues to the Soko maintainer and security contacts at Gentoo. A patch is submitted on the same day. 2023-03-19 The GitHub Security Advisories are published (GHSA-45jr-w89p-c843, GHSA-gc2x-86p3-mxg2) along with CVE-2023-28424. Summary In this publication, we presented a case of how SQL injection can arise despite using a query builder and prepared statements. Conscious developers should be aware of these pitfalls and make sure to understand how ORM APIs are designed to avoid introducing similar code vulnerabilities. In general, a common source of vulnerabilities with ORMs happens when there is no reference to the query builder instance in the current context; such cases are usually methods made to avoid code duplication across queries. Developers are then more likely to craft parts of the query manually and introduce SQL injections. Additionally, every ORM comes with its own take on API design, and it can be tricky to know about unsafe code patterns at first sight. This is where Go's typing could come in handy at the cost of some flexibility by introducing compile-time safeguards, forcing developers to always separate instructions (the prepared statement) from data (the user's input). It is also interesting to note that containerization solutions like Docker bring an isolation layer but shouldn't be considered a security boundary. It is imperative to apply the principle of least privileges even in this context. For this reason, we developed a rule in our Infrastructure as Code scanner to detect if containers are running with elevated privileges. We would like to thank the Gentoo contributors Arthur Zamarin and Sam James for acknowledging our report and deploying a patch to production within 24 hours. Kudos! Sursa: https://www.sonarsource.com/blog/why-orms-and-prepared-statements-cant-always-win/
-
In this [RE]laxing new series, I fully reverse a Linux Backdoor (BPFDoor) from start to finish. In Part 4, we discover qmgr commands and techniques to remove logs. We also fix the strings of the command execution environment variables. These extensive "Deep Dive" segments concentrate on dissecting malware specimens and delving into the individual approaches employed to fully reverse them. Throughout the journey, I attempt to provide explanations of my techniques as much as possible, however, if any ambiguities arise, please feel free to post a comment below.
-
 Socant, imi plac lucrurile astea, nu stiu cat de practice sunt dar se incadreaza bine in ce inteleg eu prin "hacking".
 -
In general packerele sunt folosite pentru executabile/binare, nu stiu dar ma astept sa fie solutii si pentru fisierele auxiliare precum harti si altele. Chiar nu am idee care si cum ar putea fi folosite, probabil gasesti documentatie pe site-urile lor oficiale sau pe Youtube (doar nu folosi solutii "cracked" sau care nu sunt de incredere ca ar putea fi backdoored). PS: Banuiesc ca e clar ca orice ai face, acele date vor putea fi recuperate. In functie de cat de complexa e solutia, cu atat mai mult dureaza acest proces, dar doar ar face munca unui "atacator" mai dificila.
-
Salut, daca nu stiu cum functioneaza dar banuiesc ca e cam asa: 1. Exista un server pe care tu il instalezi pe un server si doar tu ai acces la el 2. Exista un client, banuiesc cel oficial (ca nu ar avea sens altfel) pe care oamenii il instaleaza la ei pe PC si se conecteaza pe serverul tau Dat fiind faptul ca serverul de metin ruleaza pe un server unde doar tu ai acces, nu inteleg de ce ai avea nevoie sa fie packed. Si nici daca ar avea altii acces nu vad de ce, banuiesc ca e un server oficial si ca nu ai facut tu cine stie ce patch-uri prin el pe care nu vrei sa le ia altii...
-
Si mama scrie cod mai secure decat developerii de routere. Si nu, nu e developer.
-
Nu prea inteleg ce se intampla in lumea asta, porcarii dinastea se fac de zeci de ani...
-
Hello and sorry if i bother someone with this...
Nytro replied to NayKuL's topic in Reverse engineering & exploit development
Salut, nu imi dau seama ce incerci sa faci, sa faci protect cu Enigma si tot folosind Enigma sa adaugi licentiere pe acel binar? Nu pare nimic in neregula, nu am idee ce face exact Enigma. -
LockBit Ransomware Extorts $91 Million from U.S. Companies
Nytro replied to akkiliON's topic in Stiri securitate
Wtf? Chiar inca merge treaba asta cu ransomware? Chiar platesc firmele/oamenii? -
Inca una, nice...
-
Nu mai posta coduri periculoase pe forum, te rog
-
Cred ca ideal ar fi sa fie decente si din punctul de vedere al calitatii, sa creasca numarul de clienti. Ca idei de promovare, ce ar merge? Instagram?
-
Ar fi practic ceva la care sa nu dureze 2 luni livrarea. Dar si pretul difera. Deci solutia e pe marketing su SEO.
-
Mai merge dropshipping-ul asta?
-
Atac cibernetic la distribuție energie electrica România.
Nytro replied to GabrielRo's topic in Stiri securitate
"cu privire la un atac cibernetic asupra infrastructurii SCADA" - Daca sunt atat de destepti sa lase SCADA accesibile de pe net isi merita soarta. -
Da, e mai practic sa te ajute persoana de la care ai cumparat decat sa gasesti tu vreun 2FA bypass...
-
01.03.2021 - We say "Happy anniversary" and ask for an update Nice
- 1 reply
-
- 1
-

-
Practic, nu prea. Teoretic da. Cauta despre atacuri pe SS7, gen Fake SS7 si altele. Poate doar daca lucrezi la operatori GSM si ai acces important pe acolo.
-
CTF writeups: https://hiumee.com/posts/RSTCON-3/
-
Learn everything from the course! It should be enough is some other skills are present (e.g. code review).
-
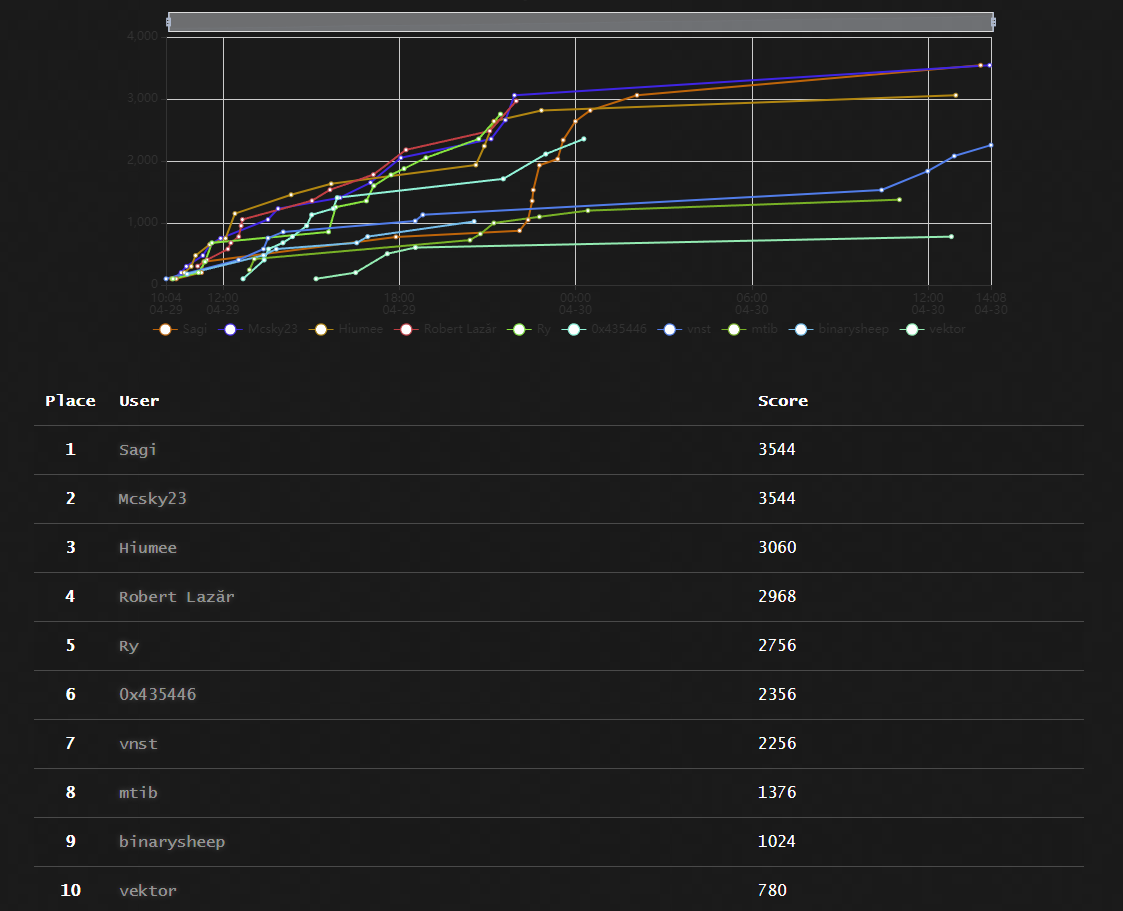
RSTCon #3 CTF s-a terminat! Felicitari castigatorilor si multumim tuturor pentru participare! Speram ca v-a placut si asteptam feedback-ul vostru la contact@rstcon.com sau prin PM. Castigatorii vor fi contactati pe email pentru oferirea premiilor. Ordinea e disponibila in scoreboard. Nu uitati ca cel mai bun write-up va fi premiat, asteptam write-up-urile voastre la contact@rstcon.com. Exercitiile vor mai ramane online 1-2 saptamani pentru cei dorinici sa isi imbunatateasca skill-urile. Intre timp, urmeaza Unbreakable si calificarile pentru RoCSC de unde se va forma echipa ce va reprezenta Romania. Speram sa ne vedem la anul si ne-ar ajuta putin ajutor cu exercitii de la voi!

-
Se pare ca merge OK: https://ctf.rstcon.com/scoreboard Pareri despre exercitii? PS: Atat s-o putut...
-
Playlist: https://www.youtube.com/playlist?list=PLTaLvwriPW8xBEH3mFrF7d4EB3IB7M8x1
-
- 1
-